other
Page 1
... of Camera A Mounting the Lens Memoɿ ● Make use . 3. If the appliance has been dropped or the cabinet has been damaged. The exclamation point within the permissible range of this product. The unit is intended to alert the user to the network. ( A [INSTRUCTIONS] )(VN-X35U only)...16.Unplug this manual are designed to the R ch and not other hazards. Memoɿ ● To use of open source codec AffdshowB. JVC is not responsible for improvement without prior notice. DC Iris Lens (Without Built-in EE Amplifier) 1 Damping (-) 2 Damping (+) 3 Driving (+) ...
... of Camera A Mounting the Lens Memoɿ ● Make use . 3. If the appliance has been dropped or the cabinet has been damaged. The exclamation point within the permissible range of this product. The unit is intended to alert the user to the network. ( A [INSTRUCTIONS] )(VN-X35U only)...16.Unplug this manual are designed to the R ch and not other hazards. Memoɿ ● To use of open source codec AffdshowB. JVC is not responsible for improvement without prior notice. DC Iris Lens (Without Built-in EE Amplifier) 1 Damping (-) 2 Damping (+) 3 Driving (+) ...
other
Page 2
...255.255.0 when the camera is unknown. Specifications Supply voltage : AC 24 V 50 Hz/60 Hz or PoE (DC -48 V) Current consumption : AC 24 V 0.35 A, PoE 115 mA (5.5 W)(VN-V25U/VN-V26U), PoE 135 mA (6.5 W)(VN-X35U) Only while Infrared ray cut filter is appropriate for Microsoft Networks] and [Internet Protocol(...Security Settings] window. B Specify the [Time Zone]. It takes about one minute for the camera Set the [IP Setting] item on VN-X35U, you can monitor JPEG and MPEG4 images and audio (VN-V26U/VN-X35U only). Memoɿ ● Access from the same computer, alter the IP address of ...
...255.255.0 when the camera is unknown. Specifications Supply voltage : AC 24 V 50 Hz/60 Hz or PoE (DC -48 V) Current consumption : AC 24 V 0.35 A, PoE 115 mA (5.5 W)(VN-V25U/VN-V26U), PoE 135 mA (6.5 W)(VN-X35U) Only while Infrared ray cut filter is appropriate for Microsoft Networks] and [Internet Protocol(...Security Settings] window. B Specify the [Time Zone]. It takes about one minute for the camera Set the [IP Setting] item on VN-X35U, you can monitor JPEG and MPEG4 images and audio (VN-V26U/VN-X35U only). Memoɿ ● Access from the same computer, alter the IP address of ...

Instruction Manual
Page 1
IP CAMERA VN-V25U VN-V26U VN-X35U VN-V225U series VN-X235U series INSTRUCTIONS (Setting) Thank you for purchasing this unit, please read the instructions carefully to ensure the best possible performance. Before operating this JVC product. LST0886-001A
IP CAMERA VN-V25U VN-V26U VN-X35U VN-V225U series VN-X235U series INSTRUCTIONS (Setting) Thank you for purchasing this unit, please read the instructions carefully to ensure the best possible performance. Before operating this JVC product. LST0886-001A
Instruction Manual
Page 2
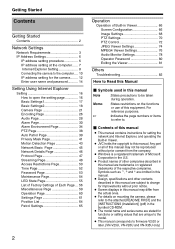
...manual ● This manual contains instructions for setting the network and Internet Explorer, and operating the Built-in Viewer. ● JVC holds the copyright to this manual. Getting Started Contents Getting Started Contents 2 Network Settings Network Requirements 3 IP Address Settings 6 IP address setting procedure... the page numbers or items to refer to firmware V2.00 or later. (VN-V25U, VN-V26U and VN-X35U only) 2 Any part or all of this equipment. Memo A :States restrictions on mounting the camera, please refer to the attached [READ ME FIRST] and the [INSTRUCTIONS (Installation...
...manual ● This manual contains instructions for setting the network and Internet Explorer, and operating the Built-in Viewer. ● JVC holds the copyright to this manual. Getting Started Contents Getting Started Contents 2 Network Settings Network Requirements 3 IP Address Settings 6 IP address setting procedure... the page numbers or items to refer to firmware V2.00 or later. (VN-V25U, VN-V26U and VN-X35U only) 2 Any part or all of this equipment. Memo A :States restrictions on mounting the camera, please refer to the attached [READ ME FIRST] and the [INSTRUCTIONS (Installation...

Instruction Manual
Page 3
... be maintained, and the file size will be performed such that there is sufficient network bandwidth for transmission is about 20 Mbps. When VFS is selected, the quantization table during JPEG encoding will be sent by the camera settings, number of clients, and the client's requested number of the bit rate is...) VGA QVGA 40 KB to 200 KB 10 KB to 100 KB 3 KB to 33 KB Ⅵ VFS(Variable File Size) (TX) is applicable to VN-X series only. Develop a design upon taking the above into consideration. Bit Rate of JPEG Stream The JPEG file size per piece is 120KB, total bit...
... be maintained, and the file size will be performed such that there is sufficient network bandwidth for transmission is about 20 Mbps. When VFS is selected, the quantization table during JPEG encoding will be sent by the camera settings, number of clients, and the client's requested number of the bit rate is...) VGA QVGA 40 KB to 200 KB 10 KB to 100 KB 3 KB to 33 KB Ⅵ VFS(Variable File Size) (TX) is applicable to VN-X series only. Develop a design upon taking the above into consideration. Bit Rate of JPEG Stream The JPEG file size per piece is 120KB, total bit...

Instruction Manual
Page 4
...Mode is the total number of streams sent via TCP (number of clients), streams sent via multicast, and stream received by camera (Example) When camera sends out 2 audio streams and receives 1 audio stream, data volume will be accepted in the frame rate priority mode, ...of distributions is received, this request is distributed Current number of Maximum bit rate Total maximum bit distributions rate 2 and below 5 Mbps. Network Settings Network Requirements (continued) Bit Rate of Audio Only 1 audio data stream can select either "Frame Rate Priority" mode or "Client number Priority...
...Mode is the total number of streams sent via TCP (number of clients), streams sent via multicast, and stream received by camera (Example) When camera sends out 2 audio streams and receives 1 audio stream, data volume will be accepted in the frame rate priority mode, ...of distributions is received, this request is distributed Current number of Maximum bit rate Total maximum bit distributions rate 2 and below 5 Mbps. Network Settings Network Requirements (continued) Bit Rate of Audio Only 1 audio data stream can select either "Frame Rate Priority" mode or "Client number Priority...

Instruction Manual
Page 5
...the case of MPEG4, noise interference may occur and playback may fail. Network Delay When the client acquires JPEG via TCP, camera will drop. Decrease in the following table, to accept distribution requests for up to network delays can acquire will be prolonged and the image frame rate may ...be accepted in the audio. Network Jitter When there is distributed Current number ...
...the case of MPEG4, noise interference may occur and playback may fail. Network Delay When the client acquires JPEG via TCP, camera will drop. Decrease in the following table, to accept distribution requests for up to network delays can acquire will be prolonged and the image frame rate may ...be accepted in the audio. Network Jitter When there is distributed Current number ...

Instruction Manual
Page 6
Network Settings IP Address Settings IP address setting procedure Follow the procedure below to configure the IP address of the computer for configuring the camera settings. Set the computer to 255.255.255.0.) IP address : 192.168.0.2 Subnet mask : 255.255.255.0 Default gateway : ... Settings1] screen to ADHCP DisableB or ADHCP EnableB. ⅷ Set up of only the camera, the computer for setting and the switching hub. ● Using a hub connected to other network devices or networks via a LAN cable for setting can cause problems. ⅷ System configuration required for setting...
Network Settings IP Address Settings IP address setting procedure Follow the procedure below to configure the IP address of the computer for configuring the camera settings. Set the computer to 255.255.255.0.) IP address : 192.168.0.2 Subnet mask : 255.255.255.0 Default gateway : ... Settings1] screen to ADHCP DisableB or ADHCP EnableB. ⅷ Set up of only the camera, the computer for setting and the switching hub. ● Using a hub connected to other network devices or networks via a LAN cable for setting can cause problems. ⅷ System configuration required for setting...

Instruction Manual
Page 7
...: Make sure that you have any queries. (Use 255.255.255.0 when the camera is in this item are selected. The computer on the ALocal Area Connection PropertiesB screen 7 Consult the network administrator if you take note of [Control Panel]-[Network Connection]-[Local Area]. Procedures described in its default settings.) D When a [Default Gateway...
...: Make sure that you have any queries. (Use 255.255.255.0 when the camera is in this item are selected. The computer on the ALocal Area Connection PropertiesB screen 7 Consult the network administrator if you take note of [Control Panel]-[Network Connection]-[Local Area]. Procedures described in its default settings.) D When a [Default Gateway...

Instruction Manual
Page 9
...Tool]-[Internet Options]-[Security]. Select [Enable] 5. Set all items under [ActiveX controls and plug-ins] in the opened window, add the address of camera as camera, select [Tool]-[Pop-up Blocker]-[Turn On Pop-up Blocker], followed by selecting [Tool]-[Pop-up Blocker]-[Pop-up Blocker Settings] that becomes active... of these plug-in the Internet Explorer is disabled, follow the steps below to set to [Enable]. Disable pop-up block Connection of camera cannot be established when pop-up block function of the Internet Explorer is set the pop-up block to enable it ● Click [...
...Tool]-[Internet Options]-[Security]. Select [Enable] 5. Set all items under [ActiveX controls and plug-ins] in the opened window, add the address of camera as camera, select [Tool]-[Pop-up Blocker]-[Turn On Pop-up Blocker], followed by selecting [Tool]-[Pop-up Blocker]-[Pop-up Blocker Settings] that becomes active... of these plug-in the Internet Explorer is disabled, follow the steps below to set to [Enable]. Disable pop-up block Connection of camera cannot be established when pop-up block function of the Internet Explorer is set the pop-up block to enable it ● Click [...

Instruction Manual
Page 10
... T For details on [Search tool], please refer to the AReadmeB file in the LAN using [Search tool] inside [Tool_E] folder of the camera is unknown IP address settings cannot be changed by accessing via the Internet Explorer is unknown. This is set to AjvcB by default. C Click ...this case, change the proxy settings of the Internet Explorer. Ⅵ When the IP address of the supplied CD- Network Settings IP Address Settings (continued) Connecting the camera to proceed. 10 Launch the Internet Explorer A Enter the following method to specify the IP address directly. Memo: ●...
... T For details on [Search tool], please refer to the AReadmeB file in the LAN using [Search tool] inside [Tool_E] folder of the camera is unknown IP address settings cannot be changed by accessing via the Internet Explorer is unknown. This is set to AjvcB by default. C Click ...this case, change the proxy settings of the Internet Explorer. Ⅵ When the IP address of the supplied CD- Network Settings IP Address Settings (continued) Connecting the camera to proceed. 10 Launch the Internet Explorer A Enter the following method to specify the IP address directly. Memo: ●...

Instruction Manual
Page 11
The operator password entry screen appears A B A Enter the password (default is AjvcB) of camera is stored on the computer. Memo: ● The operator password entry screen does not appear if the password is displayed 4. Built-in Viewer of AoperatorB authority. Proceed to configure the IP address setting for the camera. (A Page 12) 11 3. B Click [OK].
The operator password entry screen appears A B A Enter the password (default is AjvcB) of camera is stored on the computer. Memo: ● The operator password entry screen does not appear if the password is displayed 4. Built-in Viewer of AoperatorB authority. Proceed to configure the IP address setting for the camera. (A Page 12) 11 3. B Click [OK].

Instruction Manual
Page 12
...the DHCP server, connect the DHCP server to ADHCP EnableB, and click the [OK] button. Network Settings IP Address Settings (continued) IP address setting for the camera 1 Click [Details] of the camera Built-in the [IP Address], [Subnet Mask] and [Default Gateway] fields. ● When... selecting ADHCP EnableB: The default setting is ADHCP DisableB (DHCP client function is Disabled). Enter the values you wish to the camera, consult your network administrator. For details on IP addresses assigned to specify in the [IP Address], [Subnet Mask] and [Default Gateway] fields. Note:...
...the DHCP server, connect the DHCP server to ADHCP EnableB, and click the [OK] button. Network Settings IP Address Settings (continued) IP address setting for the camera 1 Click [Details] of the camera Built-in the [IP Address], [Subnet Mask] and [Default Gateway] fields. ● When... selecting ADHCP EnableB: The default setting is ADHCP DisableB (DHCP client function is Disabled). Enter the values you wish to the camera, consult your network administrator. For details on IP addresses assigned to specify in the [IP Address], [Subnet Mask] and [Default Gateway] fields. Note:...

Instruction Manual
Page 13
... [Normal size (96DPI)] and reboot windows 13 When the display or configuration of the camera is changed. Memo: ● Access from the same computer, alter the IP address at the computer accordingly. A Click [Start]-[Control Panel]-[Display] ... has become [Normal size (96DPI)] D Otherwise, change the setting to reboot. B Select the [Time Zone]. Camera restarts using the following procedures. C Click [OK]. 3 A confirmation screen appears Click [OK]. To enable access to camera from the connected computer may fail when the IP address of the opened screen appears strange, check...
... [Normal size (96DPI)] and reboot windows 13 When the display or configuration of the camera is changed. Memo: ● Access from the same computer, alter the IP address at the computer accordingly. A Click [Start]-[Control Panel]-[Display] ... has become [Normal size (96DPI)] D Otherwise, change the setting to reboot. B Select the [Time Zone]. Camera restarts using the following procedures. C Click [OK]. 3 A confirmation screen appears Click [OK]. To enable access to camera from the connected computer may fail when the IP address of the opened screen appears strange, check...
Instruction Manual
Page 14
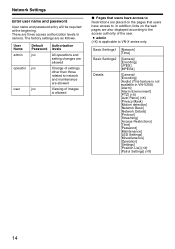
There are as follows. Basic Settings1 Basic Settings2 Details [Network] [Time] [Camera] [Encoding] [JPEG] [MPEG4] [Camera] [Encoding] [Audio] (This feature is applicable to . The factory settings are three access authorization levels to camera. In addition, links on the web pages are placed on the...8567; Pages that users have access to VN-X series only. Network Settings Enter user name and password User name and password entry will be required at the beginning. User Name admin operator user Default Password jvc jvc jvc Authorization levels All operations and setting changes...
There are as follows. Basic Settings1 Basic Settings2 Details [Network] [Time] [Camera] [Encoding] [JPEG] [MPEG4] [Camera] [Encoding] [Audio] (This feature is applicable to . The factory settings are three access authorization levels to camera. In addition, links on the web pages are placed on the...8567; Pages that users have access to VN-X series only. Network Settings Enter user name and password User name and password entry will be required at the beginning. User Name admin operator user Default Password jvc jvc jvc Authorization levels All operations and setting changes...

Instruction Manual
Page 15
Note: ● Do not reset or turn off the power of camera immediately after the settings are changed. Basic Settings2 [Camera] [Encoding] [JPEG] [MPEG4] Details ● user [Camera] [Encoding] [Audio] (This feature is not available in VN-V25U) [Alarm] [Alarm Environment] [PTZ] (TX) [Auto Patrol] (TX) [Privacy Mask] [... do not want this warning screen to proceed. Press the [Yes] button to be restored to VN-X series only. Otherwise, changes may not be saved, and camera may be displayed, change the Internet Explorer settings as follows. ● Open [Tool]-[Internet Options]-[Security...
Note: ● Do not reset or turn off the power of camera immediately after the settings are changed. Basic Settings2 [Camera] [Encoding] [JPEG] [MPEG4] Details ● user [Camera] [Encoding] [Audio] (This feature is not available in VN-V25U) [Alarm] [Alarm Environment] [PTZ] (TX) [Auto Patrol] (TX) [Privacy Mask] [... do not want this warning screen to proceed. Press the [Yes] button to be restored to VN-X series only. Otherwise, changes may not be saved, and camera may be displayed, change the Internet Explorer settings as follows. ● Open [Tool]-[Internet Options]-[Security...

Instruction Manual
Page 16
Click 2. Setting Using Internet Explorer Setting How to open the setting page 1. Click [Details]. ● [Basic Settings1] page will be opened if accessed by user name AadminB. (A Page 17) ● [Basic Settings2] page will be opened if accessed by user name AoperatorB. (A Page 18) ● [Miscellaneous] page will be opened . Enter IP address of camera in the address bar of Internet Explorer (A Page 10) A unified viewer is opened if accessed by user name AuserB. (A Page 59) 16
Click 2. Setting Using Internet Explorer Setting How to open the setting page 1. Click [Details]. ● [Basic Settings1] page will be opened if accessed by user name AadminB. (A Page 17) ● [Basic Settings2] page will be opened if accessed by user name AoperatorB. (A Page 18) ● [Miscellaneous] page will be opened . Enter IP address of camera in the address bar of Internet Explorer (A Page 10) A unified viewer is opened if accessed by user name AuserB. (A Page 59) 16

Instruction Manual
Page 17
... Default Gateway Time E Time F Time Zone G PC Time to set the time of camera. Click the [Set] button to Camera For setting the DHCP client function. Enter 0.0.0.0 if you do not want to the network. Basic Settings1 This page is for performing basic setting related to set a default gateway. ...If the DHCP server does not exist when [IP Setting] is to ADHCP EnableB, camera will be enabled. Displays the clock time of the computer on camera. 17 Connect camera to a network environment with a DHCP server when DHCP is set to be denied.
... Default Gateway Time E Time F Time Zone G PC Time to set the time of camera. Click the [Set] button to Camera For setting the DHCP client function. Enter 0.0.0.0 if you do not want to the network. Basic Settings1 This page is for performing basic setting related to set a default gateway. ...If the DHCP server does not exist when [IP Setting] is to ADHCP EnableB, camera will be enabled. Displays the clock time of the computer on camera. 17 Connect camera to a network environment with a DHCP server when DHCP is set to be denied.

Instruction Manual
Page 19
...4 VGA VGA JPEG/MPEG4 Ⅵ Combination of distribution sizes and available features of picture quality according to the JPEG comment segment (item name: camera). CRT : Picture quality setting for CRT (cathode-ray tube) monitors. [Set values: Custom, LCD1, LCD2,CRT] For selecting the frame .../MPEG4 ʵ T Images are available for each of the four (TV) or eight (TX) different patterns. (TV) is applicable to VN-V series only. (TX) is displayed in white on viewer. 19 A Camera ID B Monitor Type C Encoding Character strings entered here will be written to the user's preference.
...4 VGA VGA JPEG/MPEG4 Ⅵ Combination of distribution sizes and available features of picture quality according to the JPEG comment segment (item name: camera). CRT : Picture quality setting for CRT (cathode-ray tube) monitors. [Set values: Custom, LCD1, LCD2,CRT] For selecting the frame .../MPEG4 ʵ T Images are available for each of the four (TV) or eight (TX) different patterns. (TV) is applicable to VN-V series only. (TX) is displayed in white on viewer. 19 A Camera ID B Monitor Type C Encoding Character strings entered here will be written to the user's preference.

Instruction Manual
Page 21
.... This page can be denied. Press the [Cancel] button to restore the invalid entry to the current value. Click A B C D E F G H I J K L M N O 21 Camera Page This page is pressed upon entering an invalid value, a warning message will appear and the entry will be used during access using AadminB or ...
.... This page can be denied. Press the [Cancel] button to restore the invalid entry to the current value. Click A B C D E F G H I J K L M N O 21 Camera Page This page is pressed upon entering an invalid value, a warning message will appear and the entry will be used during access using AadminB or ...


