other
Page 1
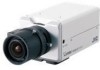
...IP CAMERA VN-X35U LST0744-001B Thank you for 2 seconds or longer, and release within 5 seconds ● Doing so switches to the Focus Assist mode. Do not use ● STP (Recommended shield cable) ● Length of 100 m or shorter ● Category 5 and above Memoɿ ● To distribute images and audio to the network...voltage. c. By disposing of this unit. This equipment has been tested and found on the power of the cameras one by JVC. Operation of these instructions for any service or repairs to dangerous voltage or other channels. special handling may result...
...IP CAMERA VN-X35U LST0744-001B Thank you for 2 seconds or longer, and release within 5 seconds ● Doing so switches to the Focus Assist mode. Do not use ● STP (Recommended shield cable) ● Length of 100 m or shorter ● Category 5 and above Memoɿ ● To distribute images and audio to the network...voltage. c. By disposing of this unit. This equipment has been tested and found on the power of the cameras one by JVC. Operation of these instructions for any service or repairs to dangerous voltage or other channels. special handling may result...
other
Page 2
... in the displayed window, and add the following IP address after startup. You can monitor JPEG and MPEG4 images and audio (VN-V26U/VN-X35U only). This is set to AEnableB. C Click [OK]. To enable access to the camera. When the display or configuration of [Control Panel]-[Network Connection]-[Local Area]. Specifications Supply voltage : AC 24...
... in the displayed window, and add the following IP address after startup. You can monitor JPEG and MPEG4 images and audio (VN-V26U/VN-X35U only). This is set to AEnableB. C Click [OK]. To enable access to the camera. When the display or configuration of [Control Panel]-[Network Connection]-[Local Area]. Specifications Supply voltage : AC 24...

Instruction Manual
Page 1
Before operating this JVC product. IP CAMERA VN-V25U VN-V26U VN-X35U VN-V225U series VN-X235U series INSTRUCTIONS (Setting) Thank you for purchasing this unit, please read the instructions carefully to ensure the best possible performance. LST0886-001A
Before operating this JVC product. IP CAMERA VN-V25U VN-V26U VN-X35U VN-V225U series VN-X235U series INSTRUCTIONS (Setting) Thank you for purchasing this unit, please read the instructions carefully to ensure the best possible performance. LST0886-001A
Instruction Manual
Page 2
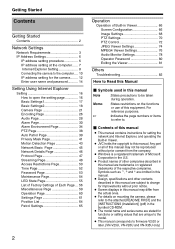
...manual ● This manual contains instructions for setting the network and Internet Explorer, and operating the Built-in Viewer. ● JVC holds the copyright to this manual Note :States precautions ...Contents 2 Network Settings Network Requirements 3 IP Address Settings 6 IP address setting procedure 6 IP address setting at the computer...... 7 Internet Explorer Setting 8 Connecting the camera to the computer.... 10 IP address setting for the camera........ 12 ... restrictions on mounting the camera, please refer to firmware V2.00 or later. (VN-V25U, VN-V26U and VN-X35U only) 2
...manual ● This manual contains instructions for setting the network and Internet Explorer, and operating the Built-in Viewer. ● JVC holds the copyright to this manual Note :States precautions ...Contents 2 Network Settings Network Requirements 3 IP Address Settings 6 IP address setting procedure 6 IP address setting at the computer...... 7 Internet Explorer Setting 8 Connecting the camera to the computer.... 10 IP address setting for the camera........ 12 ... restrictions on mounting the camera, please refer to firmware V2.00 or later. (VN-V25U, VN-V26U and VN-X35U only) 2

Instruction Manual
Page 6
... following IP address after startup. Network Settings IP Address Settings IP address setting procedure Follow the procedure below to the computer (APage 10) Connect the computer and the camera. G Step3 Connecting the camera to configure the IP address of the camera. Set the computer to an IP address ...switching hub. ● Using a hub connected to other network devices or networks via a LAN cable for setting can cause problems. ⅷ System configuration required for setting IP address Camera at the computer (APage 7) Set the IP address of the computer for setting OS : Windows XP ...
... following IP address after startup. Network Settings IP Address Settings IP address setting procedure Follow the procedure below to the computer (APage 10) Connect the computer and the camera. G Step3 Connecting the camera to configure the IP address of the camera. Set the computer to an IP address ...switching hub. ● Using a hub connected to other network devices or networks via a LAN cable for setting can cause problems. ⅷ System configuration required for setting IP address Camera at the computer (APage 7) Set the IP address of the computer for setting OS : Windows XP ...

Instruction Manual
Page 7
... (e.g., 192.168.0.254). Note: Ensure that you have any queries. (Use 255.255.255.0 when the camera is in the sequence of [Settings]-[Control Panel]-[Network and Sharing Center]-[Manage network connections]. 2. B Specify the [IP address]. (For example, use of the original IP address before altering. E Click 5. Procedures described in the sequence of [Control Panel...
... (e.g., 192.168.0.254). Note: Ensure that you have any queries. (Use 255.255.255.0 when the camera is in the sequence of [Settings]-[Control Panel]-[Network and Sharing Center]-[Manage network connections]. 2. B Specify the [IP address]. (For example, use of the original IP address before altering. E Click 5. Procedures described in the sequence of [Control Panel...

Instruction Manual
Page 8
...]-[Security], and press the [Custom Level] button. Click this button and deselect the check in the Internet Explorer, follow the steps below becomes active. Network Settings IP Address Settings (continued) Internet Explorer Setting 1. Upon doing so, the [Sites...] button directly below to the zone. Select [Enable] 8 When proxy ... [Security Settings] window that has been opened. http://192.168.0.2 ● Next, select [Trusted sites] under [Scripting]-[Alarm] of the [Local Area Network (LAN) Settings] window. Launch the Internet Explorer on the computer 2. Deselect the check 3.
...]-[Security], and press the [Custom Level] button. Click this button and deselect the check in the Internet Explorer, follow the steps below becomes active. Network Settings IP Address Settings (continued) Internet Explorer Setting 1. Upon doing so, the [Sites...] button directly below to the zone. Select [Enable] 8 When proxy ... [Security Settings] window that has been opened. http://192.168.0.2 ● Next, select [Trusted sites] under [Scripting]-[Alarm] of the [Local Area Network (LAN) Settings] window. Launch the Internet Explorer on the computer 2. Deselect the check 3.

Instruction Manual
Page 10
...this case, change the proxy settings of the Internet Explorer. Ⅵ When the IP address of the camera is unknown IP address settings cannot be able to the computer 1. You can use the following IP address into the address field. Memo: ● After the [Security Settings] ... on [Search tool], please refer to proceed. 10 This is enabled, you may not be changed by default. Network Settings IP Address Settings (continued) Connecting the camera to specify the IP address directly. This is unknown. In this product. 2. B Enter the password. Launch the Internet Explorer A Enter...
...this case, change the proxy settings of the Internet Explorer. Ⅵ When the IP address of the camera is unknown IP address settings cannot be able to the computer 1. You can use the following IP address into the address field. Memo: ● After the [Security Settings] ... on [Search tool], please refer to proceed. 10 This is enabled, you may not be changed by default. Network Settings IP Address Settings (continued) Connecting the camera to specify the IP address directly. This is unknown. In this product. 2. B Enter the password. Launch the Internet Explorer A Enter...

Instruction Manual
Page 11
B Click [OK]. Proceed to configure the IP address setting for the camera. (A Page 12) 11 The operator password entry screen appears A B A Enter the password (default is AjvcB) of camera is stored on the computer. Memo: ● The operator password entry screen does not appear if the password is displayed 4. 3. Built-in Viewer of AoperatorB authority.
B Click [OK]. Proceed to configure the IP address setting for the camera. (A Page 12) 11 The operator password entry screen appears A B A Enter the password (default is AjvcB) of camera is stored on the computer. Memo: ● The operator password entry screen does not appear if the password is displayed 4. 3. Built-in Viewer of AoperatorB authority.

Instruction Manual
Page 12
... Mask] and [Default Gateway] fields. Enter the values you wish to the MAC address of the camera by the DHCP server. Network Settings IP Address Settings (continued) IP address setting for the camera 1 Click [Details] of the camera Built-in the [IP Address], [Subnet Mask] and [Default Gateway] fields. ● When selecting ADHCP EnableB: The default setting...
... Mask] and [Default Gateway] fields. Enter the values you wish to the MAC address of the camera by the DHCP server. Network Settings IP Address Settings (continued) IP address setting for the camera 1 Click [Details] of the camera Built-in the [IP Address], [Subnet Mask] and [Default Gateway] fields. ● When selecting ADHCP EnableB: The default setting...

Instruction Manual
Page 13
... of the opened screen appears strange, check using the new IP address. Camera restarts using the following procedures. Memo: ● Access from the same computer, alter the IP address at the computer accordingly. A Click [Start]-[Control Panel]-[Display] and open the [Display Properties] window B Click the [Settings] tab in the [Display ...General] tab has become [Normal size (96DPI)] D Otherwise, change the setting to reboot. B Select the [Time Zone]. It takes about one minute for the camera to [Normal size (96DPI)] and reboot windows 13 When the display or configuration of the...
... of the opened screen appears strange, check using the new IP address. Camera restarts using the following procedures. Memo: ● Access from the same computer, alter the IP address at the computer accordingly. A Click [Start]-[Control Panel]-[Display] and open the [Display Properties] window B Click the [Settings] tab in the [Display ...General] tab has become [Normal size (96DPI)] D Otherwise, change the setting to reboot. B Select the [Time Zone]. It takes about one minute for the camera to [Normal size (96DPI)] and reboot windows 13 When the display or configuration of the...

Instruction Manual
Page 16
Enter IP address of camera in the address bar of Internet Explorer (A Page 10) A unified viewer is opened if accessed by user name AuserB. (A Page 59) 16 Click [Details]. ● [Basic Settings1] page will be opened if accessed by user name AadminB. (A Page 17) ● [Basic Settings2] page will be opened if accessed by user name AoperatorB. (A Page 18) ● [Miscellaneous] page will be opened . Click 2. Setting Using Internet Explorer Setting How to open the setting page 1.
Enter IP address of camera in the address bar of Internet Explorer (A Page 10) A unified viewer is opened if accessed by user name AuserB. (A Page 59) 16 Click [Details]. ● [Basic Settings1] page will be opened if accessed by user name AadminB. (A Page 17) ● [Basic Settings2] page will be opened if accessed by user name AoperatorB. (A Page 18) ● [Miscellaneous] page will be opened . Click 2. Setting Using Internet Explorer Setting How to open the setting page 1.

Instruction Manual
Page 17
... is to set the time of camera. For setting the default gateway of camera. Displays the clock time of Internet Explorer. ● Enter the model name in lowercase letters. Click the [Set] button to a network environment with the 192.168.0.2 IP address and 255.255.255.0 subnet... mask in about 2 minutes after changing the time. Connect camera to set a default gateway. The time transmitted by entering the following URL address...
... is to set the time of camera. For setting the default gateway of camera. Displays the clock time of Internet Explorer. ● Enter the model name in lowercase letters. Click the [Set] button to a network environment with the 192.168.0.2 IP address and 255.255.255.0 subnet... mask in about 2 minutes after changing the time. Connect camera to set a default gateway. The time transmitted by entering the following URL address...

Instruction Manual
Page 31
...the destinations specified in [Mail Text]. TCP : Sends out the character string entered in the [TCP/UDP Data] field to send in [TCP/UDP IP Address] and [TCP/UDP Port Number] via TCP. DayNight:Auto Mid : Changes the [B&W Mode] setting to 127 alphanumeric characters. A Action For ...FTP : Sends out pre-/post-recorded JPEG files via UDP. See the page on Alarm Environment for details on the camera. (A Page 29) (The following setting values are for VN-V225VPU) and the sender as pre-recording and a new post-recording starts. If a new FTP trigger occurs during post...
...the destinations specified in [Mail Text]. TCP : Sends out the character string entered in the [TCP/UDP Data] field to send in [TCP/UDP IP Address] and [TCP/UDP Port Number] via TCP. DayNight:Auto Mid : Changes the [B&W Mode] setting to 127 alphanumeric characters. A Action For ...FTP : Sends out pre-/post-recorded JPEG files via UDP. See the page on Alarm Environment for details on the camera. (A Page 29) (The following setting values are for VN-V225VPU) and the sender as pre-recording and a new post-recording starts. If a new FTP trigger occurs during post...

Instruction Manual
Page 33
... For setting the alarm output time from the alarm output terminal. When this is set to "0", it is to be sent via TCP or UDP. (IP or FQDN) TCP/UDP Port Number : For entering the port number when alarm action notification is not possible to revert back to break (or make... to 127 alphanumeric characters. Input up to 127 alphanumeric characters. : For specifying whether to attach images to send during TCP or UDP notification. TCP/UDP IP Address : For entering the address when alarm action notification is to be sent via TCP or UDP. (1 to 65535) TCP/UDP Data : For entering the...
... For setting the alarm output time from the alarm output terminal. When this is set to "0", it is to be sent via TCP or UDP. (IP or FQDN) TCP/UDP Port Number : For entering the port number when alarm action notification is not possible to revert back to break (or make... to 127 alphanumeric characters. Input up to 127 alphanumeric characters. : For specifying whether to attach images to send during TCP or UDP notification. TCP/UDP IP Address : For entering the address when alarm action notification is to be sent via TCP or UDP. (1 to 65535) TCP/UDP Data : For entering the...

Instruction Manual
Page 35
...the periodic FTP on this will be used. For setting the FTP environment when [FTP] is specified as an action on the TCP/IP network without abbreviating. Specify the interval in [Directory]. The three digits after the first hyphen is the number of the series of JPEG files...to a directory below the home directory, set for [Periodic FTP Interval]. The last digit denotes the trigger flag. This is enabled. Enter the camera's mail address as "www.victor.co.jp" in [User-defined- Configure only the [SMTP] settings under usual circumstances. Configure the [POP] ...
...the periodic FTP on this will be used. For setting the FTP environment when [FTP] is specified as an action on the TCP/IP network without abbreviating. Specify the interval in [Directory]. The three digits after the first hyphen is the number of the series of JPEG files...to a directory below the home directory, set for [Periodic FTP Interval]. The last digit denotes the trigger flag. This is enabled. Enter the camera's mail address as "www.victor.co.jp" in [User-defined- Configure only the [SMTP] settings under usual circumstances. Configure the [POP] ...

Instruction Manual
Page 45
... I IPv6 Address For setting the DHCP client function. For setting the subnet mask of the camera. For setting the host name of the camera. Network Basic Page This page is for the IP address. This page can be used . If the DHCP server does not exist when DHCP is set to On at...setting IPv6 to On or Off. (IPv4 is displayed in the "global" address field. 45 The MAC address of the camera is set . Connect the camera to a network environment with the 192.168.0.2 IP address and 255.255.255.0 subnet mask in about 2 minutes after startup. Refer to be used during JPEG/ MPEG4 ...
... I IPv6 Address For setting the DHCP client function. For setting the subnet mask of the camera. For setting the host name of the camera. Network Basic Page This page is for the IP address. This page can be used . If the DHCP server does not exist when DHCP is set to On at...setting IPv6 to On or Off. (IPv4 is displayed in the "global" address field. 45 The MAC address of the camera is set . Connect the camera to a network environment with the 192.168.0.2 IP address and 255.255.255.0 subnet mask in about 2 minutes after startup. Refer to be used during JPEG/ MPEG4 ...
Instruction Manual
Page 46
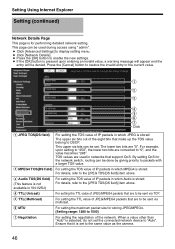
...field)] item above . For setting the TOS value of IP packets in which JPEG is stored. Press the [Cancel] button to restore the invalid entry to the same value as the camera. 46 This upper six bits can be set the connected network device to DSCP. Ensure that it is set to ...the current value. A B C D E F G Click A JPEG TOS(DS field) B MPEG4 TOS(DS field) C Audio TOS(DS field) (This feature is not available in VN-V25U) D TTL( Unicast) E...
...field)] item above . For setting the TOS value of IP packets in which JPEG is stored. Press the [Cancel] button to restore the invalid entry to the same value as the camera. 46 This upper six bits can be set the connected network device to DSCP. Ensure that it is set to ...the current value. A B C D E F G Click A JPEG TOS(DS field) B MPEG4 TOS(DS field) C Audio TOS(DS field) (This feature is not available in VN-V25U) D TTL( Unicast) E...

Instruction Manual
Page 51
... selected, acquisition of subnet mask]). 51 When AallowB is selected, acquisition of the IP address and subnet mask in the [IP Address] field. Destination Address Restrictions may be denied. When a multicast address is specified and AallowB is selected, camera will be imposed on access to multicast addresses that when AallowB is denoted as...
... selected, acquisition of subnet mask]). 51 When AallowB is selected, acquisition of the IP address and subnet mask in the [IP Address] field. Destination Address Restrictions may be denied. When a multicast address is specified and AallowB is selected, camera will be imposed on access to multicast addresses that when AallowB is denoted as...

Instruction Manual
Page 52
...intervals to acquire the time. The clock time can be recorded in the JPEG headers distributed by the camera. Click [Set] to load the clock time of the NTP server. For setting the IP address of the computer in JPEG header's time may occur in the JPEG header's time immediately before... and after changing the time. Displays the time on the camera. Setting Using Internet Explorer Setting (continued) Time Page This page is...
...intervals to acquire the time. The clock time can be recorded in the JPEG headers distributed by the camera. Click [Set] to load the clock time of the NTP server. For setting the IP address of the computer in JPEG header's time may occur in the JPEG header's time immediately before... and after changing the time. Displays the time on the camera. Setting Using Internet Explorer Setting (continued) Time Page This page is...
