Instruction Manual
Page 1
LST0926-001A Please read through this manual together with the bundled [READ ME FIRST] (sheet). ● For image and network settings, please refer to [READ ME FIRST]. FIXD IP DOME CAMERA FIXD MEGAPIXEL IP DOME CAMERA VN-V225U VN-X235U INSTRUCTIONS (Installation) ● This is a supplementary instruction manual to [INSTRUCTIONS (Setting)].
LST0926-001A Please read through this manual together with the bundled [READ ME FIRST] (sheet). ● For image and network settings, please refer to [READ ME FIRST]. FIXD IP DOME CAMERA FIXD MEGAPIXEL IP DOME CAMERA VN-V225U VN-X235U INSTRUCTIONS (Installation) ● This is a supplementary instruction manual to [INSTRUCTIONS (Setting)].
Instruction Manual
Page 2
...-and-white mode). This allows surveillance to be set as during night time, is possible using a small bandwidth. Supports night surveillance Surveillance under low illumination, such as required. Unblocked Design The dome-shaped design enables ease of 3.6x (VN-V225U) and 3x (VN-X235U) for PoE (Power over Ethernet) This camera supports 1P& (IEEE802.3af) and enables power supply through an audio signal input/output cable via the network. HTTP-based API This product comes with an optical zoom...
...-and-white mode). This allows surveillance to be set as during night time, is possible using a small bandwidth. Supports night surveillance Surveillance under low illumination, such as required. Unblocked Design The dome-shaped design enables ease of 3.6x (VN-V225U) and 3x (VN-X235U) for PoE (Power over Ethernet) This camera supports 1P& (IEEE802.3af) and enables power supply through an audio signal input/output cable via the network. HTTP-based API This product comes with an optical zoom...
Instruction Manual
Page 3
... this INSTRUCTIONS (Installation) Ⅵ Symbols used for adjusting the camera angle during operation. :States restrictions on the functions or use of this equipment. Alarm input/output This camera comes with a motion detection feature and dual alarm input. Fine focus adjust This feature eases fine-tuning of the focus, and enables focus to the server. Any part or all of this manual may be uploaded to the FTP server at regular intervals JPEG images may...
... this INSTRUCTIONS (Installation) Ⅵ Symbols used for adjusting the camera angle during operation. :States restrictions on the functions or use of this equipment. Alarm input/output This camera comes with a motion detection feature and dual alarm input. Fine focus adjust This feature eases fine-tuning of the focus, and enables focus to the server. Any part or all of this manual may be uploaded to the FTP server at regular intervals JPEG images may...

Instruction Manual
Page 4
... copyrighted material may constitute a copyright infringement, and the user may melt or tarnish its surface. Maintenance ⅷ Turn off the power of the system for the duplication, modification, or transmission of copyrighted video and audio data. ⅷ Unauthorized duplication, modification, or transmission of this product and cables connected to this product at locations where strong electric waves...
... copyrighted material may constitute a copyright infringement, and the user may melt or tarnish its surface. Maintenance ⅷ Turn off the power of the system for the duplication, modification, or transmission of copyrighted video and audio data. ⅷ Unauthorized duplication, modification, or transmission of this product and cables connected to this product at locations where strong electric waves...
Instruction Manual
Page 5
... lighting equipment) to the Flickerless mode during use shielded LAN cables, shielded alarm cables and shielded audio cables for connection with intelligent features may appear around the bright subject (blooming). However, this product. When the zoom of a dark image, and the screen may appear outof-sync. Make sure that are not caused by malfunction of the camera. ⅷ For regions with the white balance set...
... lighting equipment) to the Flickerless mode during use shielded LAN cables, shielded alarm cables and shielded audio cables for connection with intelligent features may appear around the bright subject (blooming). However, this product. When the zoom of a dark image, and the screen may appear outof-sync. Make sure that are not caused by malfunction of the camera. ⅷ For regions with the white balance set...

Instruction Manual
Page 6
... cable) Red Brown Orange Alarm input 1 Alarm input 2 Alarm output 1 Yellow Alarm output 2 Black GND Audio cable Pink (Shielded cable) White Yellow Microphone input GND Black (Shielded cable) White Yellow Line output GND Power cable Red (Unshielded cable) AC 24 V Power Supply Black (Unshielded cable) Note: ● Do not use PoE and an AC24 V power supply at the same time. Note: ● To mount the camera using an electrical box, please consult the dealer shop from the side of Parts Camera G A B A B C D E A Mounting...
... cable) Red Brown Orange Alarm input 1 Alarm input 2 Alarm output 1 Yellow Alarm output 2 Black GND Audio cable Pink (Shielded cable) White Yellow Microphone input GND Black (Shielded cable) White Yellow Line output GND Power cable Red (Unshielded cable) AC 24 V Power Supply Black (Unshielded cable) Note: ● Do not use PoE and an AC24 V power supply at the same time. Note: ● To mount the camera using an electrical box, please consult the dealer shop from the side of Parts Camera G A B A B C D E A Mounting...

Instruction Manual
Page 7
... brackets are removed. This address cannot be altered. P Fall prevention wire mounting screw Use the screw for attaching the fall prevention wire fastening hook L. Removal procedures (A page 11 ARemove the outer casingB) Lens (A page 8) H I Fall prevention sheet This sheet connects the camera unit with the outer casing C using the fall prevention wire from the ceiling. (Fall prevention wire is a unique physical address of camera unit N M L K O MAC address P H H [10BASE-T/100BASE-TX(PoE)] LAN cable connector...
... brackets are removed. This address cannot be altered. P Fall prevention wire mounting screw Use the screw for attaching the fall prevention wire fastening hook L. Removal procedures (A page 11 ARemove the outer casingB) Lens (A page 8) H I Fall prevention sheet This sheet connects the camera unit with the outer casing C using the fall prevention wire from the ceiling. (Fall prevention wire is a unique physical address of camera unit N M L K O MAC address P H H [10BASE-T/100BASE-TX(PoE)] LAN cable connector...
Instruction Manual
Page 8
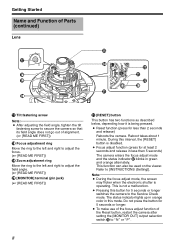
... Parts (continued) Lens Y Q X R S U T W U V T Q Tilt fastening screw Note: ● After adjusting the field angle, tighten the tilt fastening screw to secure the camera so that its field angle does not go out of the Reset button, restart the camera after setting the [MONITOR OUT] output selection switch W to [INSTRUCTIONS (Setting)]. During this interval, the [RESET] button is being pressed. ● Reset function (press for less than 5 seconds) The camera enters the focus adjust mode...
... Parts (continued) Lens Y Q X R S U T W U V T Q Tilt fastening screw Note: ● After adjusting the field angle, tighten the tilt fastening screw to secure the camera so that its field angle does not go out of the Reset button, restart the camera after setting the [MONITOR OUT] output selection switch W to [INSTRUCTIONS (Setting)]. During this interval, the [RESET] button is being pressed. ● Reset function (press for less than 5 seconds) The camera enters the focus adjust mode...
Instruction Manual
Page 9
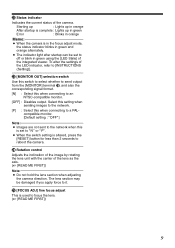
...-compatible monitor. [OFF] : Disables output. Select this setting when sending images to the network. [P] : Select this when connecting to a PALcompatible monitor. [Default setting : AOFFB] Note: ● Images are not sent to the network when this when connecting to reboot the camera. The lens section may be set to ANB or APB. ● When the switch setting is in the focus adjust mode, the status indicator blinks in green using the [LED State] of the camera...
...-compatible monitor. [OFF] : Disables output. Select this setting when sending images to the network. [P] : Select this when connecting to a PALcompatible monitor. [Default setting : AOFFB] Note: ● Images are not sent to the network when this when connecting to reboot the camera. The lens section may be set to ANB or APB. ● When the switch setting is in the focus adjust mode, the status indicator blinks in green using the [LED State] of the camera...
Instruction Manual
Page 10
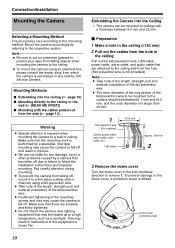
... wire (Not supplied) Cables (power cable, alarm cable, audio cable, etc.) LAN cable R120 mm Approx. 100 mm 2 3 Remove the dome cover Turn the dome cover in malfunction of the fall off due to failure to ceilings with the cables pulled out from which the camera is affixed. Dome cover protective sheet 10 Mounting Methods ⅷ Embedding into the Ceiling T The camera can be mounted to follow the installation instructions and improper mounting...
... wire (Not supplied) Cables (power cable, alarm cable, audio cable, etc.) LAN cable R120 mm Approx. 100 mm 2 3 Remove the dome cover Turn the dome cover in malfunction of the fall off due to failure to ceilings with the cables pulled out from which the camera is affixed. Dome cover protective sheet 10 Mounting Methods ⅷ Embedding into the Ceiling T The camera can be mounted to follow the installation instructions and improper mounting...

Instruction Manual
Page 11
Memo: ● For cables that are completed. 1 Mount the fall prevention wire that connects the camera and the ceiling to the camera unit 2 Connect the alarm cables and audio cables 3 Connect the LAN cable 4 Connect the power cable Note: ● Connection of an outer casing. ) A Remove the fastening screw from the catches. 5 Remove the outer casing (This mounting method does not make use of a power cable is not necessary when PoE is used , be sure...
Memo: ● For cables that are completed. 1 Mount the fall prevention wire that connects the camera and the ceiling to the camera unit 2 Connect the alarm cables and audio cables 3 Connect the LAN cable 4 Connect the power cable Note: ● Connection of an outer casing. ) A Remove the fastening screw from the catches. 5 Remove the outer casing (This mounting method does not make use of a power cable is not necessary when PoE is used , be sure...

Instruction Manual
Page 12
... the monitor. (A [READ ME FIRST]) Ⅵ Mounting the Dome Cover After video image adjustment is complete, mount the inner dome and dome cover accordingly. Connection/Installation Mounting the Camera (continued) Ⅵ Mounting 1 Align the shooting direction with shooting direction Ceiling mounting 2 bracket (tip) 2 Mount the outer casing to the ceiling or wall 3 Pull out the cables from the side without having to make a hole in the diagram such as by using...
... the monitor. (A [READ ME FIRST]) Ⅵ Mounting the Dome Cover After video image adjustment is complete, mount the inner dome and dome cover accordingly. Connection/Installation Mounting the Camera (continued) Ⅵ Mounting 1 Align the shooting direction with shooting direction Ceiling mounting 2 bracket (tip) 2 Mount the outer casing to the ceiling or wall 3 Pull out the cables from the side without having to make a hole in the diagram such as by using...
Instruction Manual
Page 13
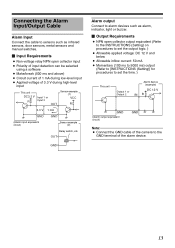
... to 5000 ms) output (Refer to [INSTRUCTIONS (Setting)] for procedures to set the time. ) This unit Output 1 or Output 2 Alarm device (example) DC 12 V IN R GND (Alarm output equivalent circuit) GND Note: ● Connect the GND cable of the camera to sensors such as alarm, indicator, light or buzzer. Ⅵ Output Requirements ● NPN open collector input ● Polarity of input detection can be selected using a software ● Make/break...
... to 5000 ms) output (Refer to [INSTRUCTIONS (Setting)] for procedures to set the time. ) This unit Output 1 or Output 2 Alarm device (example) DC 12 V IN R GND (Alarm output equivalent circuit) GND Note: ● Connect the GND cable of the camera to sensors such as alarm, indicator, light or buzzer. Ⅵ Output Requirements ● NPN open collector input ● Polarity of input detection can be selected using a software ● Make/break...
Instruction Manual
Page 14
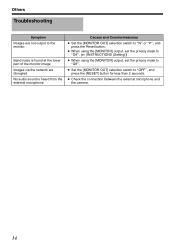
Others Troubleshooting Symptom Images are not output to the monitor Band noise is found at the lower part of the monitor image Images via the network are disrupted No audio sound is heard from the external microphone Causes and Countermeasures ● Set the [MONITOR OUT] selection switch to ANB or APB, and press the Reset button. ● When using the [MONITOR] output, set the privacy mask to AOffB. (A [INSTRUCTIONS (Setting)]) ● When using the [MONITOR] output, set the...
Others Troubleshooting Symptom Images are not output to the monitor Band noise is found at the lower part of the monitor image Images via the network are disrupted No audio sound is heard from the external microphone Causes and Countermeasures ● Set the [MONITOR OUT] selection switch to ANB or APB, and press the Reset button. ● When using the [MONITOR] output, set the privacy mask to AOffB. (A [INSTRUCTIONS (Setting)]) ● When using the [MONITOR] output, set the...

Instruction Manual
Page 15
... %, F1.2, AGC Super, 1/30 s) Minimum brightness of object (VN-X235U) Color : 0.8 lx (typ., 50 %, F1.2, AGC Super, 1/30 s) Black-and-white : 0.08 lx (typ., 50 %, F1.2, AGC Super, 1/30 s) Ⅵ Audio input Connection of plug-in power microphone supported Reference voltage : DC 2.7 V (typ.), impedance : 2.2 kK (typ.) Ⅵ Audio output Line output (200 K, max. 2 Vp-p) Ⅵ Network output Image compression format : JPEG, MPEG4 Frame size : 1280...
... %, F1.2, AGC Super, 1/30 s) Minimum brightness of object (VN-X235U) Color : 0.8 lx (typ., 50 %, F1.2, AGC Super, 1/30 s) Black-and-white : 0.08 lx (typ., 50 %, F1.2, AGC Super, 1/30 s) Ⅵ Audio input Connection of plug-in power microphone supported Reference voltage : DC 2.7 V (typ.), impedance : 2.2 kK (typ.) Ⅵ Audio output Line output (200 K, max. 2 Vp-p) Ⅵ Network output Image compression format : JPEG, MPEG4 Frame size : 1280...
Instruction Manual
Page 16
...) Internal memory : 8 MB Supply voltage : AC 24 V or PoE (DC -48 V) Current consumption : AC 24 V 0.35 A PoE 7 W Surrounding temperature : -10 I to 50 I (operation) 0 I to 40 I (recommended) Ambient humidity : 35 % RH to 90 % RH (without condensation) Mass : Approx. 750 g (1.65 lbs) 16 Others Specifications (continued) Accessories Safety Precautions 1 Overall Read Me First 1 Alarm input ן...
...) Internal memory : 8 MB Supply voltage : AC 24 V or PoE (DC -48 V) Current consumption : AC 24 V 0.35 A PoE 7 W Surrounding temperature : -10 I to 50 I (operation) 0 I to 40 I (recommended) Ambient humidity : 35 % RH to 90 % RH (without condensation) Mass : Approx. 750 g (1.65 lbs) 16 Others Specifications (continued) Accessories Safety Precautions 1 Overall Read Me First 1 Alarm input ן...

Instruction Manual
Page 17
Dimension [Unit: mm (inches)] T Specifications and appearance of this unit are subject to change for further improvements without prior notice. 17
Dimension [Unit: mm (inches)] T Specifications and appearance of this unit are subject to change for further improvements without prior notice. 17

Instruction Manual
Page 18
LST0926-001A VN-V225U/VN-X235U FIXD IP DOME CAMERA / FIXD MEGAPIXEL IP DOME CAMERA © 2009 Victor Company of Japan, Limited
LST0926-001A VN-V225U/VN-X235U FIXD IP DOME CAMERA / FIXD MEGAPIXEL IP DOME CAMERA © 2009 Victor Company of Japan, Limited

Quick Start Guide
Page 1
... prevention wire that connects the camera and the ceiling to the camera unit 4 Connect the alarm cable Connect the alarm cable to adjust the image size. Preparation T To mount the camera to a wall, perform the same procedures below but replace the word "ceiling" with "wall". 1 Use the supplied template to open a hole in the shooting screen depending on the appearance and operation of the [MONITOR] terminal to discharge any static electricity from the positions...
... prevention wire that connects the camera and the ceiling to the camera unit 4 Connect the alarm cable Connect the alarm cable to adjust the image size. Preparation T To mount the camera to a wall, perform the same procedures below but replace the word "ceiling" with "wall". 1 Use the supplied template to open a hole in the shooting screen depending on the appearance and operation of the [MONITOR] terminal to discharge any static electricity from the positions...
Quick Start Guide
Page 2
... VN-X235U Built-in Viewer, you can download "ffdshow" from the Internet. K Operating the Built-in Viewer With the Built-in Viewer. Select the [Custom Level] button to [INSTRUCTIONS (Setting)] (pdf) in the supplied CD-ROM. In this product. 2 Enter the user name and password (login as an IEEE802.3-compliant switching hub ● IEEE802.3af-compliant switching hub when PoE is used for setting to enable communication with the following IP address]. T On-screen display...
... VN-X235U Built-in Viewer, you can download "ffdshow" from the Internet. K Operating the Built-in Viewer With the Built-in Viewer. Select the [Custom Level] button to [INSTRUCTIONS (Setting)] (pdf) in the supplied CD-ROM. In this product. 2 Enter the user name and password (login as an IEEE802.3-compliant switching hub ● IEEE802.3af-compliant switching hub when PoE is used for setting to enable communication with the following IP address]. T On-screen display...


