Instruction Manual
Page 1
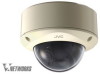
LST0529-001A FIXED IP DOME CAMERA VN-C215VP4U INSTRUCTIONS For Customer Use: Enter below the Serial No. Retain this information for future reference. VN-C215VP4U Serial No. Model No. which is located on the body.
LST0529-001A FIXED IP DOME CAMERA VN-C215VP4U INSTRUCTIONS For Customer Use: Enter below the Serial No. Retain this information for future reference. VN-C215VP4U Serial No. Model No. which is located on the body.
Instruction Manual
Page 6
...Setting is possible using the alarm input. Ⅵ Built-in Viewer Monitoring via the network. Memo : Describes reference information, such as functions and usage restrictions of this manual ● All rights reserved by JVC. Pre-recorded/post-recorded image files can be sent via FTP using the Internet ... direction is wide and the camera can be mounted on a wall with the use of a rotation adjustment mechanism. Ⅵ Unblocked Design The dome-shaped design enables ease of use without being blocked by the camera. Ⅵ High-power varifocal lens The built-in the U.S. ● ...
...Setting is possible using the alarm input. Ⅵ Built-in Viewer Monitoring via the network. Memo : Describes reference information, such as functions and usage restrictions of this manual ● All rights reserved by JVC. Pre-recorded/post-recorded image files can be sent via FTP using the Internet ... direction is wide and the camera can be mounted on a wall with the use of a rotation adjustment mechanism. Ⅵ Unblocked Design The dome-shaped design enables ease of use without being blocked by the camera. Ⅵ High-power varifocal lens The built-in the U.S. ● ...
Instruction Manual
Page 7
... Features 6 Contents 7 Operating Environment 8 Cautionary Notes 8 Name and Function of Parts 10 Features 14 Setup Procedures 16 Removing the dome cover 17 Mounting the base 17 Cable connection 18 Mounting the camera 19 Mounting the camera via electrical box 21 Mounting the camera ...connection 26 LAN Cable Connection 26 Alarm Input/Output Cable Connection 27 Adjusting Images 28 Mounting the inner dome 30 Mounting the dome cover 30 Setting Network Requirements 32 IP Address Settings 33 Setting Using Internet Explorer ......... 39 JPEG View Page 42 Camera Page 44 Encoding ...
... Features 6 Contents 7 Operating Environment 8 Cautionary Notes 8 Name and Function of Parts 10 Features 14 Setup Procedures 16 Removing the dome cover 17 Mounting the base 17 Cable connection 18 Mounting the camera 19 Mounting the camera via electrical box 21 Mounting the camera ...connection 26 LAN Cable Connection 26 Alarm Input/Output Cable Connection 27 Adjusting Images 28 Mounting the inner dome 30 Mounting the dome cover 30 Setting Network Requirements 32 IP Address Settings 33 Setting Using Internet Explorer ......... 39 JPEG View Page 42 Camera Page 44 Encoding ...
Instruction Manual
Page 8
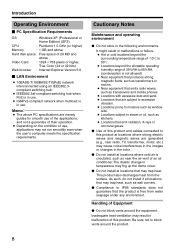
...steam or oil, such as kitchens. ● Locations that the product is free from the surface. It might result in temperature may fog up the dome cover. ⅷ Do not install at locations that may trap heat. Handling of Equipment ⅷ Do not block vents around the product. 8 ... pixels or higher, True Color (24 or 32 bits) Web browser : Internet Explorer Version 6.0 Ⅵ LAN Environment ● 10BASE-T/100BASE-TX(PoE) network interconnected using an IEEE802.3compliant switching hub. ● IEEE802.3af-compliant switching hub when PoE is in use. ● IGMPv2-compliant...
...steam or oil, such as kitchens. ● Locations that the product is free from the surface. It might result in temperature may fog up the dome cover. ⅷ Do not install at locations that may trap heat. Handling of Equipment ⅷ Do not block vents around the product. 8 ... pixels or higher, True Color (24 or 32 bits) Web browser : Internet Explorer Version 6.0 Ⅵ LAN Environment ● 10BASE-T/100BASE-TX(PoE) network interconnected using an IEEE802.3compliant switching hub. ● IEEE802.3af-compliant switching hub when PoE is in use. ● IGMPv2-compliant...
Instruction Manual
Page 9
...and they may be mixed with noises when the power voltage is not a malfunction. ⅷ The electronic shutter of the object, depending on the dome cover with a dry cloth. Be sure to AOnB, the image becomes black and white in dark locations. However, this is not a malfunction. &#... is AOnB, the product sensitivity increases automatically at the same time may dissolve or tarnish its surface. When AGC is required in use the IGMPv2compliant network switch. ⅷ Electricity can be sure to put the supplied silica gel at this is not a malfunction. ⅷ If a high-intensity object ...
...and they may be mixed with noises when the power voltage is not a malfunction. ⅷ The electronic shutter of the object, depending on the dome cover with a dry cloth. Be sure to AOnB, the image becomes black and white in dark locations. However, this is not a malfunction. &#... is AOnB, the product sensitivity increases automatically at the same time may dissolve or tarnish its surface. When AGC is required in use the IGMPv2compliant network switch. ⅷ Electricity can be sure to put the supplied silica gel at this is not a malfunction. ⅷ If a high-intensity object ...

Instruction Manual
Page 10
...electrical box. (A Pg. 17)(A Pg. 21) Noteɿ ● To mount the camera using an electrical box, please check with your dealer or nearest JVC servicing center. B Holes for connection cable and piping This hole is used to mount the fall-prevention wire to the camera. (The fall -prevention wire...attached to this hole to mount the camera directly on the piping from dropping. You can also use this hole by default. (A Pg. 23) E Dome cover The dome cover is not supplied.) Noteɿ ● Connect the fall -prevention wire is fragile. D Piping hole plug/Piping hole (side) This is for...
...electrical box. (A Pg. 17)(A Pg. 21) Noteɿ ● To mount the camera using an electrical box, please check with your dealer or nearest JVC servicing center. B Holes for connection cable and piping This hole is used to mount the fall-prevention wire to the camera. (The fall -prevention wire...attached to this hole to mount the camera directly on the piping from dropping. You can also use this hole by default. (A Pg. 23) E Dome cover The dome cover is not supplied.) Noteɿ ● Connect the fall -prevention wire is fragile. D Piping hole plug/Piping hole (side) This is for...
Instruction Manual
Page 12
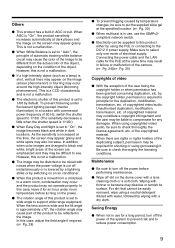
Do not press the button for the camera to reboot the camera. It connects to the network via LAN cable. (A Pg. 26) M Rotation Knob This knob rotates the lens section and adjusts the tilting of Parts (continued) Inside the camera L M N O P Q R S T U L [10BASE-T/100BASE...verification mode. Introduction Name and Function of the image. (A Pg. 28) N Rotation center mark (A Pg. 28) O Fall-prevention wire It connects the base H to the dome cover E. It takes about 1 minute for 5 seconds or longer. R Status indicator This indicator appears blinking when the power is turned on and turns off when...
Do not press the button for the camera to reboot the camera. It connects to the network via LAN cable. (A Pg. 26) M Rotation Knob This knob rotates the lens section and adjusts the tilting of Parts (continued) Inside the camera L M N O P Q R S T U L [10BASE-T/100BASE...verification mode. Introduction Name and Function of the image. (A Pg. 28) N Rotation center mark (A Pg. 28) O Fall-prevention wire It connects the base H to the dome cover E. It takes about 1 minute for 5 seconds or longer. R Status indicator This indicator appears blinking when the power is turned on and turns off when...
Instruction Manual
Page 17
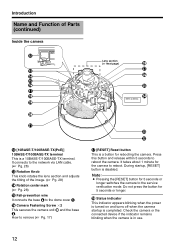
...for mounting. Remove the camera unit from the base and mount the base to release the static electricity from the claws. Remove the inner dome from your body. Noteɿ ● Make sure you touch the metal surface of the [MONITOR] terminal to the ceiling or wall.... alarm cable, heater cable LAN cable Approx. 100 mm (3-7/8 inches) 1. Remove the inner dome The inner dome is connected to malfunction. A B Claw (2 locations) Camera unit Base 17 Remove the dome cover Loosen the dome cover fastening screws (x3) with "wall". Setup If necessary, use the same procedures below ...
...for mounting. Remove the camera unit from the base and mount the base to release the static electricity from the claws. Remove the inner dome from your body. Noteɿ ● Make sure you touch the metal surface of the [MONITOR] terminal to the ceiling or wall.... alarm cable, heater cable LAN cable Approx. 100 mm (3-7/8 inches) 1. Remove the inner dome The inner dome is connected to malfunction. A B Claw (2 locations) Camera unit Base 17 Remove the dome cover Loosen the dome cover fastening screws (x3) with "wall". Setup If necessary, use the same procedures below ...
Instruction Manual
Page 19
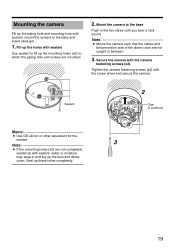
Noteɿ ● Mount the camera such that the cables and fall-prevention wire of the dome cover are mounted. 2. Mounting the camera Fill up the piping hole and mounting hole with sealant, mount the camera to the base Push in the ...two claws until you hear a click sound. Secure the camera with the screw driver and secure the camera. Seal up the lens and dome cover. Tighten the camera fastening screws (x2) with the camera fastening screws (x2). Mount the camera to the base and insert silica gel. 1. Fill up...
Noteɿ ● Mount the camera such that the cables and fall-prevention wire of the dome cover are mounted. 2. Mounting the camera Fill up the piping hole and mounting hole with sealant, mount the camera to the base Push in the ...two claws until you hear a click sound. Secure the camera with the screw driver and secure the camera. Seal up the lens and dome cover. Tighten the camera fastening screws (x2) with the camera fastening screws (x2). Mount the camera to the base and insert silica gel. 1. Fill up...
Instruction Manual
Page 20
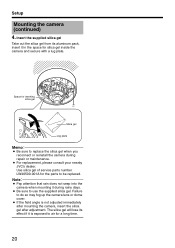
... for a long time. 20 The silica gel will lose its aluminum pack, insert it during repair or maintenance. ● For replacement, please consult your nearby JVC's dealer. Setup Mounting the camera (continued) 4. Noteɿ ● Pay attention that rain does not seep into the camera when mounting it in the space... be replaced. Space for silica gel inside the camera and secure with a lug plate. Failure to do so may fog up the camera lens or dome cover. ● If the field angle is exposed to air for the parts to use the supplied silica gel.
... for a long time. 20 The silica gel will lose its aluminum pack, insert it during repair or maintenance. ● For replacement, please consult your nearby JVC's dealer. Setup Mounting the camera (continued) 4. Noteɿ ● Pay attention that rain does not seep into the camera when mounting it in the space... be replaced. Space for silica gel inside the camera and secure with a lug plate. Failure to do so may fog up the camera lens or dome cover. ● If the field angle is exposed to air for the parts to use the supplied silica gel.

Instruction Manual
Page 21
...; Cable connection (A Pg. 18) ● Mounting the camera to the base (A Pg. 19) ● Image adjustment (A Pg. 28) ● Mounting the inner dome (A Pg. 30) ● Mounting the dome cover (A Pg. 30) 21 The following procedures are not supplied. 4 inch square electrical box M4 screw (not supplied) 3. Mount the base to the...
...; Cable connection (A Pg. 18) ● Mounting the camera to the base (A Pg. 19) ● Image adjustment (A Pg. 28) ● Mounting the inner dome (A Pg. 30) ● Mounting the dome cover (A Pg. 30) 21 The following procedures are not supplied. 4 inch square electrical box M4 screw (not supplied) 3. Mount the base to the...
Instruction Manual
Page 22
... may damage the internal parts of the base to the base (A Pg. 19) ● Image adjustment (A Pg. 28) ● Mounting the inner dome (A Pg. 30) ● Mounting the dome cover (A Pg. 30) 22 Mount the fall -prevention wire to mount the camera. Noteɿ ● RM4 screws are the same as normal...
... may damage the internal parts of the base to the base (A Pg. 19) ● Image adjustment (A Pg. 28) ● Mounting the inner dome (A Pg. 30) ● Mounting the dome cover (A Pg. 30) 22 Mount the fall -prevention wire to mount the camera. Noteɿ ● RM4 screws are the same as normal...

Instruction Manual
Page 23
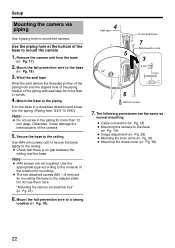
...; Cable connection (A Pg. 18) ● Mounting the camera to the base (A Pg. 19) ● Image adjustment (A Pg. 28) ● Mounting the inner dome (A Pg. 30) ● Mounting the dome cover (A Pg. 30) Mounting screw 23 Using the piping hole at the side of the base to mount the camera When the camera...
...; Cable connection (A Pg. 18) ● Mounting the camera to the base (A Pg. 19) ● Image adjustment (A Pg. 28) ● Mounting the inner dome (A Pg. 30) ● Mounting the dome cover (A Pg. 30) Mounting screw 23 Using the piping hole at the side of the base to mount the camera When the camera...

Instruction Manual
Page 29
... the iris level within 30 seconds after pressing the focus adjustment button. The dome cover is not distorted. (Refer to hold the dome cover over the lens when adjusting the focus. If focus is not adjusted with the dome cover held over the lens, the camera may be able to adjust correctly...Noteɿ ● Be sure to the diagram below) Field angle adjustment Loosen the fastening screw of focus when the dome cover is actually attached. ● When adjusting focus, hold the dome cover over the lens such that the optical axis of the lens and the center of the focus adjustment ring...
... the iris level within 30 seconds after pressing the focus adjustment button. The dome cover is not distorted. (Refer to hold the dome cover over the lens when adjusting the focus. If focus is not adjusted with the dome cover held over the lens, the camera may be able to adjust correctly...Noteɿ ● Be sure to the diagram below) Field angle adjustment Loosen the fastening screw of focus when the dome cover is actually attached. ● When adjusting focus, hold the dome cover over the lens such that the optical axis of the lens and the center of the focus adjustment ring...
Instruction Manual
Page 30
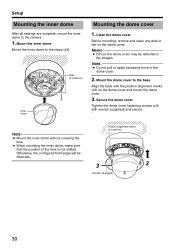
... reflected in the images. Secure the dome cover Tighten the dome cover fastening screws (x3) with the position alignment marks (x3) on the dome cover. Mount the inner dome Mount the inner dome to the camera. 1. Mount the dome cover to the dome cover. 2. Position alignment marks (3 ...locations) 3 2 Wrench (Supplied) 30 Claw (3 locations) Inner dome Mounting the dome cover 1. Clean the dome cover Before mounting, ...
... reflected in the images. Secure the dome cover Tighten the dome cover fastening screws (x3) with the position alignment marks (x3) on the dome cover. Mount the inner dome Mount the inner dome to the camera. 1. Mount the dome cover to the dome cover. 2. Position alignment marks (3 ...locations) 3 2 Wrench (Supplied) 30 Claw (3 locations) Inner dome Mounting the dome cover 1. Clean the dome cover Before mounting, ...

Instruction Manual
Page 31
Insecure mounting may increase humidity, fog up the camera or the cover may not work properly. 31 Otherwise, the anti-dust and waterproof function may drop. ● When the cover is removed again after mounting the dome cover, adjust the field angle. ● Make sure that the fall-prevention wire of the dome cover is not caught between the dome cover and the base. Noteɿ ● Secure the dome cover tightly.
Insecure mounting may increase humidity, fog up the camera or the cover may not work properly. 31 Otherwise, the anti-dust and waterproof function may drop. ● When the cover is removed again after mounting the dome cover, adjust the field angle. ● Make sure that the fall-prevention wire of the dome cover is not caught between the dome cover and the base. Noteɿ ● Secure the dome cover tightly.

Instruction Manual
Page 88
© 2006 Victor Company of Japan, Limited LST0529-001A VN-C215VP4U FIXED IP DOME CAMERA
© 2006 Victor Company of Japan, Limited LST0529-001A VN-C215VP4U FIXED IP DOME CAMERA