
VN-C10U User Manual (32 pages)
Page 4
... Power Cord 13 Connecting a LAN Cable 14 Installing the Camera 15 Step 2 Setting the Network Installing the Software 16 Setting the PC's IP Address for Windows XP 17 Setting the PC's IP Address for Windows 2000 19 Setting the IP Address for VN-C10U.) Before beginning to make sure that the best possible performance...
... Power Cord 13 Connecting a LAN Cable 14 Installing the Camera 15 Step 2 Setting the Network Installing the Software 16 Setting the PC's IP Address for Windows XP 17 Setting the PC's IP Address for Windows 2000 19 Setting the IP Address for VN-C10U.) Before beginning to make sure that the best possible performance...

VN-C10U User Manual (32 pages)
Page 7
...properly. ● To save electricity, turn off the power to the system when not in use , prepare a proper housing to cover and protect the camera. ● The product should not be affected. ● If a high-intensity object (such as a lamp) is shot, the image on the ... . Use a soft cloth like cotton flannel to the product design, therefore not a defect. (This product uses a network protocol called RTP for transmitting MPEG4 images. Operating Precautions ● VN-C10 is designed for indoor use a cloth soaked with water-diluted mild detergent and then wipe it with the power...
...properly. ● To save electricity, turn off the power to the system when not in use , prepare a proper housing to cover and protect the camera. ● The product should not be affected. ● If a high-intensity object (such as a lamp) is shot, the image on the ... . Use a soft cloth like cotton flannel to the product design, therefore not a defect. (This product uses a network protocol called RTP for transmitting MPEG4 images. Operating Precautions ● VN-C10 is designed for indoor use a cloth soaked with water-diluted mild detergent and then wipe it with the power...

VN-C10U User Manual (32 pages)
Page 9
..., this button to those set at the factory, and VN-C10 restarts. ! [IRIS] terminal For connecting with [V.Networks Setup Tool] return to reset VN-C10. When the camera is in a way that does not cover the opening # [DC 12 V/AC 24 V] Power terminal For the internal ... 2 G 2 1 OUT COM POWER ALARM PUSH 10BASE-T/100BASE-TX For USA DO NOT CONNECT TO THE TELEPHONE NETWORK ^ 9 Ventilation opening . Install the camera in use, check the camera and/or the network equipment. $ [ALARM INPUT] terminals For connecting with an external alarm equipment. % [ALARM OUTPUT] terminals For ...
..., this button to those set at the factory, and VN-C10 restarts. ! [IRIS] terminal For connecting with [V.Networks Setup Tool] return to reset VN-C10. When the camera is in a way that does not cover the opening # [DC 12 V/AC 24 V] Power terminal For the internal ... 2 G 2 1 OUT COM POWER ALARM PUSH 10BASE-T/100BASE-TX For USA DO NOT CONNECT TO THE TELEPHONE NETWORK ^ 9 Ventilation opening . Install the camera in use, check the camera and/or the network equipment. $ [ALARM INPUT] terminals For connecting with an external alarm equipment. % [ALARM OUTPUT] terminals For ...

VN-C10U User Manual (32 pages)
Page 11
...Networks Setup Tool. Fix a wire securely for preventing the camera from falling off. ☞ Page 12 Step 2 Setting the Network Install the software [V.Networks Controller], and set the network for other PCs. Also perform the setting with [V.Networks Setup Tool] and registration of the connected camera with [V.Networks.... Only then, turn on to Other Settings with V.Networks Controller Now the camera is ready for recording and playback, etc. with [V.Networks Controller]. ☞ Page 27 Step 6 Operations with V.Networks Setup Tool. Step 1 Connection and Installation Attach a ...
...Networks Setup Tool. Fix a wire securely for preventing the camera from falling off. ☞ Page 12 Step 2 Setting the Network Install the software [V.Networks Controller], and set the network for other PCs. Also perform the setting with [V.Networks Setup Tool] and registration of the connected camera with [V.Networks.... Only then, turn on to Other Settings with V.Networks Controller Now the camera is ready for recording and playback, etc. with [V.Networks Controller]. ☞ Page 27 Step 6 Operations with V.Networks Setup Tool. Step 1 Connection and Installation Attach a ...

VN-C10U User Manual (32 pages)
Page 13
... occurred, ensure that only one and go on for some time (at least 10 minutes). Repeat the procedure for a VN-C10 first and proceed the setting to Other Settings with V.Networks Setup Tool. If a voltage exceeding the rating is supplied, malfunction, or in the worst case, fuming or fire, ... "198.168.0.2" at the same time. Do not turn on the power for a second one VN-C10 exists on again for VN-C10 is insulated with V.Networks Setup Tool. Connecting the Power Cord Connect the camera to the PDF instruction manual inside the supplied CD-ROM. Power Cord • Do not connect...
... occurred, ensure that only one and go on for some time (at least 10 minutes). Repeat the procedure for a VN-C10 first and proceed the setting to Other Settings with V.Networks Setup Tool. If a voltage exceeding the rating is supplied, malfunction, or in the worst case, fuming or fire, ... "198.168.0.2" at the same time. Do not turn on the power for a second one VN-C10 exists on again for VN-C10 is insulated with V.Networks Setup Tool. Connecting the Power Cord Connect the camera to the PDF instruction manual inside the supplied CD-ROM. Power Cord • Do not connect...

VN-C10U User Manual (32 pages)
Page 14
... For USA ISOLATED POWER ONLY For EUROPE INPUT OUTPUT 1 2 G 2 1 OUT COM POWER ALARM PUSH 10BASE-T/100BASE-TX For USA DO NOT CONNECT TO THE TELEPHONE NETWORK • For hub connection Use a straight cable. • For PC connection Use a cross-over cable cannot be used . Caution There are a few types of the... by using a LAN cable. Check the specifications of LAN board for which a cross-over cable. Preparations (Step 1 Connection and Installation) Connecting a LAN Cable Connect the camera to be used before performing connection.
... For USA ISOLATED POWER ONLY For EUROPE INPUT OUTPUT 1 2 G 2 1 OUT COM POWER ALARM PUSH 10BASE-T/100BASE-TX For USA DO NOT CONNECT TO THE TELEPHONE NETWORK • For hub connection Use a straight cable. • For PC connection Use a cross-over cable cannot be used . Caution There are a few types of the... by using a LAN cable. Check the specifications of LAN board for which a cross-over cable. Preparations (Step 1 Connection and Installation) Connecting a LAN Cable Connect the camera to be used before performing connection.

VN-C10U User Manual (32 pages)
Page 16
... [JVC] folder and then the "setup" folder inside. If the installation is successfully executed, the [V.Networks] icon is created in [Programs] of the Windows [Start] menu. [vn-c10u Controller] is older, select [DX81NTeng.exe] and follow the instructions on the screen. 3. Installing DirectX 8.1 1. Preparations (Step 2 Setting the Network) Installing the Software For the operating camera in VN...
... [JVC] folder and then the "setup" folder inside. If the installation is successfully executed, the [V.Networks] icon is created in [Programs] of the Windows [Start] menu. [vn-c10u Controller] is older, select [DX81NTeng.exe] and follow the instructions on the screen. 3. Installing DirectX 8.1 1. Preparations (Step 2 Setting the Network) Installing the Software For the operating camera in VN...

VN-C10U User Manual (32 pages)
Page 17
With Windows XP, follow the procedure below to set the IP address of the PC by which the camera is operated. Click . • Right-click [My Network] and select [Properties]. 2. Select the network connected to the PC by which VN-C10 is operated. • Right-click to select [Properties]. Note If either [Client for Microsoft...
With Windows XP, follow the procedure below to set the IP address of the PC by which the camera is operated. Click . • Right-click [My Network] and select [Properties]. 2. Select the network connected to the PC by which VN-C10 is operated. • Right-click to select [Properties]. Note If either [Client for Microsoft...

VN-C10U User Manual (32 pages)
Page 19
Select [Settings] and click [Control Panel]. 2. Double-click [Local Area Connection]. Click [Properties]. 19 Double-click [Network and Dial-up Co...]. 3. Select [Internet Protocol (TCP/IP)]. With Windows 2000, follow the procedure below to set the IP address. 1. Setting the PC's IP Address for Windows 2000 After attaching the camera, proceed to set the IP address of the PC by which the camera is operated. Click .
Select [Settings] and click [Control Panel]. 2. Double-click [Local Area Connection]. Click [Properties]. 19 Double-click [Network and Dial-up Co...]. 3. Select [Internet Protocol (TCP/IP)]. With Windows 2000, follow the procedure below to set the IP address. 1. Setting the PC's IP Address for Windows 2000 After attaching the camera, proceed to set the IP address of the PC by which the camera is operated. Click .

VN-C10U User Manual (32 pages)
Page 21
... IP address may be assigned upon the renewal of the connected camera. Click . Reconnect the camera after changing the IP address of the camera to be connected to 30 seconds). Select [Start], [Programs], [V.NETWORKS] and then [vn-c10u Setup Tool] to see the IP address of the leasing contract...start up [V.Networks Setup Tool]. This is not a defect. ● At the factory, DHCP is required. ● Environment where no IP address is set enabled for VN-C10. ● About the DHCP function JVC does not recommend operating VN-C10 with this [V.Networks Setup tool] only VN-C10, not ...
... IP address may be assigned upon the renewal of the connected camera. Click . Reconnect the camera after changing the IP address of the camera to be connected to 30 seconds). Select [Start], [Programs], [V.NETWORKS] and then [vn-c10u Setup Tool] to see the IP address of the leasing contract...start up [V.Networks Setup Tool]. This is not a defect. ● At the factory, DHCP is required. ● Environment where no IP address is set enabled for VN-C10. ● About the DHCP function JVC does not recommend operating VN-C10 with this [V.Networks Setup tool] only VN-C10, not ...

VN-C10U User Manual (32 pages)
Page 22
... PDF instruction manual inside the supplied CD-ROM. 22 Ask the network administrator if necessary. Note A new IP address becomes effective when VN-C10 is automatically reset. 4. Click . This ID does not directly affect the operation by the network administrator. For other cameras. Set the subnet mask to an appropriate value according to Other...
... PDF instruction manual inside the supplied CD-ROM. 22 Ask the network administrator if necessary. Note A new IP address becomes effective when VN-C10 is automatically reset. 4. Click . This ID does not directly affect the operation by the network administrator. For other cameras. Set the subnet mask to an appropriate value according to Other...

VN-C10U User Manual (32 pages)
Page 23
... no DHCP server exists. • Environment where a DHCP server, which the camera is registered. You can be registered with the factory settings, either one of the name given in are saved in [IP Address]. Enter [V.Network Name], a name under which clearly defines the IP address and MAC address allotted... folder here. Note In a DHCP environment, enter the IP address allotted by the DHCP server. Use a name that is displayed. Select [Start], [Programs], [V.NETWORKS] and then [V.Networks Controller]. [vn-c10u Controller] to start up Select [File] and [New]. 2. [New] is easy to...
... no DHCP server exists. • Environment where a DHCP server, which the camera is registered. You can be registered with the factory settings, either one of the name given in are saved in [IP Address]. Enter [V.Network Name], a name under which clearly defines the IP address and MAC address allotted... folder here. Note In a DHCP environment, enter the IP address allotted by the DHCP server. Use a name that is displayed. Select [Start], [Programs], [V.NETWORKS] and then [V.Networks Controller]. [vn-c10u Controller] to start up Select [File] and [New]. 2. [New] is easy to...
VN-C10U User Manual (32 pages)
Page 25
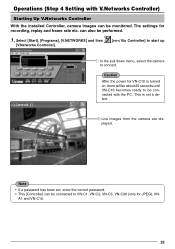
...VN-C10. 25 Select [Start], [Programs], [V.NETWORKS] and then [V.Networks Controller]. [vn-c10u Controller] to start up In the pull down menu, select the camera to VN-C1, VN-C2, VN-C3, VN-C30 (only for JPEG), VN- Live images from the camera are displayed. Caution After the power for recording, replay and frame rate etc. The settings for VN... is turned on, there will be about 20 seconds until VN-C10 becomes ready to be connected with V.Networks Controller) Starting Up V.Networks Controller With the installed Controller, camera images can be monitored. can be performed. 1.
...VN-C10. 25 Select [Start], [Programs], [V.NETWORKS] and then [V.Networks Controller]. [vn-c10u Controller] to start up In the pull down menu, select the camera to VN-C1, VN-C2, VN-C3, VN-C30 (only for JPEG), VN- Live images from the camera are displayed. Caution After the power for recording, replay and frame rate etc. The settings for VN... is turned on, there will be about 20 seconds until VN-C10 becomes ready to be connected with V.Networks Controller) Starting Up V.Networks Controller With the installed Controller, camera images can be monitored. can be performed. 1.

VN-C10U User Manual (32 pages)
Page 26
This func- 4 Help tion is used in the About case that the camera is inversely installed. (Not available for MPEG4) : Sets the compression rate and image quality. : Sets the number of [V.Networks Controller]. 26 JPEG : 640x480 320x240 160x120 MPEG4 : 320x240 160x120 Alarm Reg Alarm... Time Stamp Property Upside Down : Displays the image inversely. Motion Detect Standby Exit : For selecting the camera for each alarm can be set individually. :...
This func- 4 Help tion is used in the About case that the camera is inversely installed. (Not available for MPEG4) : Sets the compression rate and image quality. : Sets the number of [V.Networks Controller]. 26 JPEG : 640x480 320x240 160x120 MPEG4 : 320x240 160x120 Alarm Reg Alarm... Time Stamp Property Upside Down : Displays the image inversely. Motion Detect Standby Exit : For selecting the camera for each alarm can be set individually. :...
VN-C10U User Manual (32 pages)
Page 27
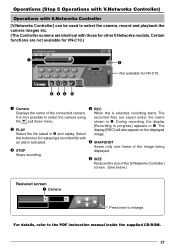
... instruction manual inside the supplied CD-ROM. 27 Stops recording. 6 SIZE Reduces the size of the [V.Networks Controller] screen. (See below.) Reduced screen 1 Camera Press here to select the camera using recorded files are not available for VN-C10.) 1 6 Not available for replaying a recorded file with an alarm activated. 5 SNAPSHOT 3 STOP Saves only one...
... instruction manual inside the supplied CD-ROM. 27 Stops recording. 6 SIZE Reduces the size of the [V.Networks Controller] screen. (See below.) Reduced screen 1 Camera Press here to select the camera using recorded files are not available for VN-C10.) 1 6 Not available for replaying a recorded file with an alarm activated. 5 SNAPSHOT 3 STOP Saves only one...

