
Instructions
Page 2
... presence of electric shock to constitute a risk of important operating and maintenance (servicing) instructions in the literature accompanying the appliance. (For U.S.A.) WARNING: TO REDUCE THE RISK OF FIRE OR ELECTRIC SHOCK, DO NOT EXPOSE THIS APPLIANCE TO RAIN OR MOISTURE. G-1 NO USER SERVICEABLE PARTS INSIDE. REFER SERVICING TO QUALIFIED SERVICE PERSONNEL. Warnings, Cautions and Others Mises en garde...
... presence of electric shock to constitute a risk of important operating and maintenance (servicing) instructions in the literature accompanying the appliance. (For U.S.A.) WARNING: TO REDUCE THE RISK OF FIRE OR ELECTRIC SHOCK, DO NOT EXPOSE THIS APPLIANCE TO RAIN OR MOISTURE. G-1 NO USER SERVICEABLE PARTS INSIDE. REFER SERVICING TO QUALIFIED SERVICE PERSONNEL. Warnings, Cautions and Others Mises en garde...
Instructions
Page 4
... Model Number: NX-PS1 Trade Name: JVC Responsible Party: JVC Americas Corp. This equipment generates, uses and can be determined by turning the equipment off and on a circuit different from that to the following measures: Reorient or relocate the receiving antenna. For Canada/pour le Canada THIS DIGITAL APPARATUS DOES NOT EXCEED THE CLASS B LIMITS FOR RADIO NOISE EMISSIONS FROM DIGITAL APPARATUS AS SET...
... Model Number: NX-PS1 Trade Name: JVC Responsible Party: JVC Americas Corp. This equipment generates, uses and can be determined by turning the equipment off and on a circuit different from that to the following measures: Reorient or relocate the receiving antenna. For Canada/pour le Canada THIS DIGITAL APPARATUS DOES NOT EXCEED THE CLASS B LIMITS FOR RADIO NOISE EMISSIONS FROM DIGITAL APPARATUS AS SET...
Instructions
Page 6
... 3 Connection 5 Basic Operations 7 Unit 7 Remote Control 9 Setting the Clock and Daily Timer ...... 11 Setting the Clock 11 Setting the Daily Timer 11 Playing Back from iPod 13 To Connect iPod 13 Basic Operations 14 Playing Back from USB mass storage class device 15 To connect the USB mass storage class device ....15 Basic Operations 15 Playing Back from the PC 17 How to install the USB drivers 17 To playback sounds on...
... 3 Connection 5 Basic Operations 7 Unit 7 Remote Control 9 Setting the Clock and Daily Timer ...... 11 Setting the Clock 11 Setting the Daily Timer 11 Playing Back from iPod 13 To Connect iPod 13 Basic Operations 14 Playing Back from USB mass storage class device 15 To connect the USB mass storage class device ....15 Basic Operations 15 Playing Back from the PC 17 How to install the USB drivers 17 To playback sounds on...

Instructions
Page 7
...; Keep the speakers away from the wall outlet, always pull on the plug, not the AC adaptor. Poor ventilation could overheat and damage the System. • DO NOT block the ventilation openings or holes. Please read all instructions carefully before operating any further. Precautions Installation • Install in a location with wet hands. Power sources • When unplugging the System from the TV...
...; Keep the speakers away from the wall outlet, always pull on the plug, not the AC adaptor. Poor ventilation could overheat and damage the System. • DO NOT block the ventilation openings or holes. Please read all instructions carefully before operating any further. Precautions Installation • Install in a location with wet hands. Power sources • When unplugging the System from the TV...
Instructions
Page 8
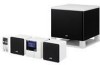
... (product number: CR2025) (Rear side) 3 CAUTION: To avoid risk of each piece supplied. • Remote control (1) • Lithium coin battery CR2025 (1) (The battery has been installed when shipped from the factory.) • Speaker cords 1.5m (2) • Speaker cord 2.5m (1) • AC power cord (1) • AC adaptor (AA-R2401) (1) • iPod connection cable (Audio) (1) • iPod stand (1) If anything is missing, consult your dealer immediately. Prepare the Remote Control When...
... (product number: CR2025) (Rear side) 3 CAUTION: To avoid risk of each piece supplied. • Remote control (1) • Lithium coin battery CR2025 (1) (The battery has been installed when shipped from the factory.) • Speaker cords 1.5m (2) • Speaker cord 2.5m (1) • AC power cord (1) • AC adaptor (AA-R2401) (1) • iPod connection cable (Audio) (1) • iPod stand (1) If anything is missing, consult your dealer immediately. Prepare the Remote Control When...

Instructions
Page 12
...ON button USB MEMORY terminal PHONES jack Opening the front panel cover STANDBY FUNCTION MEUMSOBRY AUX PHONES AUX jack Using Headphones Be sure to 29 / VOLUME MAX. 1 VOLUME Selects a source. 2 FUNCTION iPod AUX USB MEMORY USB AUDIO See "Playing Back from USB" (P.15). 7 See "Playing Back from the PC" (P.17). See "Playing Back from iPod" (P.13). 4 See "Playing Back from iPod" (P.13). Operating on or off (standby) the power. 3 Operates music. Turns on the Unit Buttons Functions Adjusts the volume level VOLUME MIN / 1 to turn down the volume before connecting...
...ON button USB MEMORY terminal PHONES jack Opening the front panel cover STANDBY FUNCTION MEUMSOBRY AUX PHONES AUX jack Using Headphones Be sure to 29 / VOLUME MAX. 1 VOLUME Selects a source. 2 FUNCTION iPod AUX USB MEMORY USB AUDIO See "Playing Back from USB" (P.15). 7 See "Playing Back from the PC" (P.17). See "Playing Back from iPod" (P.13). 4 See "Playing Back from iPod" (P.13). Operating on or off (standby) the power. 3 Operates music. Turns on the Unit Buttons Functions Adjusts the volume level VOLUME MIN / 1 to turn down the volume before connecting...
Instructions
Page 13
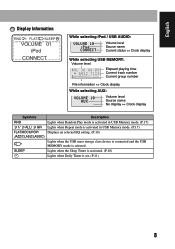
... selecting iPod / USB AUDIO: Volume level Source name Current status ⇔ Clock display While selecting USB MEMORY: Volume level Elapsed playing time Current track number Current group number File information ⇔ Clock display While selecting AUX: Volume level Source name No display ⇔ Clock display Symbols RND 1/ ALL/ GR FLAT/ROCK/POP/ JAZZ/CLAS(CLASSIC) SLEEP Description Lights when Random Play mode is activated in USB Memory mode. (P.17) Lights when Repeat mode is activated in USB Memory mode. (P.17) Displays an selected EQ setting...
... selecting iPod / USB AUDIO: Volume level Source name Current status ⇔ Clock display While selecting USB MEMORY: Volume level Elapsed playing time Current track number Current group number File information ⇔ Clock display While selecting AUX: Volume level Source name No display ⇔ Clock display Symbols RND 1/ ALL/ GR FLAT/ROCK/POP/ JAZZ/CLAS(CLASSIC) SLEEP Description Lights when Random Play mode is activated in USB Memory mode. (P.17) Lights when Repeat mode is activated in USB Memory mode. (P.17) Displays an selected EQ setting...
Instructions
Page 14
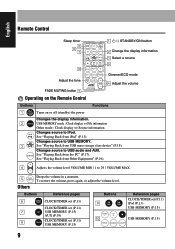
..." (P.13). Changes source to USB MEMORY. 3 See "Playing Back from Other Equipment" (P.19). 4 Adjusts the volume level VOLUME MIN / 1 to iPod. Changes source to USB audio and AUX. Drops the volume in a moment. 5 To restore the volume, press again, or adjust the volume level. Remote Control Sleep timer 6 8 7 10 Adjust the tone 1 STANDBY/ON button 2 Change the display information 3 Select a source 9 Dimmer/ECO mode 4 Adjust the volume FADE MUTING button 5 Operating on the Remote Control Buttons Functions 1 Turns on or off (standby) the power Changes the display...
..." (P.13). Changes source to USB MEMORY. 3 See "Playing Back from Other Equipment" (P.19). 4 Adjusts the volume level VOLUME MIN / 1 to iPod. Changes source to USB audio and AUX. Drops the volume in a moment. 5 To restore the volume, press again, or adjust the volume level. Remote Control Sleep timer 6 8 7 10 Adjust the tone 1 STANDBY/ON button 2 Change the display information 3 Select a source 9 Dimmer/ECO mode 4 Adjust the volume FADE MUTING button 5 Operating on the Remote Control Buttons Functions 1 Turns on or off (standby) the power Changes the display...
Instructions
Page 15
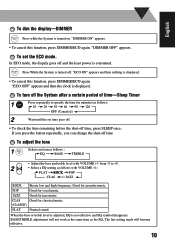
... again. If you press the button repeatedly, you can change the shut-off the System after a certain period of time-Sleep Timer 1 Press repeatedly to +5. 2 • Select a EQ setting as follows : EQ BASS TREBLE • Adjust the bass and treble level with VOLUME +/-: FLAT ROCK POP CLAS JAZZ ROCK Boosts low and high frequency. CLAS Good for acoustic music. "ECO OFF" appears and then...
... again. If you press the button repeatedly, you can change the shut-off the System after a certain period of time-Sleep Timer 1 Press repeatedly to +5. 2 • Select a EQ setting as follows : EQ BASS TREBLE • Adjust the bass and treble level with VOLUME +/-: FLAT ROCK POP CLAS JAZZ ROCK Boosts low and high frequency. CLAS Good for acoustic music. "ECO OFF" appears and then...

Instructions
Page 16
... setting mode ("Clock Adjust" appears). You need to set . 4 Select the volume level ("VOLUME MIN / 1 to the previous step. 11 "SET OK" appears briefly followed by setting information, then the icon appears on the display. You can wake up with music, etc. If you can return to 29 / VOLUME MAX"). The hour digit of the Daily Timer cannot be set to the same time. 3 Select the playback source-"iPod," "USB...
... setting mode ("Clock Adjust" appears). You need to set . 4 Select the volume level ("VOLUME MIN / 1 to the previous step. 11 "SET OK" appears briefly followed by setting information, then the icon appears on the display. You can wake up with music, etc. If you can return to 29 / VOLUME MAX"). The hour digit of the Daily Timer cannot be set to the same time. 3 Select the playback source-"iPod," "USB...

Instructions
Page 17
To cancel the Daily Timer 1 Select the current timer settings mode. 2 icon disappears. To turn on the Daily Timer again (Turn on a timer setting you have made beforehand.) 1 Select the current timer settings mode. 2 icon appears on the display. 12
To cancel the Daily Timer 1 Select the current timer settings mode. 2 icon disappears. To turn on the Daily Timer again (Turn on a timer setting you have made beforehand.) 1 Select the current timer settings mode. 2 icon appears on the display. 12
Instructions
Page 18
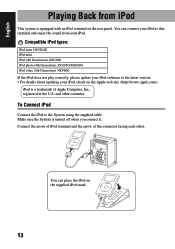
...; You can connect your iPod to the System using the supplied cable. You can place the iPod on the Apple web site . Make sure the System is equipped with an iPod terminal on the rear panel. iPod is a trademark of the connector facing each other countries. To Connect iPod Connect the iPod to this terminal and enjoy the sound from iPod This system is turned off when you connect it. Playing Back from...
...; You can connect your iPod to the System using the supplied cable. You can place the iPod on the Apple web site . Make sure the System is equipped with an iPod terminal on the rear panel. iPod is a trademark of the connector facing each other countries. To Connect iPod Connect the iPod to this terminal and enjoy the sound from iPod This system is turned off when you connect it. Playing Back from...

Instructions
Page 19
... system might be overloaded. • Sound distortion may occur when playing back audio sources with iPod connected. When distortion occurs, it is recommended to the connector part. • Do not touch or hit the iPod terminal pins or the connector pins directly. Basic Operations Button On the Unit On the remote Function Start playback / Pause Press and hold : The iPod is in sleep mode Increase the track numbers Press...
... system might be overloaded. • Sound distortion may occur when playing back audio sources with iPod connected. When distortion occurs, it is recommended to the connector part. • Do not touch or hit the iPod terminal pins or the connector pins directly. Basic Operations Button On the Unit On the remote Function Start playback / Pause Press and hold : The iPod is in sleep mode Increase the track numbers Press...
Instructions
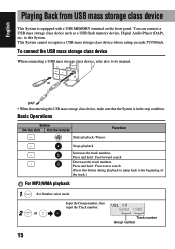
Page 20
... front panel. Track number Group number 15 To connect the USB mass storage class device When connecting a USB mass storage class device, refer also to this button during playback to jump back to the beginning of the track.) For MP3/WMA playback 1 Set Number select mode. 2 or Input the Group number, then input the Track number. Basic Operations Button On the Unit On the remote Starts playback / Pauses Function Stops...
... front panel. Track number Group number 15 To connect the USB mass storage class device When connecting a USB mass storage class device, refer also to this button during playback to jump back to the beginning of the track.) For MP3/WMA playback 1 Set Number select mode. 2 or Input the Group number, then input the Track number. Basic Operations Button On the Unit On the remote Starts playback / Pauses Function Stops...
Instructions
Page 21
... the System is turned on or on the display. NOTES • You cannot send any data to your USB mass storage class device from the Number select mode, press CANCEL. 3 Start playback. • To exit from this System. • Always set volume to the minimum level when connecting or disconnecting the other equipment. • Connect the USB mass storage class device directly to the USB MEMORY...
... the System is turned on or on the display. NOTES • You cannot send any data to your USB mass storage class device from the Number select mode, press CANCEL. 3 Start playback. • To exit from this System. • Always set volume to the minimum level when connecting or disconnecting the other equipment. • Connect the USB mass storage class device directly to the USB MEMORY...

Instructions
Page 22
... selected also by the FUNCTION button on the rear panel. Select USB AUDIO for the first time, follow the procedure below. GR Repeats all tracks are played. • To repeat random play, press REPEAT. Playing Back from your PC for the source. 2 USB AUDIO AUX • USB AUDIO can connect your PC and start playback to this terminal and enjoy the sound from the PC This System is equipped with a USB AUDIO...
... selected also by the FUNCTION button on the rear panel. Select USB AUDIO for the first time, follow the procedure below. GR Repeats all tracks are played. • To repeat random play, press REPEAT. Playing Back from your PC for the source. 2 USB AUDIO AUX • USB AUDIO can connect your PC and start playback to this terminal and enjoy the sound from the PC This System is equipped with a USB AUDIO...

Instructions
Page 23
... level when connecting or disconnecting the other equipment. Connect the System to the PC using a USB cable (not supplied). (rear panel) PC 3 USB cable (not supplied) • Use "USB series A plug to B plug" cable. 4 The USB drivers are registered trademarks of Microsoft corporation. interrupted or degraded-due to your PC does not recognize the unit, disconnect the USB cable and connect it does not work yet, restart Windows. • The installed drivers can be played...
... level when connecting or disconnecting the other equipment. Connect the System to the PC using a USB cable (not supplied). (rear panel) PC 3 USB cable (not supplied) • Use "USB series A plug to B plug" cable. 4 The USB drivers are registered trademarks of Microsoft corporation. interrupted or degraded-due to your PC does not recognize the unit, disconnect the USB cable and connect it does not work yet, restart Windows. • The installed drivers can be played...
Instructions
Page 24
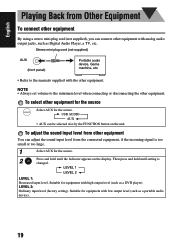
...; Always set volume to the manuals supplied with the other equipment for the source Select AUX for equipment with low output level (such as a DVD player). Playing Back from Other Equipment To connect other equipment By using a stereo mini plug cord (not supplied), you can adjust the sound input level from other equipment You can connect other equipment with analog audio output jacks, such as Digital Audio Player, a TV, etc. USB AUDIO AUX • AUX can be selected also by the FUNCTION button on the display.
...; Always set volume to the manuals supplied with the other equipment for the source Select AUX for equipment with low output level (such as a DVD player). Playing Back from Other Equipment To connect other equipment By using a stereo mini plug cord (not supplied), you can adjust the sound input level from other equipment You can connect other equipment with analog audio output jacks, such as Digital Audio Player, a TV, etc. USB AUDIO AUX • AUX can be selected also by the FUNCTION button on the display.

Instructions
Page 25
.... Speaker connections are exhausted. The battery is heard from the speakers. Adjustments or settings are suddenly canceled before calling for service. The built-in microprocessor may malfunction due to operate the System from PC connected with a USB cable. Point it back in securely. No sound is empty. Sound from the remote control. PC is a time limit. Timer Operations: Daily Timer does not work. There is connected via USB Hub...
.... Speaker connections are exhausted. The battery is heard from the speakers. Adjustments or settings are suddenly canceled before calling for service. The built-in microprocessor may malfunction due to operate the System from PC connected with a USB cable. Point it back in securely. No sound is empty. Sound from the remote control. PC is a time limit. Timer Operations: Daily Timer does not work. There is connected via USB Hub...
Instructions
Page 26
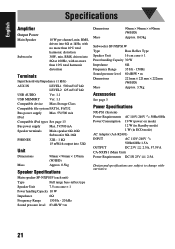
... page 3 Power Specifications NX-PS1 (System) Power Requirements AC 110V-240V 50Hz/60Hz Power Consumption 19 W (power on mode) 12 W (in Standby mode) 1 W (in ECO mode) AC Adaptor (AA-R2401) INPUT AC 110V-240V 50Hz/60Hz 1.5A OUTPUT DC 23V 2.5A, 57.5VA CA-NXPS1 (Main Unit) Power Requirements DC IN 23V 2.5A Design and specifications are subject to change without notice. 21 Specifications Amplifier Output Power Main Speaker Subwoofer 10 W per channel, min. RMS...
... page 3 Power Specifications NX-PS1 (System) Power Requirements AC 110V-240V 50Hz/60Hz Power Consumption 19 W (power on mode) 12 W (in Standby mode) 1 W (in ECO mode) AC Adaptor (AA-R2401) INPUT AC 110V-240V 50Hz/60Hz 1.5A OUTPUT DC 23V 2.5A, 57.5VA CA-NXPS1 (Main Unit) Power Requirements DC IN 23V 2.5A Design and specifications are subject to change without notice. 21 Specifications Amplifier Output Power Main Speaker Subwoofer 10 W per channel, min. RMS...


