Instruction Manual
Page 1
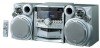
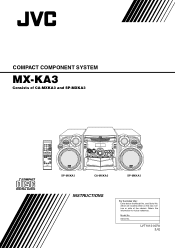
Retain this information for future reference. Serial No. and Serial No. COMPACT COMPONENT SYSTEM MX-KA3 Consists of the cabinet. which are located either on the rear, bottom or side of CA-MXKA3 and SP-MXKA3 SP-MXKA3 CA-MXKA3 SP-MXKA3 INSTRUCTIONS For Customer Use: Enter below the Model No. LVT1013-007A [UJ] Model No.
Retain this information for future reference. Serial No. and Serial No. COMPACT COMPONENT SYSTEM MX-KA3 Consists of the cabinet. which are located either on the rear, bottom or side of CA-MXKA3 and SP-MXKA3 SP-MXKA3 CA-MXKA3 SP-MXKA3 INSTRUCTIONS For Customer Use: Enter below the Model No. LVT1013-007A [UJ] Model No.
Instruction Manual
Page 3
... System. Normal Play. Daily Timer, REC (Recording) Timer, and Sleep Timer. ❏ You can connect various external units, such as the power cord is connected to auto-seek and manual tuning. ❏ CD changer function can operate 3 discs. • Discs can turn on where the button is given in all the information you need to use the system. Use the table of contents to look up and use , freeing you to just enjoy the music...
... System. Normal Play. Daily Timer, REC (Recording) Timer, and Sleep Timer. ❏ You can connect various external units, such as the power cord is connected to auto-seek and manual tuning. ❏ CD changer function can operate 3 discs. • Discs can turn on where the button is given in all the information you need to use the system. Use the table of contents to look up and use , freeing you to just enjoy the music...
Instruction Manual
Page 4
... Manual Is Organized ...1 IMPORTANT CAUTIONS...1 Table of Contents ...2 Getting Started...3 Accessories ...3 Set the VOLTAGE SELECTOR Switch 3 How To Put Batteries In the Remote Control 3 Using the Remote Control ...4 Connecting the FM Antenna ...4 Connecting the AM Antenna...5 Connecting the Speakers ...5 Connecting External Equipment...6 Connecting to the Wall Outlet...6 DEMO Mode ...6 COMPU Play...6 Basic Operations ...7 Turning the Power On and Off...7 Adjusting the Volume...7 Fade-out Muting (FADE MUTING) ...8 Reinforcing the Bass Sound (ACTIVE BASS EX 8 Emphasizing the Sound (SOUND...
... Manual Is Organized ...1 IMPORTANT CAUTIONS...1 Table of Contents ...2 Getting Started...3 Accessories ...3 Set the VOLTAGE SELECTOR Switch 3 How To Put Batteries In the Remote Control 3 Using the Remote Control ...4 Connecting the FM Antenna ...4 Connecting the AM Antenna...5 Connecting the Speakers ...5 Connecting External Equipment...6 Connecting to the Wall Outlet...6 DEMO Mode ...6 COMPU Play...6 Basic Operations ...7 Turning the Power On and Off...7 Adjusting the Volume...7 Fade-out Muting (FADE MUTING) ...8 Reinforcing the Bass Sound (ACTIVE BASS EX 8 Emphasizing the Sound (SOUND...

Instruction Manual
Page 5
...: • Remove batteries when the Remote Control will not be used for you area with the System. Getting Started Accessories Make sure that you have all connections before plugging in the battery compartment. markings in the System. Use a screwdriver to replace the batteries, replace both batteries at is the same as the voltage. AM Loop Antenna (1) Remote Control (1) Batteries (2) FM Wire Antenna (1) AC Plug Adaptor (1) If any of batteries together. 3 Set the VOLTAGE SELECTOR Switch To avoid...
...: • Remove batteries when the Remote Control will not be used for you area with the System. Getting Started Accessories Make sure that you have all connections before plugging in the battery compartment. markings in the System. Use a screwdriver to replace the batteries, replace both batteries at is the same as the voltage. AM Loop Antenna (1) Remote Control (1) Batteries (2) FM Wire Antenna (1) AC Plug Adaptor (1) If any of batteries together. 3 Set the VOLTAGE SELECTOR Switch To avoid...
Instruction Manual
Page 7
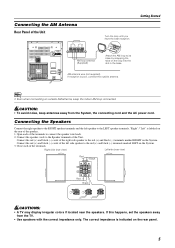
... loop connected. Open each of the Unit. If this happens, set the speakers away from the System, the connecting cord and the AC power cord. Connect the red (+) and black (-) cords of the right side speaker to the red (+) and black (-) terminals marked RIGHT on the loop into the slot in the base. Connecting the AM Antenna Rear Panel of the terminals to connect the speaker wire leads. 2. AM antenna wire (not supplied) If...
... loop connected. Open each of the Unit. If this happens, set the speakers away from the System, the connecting cord and the AC power cord. Connect the red (+) and black (-) cords of the right side speaker to the red (+) and black (-) terminals marked RIGHT on the loop into the slot in the base. Connecting the AM Antenna Rear Panel of the terminals to connect the speaker wire leads. 2. AM antenna wire (not supplied) If...
Instruction Manual
Page 8
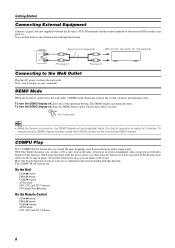
..., a DEMO mode displaying some of the operation buttons. DEMO Mode When the System is explained in place), the System still powers on the Unit during DEMO display. To turn the DEMO display off, press any of the system's features automatically starts. Signal cord (not supplied) MD recorder, tape deck, etc. (not supplied) Pin-plug x 2 Pin-plug x 2 Connecting to the external source through the System. To turn the DEMO display on, press the DEMO button on , the DEMO display will automatically starts if no CD or tape...
..., a DEMO mode displaying some of the operation buttons. DEMO Mode When the System is explained in place), the System still powers on the Unit during DEMO display. To turn the DEMO display off, press any of the system's features automatically starts. Signal cord (not supplied) MD recorder, tape deck, etc. (not supplied) Pin-plug x 2 Pin-plug x 2 Connecting to the external source through the System. To turn the DEMO display on, press the DEMO button on , the DEMO display will automatically starts if no CD or tape...
Instruction Manual
Page 9
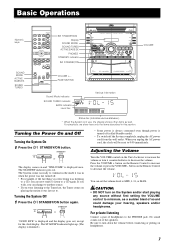
... clock display. Be sure to turn it was listening to a CD, you can set to decrease the volume. For simplicity, we show here only the items described in when the power was last turned off the System completely, unplug the AC power cord from the wall outlet. The System comes on headphones. 7 Press the VOLUME + button on playing the station it counterclockwise to a CD again. PHONES STANDBY indicator % STANDBY/ON VOLUME SOUND MODE ACTIVE BASS...
... clock display. Be sure to turn it was listening to a CD, you can set to decrease the volume. For simplicity, we show here only the items described in when the power was last turned off the System completely, unplug the AC power cord from the wall outlet. The System comes on headphones. 7 Press the VOLUME + button on playing the station it counterclockwise to a CD again. PHONES STANDBY indicator % STANDBY/ON VOLUME SOUND MODE ACTIVE BASS...
Instruction Manual
Page 10
... playing tracks on the display. Emphasizing the (SOUND TURBO) Sound High and low frequencies are highly boosted. The SOUND TURBO indicator lights up and "ACTIVE BASS EXTENSION" appears on CDs. The SOUND TURBO indicator goes out and "OFF" appears on the Remote Control. or Sound Mode function is ROCK, press the ROCK button again. Selecting the Sound Mode (SOUND MODE) You can use this effect only for wide and dynamic sound stereo systems...
... playing tracks on the display. Emphasizing the (SOUND TURBO) Sound High and low frequencies are highly boosted. The SOUND TURBO indicator lights up and "ACTIVE BASS EXTENSION" appears on CDs. The SOUND TURBO indicator goes out and "OFF" appears on the Remote Control. or Sound Mode function is ROCK, press the ROCK button again. Selecting the Sound Mode (SOUND MODE) You can use this effect only for wide and dynamic sound stereo systems...
Instruction Manual
Page 11
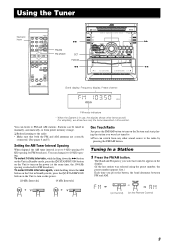
...; button on the System and start playing the station you press the button, the band alternates between FM and AM. Stations can switch from preset memory storage. ❏ Before listening to the radio: • Make sure that both the FM and AM antennas are correctly connected. (See pages 4 and 5). Using the Tuner Numeric keys ¢ ¡ X FM/AM FM MODE SET FM/AM 4 22 A B Band display, Frequency display, Preset channel FM mode...
...; button on the System and start playing the station you press the button, the band alternates between FM and AM. Stations can switch from preset memory storage. ❏ Before listening to the radio: • Make sure that both the FM and AM antennas are correctly connected. (See pages 4 and 5). Using the Tuner Numeric keys ¢ ¡ X FM/AM FM MODE SET FM/AM 4 22 A B Band display, Frequency display, Preset channel FM mode...
Instruction Manual
Page 12
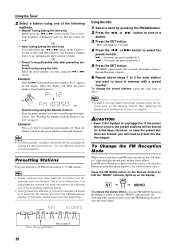
... unplugged or if the power failure occurs, the preset stations will be stored for a few days. Press the FM MODE button on the Remote Control. Selecting other station will blink for 5 seconds. 4 Press the 4 or ¢ button to an FM stereo broadcast, the "ST (Stereo)" indicator lights up , automatically until a station is found. Using the Tuner 2 Select a station using one of the following methods. • Manual Tuning (Using the Unit only...
... unplugged or if the power failure occurs, the preset stations will be stored for a few days. Press the FM MODE button on the Remote Control. Selecting other station will blink for 5 seconds. 4 Press the 4 or ¢ button to an FM stereo broadcast, the "ST (Stereo)" indicator lights up , automatically until a station is found. Using the Tuner 2 Select a station using one of the following methods. • Manual Tuning (Using the Unit only...
Instruction Manual
Page 15
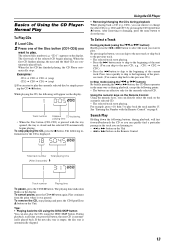
... can directly select the track on the Remote Control Total track number Total playing time (After 3 seconds) Track number Playing time To pause, press the CD 6 button. Using the numeric keys on page 8. See "Entering the Number with the tray opened, the tray is closed and the selected CD automatically begins playing. To remove the CD, stop playing the CD, press the 7 button. Basics of Using the CD PlayerNormal Play To Play CDs 1 Load CDs. 2 Press one of the Disc button...
... can directly select the track on the Remote Control Total track number Total playing time (After 3 seconds) Track number Playing time To pause, press the CD 6 button. Using the numeric keys on page 8. See "Entering the Number with the tray opened, the tray is closed and the selected CD automatically begins playing. To remove the CD, stop playing the CD, press the 7 button. Basics of Using the CD PlayerNormal Play To Play CDs 1 Load CDs. 2 Press one of the Disc button...
Instruction Manual
Page 16
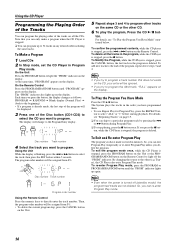
... program. ton to directly enter the track number. Tuner), the CD Player also exits Program Play mode. To Make a Program 1 Load CDs 2 In Stop mode, set the CD Player in Program Play mode. On the Remote Control Press the PROGRAM/RANDOM button until the "PRGM" indicator lights up again. • Even when the power is blinking, press the 4 or ¢ button to select the track, then press the SET button within 5 seconds. To Play the Program You Have Made Press the CD 6 button...
... program. ton to directly enter the track number. Tuner), the CD Player also exits Program Play mode. To Make a Program 1 Load CDs 2 In Stop mode, set the CD Player in Program Play mode. On the Remote Control Press the PROGRAM/RANDOM button until the "PRGM" indicator lights up again. • Even when the power is blinking, press the 4 or ¢ button to select the track, then press the SET button within 5 seconds. To Play the Program You Have Made Press the CD 6 button...
Instruction Manual
Page 17
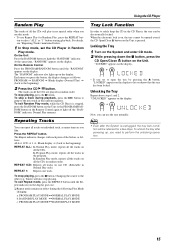
... be electronically locked. PROGRAM PLAY MODEÔNORMAL PLAY MODE b. Locking the Tray 1 Turn on the System and enter CD mode. 2 While pressing down the 7 button, press the CD Open/Close 0 button on the display. To skip a track during the following Play Mode changing: a. In Random Play mode, repeats all the tracks on all tracks on the Remote Control again to perform the unlocking operation. 15 To unlock the tray after powering up on the...
... be electronically locked. PROGRAM PLAY MODEÔNORMAL PLAY MODE b. Locking the Tray 1 Turn on the System and enter CD mode. 2 While pressing down the 7 button, press the CD Open/Close 0 button on the display. To skip a track during the following Play Mode changing: a. In Random Play mode, repeats all the tracks on all tracks on the Remote Control again to perform the unlocking operation. 15 To unlock the tray after powering up on the...
Instruction Manual
Page 19
..., you can adjust the sound you are a few things to make one for side B, can be used for side A and one or two settings, and you must cover the holes with adhesive tape first. ❏ Type I tape can be recorded onto. Thus, during the recording. Thus, when recording CDs, radio broadcasts, etc., wind on the System. Either turn off the TV...
..., you can adjust the sound you are a few things to make one for side B, can be used for side A and one or two settings, and you must cover the holes with adhesive tape first. ❏ Type I tape can be recorded onto. Thus, during the recording. Thus, when recording CDs, radio broadcasts, etc., wind on the System. Either turn off the TV...

Instruction Manual
Page 20
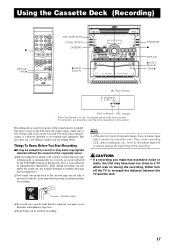
... you have set enough time to allow for the CD to the beginning) CD Synchro Recording Everything on the Unit or the 7 button. However, the sound is dubbed without sound effects. Using the Cassette Deck (Recording) Standard Recording This is the basic method for recording any sound source onto a tape in a radio station, loading CDs, or turning on connected equipment. • For CD recording, see "CD Synchro Recording...
... you have set enough time to allow for the CD to the beginning) CD Synchro Recording Everything on the Unit or the 7 button. However, the sound is dubbed without sound effects. Using the Cassette Deck (Recording) Standard Recording This is the basic method for recording any sound source onto a tape in a radio station, loading CDs, or turning on connected equipment. • For CD recording, see "CD Synchro Recording...

Instruction Manual
Page 21
... other source (e.g. ed to the System. (See page 6.) 1 Set the volume level to its Instructions. 19 "AUX" appears on the display. 3 Start playing the external equipment. 4 Adjust the volume level to the level you want listen to. 5 Apply the following sound effects, if you wish. • ACTIVE BASS EX. (See page 8.) • SOUND TURBO (See page 8.) • Sound Mode (See page 8.) To exit AUX mode, select other auxiliary. ❏ First, make...
... other source (e.g. ed to the System. (See page 6.) 1 Set the volume level to its Instructions. 19 "AUX" appears on the display. 3 Start playing the external equipment. 4 Adjust the volume level to the level you want listen to. 5 Apply the following sound effects, if you wish. • ACTIVE BASS EX. (See page 8.) • SOUND TURBO (See page 8.) • Sound Mode (See page 8.) To exit AUX mode, select other auxiliary. ❏ First, make...

Instruction Manual
Page 23
... TIME = Clock setting display = Canceled = (back to the specified preset FM station. The System enter Music Source Selecting mode and "TUNER FM" appears on the display. TUNER FM: Tunes in Deck A. Setting the Daily Timer Once you have set is turned on or off , then press the SET button. The minute digits of the ON time blink on the display. 3 Setting the ON time (Example: 10:15). 1. eration differs. The current OFF time appears on the display. 2. CD - - -: Plays the...
... TIME = Clock setting display = Canceled = (back to the specified preset FM station. The System enter Music Source Selecting mode and "TUNER FM" appears on the display. TUNER FM: Tunes in Deck A. Setting the Daily Timer Once you have set is turned on or off , then press the SET button. The minute digits of the ON time blink on the display. 3 Setting the ON time (Example: 10:15). 1. eration differs. The current OFF time appears on the display. 2. CD - - -: Plays the...

Instruction Manual
Page 24
... preset station number, then press the SET button. The Timer indicator ( ) blinks and "DAILY" indicator lights during timer operation. • When the timer OFF-time comes, "OFF" blinks on the display. So, the Daily Timer will be repeated from the first track of a radio broadcast automatically whether or not you are lit on the display, showing that it will turn off the System. To activate the cancelled Daily Timer: 1 Press the CLOCK/TIMER button...
... preset station number, then press the SET button. The Timer indicator ( ) blinks and "DAILY" indicator lights during timer operation. • When the timer OFF-time comes, "OFF" blinks on the display. So, the Daily Timer will be repeated from the first track of a radio broadcast automatically whether or not you are lit on the display, showing that it will turn off the System. To activate the cancelled Daily Timer: 1 Press the CLOCK/TIMER button...

Instruction Manual
Page 25
.... The Timer indicator ( ) blinks during timer operation. CAUTION: • If the System is used, you want the System to record a source, the timer setting is turned on . To cancel the REC Timer temporarily: 1 Press the CLOCK/TIMER button on the Unit repeatedly until "ON TIME" immediately after "REC" appears on the display and the hour digits blink. 3 Setting the ON time you have set the REC Timer to turn off . 1. The Timer indicator ( ) lights and the...
.... The Timer indicator ( ) blinks during timer operation. CAUTION: • If the System is used, you want the System to record a source, the timer setting is turned on . To cancel the REC Timer temporarily: 1 Press the CLOCK/TIMER button on the Unit repeatedly until "ON TIME" immediately after "REC" appears on the display and the hour digits blink. 3 Setting the ON time you have set the REC Timer to turn off . 1. The Timer indicator ( ) lights and the...
Instruction Manual
Page 28
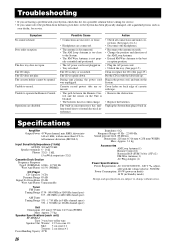
... Loop Antenna (1) Remote Control (1) Batteries R6P (SUM-3)/AA (15F) (2) FM Wire Antenna (1) AC Plug Adaptor (1) Power Specifications Power Requirements AC 110/127/220/230 - 240 V , adjustable with your dealer, for service. • If you are having a problem with the voltage selector, 50/60 Hz Power Consumption 100 W (power on mode) 16 W (in Standby mode) Design and specifications are subject to change without notice. erly extended and positioned. • The AC power cord...
... Loop Antenna (1) Remote Control (1) Batteries R6P (SUM-3)/AA (15F) (2) FM Wire Antenna (1) AC Plug Adaptor (1) Power Specifications Power Requirements AC 110/127/220/230 - 240 V , adjustable with your dealer, for service. • If you are having a problem with the voltage selector, 50/60 Hz Power Consumption 100 W (power on mode) 16 W (in Standby mode) Design and specifications are subject to change without notice. erly extended and positioned. • The AC power cord...


