Operation Manual
Page 2
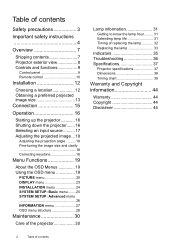
... 7 Projector exterior view 8 Controls and functions 9 Control panel 9 Remote control 10 Installation 12 Choosing a location 12 Obtaining a preferred projected image size 13 Connection 15 Operation 16 Starting up the projector 16 Shutting down the projector....... 16 Selecting an input source .......... 17 Adjusting the projected image ... 18 Adjusting the projection angle .........18 Fine-tuning the image size and clarity 18 Correcting keystone 18 Menu Functions 19 About the OSD Menus 19 Using the OSD menu 19 PICTURE menu 20 DISPLAY menu 23 INSTALLATION menu 24 SYSTEM SETUP...
... 7 Projector exterior view 8 Controls and functions 9 Control panel 9 Remote control 10 Installation 12 Choosing a location 12 Obtaining a preferred projected image size 13 Connection 15 Operation 16 Starting up the projector 16 Shutting down the projector....... 16 Selecting an input source .......... 17 Adjusting the projected image ... 18 Adjusting the projection angle .........18 Fine-tuning the image size and clarity 18 Correcting keystone 18 Menu Functions 19 About the OSD Menus 19 Using the OSD menu 19 PICTURE menu 20 DISPLAY menu 23 INSTALLATION menu 24 SYSTEM SETUP...
Operation Manual
Page 5
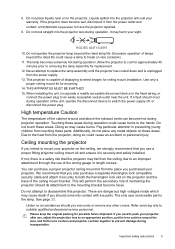
... the lens cushion and projector cushion together to pack your warranty. Touching these areas. This will void your projector after use of displaying inverted images for replacement. 12. Under no circumstances should occur during operation. Do not look straight into contact with live parts. Pay particular attention in the fixed wiring, or connect the power plug to removing the lamp assembly for ceiling mount installation. Allow the projector to...
... the lens cushion and projector cushion together to pack your warranty. Touching these areas. This will void your projector after use of displaying inverted images for replacement. 12. Under no circumstances should occur during operation. Do not look straight into contact with live parts. Pay particular attention in the fixed wiring, or connect the power plug to removing the lamp assembly for ceiling mount installation. Allow the projector to...

Operation Manual
Page 8
...size of the projected image. 8 6. Ceiling mount holes 22. Projection lens 5. Lens shift knob (Up/Down) 9 Adjusts the vertical position of the projected image. 11. HDMI 2 port 15. USB Type-A port Used for details.) 2. Lamp cover 5 3. Focus ring Adjusts the focus of the 10 projected image. 7. HDMI 1 port (HDCP 2.2) 14. Kensington lock slot 20. Control panel (See "Control panel" for charging external device. 18. 12VDC output terminal Used to connect these devices. 19. Front IR remote sensor 9. AC Power cable inlet 12. Mini USB port 22 21 Used...
...size of the projected image. 8 6. Ceiling mount holes 22. Projection lens 5. Lens shift knob (Up/Down) 9 Adjusts the vertical position of the projected image. 11. HDMI 2 port 15. USB Type-A port Used for details.) 2. Lamp cover 5 3. Focus ring Adjusts the focus of the 10 projected image. 7. HDMI 1 port (HDCP 2.2) 14. Kensington lock slot 20. Control panel (See "Control panel" for charging external device. 18. 12VDC output terminal Used to connect these devices. 19. Front IR remote sensor 9. AC Power cable inlet 12. Mini USB port 22 21 Used...

Operation Manual
Page 9
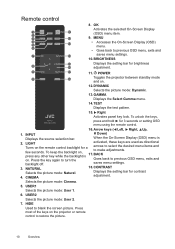
... lamp. POWER Toggles the projector between standby mode and on the projector or remote control to previous OSD menus, exits and saves any changes made using the remote control. 11. BACK Goes back to restore the picture. 5. HIDE Used to make adjustments. 6. Arrow keys ( , , , ) When the On-Screen Display (OSD) menu is under operation. 2. INPUT Displays the source selection bar. 10. LAMP indicator light Indicates the status of the keys on . 8. Activates panel key lock. Top IR remote sensor Overview 9 MENU...
... lamp. POWER Toggles the projector between standby mode and on the projector or remote control to previous OSD menus, exits and saves any changes made using the remote control. 11. BACK Goes back to restore the picture. 5. HIDE Used to make adjustments. 6. Arrow keys ( , , , ) When the On-Screen Display (OSD) menu is under operation. 2. INPUT Displays the source selection bar. 10. LAMP indicator light Indicates the status of the keys on . 8. Activates panel key lock. Top IR remote sensor Overview 9 MENU...
Operation Manual
Page 10
... standby mode 10 18 and on the projector or remote control to previous OSD menu, exits and 7 saves menu settings. 14 10. To unlock the keys, press and hold for a few seconds. When the On-Screen Display (OSD) menu is on , press any other key while the backlight is 2. CONTRAST Selects the picture mode: Natural. 4. USER2 Selects the picture mode: User 2. 7. INPUT Down) Displays the source selection bar. To keep...
... standby mode 10 18 and on the projector or remote control to previous OSD menu, exits and 7 saves menu settings. 14 10. To unlock the keys, press and hold for a few seconds. When the On-Screen Display (OSD) menu is on , press any other key while the backlight is 2. CONTRAST Selects the picture mode: Natural. 4. USER2 Selects the picture mode: User 2. 7. INPUT Down) Displays the source selection bar. To keep...
Operation Manual
Page 12
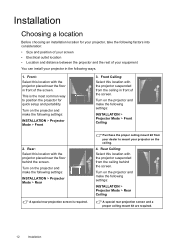
... in the following settings: INSTALLATION > Projector Mode > Rear A special rear projection screen is the most common way to mount your projector in front of your equipment You can install your projector on the ceiling. 4. Installation Choosing a location Before choosing an installation location for quick setup and portability. Turn on the projector and make the following ways. 1. Turn on the projector and make the following factors into consideration: • Size and position...
... in the following settings: INSTALLATION > Projector Mode > Rear A special rear projection screen is the most common way to mount your projector in front of your equipment You can install your projector on the ceiling. 4. Installation Choosing a location Before choosing an installation location for quick setup and portability. Turn on the projector and make the following ways. 1. Turn on the projector and make the following factors into consideration: • Size and position...
Operation Manual
Page 16
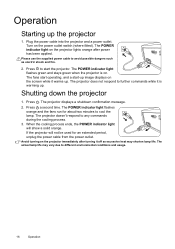
...POWER indicator light flashes green and stays green when the projector is warming up. The POWER indicator light flashes orange and the fans run for an extended period, unplug the power cable from the power outlet. The actual lamp life may shorten lamp life. The fans start operating, and a start the projector. Shutting down the projector 1. Turn on the projector lights orange after turning it warms up the projector 1. The projector doesn't respond to different environmental conditions and usage. 16 Operation Please use the supplied power cable to further commands...
...POWER indicator light flashes green and stays green when the projector is warming up. The POWER indicator light flashes orange and the fans run for an extended period, unplug the power cable from the power outlet. The actual lamp life may shorten lamp life. The fans start operating, and a start the projector. Shutting down the projector 1. Turn on the projector lights orange after turning it warms up the projector 1. The projector doesn't respond to different environmental conditions and usage. 16 Operation Please use the supplied power cable to further commands...
Operation Manual
Page 18
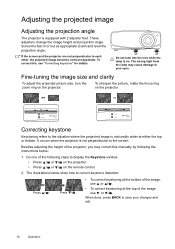
... cause damage to your changes and exit. 18 Operation Fine-tuning the image size and clarity To adjust the projected picture size, turn the zoom ring on the projector. It occurs when the projector is equipped with 2 adjuster feet. Do not look into the lens while the lamp is noticeably wider at the top of the image, use or / . The strong light from the lamp may correct this , see...
... cause damage to your changes and exit. 18 Operation Fine-tuning the image size and clarity To adjust the projected picture size, turn the zoom ring on the projector. It occurs when the projector is equipped with 2 adjuster feet. Do not look into the lens while the lamp is noticeably wider at the top of the image, use or / . The strong light from the lamp may correct this , see...
Operation Manual
Page 20
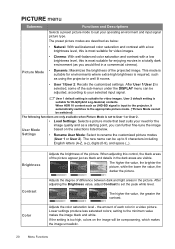
... the picture. 30 50 70 Adjusts the degree of the projected image. Lower settings produce less saturated colors; Settings • Rename User Mode: Select to the minimum value makes the image black and white. setting to rename the customized picture modes (User 1 or User 2). User 2 default setting is suitable for video images. When HDR 10 content such as UHD-BD signal is input to the projector, it automatically switches to the appropriate picture mode. (*Picture Mode cannot be switched) The...
... the picture. 30 50 70 Adjusts the degree of the projected image. Lower settings produce less saturated colors; Settings • Rename User Mode: Select to the minimum value makes the image black and white. setting to rename the customized picture modes (User 1 or User 2). User 2 default setting is suitable for video images. When HDR 10 content such as UHD-BD signal is input to the projector, it automatically switches to the appropriate picture mode. (*Picture Mode cannot be switched) The...
Operation Manual
Page 22
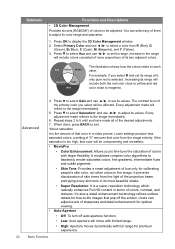
.... • High: Aperture moves dynamically with larger flexibility. Red Yellow Green Magenta Cyan Blue The illustration shows how the colors relate to each other colors in the image. Press to select Saturation* and use / to set its range. a setting of "0" removes that pop off auto aperture function. • Low: Auto aperture will be affected. Press to select Gain and use / to display the 3D Color Management window. 2. It...
.... • High: Aperture moves dynamically with larger flexibility. Red Yellow Green Magenta Cyan Blue The illustration shows how the colors relate to each other colors in the image. Press to select Saturation* and use / to set its range. a setting of "0" removes that pop off auto aperture function. • Low: Auto aperture will be affected. Press to select Gain and use / to display the 3D Color Management window. 2. It...

Operation Manual
Page 24
... the lamp time has been reset to "0". • Lamp Information Select to your needs for details. Test Pattern Is used to adjust the image size and focus and check that works according to learn the duration (in hours) of lamp usage which is selected, the light output will send a low to high electronic signal out when it is turned on . • On: The projector will be set to fixed mode. •...
... the lamp time has been reset to "0". • Lamp Information Select to your needs for details. Test Pattern Is used to adjust the image size and focus and check that works according to learn the duration (in hours) of lamp usage which is selected, the light output will send a low to high electronic signal out when it is turned on . • On: The projector will be set to fixed mode. •...
Operation Manual
Page 25
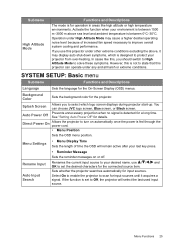
Auto Power Off Prevents unnecessary projection when no signal is detected for the connected source item. use this projector can choose JVC logo screen, Blue screen, or Black screen. Sets whether the projector searches automatically for input sources until it may cause a higher decibel operating noise level because of time the OSD will select the last used input source. Select On to enable the projector to improve overall system cooling and performance. In cases...
Auto Power Off Prevents unnecessary projection when no signal is detected for the connected source item. use this projector can choose JVC logo screen, Blue screen, or Black screen. Sets whether the projector searches automatically for input sources until it may cause a higher decibel operating noise level because of time the OSD will select the last used input source. Select On to enable the projector to improve overall system cooling and performance. In cases...
Operation Manual
Page 26
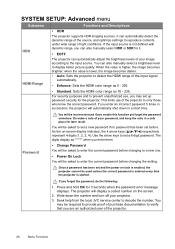
... HDMI range of light conditions. You may set before changing the setting. When the value is lower, the image becomes darker. • Auto: Sets the projector to enter the current password before . For security purposes and to provide proof of the projector. 26 Menu Functions The digits display as 16 - 235. Seek help from the local JVC service center to display better picture quality. If the input source is enabled, the projector...
... HDMI range of light conditions. You may set before changing the setting. When the value is lower, the image becomes darker. • Auto: Sets the projector to enter the current password before . For security purposes and to provide proof of the projector. 26 Menu Functions The digits display as 16 - 235. Seek help from the local JVC service center to display better picture quality. If the input source is enabled, the projector...
Operation Manual
Page 27
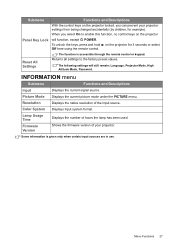
... Displays input system format. on the projector Panel Key Lock will still remain: Language, Projector Mode, High Altitude Mode, Password. The following settings will function, except POWER. Lamp Usage Time Firmware Version Displays the number of the input source. Resolution Displays the native resolution of hours the lamp has been used. To unlock the keys, press and hold Off here using the remote control. Shows the firmware version of your projector settings from being changed accidentally (by children, for 3 seconds or select Reset...
... Displays input system format. on the projector Panel Key Lock will still remain: Language, Projector Mode, High Altitude Mode, Password. The following settings will function, except POWER. Lamp Usage Time Firmware Version Displays the number of the input source. Resolution Displays the native resolution of hours the lamp has been used. To unlock the keys, press and hold Off here using the remote control. Shows the firmware version of your projector settings from being changed accidentally (by children, for 3 seconds or select Reset...
Operation Manual
Page 29
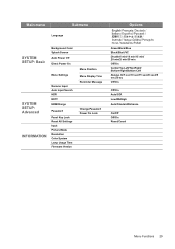
... Options Language SYSTEM SETUP: Basic Background Color Splash Screen Auto Power Off Direct Power On Menu Settings SYSTEM SETUP: Advanced INFORMATION Rename Input Auto Input Search HDR EOTF HDMI Range Password Panel Key Lock Reset All Settings Input Picture Mode Resolution Color System Lamp Usage Time Firmware Version Menu Position Menu Display Time Reminder Message Change Password Power On Lock Norsk Green/Black/Blue Black/Blue/JVC Disable/5 min/10 min/15 min/ 20 min/25 min/30 min Off/On Center/Top-Left/Top-Right/ Bottom-Right/Bottom...
... Options Language SYSTEM SETUP: Basic Background Color Splash Screen Auto Power Off Direct Power On Menu Settings SYSTEM SETUP: Advanced INFORMATION Rename Input Auto Input Search HDR EOTF HDMI Range Password Panel Key Lock Reset All Settings Input Picture Mode Resolution Color System Lamp Usage Time Firmware Version Menu Position Menu Display Time Reminder Message Change Password Power On Lock Norsk Green/Black/Blue Black/Blue/JVC Disable/5 min/10 min/15 min/ 20 min/25 min/30 min Off/On Center/Top-Left/Top-Right/ Bottom-Right/Bottom...
Operation Manual
Page 31
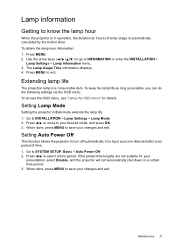
... OK. 3. Setting Lamp Mode Setting the projector in hours) of time. 1. When done, press MENU to INFORMATION or enter the INSTALLATION > Lamp Settings > Lamp Information menu. 3. The Lamp Usage Time information displays. 4. Lamp information Getting to turn off automatically if no input source is detected after a set period of lamp usage is a consumable item. Setting Auto Power Off This function allows the projector to know the lamp hour When the projector is in operation, the duration (in Eco mode extends the lamp life. 1.
... OK. 3. Setting Lamp Mode Setting the projector in hours) of time. 1. When done, press MENU to INFORMATION or enter the INSTALLATION > Lamp Settings > Lamp Information menu. 3. The Lamp Usage Time information displays. 4. Lamp information Getting to turn off automatically if no input source is detected after a set period of lamp usage is a consumable item. Setting Auto Power Off This function allows the projector to know the lamp hour When the projector is in operation, the duration (in Eco mode extends the lamp life. 1.
Operation Manual
Page 32
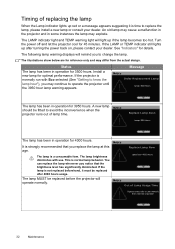
... with use. The LAMP indicator light and TEMP warning light will operate normally. The lamp MUST be replaced after turning the power back on, please contact your dealer. The following lamp warning displays will remind you replace the lamp at this age. Message Notice Order Replacement Lamp Lamp>3500 Hours The lamp has been in operation for 3950 hours. Notice Notice Replace Lamp Now Lamp hour>4000 Hours Out of Lamp Usage Time Replace lamp (refer to user manual) then reset the lamp timer 32 Maintenance If the projector is...
... with use. The LAMP indicator light and TEMP warning light will operate normally. The lamp MUST be replaced after turning the power back on, please contact your dealer. The following lamp warning displays will remind you replace the lamp at this age. Message Notice Order Replacement Lamp Lamp>3500 Hours The lamp has been in operation for 3950 hours. Notice Notice Replace Lamp Now Lamp hour>4000 Hours Out of Lamp Usage Time Replace lamp (refer to user manual) then reset the lamp timer 32 Maintenance If the projector is...
Operation Manual
Page 33
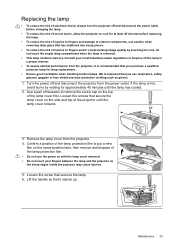
...; Do not turn the projector off and disconnect the projector from the projector. 4. Remove the lamp cover from the power outlet. Use a pair of tweezers to remove the screw cap on with the lamp cover removed. • Do not insert your local hazardous waste regulations to internal components, use caution when removing lamp glass that you purchase a qualified projector lamp for approximately 45 minutes until the lamp cover loosens. 3. Replacing the lamp •...
...; Do not turn the projector off and disconnect the projector from the projector. 4. Remove the lamp cover from the power outlet. Use a pair of tweezers to remove the screw cap on with the lamp cover removed. • Do not insert your local hazardous waste regulations to internal components, use caution when removing lamp glass that you purchase a qualified projector lamp for approximately 45 minutes until the lamp cover loosens. 3. Replacing the lamp •...
Operation Manual
Page 35
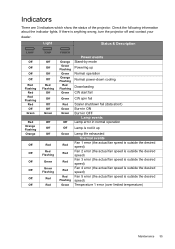
... indicator lights. Light Status & Description Off Off Off Off Red Flashing Red Red Flashing Red Off Green Red Orange Flashing Orange Off Off Off Off Off Off Off Off Off Off Red Flashing Off Off Off Off Green Off Off Off Red Red Flashing Green Green Flashing Red Red Orange Green Flashing Green Orange Flashing Red Flashing Green Power events Stand-by mode Powering up Normal operation Normal power-down cooling Downloading CW start fail Green CW spin fail Red Green Green Off Scaler shutdown fail (data abort) Burn-in ON Burn-in OFF Lamp events Lamp error in normal operation...
... indicator lights. Light Status & Description Off Off Off Off Red Flashing Red Red Flashing Red Off Green Red Orange Flashing Orange Off Off Off Off Off Off Off Off Off Off Red Flashing Off Off Off Off Green Off Off Off Red Red Flashing Green Green Flashing Red Red Orange Green Flashing Green Orange Flashing Red Flashing Green Power events Stand-by mode Powering up Normal operation Normal power-down cooling Downloading CW start fail Green CW spin fail Red Green Green Off Scaler shutdown fail (data abort) Burn-in ON Burn-in OFF Lamp events Lamp error in normal operation...
Operation Manual
Page 36
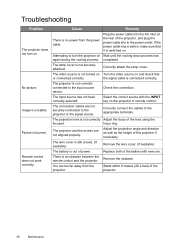
... on the projector or remote control. Check the connection. Remove the obstacle. Correctly attach the lamp cover. The connection cables are not securely connected to the appropriate terminals. Replace both of the battery with the INPUT key on the rear of power. Troubleshooting Problem The projector does not turn the projector on . The lens cover is still closed. (If available) Remove the lens cover. (If available) The battery is not turned on Turn the video source on . No picture.
... on the projector or remote control. Check the connection. Remove the obstacle. Correctly attach the lamp cover. The connection cables are not securely connected to the appropriate terminals. Replace both of the battery with the INPUT key on the rear of power. Troubleshooting Problem The projector does not turn the projector on . The lens cover is still closed. (If available) Remove the lens cover. (If available) The battery is not turned on Turn the video source on . No picture.


