
Operation Manual
Page 2
... menu 26 INFORMATION menu 27 OSD menu structure 28 Maintenance 30 Care of the projector 30 Lamp information 31 Getting to know the lamp hour......... 31 Extending lamp life 31 Timing of replacing the lamp 32 Replacing the lamp 33 Indicators 35 Troubleshooting 36 Specifications 37 Projector specifications 37 Dimensions 38 Timing chart 39 Warranty...
... menu 26 INFORMATION menu 27 OSD menu structure 28 Maintenance 30 Care of the projector 30 Lamp information 31 Getting to know the lamp hour......... 31 Extending lamp life 31 Timing of replacing the lamp 32 Replacing the lamp 33 Indicators 35 Troubleshooting 36 Specifications 37 Projector specifications 37 Dimensions 38 Timing chart 39 Warranty...

Operation Manual
Page 3
...and, if not installed and used in accordance with disposal laws. Safety precautions This product has a High Intensity Dis-charge (HID) lamp that may cause undesired operation. or call 1-800-2525722(For USA) or 1-800-964-2650(For Canada). This equipment generates, uses... or an experienced radio/TV technician for Class B digital devices, pursuant to comply with Part 15 of Conformity Model Number: LX-UH1B, LX-UH1W Trade Name: JVC Responsible party: JVCKENWOOD USA Corporation Address: 1700 Valley Road Wayne, N. If this device must accept any interference received, including ...
...and, if not installed and used in accordance with disposal laws. Safety precautions This product has a High Intensity Dis-charge (HID) lamp that may cause undesired operation. or call 1-800-2525722(For USA) or 1-800-964-2650(For Canada). This equipment generates, uses... or an experienced radio/TV technician for Class B digital devices, pursuant to comply with Part 15 of Conformity Model Number: LX-UH1B, LX-UH1W Trade Name: JVC Responsible party: JVCKENWOOD USA Corporation Address: 1700 Valley Road Wayne, N. If this device must accept any interference received, including ...
Operation Manual
Page 5
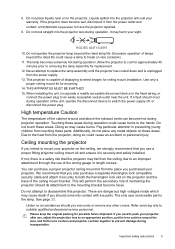
...outlet and contact to prevent damage during projector operation. 8. If the projector does become hot during transportation. Excessive operation of lamps beyond the rated lamp life. THIS APPARATUS MUST BE EARTHED. 15. Due to switch the power supply off, or disconnect the power plug. ... a proper fitting projector ceiling mount kit and ensure it securely to replace the lamp assembly until the projector has cooled down and is the lamp. Do not operate the projector lamp beyond the rated life could cause burns to suitably qualified professional service personnel. There...
...outlet and contact to prevent damage during projector operation. 8. If the projector does become hot during transportation. Excessive operation of lamps beyond the rated lamp life. THIS APPARATUS MUST BE EARTHED. 15. Due to switch the power supply off, or disconnect the power plug. ... a proper fitting projector ceiling mount kit and ensure it securely to replace the lamp assembly until the projector has cooled down and is the lamp. Do not operate the projector lamp beyond the rated life could cause burns to suitably qualified professional service personnel. There...
Operation Manual
Page 6
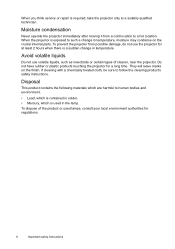
...sure to follow the cleaning product's safety instructions. Avoid volatile liquids Do not use the projector for at least 2 hours when there is used lamps, consult your local environment authorities for a long time. Do not have rubber or plastic products touching the projector for regulations. 6 Important safety ...after moving it from possible damage, do not use volatile liquids, such as insecticide or certain types of the product or used in the lamp. To prevent the projector from a cold location to a hot location. They will leave marks on the crucial internal parts. When you ...
...sure to follow the cleaning product's safety instructions. Avoid volatile liquids Do not use the projector for at least 2 hours when there is used lamps, consult your local environment authorities for a long time. Do not have rubber or plastic products touching the projector for regulations. 6 Important safety ...after moving it from possible damage, do not use volatile liquids, such as insecticide or certain types of the product or used in the lamp. To prevent the projector from a cold location to a hot location. They will leave marks on the crucial internal parts. When you ...

Operation Manual
Page 8
...-232 control port 17. Vent (heated air exhaust) 6 4. Lens shift knob (Left/Right) 7 Adjusts the horizontal position of the projected image. 11. Adjuster feet 21. Lamp cover 5 3. Vent (cool air intake) 8. Projector exterior view Front and upper side view 1 2 3 4 Rear/bottom view 11 12 13 14 15 16 17 20 21...
...-232 control port 17. Vent (heated air exhaust) 6 4. Lens shift knob (Left/Right) 7 Adjusts the horizontal position of the projected image. 11. Adjuster feet 21. Lamp cover 5 3. Vent (cool air intake) 8. Projector exterior view Front and upper side view 1 2 3 4 Rear/bottom view 11 12 13 14 15 16 17 20 21...

Operation Manual
Page 9
... panel key lock. HIDE Used to previous OSD menu, exits and saves menu settings. 7. LAMP indicator light Indicates the status of the keys on . 8. Press most of the lamp. TEMPerature warning light Lights up or flashes when the lamp has developed a problem. 4. BACK Goes back to manually correct distorted images resulting from an...
... panel key lock. HIDE Used to previous OSD menu, exits and saves menu settings. 7. LAMP indicator light Indicates the status of the keys on . 8. Press most of the lamp. TEMPerature warning light Lights up or flashes when the lamp has developed a problem. 4. BACK Goes back to manually correct distorted images resulting from an...
Operation Manual
Page 16
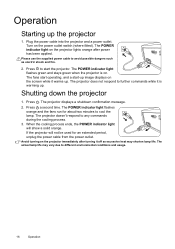
... indicator light flashes orange and the fans run for an extended period, unplug the power cable from the power outlet. Press . Press to cool the lamp. The actual lamp life may shorten lamp life. The POWER indicator light on the projector immediately after power has been applied.
... indicator light flashes orange and the fans run for an extended period, unplug the power cable from the power outlet. Press . Press to cool the lamp. The actual lamp life may shorten lamp life. The POWER indicator light on the projector immediately after power has been applied.
Operation Manual
Page 18
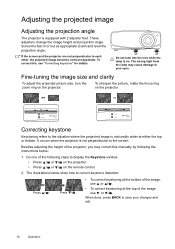
... / on the projector. • Press / or / on . The illustrations below : 1. To correct this manually by following steps to the screen. The strong light from the lamp may correct this , see "Correcting keystone" for details. It occurs when the projector is on the remote control. 2. These adjusters change the image height and...
... / on the projector. • Press / or / on . The illustrations below : 1. To correct this manually by following steps to the screen. The strong light from the lamp may correct this , see "Correcting keystone" for details. It occurs when the projector is on the remote control. 2. These adjusters change the image height and...

Operation Manual
Page 24
...12V trigger that the projected image is free from the following modes. • Normal: Provides full lamp brightness. • Eco: Reduces system noise and lamp power consumption by the built-in darker projected pictures. Test Pattern Is used to adjust the image ... this is selected, the projector will not send electronic signal out when it is automatically calculated by 30%. Lamp Settings 12V Trigger • Lamp Mode Select the projector lamp power from distortion. INSTALLATION menu Submenu Functions and Descriptions Projector Mode See "Choosing a location" for details. ...
...12V trigger that the projected image is free from the following modes. • Normal: Provides full lamp brightness. • Eco: Reduces system noise and lamp power consumption by the built-in darker projected pictures. Test Pattern Is used to adjust the image ... this is selected, the projector will not send electronic signal out when it is automatically calculated by 30%. Lamp Settings 12V Trigger • Lamp Mode Select the projector lamp power from distortion. INSTALLATION menu Submenu Functions and Descriptions Projector Mode See "Choosing a location" for details. ...
Operation Manual
Page 27
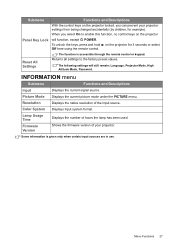
... for example). Picture Mode Displays the current picture mode under the PICTURE menu. Resolution Displays the native resolution of hours the lamp has been used. Shows the firmware version of your projector settings from being changed accidentally (by children, for 3 seconds or... sources are in use. Some information is accessible through the remote control or keypad. When you can prevent your projector. Lamp Usage Time Firmware Version Displays the number of the input source. INFORMATION menu Submenu Functions and Descriptions Input Displays the current ...
... for example). Picture Mode Displays the current picture mode under the PICTURE menu. Resolution Displays the native resolution of hours the lamp has been used. Shows the firmware version of your projector settings from being changed accidentally (by children, for 3 seconds or... sources are in use. Some information is accessible through the remote control or keypad. When you can prevent your projector. Lamp Usage Time Firmware Version Displays the number of the input source. INFORMATION menu Submenu Functions and Descriptions Input Displays the current ...
Operation Manual
Page 28
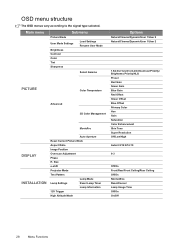
Size e-shift Projector Mode Test Pattern Lamp Mode Lamp Settings Reset Lamp Timer Lamp Information 12V Trigger High Altitude Mode Options Natural/Cinema/Dynamic/User 1/User 2 Natural/Cinema/Dynamic/User 1/User 2 1.8/2.0/2.1/2.2/2.3/2.4/2.6/Contrast Priority/ Brightness Priority/HLG Preset ...Tone Super Resolution Off/Low/High Auto/4:3/16:9/16:10 0-3 Off/On Front/Rear/Front Ceiling/Rear Ceiling Off/On Normal/Eco Reset/Cancel Lamp Usage Time Off/On On/Off 28 Menu Functions Main menu Submenu Picture Mode User Mode Settings Load Settings Rename User Mode Brightness Contrast Color...
Size e-shift Projector Mode Test Pattern Lamp Mode Lamp Settings Reset Lamp Timer Lamp Information 12V Trigger High Altitude Mode Options Natural/Cinema/Dynamic/User 1/User 2 Natural/Cinema/Dynamic/User 1/User 2 1.8/2.0/2.1/2.2/2.3/2.4/2.6/Contrast Priority/ Brightness Priority/HLG Preset ...Tone Super Resolution Off/Low/High Auto/4:3/16:9/16:10 0-3 Off/On Front/Rear/Front Ceiling/Rear Ceiling Off/On Normal/Eco Reset/Cancel Lamp Usage Time Off/On On/Off 28 Menu Functions Main menu Submenu Picture Mode User Mode Settings Load Settings Rename User Mode Brightness Contrast Color...
Operation Manual
Page 29
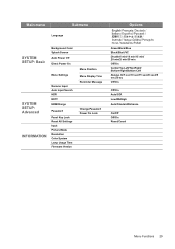
... SETUP: Advanced INFORMATION Rename Input Auto Input Search HDR EOTF HDMI Range Password Panel Key Lock Reset All Settings Input Picture Mode Resolution Color System Lamp Usage Time Firmware Version Menu Position Menu Display Time Reminder Message Change Password Power On Lock Norsk Green/Black/Blue Black/Blue.../JVC Disable/5 min/10 min/15 min/ 20 min/25 min/30 min Off/On Center/Top-Left/Top-Right/ Bottom-Right/Bottom-Left Always On/5 ...
... SETUP: Advanced INFORMATION Rename Input Auto Input Search HDR EOTF HDMI Range Password Panel Key Lock Reset All Settings Input Picture Mode Resolution Color System Lamp Usage Time Firmware Version Menu Position Menu Display Time Reminder Message Change Password Power On Lock Norsk Green/Black/Blue Black/Blue.../JVC Disable/5 min/10 min/15 min/ 20 min/25 min/30 min Off/On Center/Top-Left/Top-Right/ Bottom-Right/Bottom-Left Always On/5 ...
Operation Manual
Page 31
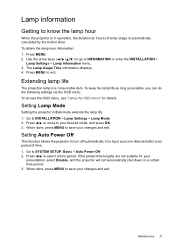
.../ / ) to go to select a time period. Press / to INFORMATION or enter the INSTALLATION > Lamp Settings > Lamp Information menu. 3. Press MENU. 2. Extending lamp life The projection lamp is detected after a set period of lamp usage is automatically calculated by the built-in timer. Go to SYSTEM SETUP: Basic > Auto Power Off.... Press MENU to your presentation, select Disable, and the projector will not automatically shut down in Eco mode extends the lamp life. 1. To keep the lamp life as long as possible, you can do the following settings via the OSD menu. Press / to move to ...
.../ / ) to go to select a time period. Press / to INFORMATION or enter the INSTALLATION > Lamp Settings > Lamp Information menu. 3. Press MENU. 2. Extending lamp life The projection lamp is detected after a set period of lamp usage is automatically calculated by the built-in timer. Go to SYSTEM SETUP: Basic > Auto Power Off.... Press MENU to your presentation, select Disable, and the projector will not automatically shut down in Eco mode extends the lamp life. 1. To keep the lamp life as long as possible, you can do the following settings via the OSD menu. Press / to move to ...
Operation Manual
Page 32
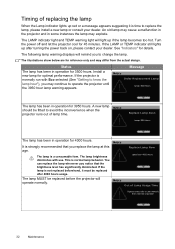
... up after 4000 hours usage. Install a new lamp for details. A new lamp should be replaced after turning the power back on, please contact your dealer. If the lamp is normal lamp behavior. Replace Lamp Soon Lamp>3950 Hours The lamp has been in operation for 45 minutes. The ...the 3950 hour lamp warning appears. It is a consumable item. Notice Notice Replace Lamp Now Lamp hour>4000 Hours Out of Lamp Usage Time Replace lamp (refer to change the lamp. Status The lamp has been in some instances the lamp may explode. Timing of replacing the lamp When the Lamp indicator lights ...
... up after 4000 hours usage. Install a new lamp for details. A new lamp should be replaced after turning the power back on, please contact your dealer. If the lamp is normal lamp behavior. Replace Lamp Soon Lamp>3950 Hours The lamp has been in operation for 45 minutes. The ...the 3950 hour lamp warning appears. It is a consumable item. Notice Notice Replace Lamp Now Lamp hour>4000 Hours Out of Lamp Usage Time Replace lamp (refer to change the lamp. Status The lamp has been in some instances the lamp may explode. Timing of replacing the lamp When the Lamp indicator lights ...
Operation Manual
Page 33
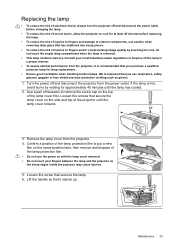
... hot, avoid burns by touching the lens, do not touch the empty lamp compartment when the lamp is recommended that you use caution when removing lamp glass that secure the lamp cover on the side and top of the lamp cover first. Use a pair of tweezers to remove the screw cap on the top of...; To reduce the risk of severe burns, allow the projector to cool for at least 45 minutes before replacing the lamp. • To reduce the risk of injuries to internal components, use respirators, safety glasses, goggles or face shield and wear protective clothing such as the ...
... hot, avoid burns by touching the lens, do not touch the empty lamp compartment when the lamp is recommended that you use caution when removing lamp glass that secure the lamp cover on the side and top of the lamp cover first. Use a pair of tweezers to remove the screw cap on the top of...; To reduce the risk of severe burns, allow the projector to cool for at least 45 minutes before replacing the lamp. • To reduce the risk of injuries to internal components, use respirators, safety glasses, goggles or face shield and wear protective clothing such as the ...
Operation Manual
Page 34
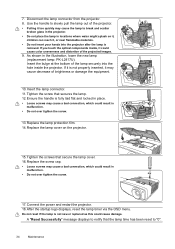
...8 • Pulling it too quickly may cause a bad connection, which could cause damage. Tighten the screw that secure the lamp cover. 16. Tighten the screws that secures the lamp. 12. Connect the power and restart the projector. 18. 7. As shown in locations where water might splash on the projector...the hole inside , it is fully laid flat and locked in place. • Loose screws may cause decrease of the lamp securely into the projector after the lamp is not new or replaced as this could result in malfunction. • Do not over tighten the screw. 13. ...
...8 • Pulling it too quickly may cause a bad connection, which could cause damage. Tighten the screw that secure the lamp cover. 16. Tighten the screws that secures the lamp. 12. Connect the power and restart the projector. 18. 7. As shown in locations where water might splash on the projector...the hole inside , it is fully laid flat and locked in place. • Loose screws may cause decrease of the lamp securely into the projector after the lamp is not new or replaced as this could result in malfunction. • Do not over tighten the screw. 13. ...
Operation Manual
Page 35
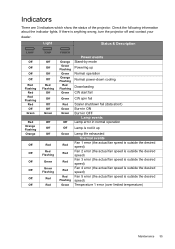
... fail Red Green Green Off Scaler shutdown fail (data abort) Burn-in ON Burn-in OFF Lamp events Lamp error in normal operation Off Lamp is not lit up Green Red Red Red Red Red Flashing Green Lamp life exhausted Thermal events Fan 1 error (the actual fan speed is outside the desired speed) Fan...
... fail Red Green Green Off Scaler shutdown fail (data abort) Burn-in ON Burn-in OFF Lamp events Lamp error in normal operation Off Lamp is not lit up Green Red Red Red Red Red Flashing Green Lamp life exhausted Thermal events Fan 1 error (the actual fan speed is outside the desired speed) Fan...
Operation Manual
Page 36
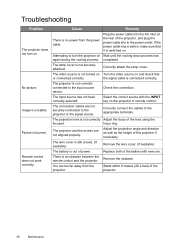
Attempting to turn on. The lamp cover is blurred. Select the correct source with new one. The projection lens is out of the lens using the focused. The lens cover is ... check that it is not correctly connected to the power outlet. Correctly connect the cables to the projector or the signal source. Correctly attach the lamp cover. No picture. Cause Remedy There is connected correctly. Remove the obstacle. The input source has not been correctly selected. The connection cables are not...
Attempting to turn on. The lamp cover is blurred. Select the correct source with new one. The projection lens is out of the lens using the focused. The lens cover is ... check that it is not correctly connected to the power outlet. Correctly connect the cables to the projector or the signal source. Correctly attach the lamp cover. No picture. Cause Remedy There is connected correctly. Remove the obstacle. The input source has not been correctly selected. The connection cables are not...
Operation Manual
Page 37
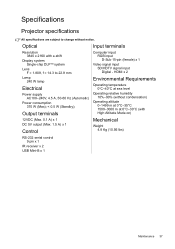
...;C (with e-shift Display system Single-chip DLPTM system Lens F = 1.809, f = 14.3 to change without notice. Specifications Projector specifications All specifications are subject to 22.9 mm Lamp 240 W lamp Electrical Power supply AC100-240V, 4.5 A, 50-60 Hz (Automatic) Power consumption 370 W (Max); < 0.5 W (Standby); Output terminals 12VDC (Max. 0.1 A) x 1 DC 5V output (Max. 1.5 A) x 1 Control Computer...
...;C (with e-shift Display system Single-chip DLPTM system Lens F = 1.809, f = 14.3 to change without notice. Specifications Projector specifications All specifications are subject to 22.9 mm Lamp 240 W lamp Electrical Power supply AC100-240V, 4.5 A, 50-60 Hz (Automatic) Power consumption 370 W (Max); < 0.5 W (Standby); Output terminals 12VDC (Max. 0.1 A) x 1 DC 5V output (Max. 1.5 A) x 1 Control Computer...

