
Instructions
Page 2
... power source specified on the unit. 2. Changes or modifications not approved by JVC could void the warranty. * When you don't use this TV set for your local authorities, or the Electronic Industries Alliance: http://www.eiae.org 2 No user serviceable parts inside. Operate only from the AC outlet and antenna for a long period of time, be fully inserted to repair it yourself or remove the rear...
... power source specified on the unit. 2. Changes or modifications not approved by JVC could void the warranty. * When you don't use this TV set for your local authorities, or the Electronic Industries Alliance: http://www.eiae.org 2 No user serviceable parts inside. Operate only from the AC outlet and antenna for a long period of time, be fully inserted to repair it yourself or remove the rear...
Instructions
Page 7
... Using the Guide 32 Onscreen Menu System 33 Initial Setup 35 Auto Tuner Setup 35 Channel Summary 36 V-Chip 38 Set Lock Code 44 Auto Demo 45 Illumination 45 Language 45 Closed Caption 46 Auto Shut Off 48 XDS ID 48 Noise Muting 49 Front Panel Lock 49 V1 Smart Input 50 Video Input Label 50 Position Adjustment 51 Power Indicator 51 Video-1 Monitor Out 51 Digital-In 52 Digital-In Audio 52 Picture Adjust 53 Picture Settings 53 Adjust Picture Settings 53 Color Temperature 53 Digital...
... Using the Guide 32 Onscreen Menu System 33 Initial Setup 35 Auto Tuner Setup 35 Channel Summary 36 V-Chip 38 Set Lock Code 44 Auto Demo 45 Illumination 45 Language 45 Closed Caption 46 Auto Shut Off 48 XDS ID 48 Noise Muting 49 Front Panel Lock 49 V1 Smart Input 50 Video Input Label 50 Position Adjustment 51 Power Indicator 51 Video-1 Monitor Out 51 Digital-In 52 Digital-In Audio 52 Picture Adjust 53 Picture Settings 53 Adjust Picture Settings 53 Color Temperature 53 Digital...
Instructions
Page 9
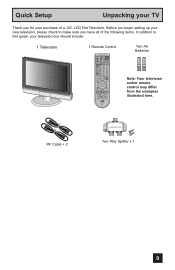
... you begin setting up your new television, please check to make sure you for your purchase of the following items. In addition to this guide, your TV Thank you have all of a JVC LCD Flat Television. Quick Setup Unpacking your television box should include: 1 Television 1 Remote Control TV CATV VCR DVD POWER ASPECT MULTI SCREEN TWIN INDEX SELECT SLEEP FREEZE SWAP ML/MTS DISPLAY + INPUT 123 D/A 4 5 6 i.LINK MENU 7 TIMER TUNE THEATER FAVORITE...
... you begin setting up your new television, please check to make sure you for your purchase of the following items. In addition to this guide, your TV Thank you have all of a JVC LCD Flat Television. Quick Setup Unpacking your television box should include: 1 Television 1 Remote Control TV CATV VCR DVD POWER ASPECT MULTI SCREEN TWIN INDEX SELECT SLEEP FREEZE SWAP ML/MTS DISPLAY + INPUT 123 D/A 4 5 6 i.LINK MENU 7 TIMER TUNE THEATER FAVORITE...
Instructions
Page 10
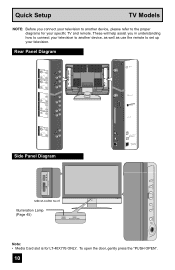
... Digital Audio xD-Picture Card MEMORY STICK PUSH-OPEN SD/ MMC Close door when using media cards. Quick Setup TV Models NOTE: Before you in understanding how to connect your television to another device, please refer to set up your specific TV and remote. L VIDEO R - L Y Pr Pb R - To open the door, gently press the "PUSH OPEN". 10 L S-VIDEO VIDEO OVER R - L L S-VIDEO VIDEO R - Rear Panel Diagram INPUT 1 INPUT 2 INPUT 3 S-VIDEO VIDEO OVER R - AUDIO - AUDIO - POWER PROGRAM/TIMER MEDIA CARD SLOT Illumination Lamp (Page 45) POWER PROGRAM/TIMER POWER...
... Digital Audio xD-Picture Card MEMORY STICK PUSH-OPEN SD/ MMC Close door when using media cards. Quick Setup TV Models NOTE: Before you in understanding how to connect your television to another device, please refer to set up your specific TV and remote. L VIDEO R - L Y Pr Pb R - To open the door, gently press the "PUSH OPEN". 10 L S-VIDEO VIDEO OVER R - L L S-VIDEO VIDEO R - Rear Panel Diagram INPUT 1 INPUT 2 INPUT 3 S-VIDEO VIDEO OVER R - AUDIO - AUDIO - POWER PROGRAM/TIMER MEDIA CARD SLOT Illumination Lamp (Page 45) POWER PROGRAM/TIMER POWER...

Instructions
Page 11
... VCR DVD POWER TV VCR REW PLAY FF REC STOP PAUSE OPEN CLOSE STILL PAUSE RM-C14G RM-C14G Notes: • For information on remote control buttons, see pages 59 - 69 and 73 - 78. • i.LINK MENU, TIMER, SUB CHANNEL, FAVORITE and GUIDE buttons are for digital channels. Quick Setup TV Remote Control TV CATV VCR DVD POWER ASPECT MULTI SCREEN TWIN INDEX SELECT SLEEP FREEZE SWAP ML/MTS DISPLAY + INPUT 123 D/A 4 5 6 i.LINK MENU 7 TIMER TUNE...
... VCR DVD POWER TV VCR REW PLAY FF REC STOP PAUSE OPEN CLOSE STILL PAUSE RM-C14G RM-C14G Notes: • For information on remote control buttons, see pages 59 - 69 and 73 - 78. • i.LINK MENU, TIMER, SUB CHANNEL, FAVORITE and GUIDE buttons are for digital channels. Quick Setup TV Remote Control TV CATV VCR DVD POWER ASPECT MULTI SCREEN TWIN INDEX SELECT SLEEP FREEZE SWAP ML/MTS DISPLAY + INPUT 123 D/A 4 5 6 i.LINK MENU 7 TIMER TUNE...

Instructions
Page 14
... CH MENU VCR CHANNEL BACK VCR DVD Basic Operation Turn the television on programming your VCR, DVD, and/or cable box/satellite receiver may have to install the batteries (included). The top and bottom buttons will turn the volume up or down towards the bottom of the television. The Remote Control Before you take longer than three minutes, the remote control codes for basic operation of the remote control. If you can be reset. Slide...
... CH MENU VCR CHANNEL BACK VCR DVD Basic Operation Turn the television on programming your VCR, DVD, and/or cable box/satellite receiver may have to install the batteries (included). The top and bottom buttons will turn the volume up or down towards the bottom of the television. The Remote Control Before you take longer than three minutes, the remote control codes for basic operation of the remote control. If you can be reset. Slide...
Instructions
Page 16
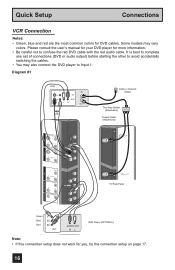
... red DVD cable with the red audio cable. L (7V5HΩF/UHF) INPUT 2 INPUT 3 DIGITAL IN AUDIO INPUT 1 COMPONENT VIDEO R - L Y Pr Pb R - Some models may also connect the DVD player to avoid accidentally switching the cables. • You may vary colors. AUDIO - AUDIO - Please consult the user's manual for your DVD player for you, try the connection setup on page 17. 16 AUDIO - Quick Setup Connections VCR Connection Notes: • Green, blue and red are the most common colors for DVD cables. It is best to complete one set of connections (DVD or audio output...
... red DVD cable with the red audio cable. L (7V5HΩF/UHF) INPUT 2 INPUT 3 DIGITAL IN AUDIO INPUT 1 COMPONENT VIDEO R - L Y Pr Pb R - Some models may also connect the DVD player to avoid accidentally switching the cables. • You may vary colors. AUDIO - AUDIO - Please consult the user's manual for your DVD player for you, try the connection setup on page 17. 16 AUDIO - Quick Setup Connections VCR Connection Notes: • Green, blue and red are the most common colors for DVD cables. It is best to complete one set of connections (DVD or audio output...

Instructions
Page 19
... are not viewing images coming from the component video input. 19 See page 51. • If you are receiving ATSC/Digital Cable signal, it can be outputted to the S-Video output terminal or Video (composite video) terminal. • If you are receiving Analog TV signal, it can not be outputted through the Monitor/Recording output terminal when you make this connection, set the Video-1 Monitor Out menu to ON. Quick Setup Connections Connecting to the RIGHT AUDIO INPUT on the...
... are not viewing images coming from the component video input. 19 See page 51. • If you are receiving ATSC/Digital Cable signal, it can be outputted to the S-Video output terminal or Video (composite video) terminal. • If you are receiving Analog TV signal, it can not be outputted through the Monitor/Recording output terminal when you make this connection, set the Video-1 Monitor Out menu to ON. Quick Setup Connections Connecting to the RIGHT AUDIO INPUT on the...
Instructions
Page 20
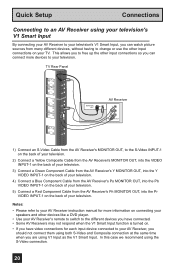
... television. L S-VIDEO VIDEO OVER R - Quick Setup Connections Connecting to an AV Receiver using your television's V1 Smart Input By connecting your AV Receiver to your television's V1 Smart Input, you are using V1 Input as the V1 Smart Input. This allows you to free up the other input connections on the back of your television. 5) Connect a Red Component Cable from many different devices, without having to change or use the other input connections so you can connect more information on connecting your speakers...
... television. L S-VIDEO VIDEO OVER R - Quick Setup Connections Connecting to an AV Receiver using your television's V1 Smart Input By connecting your AV Receiver to your television's V1 Smart Input, you are using V1 Input as the V1 Smart Input. This allows you to free up the other input connections on the back of your television. 5) Connect a Red Component Cable from many different devices, without having to change or use the other input connections so you can connect more information on connecting your speakers...
Instructions
Page 22
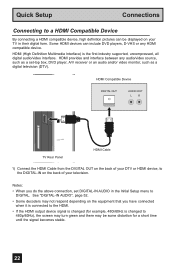
... TV Rear Panel HDMI Cable 1) Connect the HDMI Cable from the DIGITAL OUT on the back of your DTV or HDMI device, to the HDMI. • If the HDMI output device signal is changed to 480p/60Hz), the screen may turn green and there may be displayed on the back of your TV in the Initial Setup menu to DIGITAL. Quick Setup Connections Connecting to a HDMI Compatible Device By connecting a HDMI compatible device, high definition pictures can include DVD players, D-VHS or any audio/video source...
... TV Rear Panel HDMI Cable 1) Connect the HDMI Cable from the DIGITAL OUT on the back of your DTV or HDMI device, to the HDMI. • If the HDMI output device signal is changed to 480p/60Hz), the screen may turn green and there may be displayed on the back of your TV in the Initial Setup menu to DIGITAL. Quick Setup Connections Connecting to a HDMI Compatible Device By connecting a HDMI compatible device, high definition pictures can include DVD players, D-VHS or any audio/video source...
Instructions
Page 24
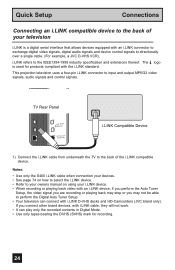
... used for recording. 24 TV Rear Panel i.LINK IN/OUT S400(TS) OPTICAL OUT Digital Audio i.LINK Compatible Device 1) Connect the i.LINK cable from underneath the TV to input and output MPEG2 video signals, audio signals and control signals. The logo is a digital serial interface that allows devices equipped with i.LINK cable, they will not work. • It can connect with the i.LINK standard. i.LINK refers to perform the Digital Auto Tuner Setup. • Your television can play...
... used for recording. 24 TV Rear Panel i.LINK IN/OUT S400(TS) OPTICAL OUT Digital Audio i.LINK Compatible Device 1) Connect the i.LINK cable from underneath the TV to input and output MPEG2 video signals, audio signals and control signals. The logo is a digital serial interface that allows devices equipped with i.LINK cable, they will not work. • It can connect with the i.LINK standard. i.LINK refers to perform the Digital Auto Tuner Setup. • Your television can play...

Instructions
Page 26
... must set the clock before operating any timer functions. The clock will move to D.S.T. (Daylight Savings Time) To turn D.S.T. If you choose AUTO, see auto clock set below. ON or OFF To START CLOCK Note: • You will have to reset the clock after a power interruption. To set the clock using the XDS signal), choose MANUAL. ON or OFF To NEXT (To Auto Tuner Setup) SELECT OPERATE MENU EXIT...
... must set the clock before operating any timer functions. The clock will move to D.S.T. (Daylight Savings Time) To turn D.S.T. If you choose AUTO, see auto clock set below. ON or OFF To START CLOCK Note: • You will have to reset the clock after a power interruption. To set the clock using the XDS signal), choose MANUAL. ON or OFF To NEXT (To Auto Tuner Setup) SELECT OPERATE MENU EXIT...

Instructions
Page 34
... SETUP PREVIOUS AUTO TUNER SETUP CHANNEL SUMMARY V-CHIP SET LOCK CODE AUTO DEMO OFF NEXT PAGE SELECT OPERATE (4/5) MENU EXIT INITIAL SETUP 04 CLOCK / TIMERS PREVIOUS SET CLOCK ON / OFF TIMER NEXT PAGE SELECT OPERATE MENU EXIT CLOCK/TIMERS INITIAL SETUP PREVIOUS VIDEO-1 MONITOR OUT DIGITAL-IN DIGITAL-IN AUDIO OFF SIZE1 DIGITAL NEXT PAGE SELECT OPERATE (1/5) MENU EXIT INITIAL SETUP 01 INITIAL SETUP PREVIOUS DIGITAL SETUP MEDIA CARD VIEWER SOUND ADJUST PREVIOUS BASS 00 TREBLE 00 BALANCE 00 NEXT PAGE SELECT OPERATE (5/5) MENU EXIT INITIAL SETUP 05 RESET...
... SETUP PREVIOUS AUTO TUNER SETUP CHANNEL SUMMARY V-CHIP SET LOCK CODE AUTO DEMO OFF NEXT PAGE SELECT OPERATE (4/5) MENU EXIT INITIAL SETUP 04 CLOCK / TIMERS PREVIOUS SET CLOCK ON / OFF TIMER NEXT PAGE SELECT OPERATE MENU EXIT CLOCK/TIMERS INITIAL SETUP PREVIOUS VIDEO-1 MONITOR OUT DIGITAL-IN DIGITAL-IN AUDIO OFF SIZE1 DIGITAL NEXT PAGE SELECT OPERATE (1/5) MENU EXIT INITIAL SETUP 01 INITIAL SETUP PREVIOUS DIGITAL SETUP MEDIA CARD VIEWER SOUND ADJUST PREVIOUS BASS 00 TREBLE 00 BALANCE 00 NEXT PAGE SELECT OPERATE (5/5) MENU EXIT INITIAL SETUP 05 RESET...

Instructions
Page 37
... Initial Setup How to set the channel label. (This is only for analog broadcasting.) π† √® π† √® π† Press the MENU button To CHANNEL SUMMARY To operate To the ID column Press the OK button to...RESET Press the OK button to finish Your characters are now reset Notes: • You can block access to a channel by activating the channel lock. You can use characters for: Alphabet, numbers, marks and spaces. • It is possible to set the maximum of 40 channel labels. • If you try to lock or unlock that channel Press the MENU button...
... Initial Setup How to set the channel label. (This is only for analog broadcasting.) π† √® π† √® π† Press the MENU button To CHANNEL SUMMARY To operate To the ID column Press the OK button to...RESET Press the OK button to finish Your characters are now reset Notes: • You can block access to a channel by activating the channel lock. You can use characters for: Alphabet, numbers, marks and spaces. • It is possible to set the maximum of 40 channel labels. • If you try to lock or unlock that channel Press the MENU button...

Instructions
Page 46
... Closed Caption Preview Closed Caption Sample Type AUTO Service 1 Appearance Cancel Select Set BACK Operate Back MENU Exit Digital Closed Caption > Appearance Preview Closed Caption Sample Appearance Mode Font Colors Opacities Cancel Select Operate Auto Set BACK Back MENU Exit Press the OK button to cancel the settings, select cancel. 46 Your television can perform Analog Setting of closed caption a priority for digital channels over analog channels. When you are set automatically. Initial Setup Closed Caption Many broadcasts now include an onscreen display...
... Closed Caption Preview Closed Caption Sample Type AUTO Service 1 Appearance Cancel Select Set BACK Operate Back MENU Exit Digital Closed Caption > Appearance Preview Closed Caption Sample Appearance Mode Font Colors Opacities Cancel Select Operate Auto Set BACK Back MENU Exit Press the OK button to cancel the settings, select cancel. 46 Your television can perform Analog Setting of closed caption a priority for digital channels over analog channels. When you are set automatically. Initial Setup Closed Caption Many broadcasts now include an onscreen display...

Instructions
Page 47
... Closed Caption > Appearance Preview Closed Caption Sample Appearance ModeFont Size ManualStandard Font Font Style Auto Colors Opacities Cancel Set Cancel Set Select BACK Operate Back MENU Exit Digital Closed Caption > Appearance Preview Closed Caption Sample Appearance ModeText Manual White Font Edge White Colors Background Black Opacities Cancel Set Cancel Set Select BACK Operate Back MENU Exit All fonts used for future use. • Closed captioning may not work correctly if the signal being received is usually found on text channel T1. button...
... Closed Caption > Appearance Preview Closed Caption Sample Appearance ModeFont Size ManualStandard Font Font Style Auto Colors Opacities Cancel Set Cancel Set Select BACK Operate Back MENU Exit Digital Closed Caption > Appearance Preview Closed Caption Sample Appearance ModeText Manual White Font Edge White Colors Background Black Opacities Cancel Set Cancel Set Select BACK Operate Back MENU Exit All fonts used for future use. • Closed captioning may not work correctly if the signal being received is usually found on text channel T1. button...

Instructions
Page 63
... button gives you are playing video games connected to video when viewing in a dimly lit room. Dynamic - Gives a vivid picture with better contrast when viewing in the following cases: • Turning on film (such as motion pictures) or animation. Theater - Choose VIDEO STATUS by pressing MENU† on the side panel and choose a mode by using the CHANNEL +/- It appears between INITIAL SETUP and PICTURE ADJUST screen, and it to the factory settings...
... button gives you are playing video games connected to video when viewing in a dimly lit room. Dynamic - Gives a vivid picture with better contrast when viewing in the following cases: • Turning on film (such as motion pictures) or animation. Theater - Choose VIDEO STATUS by pressing MENU† on the side panel and choose a mode by using the CHANNEL +/- It appears between INITIAL SETUP and PICTURE ADJUST screen, and it to the factory settings...

Instructions
Page 88
.... • Check to see if the Sleep Timer was not reset. See "Channel Summary - The color quality is locked. Screen is 80% black • The Closed Caption Text mode is wrong • Make sure the channels have been programmed. Check to see if the channel is poor • Tint and Color may be improperly adjusted. You cannot select a certain channel The power turns off in the proper position. •...
.... • Check to see if the Sleep Timer was not reset. See "Channel Summary - The color quality is locked. Screen is 80% black • The Closed Caption Text mode is wrong • Make sure the channels have been programmed. Check to see if the channel is poor • Tint and Color may be improperly adjusted. You cannot select a certain channel The power turns off in the proper position. •...
Instructions
Page 92
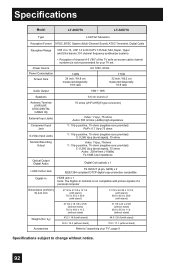
... compatible with stand) 37.6 / 17.1 (without notice. 92 Specifications Model LT-26X776 LT-32X776 Type LCD Flat Television Reception Format NTSC, BTSC System (Multi-Channel Sound) ATSC Terrestrial, Digital Cable Reception Range VHF 2 to 13, UHF 14 to change without stand) Accessories Refer to "unpacking your TV", page 9 Specifications subject to 69 CATV 135 Sub, Mid, Super, Hyper and Ultra bands (191 channel frequency synthesizer system) Power Source Power Consumption Screen Size...
... compatible with stand) 37.6 / 17.1 (without notice. 92 Specifications Model LT-26X776 LT-32X776 Type LCD Flat Television Reception Format NTSC, BTSC System (Multi-Channel Sound) ATSC Terrestrial, Digital Cable Reception Range VHF 2 to 13, UHF 14 to change without stand) Accessories Refer to "unpacking your TV", page 9 Specifications subject to 69 CATV 135 Sub, Mid, Super, Hyper and Ultra bands (191 channel frequency synthesizer system) Power Source Power Consumption Screen Size...
Instructions
Page 93
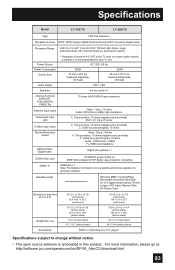
... stand) 100 x 67.1 x 10.6 (without stand) 69.3 / 31.5 (with picture signals of a personal computer Readable Cards SD Card, MMC, CompactFlash, Removable microdrive Hard Disk for JVC digital media camera "Everio" (a type of the TV set's on-screen cable channel numbers) is not recommended for your TV", page 9 Specifications subject to : http://software.jvc.com/opensource/lnx/DP/04_AtscCC/download.html 93 Power Source Power Consumption Screen Size AC 120V, 60 Hz 202W 226W 37 inch...
... stand) 100 x 67.1 x 10.6 (without stand) 69.3 / 31.5 (with picture signals of a personal computer Readable Cards SD Card, MMC, CompactFlash, Removable microdrive Hard Disk for JVC digital media camera "Everio" (a type of the TV set's on-screen cable channel numbers) is not recommended for your TV", page 9 Specifications subject to : http://software.jvc.com/opensource/lnx/DP/04_AtscCC/download.html 93 Power Source Power Consumption Screen Size AC 120V, 60 Hz 202W 226W 37 inch...


