

Instructions
Page 9
... Included items 04 Inserting batteries into the remote control 05 Attaching and connecting the speaker unit 05 Installation 05 To adjust the vertical position of monitor 06 Connecting external devices 08 Connecting the power cable/Turning on the power 10 Initial settings 10 Parts identification 11 Controlling HDMI devices 13 Changing the settings...
... Included items 04 Inserting batteries into the remote control 05 Attaching and connecting the speaker unit 05 Installation 05 To adjust the vertical position of monitor 06 Connecting external devices 08 Connecting the power cable/Turning on the power 10 Initial settings 10 Parts identification 11 Controlling HDMI devices 13 Changing the settings...

Instructions
Page 10
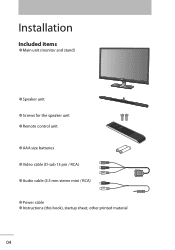
Installation Included items ● Main unit (monitor and stand) ● Speaker unit ● Screws for the speaker unit ● Remote control unit ● AAA size batteries ● Video cable (D-sub 15 pin / RCA) ● Audio cable (3.5 mm stereo mini / RCA) ● Power cable ● Instructions (this book), startup sheet, other printed material 04
Installation Included items ● Main unit (monitor and stand) ● Speaker unit ● Screws for the speaker unit ● Remote control unit ● AAA size batteries ● Video cable (D-sub 15 pin / RCA) ● Audio cable (3.5 mm stereo mini / RCA) ● Power cable ● Instructions (this book), startup sheet, other printed material 04

Instructions
Page 11
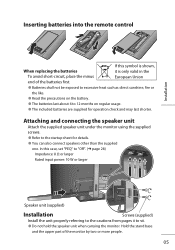
Installation Inserting batteries into the remote control When replacing the batteries To avoid short-circuit, place the minus end of the monitor by two or more people. 05 Attaching and connecting the ...
Installation Inserting batteries into the remote control When replacing the batteries To avoid short-circuit, place the minus end of the monitor by two or more people. 05 Attaching and connecting the ...
Instructions
Page 17
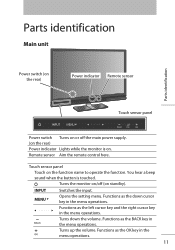
...BACK key in the menu operations. Functions as the down the volume. Parts identification Main unit Power switch (on the rear) Power indicator Remote sensor Parts identification Touch sensor panel Power switch Turns on or off (on standby). Turns the monitor on/off the main power supply..... Turns up the volume. You hear a beep sound when the button is on the function name to operate the function. Remote sensor Aim the remote control here. Functions as the left cursor key and the right cursor key in the menu operations. 11 INPUT Switches the input.
...BACK key in the menu operations. Functions as the down the volume. Parts identification Main unit Power switch (on the rear) Power indicator Remote sensor Parts identification Touch sensor panel Power switch Turns on or off (on standby). Turns the monitor on/off the main power supply..... Turns up the volume. You hear a beep sound when the button is on the function name to operate the function. Remote sensor Aim the remote control here. Functions as the left cursor key and the right cursor key in the menu operations. 11 INPUT Switches the input.
Instructions
Page 18
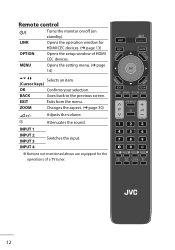
... volume. INPUT 4 ● Buttons not mentioned above are equipped for HDMI CEC devices. (➔ page 13) OPTION Opens the setup window of a TV tuner. 12 Attenuates the sound. Remote control Turns the monitor on/off (on standby). LINK Opens the operation window for the operations of HDMI CEC devices. Changes the aspect. (➔...
... volume. INPUT 4 ● Buttons not mentioned above are equipped for HDMI CEC devices. (➔ page 13) OPTION Opens the setup window of a TV tuner. 12 Attenuates the sound. Remote control Turns the monitor on/off (on standby). LINK Opens the operation window for the operations of HDMI CEC devices. Changes the aspect. (➔...
Instructions
Page 48
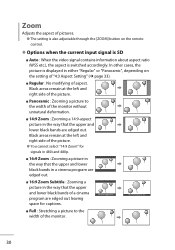
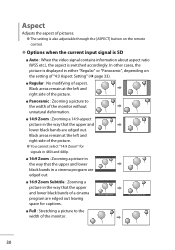
... to the width of the monitor. 30 Zoom Adjusts the aspect of pictures. ● The setting is also adjustable through the [ZOOM] button on the remote control. ◆ Options when the current input signal is SD ■ Auto : When the video signal contains information about aspect ratio (WSS etc.), the aspect is...
... to the width of the monitor. 30 Zoom Adjusts the aspect of pictures. ● The setting is also adjustable through the [ZOOM] button on the remote control. ◆ Options when the current input signal is SD ■ Auto : When the video signal contains information about aspect ratio (WSS etc.), the aspect is...
Instructions
Page 57
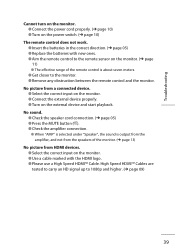
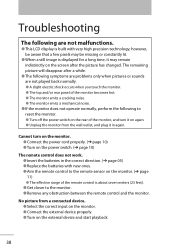
...correct input on the monitor. ● Use a cable marked with new ones. ● Aim the remote control to the remote sensor on the monitor. (➔ page 11) ● The effective range of the remote control is about seven meters. ● Get closer to 1080p and higher. (➔ page 09) 39 ... on the monitor. ● Connect the power cord properly. (➔ page 10) ● Turn on the power switch. (➔ page 10) The remote control does not work. ● Insert the batteries in the correct direction. (➔ page 05) ● Replace the batteries with the HDMI logo. ●...
...correct input on the monitor. ● Use a cable marked with new ones. ● Aim the remote control to the remote sensor on the monitor. (➔ page 11) ● The effective range of the remote control is about seven meters. ● Get closer to 1080p and higher. (➔ page 09) 39 ... on the monitor. ● Connect the power cord properly. (➔ page 10) ● Turn on the power switch. (➔ page 10) The remote control does not work. ● Insert the batteries in the correct direction. (➔ page 05) ● Replace the batteries with the HDMI logo. ●...
Instructions
Page 60
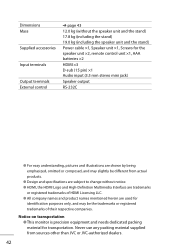
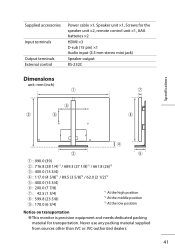
...stand) 19.0 kg (including the speaker unit and the stand) Power cable ×1, Speaker unit ×1, Screws for the speaker unit ×2, remote control unit ×1, AAA batteries ×2 HDMI ×3 D-sub (15 pin) ×1 Audio input (3.5 mm stereo mini jack) Speaker output RS... JVC-authorized dealers. 42 Notice on transportation ● This monitor is precision equipment and needs dedicated packing material for transportation. Dimensions Mass Supplied accessories Input terminals Output terminals External control ➔ page 43 12.0 kg (without notice. ● HDMI, the HDMI Logo and...
...stand) 19.0 kg (including the speaker unit and the stand) Power cable ×1, Speaker unit ×1, Screws for the speaker unit ×2, remote control unit ×1, AAA batteries ×2 HDMI ×3 D-sub (15 pin) ×1 Audio input (3.5 mm stereo mini jack) Speaker output RS... JVC-authorized dealers. 42 Notice on transportation ● This monitor is precision equipment and needs dedicated packing material for transportation. Dimensions Mass Supplied accessories Input terminals Output terminals External control ➔ page 43 12.0 kg (without notice. ● HDMI, the HDMI Logo and...

Instructions
Page 67
... Time 25 Picture Management 23 Position Adjustment 32 Power cable 10 Power indicator 11 Power Indicator 32 Power Off Link 36 Power switch 10 R Remote control unit 12 Remote sensor 11 Reset 28, 35, 37 S Setup 29 Sharpness 18 Sound 27 Speaker unit 05 T Touch sensor panel 11 Treble 27 Turn On Volume...
... Time 25 Picture Management 23 Position Adjustment 32 Power cable 10 Power indicator 11 Power Indicator 32 Power Off Link 36 Power switch 10 R Remote control unit 12 Remote sensor 11 Reset 28, 35, 37 S Setup 29 Sharpness 18 Sound 27 Speaker unit 05 T Touch sensor panel 11 Treble 27 Turn On Volume...

Instructions
Page 77
... Included items 04 Inserting batteries into the remote control 05 Attaching and connecting the speaker unit 05 Installation 05 To adjust the vertical position of monitor 06 Connecting external devices 08 Connecting the power cable/Turning on the power 10 Initial settings 10 Parts identification 11 Controlling HDMI devices 13 Changing the settings...
... Included items 04 Inserting batteries into the remote control 05 Attaching and connecting the speaker unit 05 Installation 05 To adjust the vertical position of monitor 06 Connecting external devices 08 Connecting the power cable/Turning on the power 10 Initial settings 10 Parts identification 11 Controlling HDMI devices 13 Changing the settings...
Instructions
Page 78
Installation Included items ● Main unit (monitor and stand) ● Speaker unit ● Screws for the speaker unit ● Remote control unit ● AAA size batteries ● Video cable (D-sub 15 pin / RCA) ● Audio cable (3.5 mm stereo mini / RCA) ● Power cable ● Instructions (this book), startup sheet, other printed material 04
Installation Included items ● Main unit (monitor and stand) ● Speaker unit ● Screws for the speaker unit ● Remote control unit ● AAA size batteries ● Video cable (D-sub 15 pin / RCA) ● Audio cable (3.5 mm stereo mini / RCA) ● Power cable ● Instructions (this book), startup sheet, other printed material 04
Instructions
Page 79
... usage. ● The included batteries are supplied for details. ● You can also connect speakers other than the supplied one. Installation Inserting batteries into the remote control If this case, set "PEQ" to "Off". (➔ page 28) Impedance: 8 Ω or larger Rated input power: 10 W or larger Speaker unit (supplied) Installation Screws...
... usage. ● The included batteries are supplied for details. ● You can also connect speakers other than the supplied one. Installation Inserting batteries into the remote control If this case, set "PEQ" to "Off". (➔ page 28) Impedance: 8 Ω or larger Rated input power: 10 W or larger Speaker unit (supplied) Installation Screws...

Instructions
Page 85
Remote sensor Aim the remote control here. Turns up the volume. INPUT Switches the input. MENU Opens the setting menu. Functions as the OK key in the menu operations. Functions as ... while the monitor is touched. Functions as the BACK key in the menu operations. Parts identification Main unit Power switch (on the rear) Power indicator Remote sensor Parts identification Touch sensor panel Power switch Turns on or off (on standby). Turns the monitor on/off the main power supply. (on the...
Remote sensor Aim the remote control here. Turns up the volume. INPUT Switches the input. MENU Opens the setting menu. Functions as the OK key in the menu operations. Functions as ... while the monitor is touched. Functions as the BACK key in the menu operations. Parts identification Main unit Power switch (on the rear) Power indicator Remote sensor Parts identification Touch sensor panel Power switch Turns on or off (on standby). Turns the monitor on/off the main power supply. (on the...
Instructions
Page 86
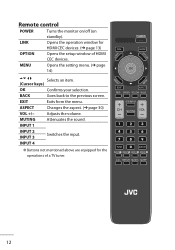
Remote control POWER Turns the monitor on/off (on standby). MENU Opens the setting menu. (➔ page 14) Selects an item. (Cursor keys) OK Confirms your selection. .... (➔ page 30) VOL +/- INPUT 4 ● Buttons not mentioned above are equipped for HDMI CEC devices. (➔ page 13) OPTION Opens the setup window of a TV tuner. 12 MUTING Attenuates the sound. BACK Goes back to the previous screen. EXIT ASPECT Exits from the menu. Adjusts the volume. INPUT 1 INPUT 2 INPUT...
Remote control POWER Turns the monitor on/off (on standby). MENU Opens the setting menu. (➔ page 14) Selects an item. (Cursor keys) OK Confirms your selection. .... (➔ page 30) VOL +/- INPUT 4 ● Buttons not mentioned above are equipped for HDMI CEC devices. (➔ page 13) OPTION Opens the setup window of a TV tuner. 12 MUTING Attenuates the sound. BACK Goes back to the previous screen. EXIT ASPECT Exits from the menu. Adjusts the volume. INPUT 1 INPUT 2 INPUT...
Instructions
Page 116
... a picture to the width of the monitor without unnatural deformation. ■ 14:9 Zoom : Zooming a 14:9-aspect picture in either "Regular" or "Panoramic", depending on the remote control. ◆ Options when the current input signal is SD ■ Auto : When the video signal contains information about aspect ratio (WSS etc.), the aspect is...
... a picture to the width of the monitor without unnatural deformation. ■ 14:9 Zoom : Zooming a 14:9-aspect picture in either "Regular" or "Panoramic", depending on the remote control. ◆ Options when the current input signal is SD ■ Auto : When the video signal contains information about aspect ratio (WSS etc.), the aspect is...
Instructions
Page 124
... the monitor. ● Connect the power cord properly. (➔ page 10) ● Turn on the power switch. (➔ page 10) The remote control does not work. ● Insert the batteries in again. No picture from the wall outlet, and plug it may be missing or constantly lit. &#...9679; The monitor emits a mechanical noise. ● If the monitor does not operate normally, perform the following are not malfunctions. ● This LCD display is displayed for a long time, it in the correct direction. (➔ page 05) ● Replace the batteries with very high precision technology;
... the monitor. ● Connect the power cord properly. (➔ page 10) ● Turn on the power switch. (➔ page 10) The remote control does not work. ● Insert the batteries in again. No picture from the wall outlet, and plug it may be missing or constantly lit. &#...9679; The monitor emits a mechanical noise. ● If the monitor does not operate normally, perform the following are not malfunctions. ● This LCD display is displayed for a long time, it in the correct direction. (➔ page 05) ● Replace the batteries with very high precision technology;
Instructions
Page 127
... than JVC or JVC-authorized dealers. 41 Supplied accessories Input terminals Output terminals External control Power cable ×1, Speaker unit ×1, Screws for the speaker unit ×2, remote control unit ...×1, AAA batteries ×2 HDMI ×3 D-sub (15 pin) ×1 Audio input (3.5 mm stereo mini jack) Speaker output RS-232C Dimensions unit: mm (inch) Specifications 1 : 990.0 (39) 2 : 716.8 (28 1/4)*1 / 689.3 (27 1/8)*2 / 661.8 (26)*3 3 : 400.0 (15 3/4) 4 : 117.0 (4 5/8)*1 / 89.5 (3 5/8)*2 / 62.0 (2 1/2)*3 5 : 400.0 (15 3/4) 6 : 200.0 (7 7/8) 7 : 42...
... than JVC or JVC-authorized dealers. 41 Supplied accessories Input terminals Output terminals External control Power cable ×1, Speaker unit ×1, Screws for the speaker unit ×2, remote control unit ...×1, AAA batteries ×2 HDMI ×3 D-sub (15 pin) ×1 Audio input (3.5 mm stereo mini jack) Speaker output RS-232C Dimensions unit: mm (inch) Specifications 1 : 990.0 (39) 2 : 716.8 (28 1/4)*1 / 689.3 (27 1/8)*2 / 661.8 (26)*3 3 : 400.0 (15 3/4) 4 : 117.0 (4 5/8)*1 / 89.5 (3 5/8)*2 / 62.0 (2 1/2)*3 5 : 400.0 (15 3/4) 6 : 200.0 (7 7/8) 7 : 42...
Instructions
Page 133
... Delay Time 25 Position Adjustment 32 POWER 12 Power cable 10 Power indicator 11 Power Indicator 32 Power Off Link 36 Power switch 10 R Remote control unit 12 Remote sensor 11 Reset 28, 35, 37 S Setup 29 Sharpness 18 Sound 27 Speaker unit 05 T Tint 16 Tint Setting 16 Touch sensor panel 11...
... Delay Time 25 Position Adjustment 32 POWER 12 Power cable 10 Power indicator 11 Power Indicator 32 Power Off Link 36 Power switch 10 R Remote control unit 12 Remote sensor 11 Reset 28, 35, 37 S Setup 29 Sharpness 18 Sound 27 Speaker unit 05 T Tint 16 Tint Setting 16 Touch sensor panel 11...

Instructions
Page 145
... Included items 04 Inserting batteries into the remote control 05 Attaching and connecting the speaker unit 05 Installation 05 To adjust the vertical position of monitor 06 Connecting external devices 08 Connecting the power cable/Turning on the power 10 Initial settings 10 Parts identification 11 Controlling HDMI devices 13 Changing the settings...
... Included items 04 Inserting batteries into the remote control 05 Attaching and connecting the speaker unit 05 Installation 05 To adjust the vertical position of monitor 06 Connecting external devices 08 Connecting the power cable/Turning on the power 10 Initial settings 10 Parts identification 11 Controlling HDMI devices 13 Changing the settings...

Instructions
Page 146
Installation Included items ● Main unit (monitor and stand) ● Speaker unit ● Screws for the speaker unit ● Remote control unit ● AAA size batteries ● Video cable (D-sub 15 pin / RCA) ● Audio cable (3.5 mm stereo mini / RCA) ● Power cable ● Instructions (this book), startup sheet, other printed material 04
Installation Included items ● Main unit (monitor and stand) ● Speaker unit ● Screws for the speaker unit ● Remote control unit ● AAA size batteries ● Video cable (D-sub 15 pin / RCA) ● Audio cable (3.5 mm stereo mini / RCA) ● Power cable ● Instructions (this book), startup sheet, other printed material 04


