
Instructions
Page 2
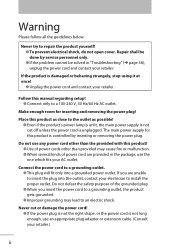
... unlit, the main power supply is not cut or damage the power cord! ● If the power plug is not the right shape, or the power cord is unplugged. Repair shall be done by inserting or removing the power plug. If the product is controlled by service personnel only. ● If the problem cannot be solved in the package, use an appropriate plug adapter or extension cable. (Consult your...
... unlit, the main power supply is not cut or damage the power cord! ● If the power plug is not the right shape, or the power cord is unplugged. Repair shall be done by inserting or removing the power plug. If the product is controlled by service personnel only. ● If the problem cannot be solved in the package, use an appropriate plug adapter or extension cable. (Consult your...

Instructions
Page 9
... connecting the speaker unit 05 Installation 05 To adjust the vertical position of monitor 06 Connecting external devices 08 Connecting the power cable/Turning on the power 10 Initial settings 10 Parts identification 11 Controlling HDMI devices 13 Changing the settings 14 Picture 15 Sound 27 Setup 29 HDMI 36 Troubleshooting 38 Specifications 41 Index 48 Technical information Customize the picture to your taste A-2 Set up the monitor for your PC A-10 Enjoy SLR digital camera photographs A-11 Menu...
... connecting the speaker unit 05 Installation 05 To adjust the vertical position of monitor 06 Connecting external devices 08 Connecting the power cable/Turning on the power 10 Initial settings 10 Parts identification 11 Controlling HDMI devices 13 Changing the settings 14 Picture 15 Sound 27 Setup 29 HDMI 36 Troubleshooting 38 Specifications 41 Index 48 Technical information Customize the picture to your taste A-2 Set up the monitor for your PC A-10 Enjoy SLR digital camera photographs A-11 Menu...
Instructions
Page 47
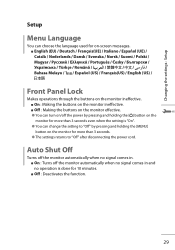
Auto Shut Off Turns off the monitor automatically when no signal comes in. ■ On : Turns off the monitor automatically when no signal comes in and no operation is done for more than 3 seconds. ● The settings returns to "Off" after disconnecting the power cord. Changing the settings : Setup Setup Menu Language You can choose the language used for on-screen messages. ■ English (EU) / Deutsch / Français...
Auto Shut Off Turns off the monitor automatically when no signal comes in. ■ On : Turns off the monitor automatically when no signal comes in and no operation is done for more than 3 seconds. ● The settings returns to "Off" after disconnecting the power cord. Changing the settings : Setup Setup Menu Language You can choose the language used for on-screen messages. ■ English (EU) / Deutsch / Français...

Instructions
Page 51
... the monitor cannot detect the aspect of connection. (➔ page 08) ■ PC : For PC signals ■ Component : For component signals ■ Composite : For composite signals 33 Input-4 Setting Selects the signal type for 1080i/p signals. ■ Full : Expands the picture to the full display size. ■ Full Native : Displays the picture in "Panoramic". 1080 Auto Setting Selects the default aspect for the INPUT-4 terminal (D-sub 15 pin). ● Use the supplied conversion cables...
... the monitor cannot detect the aspect of connection. (➔ page 08) ■ PC : For PC signals ■ Component : For component signals ■ Composite : For composite signals 33 Input-4 Setting Selects the signal type for 1080i/p signals. ■ Full : Expands the picture to the full display size. ■ Full Native : Displays the picture in "Panoramic". 1080 Auto Setting Selects the default aspect for the INPUT-4 terminal (D-sub 15 pin). ● Use the supplied conversion cables...
Instructions
Page 57
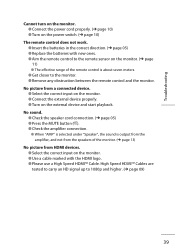
... remote control does not work. ● Insert the batteries in the correct direction. (➔ page 05) ● Replace the batteries with the HDMI logo. ● Please use a High Speed HDMITM Cable. No picture from a connected device. ● Select the correct input on the monitor. ● Connect the external device properly. ● Turn on the monitor. ● Use a cable marked with new ones. ● Aim the remote control to the remote sensor...
... remote control does not work. ● Insert the batteries in the correct direction. (➔ page 05) ● Replace the batteries with the HDMI logo. ● Please use a High Speed HDMITM Cable. No picture from a connected device. ● Select the correct input on the monitor. ● Connect the external device properly. ● Turn on the monitor. ● Use a cable marked with new ones. ● Aim the remote control to the remote sensor...

Instructions
Page 58
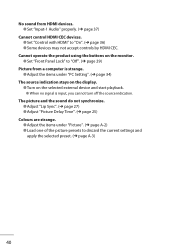
... operate the product using the buttons on the monitor. ● Set "Front Panel Lock" to "Off". (➔ page 29) Picture from HDMI devices. ● Set "Input-1 Audio" properly. (➔ page 37) Cannot control HDMI CEC devices. ● Set "Control with HDMI" to discard the current settings and apply the selected preset. (➔ page A-3) 40 The picture and the sound do not synchronize. ● Adjust "Lip Sync". (➔ page 27) ● Adjust "Picture Delay Time...
... operate the product using the buttons on the monitor. ● Set "Front Panel Lock" to "Off". (➔ page 29) Picture from HDMI devices. ● Set "Input-1 Audio" properly. (➔ page 37) Cannot control HDMI CEC devices. ● Set "Control with HDMI" to discard the current settings and apply the selected preset. (➔ page A-3) 40 The picture and the sound do not synchronize. ● Adjust "Lip Sync". (➔ page 27) ● Adjust "Picture Delay Time...
Instructions
Page 60
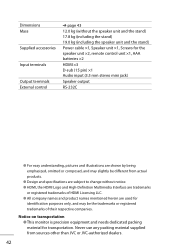
... respective companies. Dimensions Mass Supplied accessories Input terminals Output terminals External control ➔ page 43 12.0 kg (without the speaker unit and the stand) 17.8 kg (including the stand) 19.0 kg (including the speaker unit and the stand) Power cable ×1, Speaker unit ×1, Screws for the speaker unit ×2, remote control unit ×1, AAA batteries ×2 HDMI ×3 D-sub (15 pin) ×1 Audio input (3.5 mm stereo mini jack) Speaker output RS-232C...
... respective companies. Dimensions Mass Supplied accessories Input terminals Output terminals External control ➔ page 43 12.0 kg (without the speaker unit and the stand) 17.8 kg (including the stand) 19.0 kg (including the speaker unit and the stand) Power cable ×1, Speaker unit ×1, Screws for the speaker unit ×2, remote control unit ×1, AAA batteries ×2 HDMI ×3 D-sub (15 pin) ×1 Audio input (3.5 mm stereo mini jack) Speaker output RS-232C...

Instructions
Page 70
... of important operating and maintenance (servicing) instructions in the literature accompanying the appliance. Warnings CAUTION RISK OF ELECTRIC SHOCK DO NOT OPEN CAUTION: To reduce the risk of trouble, unplug the unit and call a service technician. Refer servicing to repair it yourself or remove the rear cover. CAUTION: TO INSURE PERSONAL SAFETY, OBSERVE THE FOLLOWING RULES REGARDING THE USE OF...
... of important operating and maintenance (servicing) instructions in the literature accompanying the appliance. Warnings CAUTION RISK OF ELECTRIC SHOCK DO NOT OPEN CAUTION: To reduce the risk of trouble, unplug the unit and call a service technician. Refer servicing to repair it yourself or remove the rear cover. CAUTION: TO INSURE PERSONAL SAFETY, OBSERVE THE FOLLOWING RULES REGARDING THE USE OF...

Instructions
Page 77
... connecting the speaker unit 05 Installation 05 To adjust the vertical position of monitor 06 Connecting external devices 08 Connecting the power cable/Turning on the power 10 Initial settings 10 Parts identification 11 Controlling HDMI devices 13 Changing the settings 14 Picture 15 Sound 27 Setup 29 HDMI 36 Troubleshooting 38 Specifications 40 Index 46 Technical information Customize the picture to your taste A-2 Set up the monitor for your PC A-10 Enjoy SLR digital camera photographs A-11 Menu...
... connecting the speaker unit 05 Installation 05 To adjust the vertical position of monitor 06 Connecting external devices 08 Connecting the power cable/Turning on the power 10 Initial settings 10 Parts identification 11 Controlling HDMI devices 13 Changing the settings 14 Picture 15 Sound 27 Setup 29 HDMI 36 Troubleshooting 38 Specifications 40 Index 46 Technical information Customize the picture to your taste A-2 Set up the monitor for your PC A-10 Enjoy SLR digital camera photographs A-11 Menu...

Instructions
Page 101
... TV programs and DVDs in a dark room. ■ Monitor : Applies no color corrections or noise reductions. Input video signals are displayed as they are. ■ Photo Pro : Suitable for watching still pictures. ■ Game : Gives priority to the response time for watching cinemas in a living room. ■ Theater : Suitable for picture movement. Suitable for the input last time is changed, the memory used for playing video games. 15 Changing the settings : Picture Picture Memory Setting...
... TV programs and DVDs in a dark room. ■ Monitor : Applies no color corrections or noise reductions. Input video signals are displayed as they are. ■ Photo Pro : Suitable for watching still pictures. ■ Game : Gives priority to the response time for watching cinemas in a living room. ■ Theater : Suitable for picture movement. Suitable for the input last time is changed, the memory used for playing video games. 15 Changing the settings : Picture Picture Memory Setting...

Instructions
Page 105
... in dark scenes to represent black deeper. ■ High / Medium / Low / Off Color System Selects the color system for the picture signal which is input to INPUT-4 from composite terminal. ● The setting is adjustable only when "Input-4 Setting" is set to "Composite". (➔ page 33) ● The setting is unadjustable when "PC Monitor Mode" is set to "On". ■ Auto : An appropriate color system is PAL-N. 19
... in dark scenes to represent black deeper. ■ High / Medium / Low / Off Color System Selects the color system for the picture signal which is input to INPUT-4 from composite terminal. ● The setting is adjustable only when "Input-4 Setting" is set to "Composite". (➔ page 33) ● The setting is unadjustable when "PC Monitor Mode" is set to "On". ■ Auto : An appropriate color system is PAL-N. 19
Instructions
Page 119
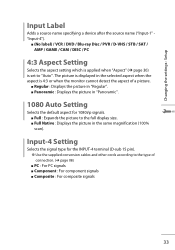
... type of a picture. ■ Regular : Displays the picture in "Regular". ■ Panoramic : Displays the picture in "Panoramic". 1080 Auto Setting Selects the default aspect for 1080i/p signals. ■ Full : Expands the picture to the full display size. ■ Full Native : Displays the picture in the selected aspect when the aspect is set to "Auto". Changing the settings : Setup Input Label Adds a source name specifying a device after the source name ("Input-1" "Input-4"). ■ (No label) / VCR / DVD...
... type of a picture. ■ Regular : Displays the picture in "Regular". ■ Panoramic : Displays the picture in "Panoramic". 1080 Auto Setting Selects the default aspect for 1080i/p signals. ■ Full : Expands the picture to the full display size. ■ Full Native : Displays the picture in the selected aspect when the aspect is set to "Auto". Changing the settings : Setup Input Label Adds a source name specifying a device after the source name ("Input-1" "Input-4"). ■ (No label) / VCR / DVD...
Instructions
Page 124
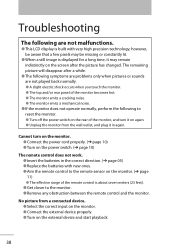
... the remote control to the monitor. ● Remove any obstruction between the remote control and the monitor. Troubleshooting The following to reset the monitor. ● Turn off the power switch on the rear of the monitor, and turn on the monitor. ● Connect the power cord properly. (➔ page 10) ● Turn on the power switch. (➔ page 10) The remote control does not work. ● Insert the batteries in again. No picture from the wall outlet, and plug...
... the remote control to the monitor. ● Remove any obstruction between the remote control and the monitor. Troubleshooting The following to reset the monitor. ● Turn off the power switch on the rear of the monitor, and turn on the monitor. ● Connect the power cord properly. (➔ page 10) ● Turn on the power switch. (➔ page 10) The remote control does not work. ● Insert the batteries in again. No picture from the wall outlet, and plug...

Instructions
Page 125
...; Adjust "Picture Delay Time". (➔ page 25) Colours are tested to carry an HD signal up to 1080p and higher. (➔ page 09) No sound from HDMI devices. ● Set "Input-1 Audio" properly. (➔ page 37) Cannot control HDMI CEC devices. ● Set "Control with the HDMI logo. ● Please use a High Speed HDMITM Cable. Troubleshooting No sound. ● Check the speaker cord connection. (➔ page 05) ● Press the MUTING button...
...; Adjust "Picture Delay Time". (➔ page 25) Colours are tested to carry an HD signal up to 1080p and higher. (➔ page 09) No sound from HDMI devices. ● Set "Input-1 Audio" properly. (➔ page 37) Cannot control HDMI CEC devices. ● Set "Control with the HDMI logo. ● Please use a High Speed HDMITM Cable. Troubleshooting No sound. ● Check the speaker cord connection. (➔ page 05) ● Press the MUTING button...
Instructions
Page 127
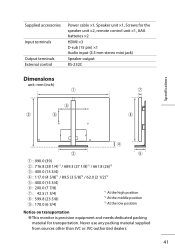
... sources other than JVC or JVC-authorized dealers. 41 Supplied accessories Input terminals Output terminals External control Power cable ×1, Speaker unit ×1, Screws for the speaker unit ×2, remote control unit ×1, AAA batteries ×2 HDMI ×3 D-sub (15 pin) ×1 Audio input (3.5 mm stereo mini jack) Speaker output RS-232C Dimensions unit: mm (inch) Specifications 1 : 990.0 (39) 2 : 716.8 (28 1/4)*1 / 689.3 (27 1/8)*2 / 661.8 (26)*3 3 : 400.0 (15 3/4) 4 : 117.0 (4 5/8)*1 / 89.5 (3 5/8)*2 / 62.0 (2 1/2)*3 5 : 400.0 (15 3/4) 6 : 200.0 (7 7/8) 7 : 42...
... sources other than JVC or JVC-authorized dealers. 41 Supplied accessories Input terminals Output terminals External control Power cable ×1, Speaker unit ×1, Screws for the speaker unit ×2, remote control unit ×1, AAA batteries ×2 HDMI ×3 D-sub (15 pin) ×1 Audio input (3.5 mm stereo mini jack) Speaker output RS-232C Dimensions unit: mm (inch) Specifications 1 : 990.0 (39) 2 : 716.8 (28 1/4)*1 / 689.3 (27 1/8)*2 / 661.8 (26)*3 3 : 400.0 (15 3/4) 4 : 117.0 (4 5/8)*1 / 89.5 (3 5/8)*2 / 62.0 (2 1/2)*3 5 : 400.0 (15 3/4) 6 : 200.0 (7 7/8) 7 : 42...

Instructions
Page 145
... connecting the speaker unit 05 Installation 05 To adjust the vertical position of monitor 06 Connecting external devices 08 Connecting the power cable/Turning on the power 10 Initial settings 10 Parts identification 11 Controlling HDMI devices 13 Changing the settings 14 Picture 15 Sound 27 Setup 29 HDMI 36 Troubleshooting 38 Specifications 41 Index 48 Technical information Customize the picture to your taste A-2 Set up the monitor for your PC A-10 Enjoy SLR digital camera photographs A-11 Menu...
... connecting the speaker unit 05 Installation 05 To adjust the vertical position of monitor 06 Connecting external devices 08 Connecting the power cable/Turning on the power 10 Initial settings 10 Parts identification 11 Controlling HDMI devices 13 Changing the settings 14 Picture 15 Sound 27 Setup 29 HDMI 36 Troubleshooting 38 Specifications 41 Index 48 Technical information Customize the picture to your taste A-2 Set up the monitor for your PC A-10 Enjoy SLR digital camera photographs A-11 Menu...
Instructions
Page 183
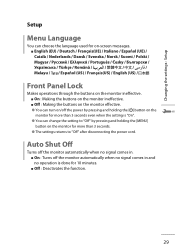
Changing the settings : Setup Setup Menu Language You can choose the language used for on-screen messages. ■ English (EU) / Deutsch / Français(UE) / Italiano...Panel Lock Makes operations through the buttons on the monitor ineffective. ■ On : Making the buttons on the monitor ineffective. ■ Off : Making the buttons on the monitor effective. ● You can change the setting to "Off" by pressing and holding the [MENU] button on the monitor for 10 minutes. ■ Off : Deactivates the function. 29 Auto Shut Off Turns off the monitor automatically when no signal...
Changing the settings : Setup Setup Menu Language You can choose the language used for on-screen messages. ■ English (EU) / Deutsch / Français(UE) / Italiano...Panel Lock Makes operations through the buttons on the monitor ineffective. ■ On : Making the buttons on the monitor ineffective. ■ Off : Making the buttons on the monitor effective. ● You can change the setting to "Off" by pressing and holding the [MENU] button on the monitor for 10 minutes. ■ Off : Deactivates the function. 29 Auto Shut Off Turns off the monitor automatically when no signal...

Instructions
Page 187
... picture is displayed in the same magnification (100% scan). Input-4 Setting Selects the signal type for the INPUT-4 terminal (D-sub 15 pin). ● Use the supplied conversion cables and other cords according to the type of a picture. ■ Regular : Displays the picture in "Regular". ■ Panoramic : Displays the picture in "Panoramic". 1080 Auto Setting Selects the default aspect for 1080i/p signals. ■ Full : Expands the picture to the full display size. ■ Full Native : Displays the picture...
... picture is displayed in the same magnification (100% scan). Input-4 Setting Selects the signal type for the INPUT-4 terminal (D-sub 15 pin). ● Use the supplied conversion cables and other cords according to the type of a picture. ■ Regular : Displays the picture in "Regular". ■ Panoramic : Displays the picture in "Panoramic". 1080 Auto Setting Selects the default aspect for 1080i/p signals. ■ Full : Expands the picture to the full display size. ■ Full Native : Displays the picture...
Instructions
Page 194
... the display. ● Turn on the monitor. ● Set "Front Panel Lock" to "Off". (➔ page 29) Picture from HDMI devices. ● Set "Input-1 Audio" properly. (➔ page 37) Cannot control HDMI CEC devices. ● Set "Control with HDMI" to discard the current settings and apply the selected preset. (➔ page A-3) 40 Cannot operate the product using the buttons on the selected external device and start playback. ● When no signal is input...
... the display. ● Turn on the monitor. ● Set "Front Panel Lock" to "Off". (➔ page 29) Picture from HDMI devices. ● Set "Input-1 Audio" properly. (➔ page 37) Cannot control HDMI CEC devices. ● Set "Control with HDMI" to discard the current settings and apply the selected preset. (➔ page A-3) 40 Cannot operate the product using the buttons on the selected external device and start playback. ● When no signal is input...

Instructions
Page 196
... than JVC or JVC-authorized dealers. 42 Dimensions Mass Supplied accessories Input terminals Output terminals External control ➔ page 43 12.0 kg (without notice. ● HDMI, the HDMI Logo and High-Definition Multimedia Interface are trademarks or registered trademarks of their respective companies. Never use any packing material supplied from actual products. ● Design and specifications are subject to change without the speaker unit and the stand...
... than JVC or JVC-authorized dealers. 42 Dimensions Mass Supplied accessories Input terminals Output terminals External control ➔ page 43 12.0 kg (without notice. ● HDMI, the HDMI Logo and High-Definition Multimedia Interface are trademarks or registered trademarks of their respective companies. Never use any packing material supplied from actual products. ● Design and specifications are subject to change without the speaker unit and the stand...


