
Instructions
Page 2
...TO INSURE PERSONAL SAFETY, OBSERVE THE FOLLOWING RULES REGARDING THE USE OF THIS UNIT. 1. Avoid damaging the AC plug and power cord. 3. Changes or modifications not approved by JVC could void the warranty. * When you don't use this TV set for a long period of uninsulated "dangerous voltage" within ...risk of trouble, unplug the unit and call a service technician. No user serviceable parts inside. Do not remove cover (or back). Avoid Improper installation and never position the unit where good ventilation is intended to alert the user to repair it yourself or remove the rear cover....
...TO INSURE PERSONAL SAFETY, OBSERVE THE FOLLOWING RULES REGARDING THE USE OF THIS UNIT. 1. Avoid damaging the AC plug and power cord. 3. Changes or modifications not approved by JVC could void the warranty. * When you don't use this TV set for a long period of uninsulated "dangerous voltage" within ...risk of trouble, unplug the unit and call a service technician. No user serviceable parts inside. Do not remove cover (or back). Avoid Improper installation and never position the unit where good ventilation is intended to alert the user to repair it yourself or remove the rear cover....
Instructions
Page 5
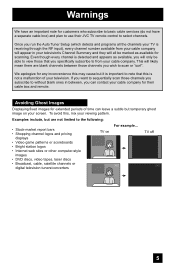
... , you run the Auto Tuner Setup (which detects and programs all the channels your TV is important to note that you specifically subscribe to from your cable company will appear in between those that this , mix your cable company for their JVC TV remote control to select channels. Even though every channel is not a malfunction of time can contact your viewing pattern. To avoid this...
... , you run the Auto Tuner Setup (which detects and programs all the channels your TV is important to note that you specifically subscribe to from your cable company will appear in between those that this , mix your cable company for their JVC TV remote control to select channels. Even though every channel is not a malfunction of time can contact your viewing pattern. To avoid this...
Instructions
Page 9
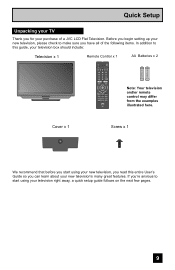
VOL + LIGHT MUTING OK AVORITE DVR STATUS SOUND VIDEO ASPECT GUIDE SUB CH TV/VCR C.C. CH + - Cover x 1 Screw x 1 We recommend that before you start using your new television, you read this guide, your television right away, a quick setup guide follows on the next few pages. 9 DISPLAY TWIN SLEEP ML/MTS SWAP SELECT FREEZE RM-C1400 TV MENU AA Batteries x 2 Note: Your television and/or remote control may differ from the examples...
VOL + LIGHT MUTING OK AVORITE DVR STATUS SOUND VIDEO ASPECT GUIDE SUB CH TV/VCR C.C. CH + - Cover x 1 Screw x 1 We recommend that before you start using your new television, you read this guide, your television right away, a quick setup guide follows on the next few pages. 9 DISPLAY TWIN SLEEP ML/MTS SWAP SELECT FREEZE RM-C1400 TV MENU AA Batteries x 2 Note: Your television and/or remote control may differ from the examples...

Instructions
Page 10
..., consult your dealer. AUDIO - AUDIO - AUDIO - L RS-232C SERVICE ONLY INPUT 5 INPUT 2 DIGITAL AUDIO OPTICAL OUT INPUT 1 RS-232C SERVICE ONLY INPUT 5 INPUT 2 DIGITAL AUDIO OPTICAL OUT INPUT 1 INPUT 3 UDIOFOORUHTDMI 1 UDIO AOUUDTIO OUT R - Side Panel Diagram INPUT MENU C H VOL OK BACK POWER 10 Rear Panel Diagram INPUT 5 INPUT 4 PC IN (D-SUB) VIDEO R - AUDIO - L Y PR PB S-VIDEO VIDEO R - AUDIO - These will help assist you connect your television to another device, as well as use the remote to set up your television. Quick Setup TV Models Before you in...
..., consult your dealer. AUDIO - AUDIO - AUDIO - L RS-232C SERVICE ONLY INPUT 5 INPUT 2 DIGITAL AUDIO OPTICAL OUT INPUT 1 RS-232C SERVICE ONLY INPUT 5 INPUT 2 DIGITAL AUDIO OPTICAL OUT INPUT 1 INPUT 3 UDIOFOORUHTDMI 1 UDIO AOUUDTIO OUT R - Side Panel Diagram INPUT MENU C H VOL OK BACK POWER 10 Rear Panel Diagram INPUT 5 INPUT 4 PC IN (D-SUB) VIDEO R - AUDIO - L Y PR PB S-VIDEO VIDEO R - AUDIO - These will help assist you connect your television to another device, as well as use the remote to set up your television. Quick Setup TV Models Before you in...
Instructions
Page 14
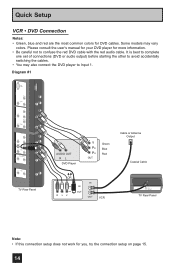
... the connection setup on page 15. 14 AUDIO - It is best to complete one set of connections (DVD or audio output) before starting the other to avoid accidentally switching the cables. • You may vary colors. Diagram #1 INPUT 5 INPUT 4 INPUT 3 PC IN (D-SUB) VIDEO R - AUDIO - L Y PR S-VIDEO PB VIDEO R - L R AUDIO INPUT L R - Please consult the user's manual for your DVD player for more information. • Be careful not to Input 1. L TV Rear Panel AUDIO OUT R L DVD Player Y PB PR OUT Green Blue Red Cable or Antenna Output Coaxial Cable OR...
... the connection setup on page 15. 14 AUDIO - It is best to complete one set of connections (DVD or audio output) before starting the other to avoid accidentally switching the cables. • You may vary colors. Diagram #1 INPUT 5 INPUT 4 INPUT 3 PC IN (D-SUB) VIDEO R - AUDIO - L Y PR S-VIDEO PB VIDEO R - L R AUDIO INPUT L R - Please consult the user's manual for your DVD player for more information. • Be careful not to Input 1. L TV Rear Panel AUDIO OUT R L DVD Player Y PB PR OUT Green Blue Red Cable or Antenna Output Coaxial Cable OR...
Instructions
Page 18
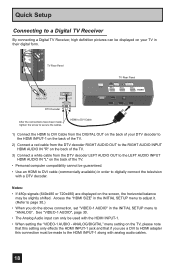
...ANALOG/DIGITAL" menu setting on the screen, the horizontal balance may be slightly shifted. Quick Setup Connecting to a Digital TV Receiver By connecting a Digital TV Receiver, high definition pictures can only be used with the HDMI INPUT-1. • When setting the "VIDEO-1 AUDIO - L TV Rear Panel UDIO AOUUDTIO OUT LR AUDIO OUT DIGITAL OUT RS-232C TV Rear Panel SERVICE ONLY INPUT 5 INPUT 2 DIGITAL AUDIO OPTICAL OUT INPUT 1 DTV Decoder After the connections have been made to the HDMI INPUT-1 along with analog audio cables. 18 HDMI to DVI Cable 1) Connect the HDMI...
...ANALOG/DIGITAL" menu setting on the screen, the horizontal balance may be slightly shifted. Quick Setup Connecting to a Digital TV Receiver By connecting a Digital TV Receiver, high definition pictures can only be used with the HDMI INPUT-1. • When setting the "VIDEO-1 AUDIO - L TV Rear Panel UDIO AOUUDTIO OUT LR AUDIO OUT DIGITAL OUT RS-232C TV Rear Panel SERVICE ONLY INPUT 5 INPUT 2 DIGITAL AUDIO OPTICAL OUT INPUT 1 DTV Decoder After the connections have been made to the HDMI INPUT-1 along with analog audio cables. 18 HDMI to DVI Cable 1) Connect the HDMI...
Instructions
Page 19
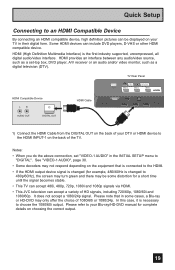
..., 1080i and 1080p signals via HDMI. • This JVC television can include DVD players, D-VHS or other HDMI compatible device. RS-232C TV Rear Panel SERVICE ONLY INPUT 5 INPUT 2 DIGITAL AUDIO OPTICAL OUT INPUT 1 HDMI Compatible Device LR AUDIO OUT DIGITAL OUT HDMI Cable 1) Connect the HDMI Cable from the DIGITAL OUT on the back of 1080/60i or 1080/24p. Notes: • When you do the above connection, set -top box, DVD player, A/V receiver or an audio and/or video monitor, such as a digital television (DTV). HDMI (High Definition...
..., 1080i and 1080p signals via HDMI. • This JVC television can include DVD players, D-VHS or other HDMI compatible device. RS-232C TV Rear Panel SERVICE ONLY INPUT 5 INPUT 2 DIGITAL AUDIO OPTICAL OUT INPUT 1 HDMI Compatible Device LR AUDIO OUT DIGITAL OUT HDMI Cable 1) Connect the HDMI Cable from the DIGITAL OUT on the back of 1080/60i or 1080/24p. Notes: • When you do the above connection, set -top box, DVD player, A/V receiver or an audio and/or video monitor, such as a digital television (DTV). HDMI (High Definition...
Instructions
Page 20
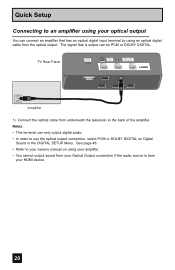
...is from your optical output You can only output digital audio. • In order to use the optical output connection, select PCM or DOLBY DIGITAL on using your amplifier. • You cannot output sound from your owners manual on Digital Sound in the DIGITAL SETUP Menu. Quick Setup Connecting to an amplifier using your HDMI device. 20 TV Rear Panel RS-232C SERVICE ONLY INPUT 5 INPUT 2 DIGITAL AUDIO OPTICAL OUT INPUT 1 Amplifier 1) Connect the optical cable from the optical output. The signal that has an optical digital input terminal by using an optical digital cable from...
...is from your optical output You can only output digital audio. • In order to use the optical output connection, select PCM or DOLBY DIGITAL on using your amplifier. • You cannot output sound from your owners manual on Digital Sound in the DIGITAL SETUP Menu. Quick Setup Connecting to an amplifier using your HDMI device. 20 TV Rear Panel RS-232C SERVICE ONLY INPUT 5 INPUT 2 DIGITAL AUDIO OPTICAL OUT INPUT 1 Amplifier 1) Connect the optical cable from the optical output. The signal that has an optical digital input terminal by using an optical digital cable from...
Instructions
Page 21
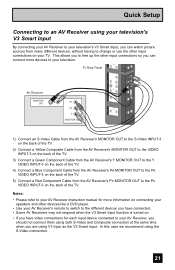
... Receiver instruction manual for more devices to your TV. L AV Receiver MONITOR OUT PR PB Y MONITOR OUT UDIO AOUUDTIO OUT UDIOFOORUHTDMI 1 INPUT 3 Y PR PB S-VIDEO VIDEO R - L R AUDIO INPUT L R - TV Rear Panel R - AUDIO - This allows you to free up the other input connections on your television. AUDIO - L 1) Connect an S-Video Cable from the AV Receiver's MONITOR OUT to the S-Video INPUT-3 on the back of the TV. 2) Connect a Yellow Composite Cable from the AV Receiver's MONITOR OUT to the VIDEO INPUT-3 on the back of the TV. 3) Connect a Green Component Cable...
... Receiver instruction manual for more devices to your TV. L AV Receiver MONITOR OUT PR PB Y MONITOR OUT UDIO AOUUDTIO OUT UDIOFOORUHTDMI 1 INPUT 3 Y PR PB S-VIDEO VIDEO R - L R AUDIO INPUT L R - TV Rear Panel R - AUDIO - This allows you to free up the other input connections on your television. AUDIO - L 1) Connect an S-Video Cable from the AV Receiver's MONITOR OUT to the S-Video INPUT-3 on the back of the TV. 2) Connect a Yellow Composite Cable from the AV Receiver's MONITOR OUT to the VIDEO INPUT-3 on the back of the TV. 3) Connect a Green Component Cable...

Instructions
Page 22
... the INITIAL SETUP menu to "PC". Quick Setup Connecting to the computer's analog RGB output terminal. AUDIO - L INPUT 3 Y PR PB Notes: • When you want to listen to the sound from a computer After starting the computer, press the V5 button on the remote control. If you do the above connection, set "V5 INPUT" in place. L Y PR PB VIDEO R - You can be used as a computer screen. Computer PC IN (D-SUB) INPUT 5 TV Rear Panel INPUT 4 VIDEO R - AUDIO -
... the INITIAL SETUP menu to "PC". Quick Setup Connecting to the computer's analog RGB output terminal. AUDIO - L INPUT 3 Y PR PB Notes: • When you want to listen to the sound from a computer After starting the computer, press the V5 button on the remote control. If you do the above connection, set "V5 INPUT" in place. L Y PR PB VIDEO R - You can be used as a computer screen. Computer PC IN (D-SUB) INPUT 5 TV Rear Panel INPUT 4 VIDEO R - AUDIO -
Instructions
Page 25
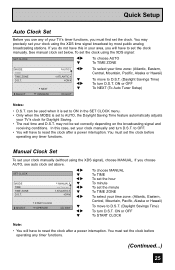
... broadcasting signal and receiving conditions. To set the clock using the XDS signal), choose MANUAL. If you choose AUTO, see auto clock set below. SET CLOCK MODE TIME TIME ZONE D.S.T. See manual clock set above. AUTO è To select your area, you will have to set the clock manually. may precisely set your clock using the XDS time signal broadcast by most public analog broadcasting stations. Quick Setup Auto Clock Set Before you use any of your TV's timer...
... broadcasting signal and receiving conditions. To set the clock using the XDS signal), choose MANUAL. If you choose AUTO, see auto clock set below. SET CLOCK MODE TIME TIME ZONE D.S.T. See manual clock set above. AUTO è To select your area, you will have to set the clock manually. may precisely set your clock using the XDS time signal broadcast by most public analog broadcasting stations. Quick Setup Auto Clock Set Before you use any of your TV's timer...
Instructions
Page 29
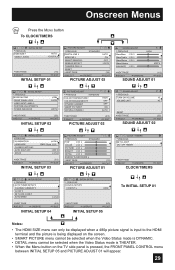
... SAVER MODE NEXT PAGE SELECT OPERATE (1/3) MENU EXIT PICTURE ADJUST 01 CLOCK / TIMERS PREVIOUS SET CLOCK ON / OFF TIMER NEXT PAGE SELECT OPERATE MENU EXIT CLOCK/TIMERS INITIAL SETUP PREVIOUS AUTO TUNER SETUP CHANNEL SUMMARY V-CHIP SET LOCK CODE AUTO DEMO ON NEXT PAGE SELECT OPERATE (4/5) MENU EXIT INITIAL SETUP 04 INITIAL SETUP PREVIOUS DIGITAL SETUP V5 INPUT HDMI NEXT PAGE SELECT OPERATE (5/5) MENU EXIT INITIAL SETUP 05 To INITIAL SETUP 01 Notes: • The HDMI SIZE menu can only be displayed when a 480p picture signal is input to the HDMI...
... SAVER MODE NEXT PAGE SELECT OPERATE (1/3) MENU EXIT PICTURE ADJUST 01 CLOCK / TIMERS PREVIOUS SET CLOCK ON / OFF TIMER NEXT PAGE SELECT OPERATE MENU EXIT CLOCK/TIMERS INITIAL SETUP PREVIOUS AUTO TUNER SETUP CHANNEL SUMMARY V-CHIP SET LOCK CODE AUTO DEMO ON NEXT PAGE SELECT OPERATE (4/5) MENU EXIT INITIAL SETUP 04 INITIAL SETUP PREVIOUS DIGITAL SETUP V5 INPUT HDMI NEXT PAGE SELECT OPERATE (5/5) MENU EXIT INITIAL SETUP 05 To INITIAL SETUP 01 Notes: • The HDMI SIZE menu can only be displayed when a 480p picture signal is input to the HDMI...
Instructions
Page 30
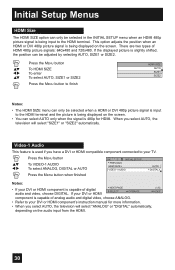
... HDMI NEXT PAGE SELECT OPERATE (1/5) MENU EXIT component is capable of analog audio and digital video, choose ANALOG. • Refer to your TV. π† √® Press the MENU button To VIDEO-1 AUDIO To select ANALOG, DIGITAL or AUTO Press the Menu button when finished INITIAL SETUP PREVIOUS HDMI SIZE VIDEO-1 AUDIO AUTO DIGITAL Notes: • If your DVI or HDMI component's instruction manual for HDMI. When you have a DVI or HDMI compatible component connected to your DVI or HDMI component is capable of HDMI 480p picture signals...
... HDMI NEXT PAGE SELECT OPERATE (1/5) MENU EXIT component is capable of analog audio and digital video, choose ANALOG. • Refer to your TV. π† √® Press the MENU button To VIDEO-1 AUDIO To select ANALOG, DIGITAL or AUTO Press the Menu button when finished INITIAL SETUP PREVIOUS HDMI SIZE VIDEO-1 AUDIO AUTO DIGITAL Notes: • If your DVI or HDMI component's instruction manual for HDMI. When you have a DVI or HDMI compatible component connected to your DVI or HDMI component is capable of HDMI 480p picture signals...

Instructions
Page 34
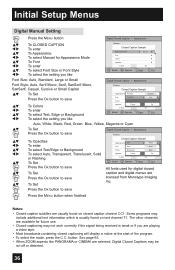
... in MODE To CAPTION or TEXT To select a caption (CC1 to CC4) or text channel (T1 to T4) Press the OK button to adjust the brightness of the television. CLOSED CAPTION AUTO SHUT OFF OFF XDS ID ON NEXT PAGE SELECT OPERATE (3/5) MENU EXIT Closed Caption Many broadcasts now include an onscreen display of closed captions. When you are watching analog channels, you can access and display this information using the closed caption feature...
... in MODE To CAPTION or TEXT To select a caption (CC1 to CC4) or text channel (T1 to T4) Press the OK button to adjust the brightness of the television. CLOSED CAPTION AUTO SHUT OFF OFF XDS ID ON NEXT PAGE SELECT OPERATE (3/5) MENU EXIT Closed Caption Many broadcasts now include an onscreen display of closed captions. When you are watching analog channels, you can access and display this information using the closed caption feature...
Instructions
Page 36
... Auto, Transparent, Translucent, Solid or Flashing To Set Press the OK button to save To Set Press the OK button to save To Set Closed Caption Sample Appearance ModeText Manual White Font Edge White Colors Background Black Opacities Cancel Set Cancel Set Select BACK Operate Back MENU Exit All fonts used for digital closed caption and digital menus are usually found on closed captioning will display a notice at the start of the program. • To select the mode...
... Auto, Transparent, Translucent, Solid or Flashing To Set Press the OK button to save To Set Press the OK button to save To Set Closed Caption Sample Appearance ModeText Manual White Font Edge White Colors Background Black Opacities Cancel Set Cancel Set Select BACK Operate Back MENU Exit All fonts used for digital closed caption and digital menus are usually found on closed captioning will display a notice at the start of the program. • To select the mode...
Instructions
Page 39
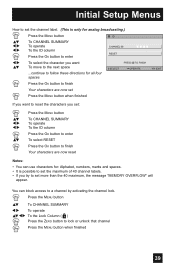
Initial Setup Menus How to set the channel label. (This is only for analog broadcasting.) Press the MENU button ID π† √® √® √® π† To CHANNEL SUMMARY To operate To the ID column Press the OK button to enter To select the character you want to reset the characters you try to lock or unlock that channel Press...
Initial Setup Menus How to set the channel label. (This is only for analog broadcasting.) Press the MENU button ID π† √® √® √® π† To CHANNEL SUMMARY To operate To the ID column Press the OK button to enter To select the character you want to reset the characters you try to lock or unlock that channel Press...
Instructions
Page 65
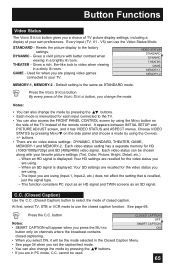
... mode of closed caption. Used for when you are using. - When an HD signal is displayed: Your HD settings are recalled for each input connected to video when viewing in PC mode, C.C. This function considers PC input as an HD signal and TWIN screens as STANDARD mode. At first, select TV, STB or VCR mode to your TV. Press the C.C. DYNAMIC - Default setting is memorized for the video status you are playing video games connected to use the Video Status Mode. buttons...
... mode of closed caption. Used for when you are using. - When an HD signal is displayed: Your HD settings are recalled for each input connected to video when viewing in PC mode, C.C. This function considers PC input as an HD signal and TWIN screens as STANDARD mode. At first, select TV, STB or VCR mode to your TV. Press the C.C. DYNAMIC - Default setting is memorized for the video status you are playing video games connected to use the Video Status Mode. buttons...
Instructions
Page 76
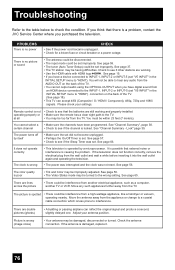
... you have digital sound from the wall outlet and wait a while before inserting it . 76 If the television does not function correctly, remove the electrical plug from an HDMI device connected to the INPUT-1, INPUT-2 or INPUT-5 (set "V5 INPUT" in the INITIAL SETUP menu to see if the Sleep Timer was not reset. See page 50. • The Video Status mode may be interference from the TV. Check the antenna connection. You...
... you have digital sound from the wall outlet and wait a while before inserting it . 76 If the television does not function correctly, remove the electrical plug from an HDMI device connected to the INPUT-1, INPUT-2 or INPUT-5 (set "V5 INPUT" in the INITIAL SETUP menu to see if the Sleep Timer was not reset. See page 50. • The Video Status mode may be interference from the TV. Check the antenna connection. You...
Instructions
Page 77
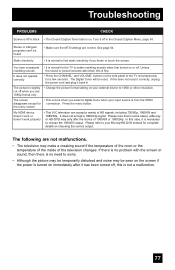
... the TV to your Blu-ray/HD-DVD manual for a few seconds. Stereo or bilingual programs can accept a variety of the television changes. Press the menu button. Troubleshooting PROBLEMS CHECK Screen is 80% black • The Closed Caption Text mode is normal to feel static electricity if you select a digital menu when your input source is fine. • Press the CHANNEL- and VOLUME- If there is no problem with the screen or sound, then...
... the TV to your Blu-ray/HD-DVD manual for a few seconds. Stereo or bilingual programs can accept a variety of the television changes. Press the menu button. Troubleshooting PROBLEMS CHECK Screen is 80% black • The Closed Caption Text mode is normal to feel static electricity if you select a digital menu when your input source is fine. • Press the CHANNEL- and VOLUME- If there is no problem with the screen or sound, then...
Instructions
Page 78
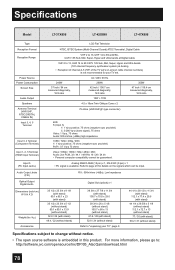
...; The open source software is available. Specifications Model LT-37X898 LT-42X898 LT-47X898 Type Reception Format Reception Range Power Source Power Consumption Screen Size Audio Output Speakers Antenna Terminal (VHF/UHF, ATSC/DIGITAL CABLE IN) Input 3, 4, 5 Terminal Input 3, 4 Terminal (Component Terminal) Input 1, 2, 5 Terminal (HDMI Input Terminal) Input 5 (PC Input Jacks) Audio Output Jacks (FIX) Optical Output Digital Audio Dimensions (inch/cm) W X H X D Weight (lbs / kg) Accessories LCD Flat Television NTSC, BTSC System (Multi-Channel Sound) ATSC Terrestrial, Digital Cable VHF...
...; The open source software is available. Specifications Model LT-37X898 LT-42X898 LT-47X898 Type Reception Format Reception Range Power Source Power Consumption Screen Size Audio Output Speakers Antenna Terminal (VHF/UHF, ATSC/DIGITAL CABLE IN) Input 3, 4, 5 Terminal Input 3, 4 Terminal (Component Terminal) Input 1, 2, 5 Terminal (HDMI Input Terminal) Input 5 (PC Input Jacks) Audio Output Jacks (FIX) Optical Output Digital Audio Dimensions (inch/cm) W X H X D Weight (lbs / kg) Accessories LCD Flat Television NTSC, BTSC System (Multi-Channel Sound) ATSC Terrestrial, Digital Cable VHF...


