

Instructions
Page 2
... not expressly approved by the partly responsible for compliance with FDA performance standards for laser products except for deviations pursuant to correct the interference by turning the equipment off and on the rear of the television cabinet). USE OF CONTROLS, ADJUSTMENTS OR THE PERFORMANCE OF PROCEDURES OTHER THAN THOSE SPECIFIED HEREIN...
... not expressly approved by the partly responsible for compliance with FDA performance standards for laser products except for deviations pursuant to correct the interference by turning the equipment off and on the rear of the television cabinet). USE OF CONTROLS, ADJUSTMENTS OR THE PERFORMANCE OF PROCEDURES OTHER THAN THOSE SPECIFIED HEREIN...
Instructions
Page 4
... INSTRUCTIONS (continued) 23) When you connect the product to other equipment carefully and follow the instructions when making home entertainment enjoyable and safe. If you turn off the power and unplug all cords and cables connected to the minimum level before switching it cannot be pushed, pulled over and cause injury...-outlet must be connected to the grounding system of the building, as close to the point of cable entry as a chest of the other equipment, turn on the product.
... INSTRUCTIONS (continued) 23) When you connect the product to other equipment carefully and follow the instructions when making home entertainment enjoyable and safe. If you turn off the power and unplug all cords and cables connected to the minimum level before switching it cannot be pushed, pulled over and cause injury...-outlet must be connected to the grounding system of the building, as close to the point of cable entry as a chest of the other equipment, turn on the product.
Instructions
Page 7
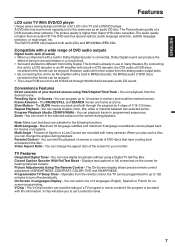
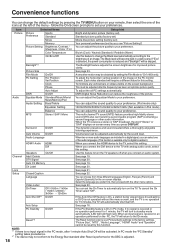
The DVD also has special options; Recalling Up to turn off automatically. The SLOW moves you back and forth through 96 kHz/24 bit exceeds audio CD sound. You can playback tracks in programmed sequences. ...
The DVD also has special options; Recalling Up to turn off automatically. The SLOW moves you back and forth through 96 kHz/24 bit exceeds audio CD sound. You can playback tracks in programmed sequences. ...
Instructions
Page 16
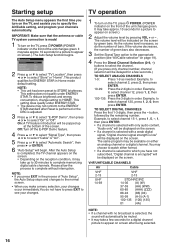
... ▲ or ▼ to select "E-POP Demo", then press ◀ or ▶ to specify the Air/Cable setting, and program your changes. 1 To turn on the TV, press POWER (POWER indicator on the front of green bars also decreases. 3 Set the Signal Type option to the appropriate position (see... only channel number, channel selection will be displayed on either format. • If a channel is selected to which you to select "On" or "Off". Off: Turn off the E-POP Demo feature. 4 Press ▲ or ▼ to select "Signal Type", then press ◀ or ▶ to select "Cable" or "Air". ...
... ▲ or ▼ to select "E-POP Demo", then press ◀ or ▶ to specify the Air/Cable setting, and program your changes. 1 To turn on the TV, press POWER (POWER indicator on the front of green bars also decreases. 3 Set the Signal Type option to the appropriate position (see... only channel number, channel selection will be displayed on either format. • If a channel is selected to which you to select "On" or "Off". Off: Turn off the E-POP Demo feature. 4 Press ▲ or ▼ to select "Signal Type", then press ◀ or ▶ to select "Cable" or "Air". ...
Instructions
Page 17
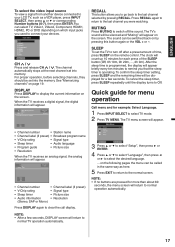
... sound will appear on by pressing RECALL. SLEEP To set into the memory. To cancel the sleep timer, press SLEEP repeatedly until the display turns to display the current information on which input jacks you to go back to normal operation automatically. 17 Main Menu Picture >> Audio CH Channel ...the remaining time will be displayed for a few seconds, DISPLAY screen will count up 10 minutes for example: Select Language. 1 Press INPUT SELECT to turn off the sound. You can be silenced and "Muting" will be called in the same way as here. 5 Press EXIT to return to connect ...
... sound will appear on by pressing RECALL. SLEEP To set into the memory. To cancel the sleep timer, press SLEEP repeatedly until the display turns to display the current information on which input jacks you to go back to normal operation automatically. 17 Main Menu Picture >> Audio CH Channel ...the remaining time will be displayed for a few seconds, DISPLAY screen will count up 10 minutes for example: Select Language. 1 Press INPUT SELECT to turn off the sound. You can be silenced and "Muting" will be called in the same way as here. 5 Press EXIT to return to connect ...
Instructions
Page 18
...reduce the roughness of the picture. In PC mode, if no signal is received or no operation performed for 1 minute, the TV will turn to standby mode automatically (LED light will require a different value for this setting. The Black level will become dark in the PC mode, ...feature adjusts the screen brightness for digital broadcast.) HDMI1 Audio HDMI When you prefer first, then proceed with analog audio cords, select this feature to turn on the TV. Language You can adjust the Equalizer Mode to your preference. Video Label On Timer Off / 0h30m / 1h00m / 1h30m / ...
...reduce the roughness of the picture. In PC mode, if no signal is received or no operation performed for 1 minute, the TV will turn to standby mode automatically (LED light will require a different value for this setting. The Black level will become dark in the PC mode, ...feature adjusts the screen brightness for digital broadcast.) HDMI1 Audio HDMI When you prefer first, then proceed with analog audio cords, select this feature to turn on the TV. Language You can adjust the Equalizer Mode to your preference. Video Label On Timer Off / 0h30m / 1h00m / 1h30m / ...
Instructions
Page 20
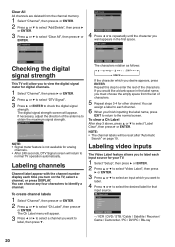
... - HDMI1 - If necessary, adjust the direction of the characters. You can assign a label to select an input which you desire appears, press ENTER. If you turn on page 19. HDMI2 - CH DTV Signal 0 Signal Level 50 100 NOTE: • Signal meter feature is not available for digital channels. 1 Select "Channel", then...
... - HDMI1 - If necessary, adjust the direction of the characters. You can assign a label to select an input which you desire appears, press ENTER. If you turn on page 19. HDMI2 - CH DTV Signal 0 Signal Level 50 100 NOTE: • Signal meter feature is not available for digital channels. 1 Select "Channel", then...
Instructions
Page 24
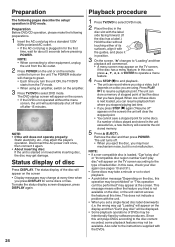
...for the first time, wait for about 5 seconds before pressing POWER. Disconnect the AC power cord once, then connect it depends on a disc you turn on the screen. • If the DVD is not operated without touching either the feature you may hear mechanism noise, but it again. •... be performed" may be prohibited" or "This operation can resume playback from where you stopped playing last time. • If you have played. The unit turns off after 15 minutes. In this time. Since this case, press or ENTER to operate a menu feature. 4 Press STOP ( ) to end playback. •...
...for the first time, wait for about 5 seconds before pressing POWER. Disconnect the AC power cord once, then connect it depends on a disc you turn on the screen. • If the DVD is not operated without touching either the feature you may hear mechanism noise, but it again. •... be performed" may be prohibited" or "This operation can resume playback from where you stopped playing last time. • If you have played. The unit turns off after 15 minutes. In this time. Since this case, press or ENTER to operate a menu feature. 4 Press STOP ( ) to end playback. •...

Instructions
Page 26
... stop mode. 2 Press to 12 points. You can be selected. • Repeat this procedure to set the other 11 scenes. 3 Press MARKER to return to turn the power off or change when: - While playing the DVD, the subtitle may not be able to the normal screen.... Turning the subtitles off ". • Some functions may not work with the marking operation. • The marking is rotated 90 degrees to 12 scenes can resume ...
... stop mode. 2 Press to 12 points. You can be selected. • Repeat this procedure to set the other 11 scenes. 3 Press MARKER to return to turn the power off or change when: - While playing the DVD, the subtitle may not be able to the normal screen.... Turning the subtitles off ". • Some functions may not work with the marking operation. • The marking is rotated 90 degrees to 12 scenes can resume ...
Instructions
Page 34
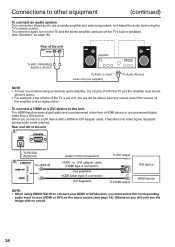
... TV and the amplifier must select the corresponding audio input source (HDMI or DVI) on page 18). To control the audio, turn on the TV and the stereo amplifier, and turn off the TV's built-in speakers (see "Speakers" on the menu screen (see page 18). DVI adapter cable (HDMI type A connector...
... TV and the amplifier must select the corresponding audio input source (HDMI or DVI) on page 18). To control the audio, turn on the TV and the stereo amplifier, and turn off the TV's built-in speakers (see "Speakers" on the menu screen (see page 18). DVI adapter cable (HDMI type A connector...
Instructions
Page 38
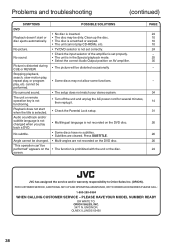
...; Multi-angles are cleared. Press SUBTITLE. Angle cannot be dirty. PAGE 24 10 10 10 24 - 25 35 - - 34 14 31 26 26 26 24 JVC has assigned the service and in the Special playback mode. • Select the correct Audio Output position on the DVD disc. Stopping playback, search, slow.... • TV/DVD selector is not set properly. • The unit is in warranty responsibility to Orion Sales Inc. (ORION). Picture is not functioning. • Turn off the unit and unplug the AC power cord for several minutes, then replug it. No surround sound. • The setup does not match your...
...; Multi-angles are cleared. Press SUBTITLE. Angle cannot be dirty. PAGE 24 10 10 10 24 - 25 35 - - 34 14 31 26 26 26 24 JVC has assigned the service and in the Special playback mode. • Select the correct Audio Output position on the DVD disc. Stopping playback, search, slow.... • TV/DVD selector is not set properly. • The unit is in warranty responsibility to Orion Sales Inc. (ORION). Picture is not functioning. • Turn off the unit and unplug the AC power cord for several minutes, then replug it. No surround sound. • The setup does not match your...


