
Instruction Manual
Page 1
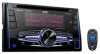
and Serial No. Retain this information for future reference. Serial No. B5A-0831-00 [K] Model No. which are located on the top or bottom of the cabinet. KW-R925BTS / KW-R920BTS CD RECEIVER INSTRUCTION MANUAL RÉCEPTEUR CD MANUEL D'INSTRUCTIONS RECEPTOR CON CD MANUAL DE INSTRUCCIONES ENGLISH FRANÇAIS ESPAÑOL For customer Use: Enter below the Model No.
and Serial No. Retain this information for future reference. Serial No. B5A-0831-00 [K] Model No. which are located on the top or bottom of the cabinet. KW-R925BTS / KW-R920BTS CD RECEIVER INSTRUCTION MANUAL RÉCEPTEUR CD MANUEL D'INSTRUCTIONS RECEPTOR CON CD MANUAL DE INSTRUCCIONES ENGLISH FRANÇAIS ESPAÑOL For customer Use: Enter below the Model No.

Instruction Manual
Page 16
...TuneScan™ You can get a short preview of the song if [TUNE START] is available with SXV200 or later SiriusXM tuner models. The SiriusXM Vehicle Tuner automatically buffers the broadcast audio content of the SmartFavorites channels in step 1. Initially, all preset channels are...This unit can assign a maximum of 6 SmartFavorites channels. Replay starts from the last character. Press and hold the knob. Using SiriusXM tuner models later than SXV200: This unit can assign a maximum of 18 SmartFavorites channels. The unit continues playing the current song. • To select...
...TuneScan™ You can get a short preview of the song if [TUNE START] is available with SXV200 or later SiriusXM tuner models. The SiriusXM Vehicle Tuner automatically buffers the broadcast audio content of the SmartFavorites channels in step 1. Initially, all preset channels are...This unit can assign a maximum of 6 SmartFavorites channels. Replay starts from the last character. Press and hold the knob. Using SiriusXM tuner models later than SXV200: This unit can assign a maximum of 18 SmartFavorites channels. The unit continues playing the current song. • To select...
Instruction Manual
Page 36
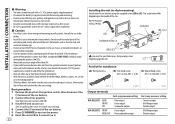
... 5 seconds. ( 3) 32 Installing the unit (in -dash mounting). 4 Connect the terminal of the car battery. 5 Press to turn on the model of the cars. Do not touch the metal parts of this unit in parallel. • Connect speakers with vinyl tape to prevent a short circuit. ...(B) Flat head screw (C) Round head screw M5 × 8 mm (M5 × 3/8") M5 × 8 mm (M5 × 3/8") Output terminals KW-R925BTS REAR FRONT SW KW-R920BTS FRONT REAR/SW For 2-way crossover setting : Rear output : Front output : Subwoofer output : Front output : Rear/subwoofer output For 3-way crossover setting :...
... 5 seconds. ( 3) 32 Installing the unit (in -dash mounting). 4 Connect the terminal of the car battery. 5 Press to turn on the model of the cars. Do not touch the metal parts of this unit in parallel. • Connect speakers with vinyl tape to prevent a short circuit. ...(B) Flat head screw (C) Round head screw M5 × 8 mm (M5 × 3/8") M5 × 8 mm (M5 × 3/8") Output terminals KW-R925BTS REAR FRONT SW KW-R920BTS FRONT REAR/SW For 2-way crossover setting : Rear output : Front output : Subwoofer output : Front output : Rear/subwoofer output For 3-way crossover setting :...


