Instruction Manual
Page 6
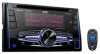
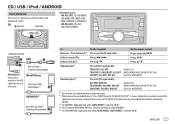
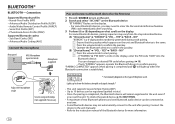
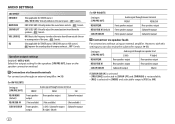
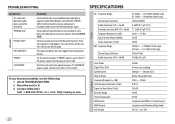
... STARTED 4 1 Cancel the demonstration 2 Set the clock 3 Set the basic settings RADIO 5 CD / USB / iPod / ANDROID 7 Pandora® 9 iHeartRadio® 10 SiriusXM® Radio 11 BLUETOOTH® 14 AUX 20 AUDIO SETTINGS 20 DISPLAY SETTINGS 24 REFERENCES 26 Maintenance More information TROUBLESHOOTING 28 SPECIFICATIONS 30 INSTALLATION / CONNECTION 32 2 BEFORE USE IMPORTANT • To ensure proper use, please read this manual • Operations are explained mainly using buttons on the faceplate of KW-R925BTS. • English indications...
... STARTED 4 1 Cancel the demonstration 2 Set the clock 3 Set the basic settings RADIO 5 CD / USB / iPod / ANDROID 7 Pandora® 9 iHeartRadio® 10 SiriusXM® Radio 11 BLUETOOTH® 14 AUX 20 AUDIO SETTINGS 20 DISPLAY SETTINGS 24 REFERENCES 26 Maintenance More information TROUBLESHOOTING 28 SPECIFICATIONS 30 INSTALLATION / CONNECTION 32 2 BEFORE USE IMPORTANT • To ensure proper use, please read this manual • Operations are explained mainly using buttons on the faceplate of KW-R925BTS. • English indications...
Instruction Manual
Page 8
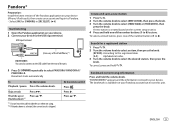
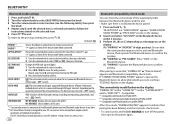
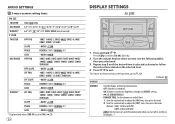
... the knob. 3 Turn the volume knob to select [CLOCK SET], then press the knob. 4 Turn the volume knob to make the settings, then press the knob. F/W UPDATE SYSTEM F/W xxxx YES: Starts upgrading the firmware. ; OFF: Disables. "DEMO OFF" appears. 2 Set the clock 1 Press and hold . 2 Turn the volume knob to select an item (see : . NO: Cancels. * Not displayed when the corresponding source is selected or activated. 4 Press to default (except the stored station). ;
... the knob. 3 Turn the volume knob to select [CLOCK SET], then press the knob. 4 Turn the volume knob to make the settings, then press the knob. F/W UPDATE SYSTEM F/W xxxx YES: Starts upgrading the firmware. ; OFF: Disables. "DEMO OFF" appears. 2 Set the clock 1 Press and hold . 2 Turn the volume knob to select an item (see : . NO: Cancels. * Not displayed when the corresponding source is selected or activated. 4 Press to default (except the stored station). ;
Instruction Manual
Page 10
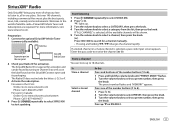
..., press . If there is a station broadcasting a program of the same PTY code as you have selected, that station is selected for [AM] in step 1. *3 Only for AM is selected/activated or follow the instructions stated on . 2 FM/ AM/ SIRIUS XM*1: Select the source. 3 01 to 18 (for FM/ SIRIUS XM)/ 01 to 18 stations for AM): Select the preset station. 4 Set the activation day*2 and time. AREA SA: For some...
..., press . If there is a station broadcasting a program of the same PTY code as you have selected, that station is selected for [AM] in step 1. *3 Only for AM is selected/activated or follow the instructions stated on . 2 FM/ AM/ SIRIUS XM*1: Select the source. 3 01 to 18 (for FM/ SIRIUS XM)/ 01 to 18 stations for AM): Select the preset station. 4 Set the activation day*2 and time. AREA SA: For some...
Instruction Manual
Page 11
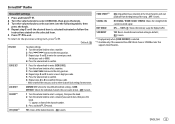
... Selectable source: • KW-R925BTS: CD/ USB FRONT/ USB REAR/ IPOD FRONT/ IPOD REAR/ ANDROID-F/ ANDROID-R • KW-R920BTS: CD/ USB/ USB-IPOD/ ANDROID USB input terminal USB USB 2.0 cable*1 (commercially available) KW-R925BTS: You can also install the latest version of JVC MUSIC PLAY application on your Android device before connecting. ( 26) *3 For ANDROID: Applicable only when [AUTO MODE] is selected. ( 8) *4 For CD: Only for iPod/ ANDROID. *5 For iPod/ ANDROID: Applicable only when [HEAD MODE]/ [AUTO MODE] is shown. Press . Press . This does not work...
... Selectable source: • KW-R925BTS: CD/ USB FRONT/ USB REAR/ IPOD FRONT/ IPOD REAR/ ANDROID-F/ ANDROID-R • KW-R920BTS: CD/ USB/ USB-IPOD/ ANDROID USB input terminal USB USB 2.0 cable*1 (commercially available) KW-R925BTS: You can also install the latest version of JVC MUSIC PLAY application on your Android device before connecting. ( 26) *3 For ANDROID: Applicable only when [AUTO MODE] is selected. ( 8) *4 For CD: Only for iPod/ ANDROID. *5 For iPod/ ANDROID: Applicable only when [HEAD MODE]/ [AUTO MODE] is shown. Press . Press . This does not work...
Instruction Manual
Page 13
... listening 1 Open the Pandora application on your device. 2 Connect your device to the USB input terminal. USB input terminal and / or (Accessory of the iPod/iPhone)*1 KW-R925BTS: You can also connect to the USB cable from the rear of the number buttons (1 to 6) to store. On the remote control Press . Press I. To select a stored station, press one of the unit. 3 Press repeatedly to select [FROM TRACK] or [FROM ARTIST], then press...
... listening 1 Open the Pandora application on your device. 2 Connect your device to the USB input terminal. USB input terminal and / or (Accessory of the iPod/iPhone)*1 KW-R925BTS: You can also connect to the USB cable from the rear of the number buttons (1 to 6) to store. On the remote control Press . Press I. To select a stored station, press one of the unit. 3 Press repeatedly to select [FROM TRACK] or [FROM ARTIST], then press...
Instruction Manual
Page 15
... "PRESET MODE" flashes. 2 Turn the volume knob to 6). 1 Press and hold one place. The preset number flashes and "MEMORY" appears. Get over 140 channels, including commercial-free music plus the best sports, news, talk, comedy and entertainment. Press one of the number buttons (1 to select a preset number, then press the knob. Press on the rear panel SiriusXM Vehicle Tuner 2 Check your Radio ID for a channel manually. • Pressing and holding changes the channel rapidly. Preparation: 1 Connect...
... "PRESET MODE" flashes. 2 Turn the volume knob to 6). 1 Press and hold one place. The preset number flashes and "MEMORY" appears. Get over 140 channels, including commercial-free music plus the best sports, news, talk, comedy and entertainment. Press one of the number buttons (1 to select a preset number, then press the knob. Press on the rear panel SiriusXM Vehicle Tuner 2 Check your Radio ID for a channel manually. • Pressing and holding changes the channel rapidly. Preparation: 1 Connect...
Instruction Manual
Page 17
... RESET YES: Resets stored channel and lock setting to the previous setting item, press . NO: Cancels. *1 Displayed only when [USER DEFINED] is selected. *2 Available only if the connected SiriusXM Vehicle Tuner is SXV200 or later that supports SmartFavorites. LOCK SET MATURE CH: Selects the SiriusXM-defined lock setting. ; OFF: Cancels. TUNE START*2 ON: All qualified music channels in front of the song. ; ENGLISH 13 CH EDIT*1 1 Turn the volume...
... RESET YES: Resets stored channel and lock setting to the previous setting item, press . NO: Cancels. *1 Displayed only when [USER DEFINED] is selected. *2 Available only if the connected SiriusXM Vehicle Tuner is SXV200 or later that supports SmartFavorites. LOCK SET MATURE CH: Selects the SiriusXM-defined lock setting. ; OFF: Cancels. TUNE START*2 ON: All qualified music channels in front of the song. ; ENGLISH 13 CH EDIT*1 1 Turn the volume...
Instruction Manual
Page 18
... display. Connect the device to the unit manually. • Refer to the instruction manual of two Bluetooth phones and one Bluetooth audio device can change to a desired PIN code before pairing. ( 18) • If only "PAIRING" appears, operate the Bluetooth device to the unit after searching. 3 Perform (A) or (B) depending on what scrolls on the display, enter the PIN code "0000" into the Bluetooth device. BLUETOOTH® BLUETOOTH - Connection Supported Bluetooth profiles - Hands-Free Profile (HFP) - Audio/Video Remote Control Profile (AVRCP) - Operate the Bluetooth...
... display. Connect the device to the unit manually. • Refer to the instruction manual of two Bluetooth phones and one Bluetooth audio device can change to a desired PIN code before pairing. ( 18) • If only "PAIRING" appears, operate the Bluetooth device to the unit after searching. 3 Perform (A) or (B) depending on what scrolls on the display, enter the PIN code "0000" into the Bluetooth device. BLUETOOTH® BLUETOOTH - Connection Supported Bluetooth profiles - Hands-Free Profile (HFP) - Audio/Video Remote Control Profile (AVRCP) - Operate the Bluetooth...

Instruction Manual
Page 19
... turned on the Android device ( 7) and [AUTO MODE] is selected ( 8). JVC MUSIC PLAY application is installed on . - [AUTO CNNT] is set to the USB input terminal, pairing request (via Bluetooth) is automatically activated. Press and hold or the Press and hold . Answer a call Reject a call End a call ... volume knob. To First incoming call On the faceplate On the remote control Press or the volume knob. ENGLISH 15 BLUETOOTH® Auto Pairing When you connect the iPhone/ iPod...
... turned on the Android device ( 7) and [AUTO MODE] is selected ( 8). JVC MUSIC PLAY application is installed on . - [AUTO CNNT] is set to the USB input terminal, pairing request (via Bluetooth) is automatically activated. Press and hold or the Press and hold . Answer a call Reject a call End a call ... volume knob. To First incoming call On the faceplate On the remote control Press or the volume knob. ENGLISH 15 BLUETOOTH® Auto Pairing When you connect the iPhone/ iPod...
Instruction Manual
Page 22
... supported profile between the Bluetooth device and the unit. • Make sure there is selected/activated or follow the instructions stated on the power again. Depending on the operating system of two Bluetooth phones and one Bluetooth audio device at any time. *2 JVC Smart Music Control is successful, "PAIRING OK" "[Device Name]" appears and Bluetooth compatibility check starts. INFORMATION MY BT NAME: Displays the unit name (JVC UNIT). ; For JVC Smart Music Control operations, visit JVC website: . 18 Bluetooth compatibility check mode You can only connect...
... supported profile between the Bluetooth device and the unit. • Make sure there is selected/activated or follow the instructions stated on the power again. Depending on the operating system of two Bluetooth phones and one Bluetooth audio device at any time. *2 JVC Smart Music Control is successful, "PAIRING OK" "[Device Name]" appears and Bluetooth compatibility check starts. INFORMATION MY BT NAME: Displays the unit name (JVC UNIT). ; For JVC Smart Music Control operations, visit JVC website: . 18 Bluetooth compatibility check mode You can only connect...
Instruction Manual
Page 24
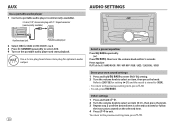
... EASY EQ setting. 2 Turn the volume knob to select an item, then press the knob. AUX Use a portable audio player 1 Connect a portable audio player (commercially available). 3.5 mm (1/8") stereo mini plug with "L" shaped connector (commercially available) AUDIO SETTINGS Auxiliary input jack Portable audio player 2 Select [ON] for [AUX] in [SRC SELECT]. ( 4) 3 Press repeatedly to select AUX. 4 Turn on the selected item. 4 Press to exit. Preset equalizer: FLAT (default)/ HARD ROCK / POP / HIP HOP / R&B / JAZZ / CLASSICAL / USER Store your own sound settings 1 Press and...
... EASY EQ setting. 2 Turn the volume knob to select an item, then press the knob. AUX Use a portable audio player 1 Connect a portable audio player (commercially available). 3.5 mm (1/8") stereo mini plug with "L" shaped connector (commercially available) AUDIO SETTINGS Auxiliary input jack Portable audio player 2 Select [ON] for [AUX] in [SRC SELECT]. ( 4) 3 Press repeatedly to select AUX. 4 Turn on the selected item. 4 Press to exit. Preset equalizer: FLAT (default)/ HARD ROCK / POP / HIP HOP / R&B / JAZZ / CLASSICAL / USER Store your own sound settings 1 Press and...
Instruction Manual
Page 25
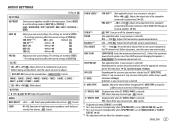
..., Speaker output settings) SPK SIZE X ' OVER Depending on the crossover type you want to prevent damaging the speakers.) ; AUDIO BASS BOOST +01 - +05: Selects your own sound settings. OFF: Cancels. F15 (00): Adjusts the front and rear speaker output balance. VOL ADJUST -15 - +06 (00): Preset the initial volume level of the subwoofer connected to +09 00) PRO EQ Adjust your preferred bass boost level. ; X ' OVER 2-WAY (Displayed only when [X ' OVER 3-WAY] is selected) YES: Selects...
..., Speaker output settings) SPK SIZE X ' OVER Depending on the crossover type you want to prevent damaging the speakers.) ; AUDIO BASS BOOST +01 - +05: Selects your own sound settings. OFF: Cancels. F15 (00): Adjusts the front and rear speaker output balance. VOL ADJUST -15 - +06 (00): Preset the initial volume level of the subwoofer connected to +09 00) PRO EQ Adjust your preferred bass boost level. ; X ' OVER 2-WAY (Displayed only when [X ' OVER 3-WAY] is selected) YES: Selects...
Instruction Manual
Page 26
...): (Mute) (For KW-R920BTS) Setting on the speaker connection method. LV1/ LV2/ LV3: Virtually adjust the sound position heard from outside the car or running noise of compressed music. ; OFF: Cancels. OFF: Cancels. Connection via speaker leads For connections without using an external amplifier. However, with this settings you can also enjoy the subwoofer output. ( 33) Setting on [SPK/PRE OUT] Audio signal through lineout terminal FRONT REAR SW REAR/REAR (default) Front speakers Rear speakers output output Subwoofer output REAR/SUB...
...): (Mute) (For KW-R920BTS) Setting on the speaker connection method. LV1/ LV2/ LV3: Virtually adjust the sound position heard from outside the car or running noise of compressed music. ; OFF: Cancels. OFF: Cancels. Connection via speaker leads For connections without using an external amplifier. However, with this settings you can also enjoy the subwoofer output. ( 33) Setting on [SPK/PRE OUT] Audio signal through lineout terminal FRONT REAR SW REAR/REAR (default) Front speakers Rear speakers output output Subwoofer output REAR/SUB...
Instruction Manual
Page 28
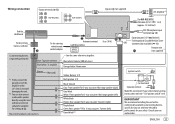
... to enter [COLOR] directly. 2 Turn the volume knob to select an item (see the following table), then press the knob. 3 Repeat step 2 until the desired item is selected/activated or follow the instructions stated on the car headlights. *1 Brightness changes to [NIGHT] setting. ( 25, [BRIGHTNESS]) DIMMER TIME: Set the dimmer on and off time. 1 Turn the volume knob to adjust the [ON] time, then press the knob. 2 Turn the volume knob to...
... to enter [COLOR] directly. 2 Turn the volume knob to select an item (see the following table), then press the knob. 3 Repeat step 2 until the desired item is selected/activated or follow the instructions stated on the car headlights. *1 Brightness changes to [NIGHT] setting. ( 25, [BRIGHTNESS]) DIMMER TIME: Set the dimmer on and off time. 1 Turn the volume knob to adjust the [ON] time, then press the knob. 2 Turn the volume knob to...

Instruction Manual
Page 31
...-party service, therefore the specifications are subject to browse video files on the "Videos" menu in [HEAD MODE]. • The song order displayed on the selection menu of this unit may differ from that of the iPod/ iPhone. • Depending on the version of the operating system of the services may not work with some functions may not operate on a USB mass storage class device. • You cannot connect a USB device via AOA...
...-party service, therefore the specifications are subject to browse video files on the "Videos" menu in [HEAD MODE]. • The song order displayed on the selection menu of this unit may differ from that of the iPod/ iPhone. • Depending on the version of the operating system of the services may not work with some functions may not operate on a USB mass storage class device. • You cannot connect a USB device via AOA...
Instruction Manual
Page 32
... not work. • Detach and reset the iPod/iPhone using hard reset. Source cannot be displayed correctly. • Reconnect the Android device. • If in [AUDIO MODE], launch any media player application on the Android device and start playback. • If in supported formats. ( 27) cannot be heard. • Adjust the volume to the optimum level. • Check the cords and connections. Press , then insert the disc correctly. Connect the antenna firmly. Make...
... not work. • Detach and reset the iPod/iPhone using hard reset. Source cannot be displayed correctly. • Reconnect the Android device. • If in [AUDIO MODE], launch any media player application on the Android device and start playback. • If in supported formats. ( 27) cannot be heard. • Adjust the volume to the optimum level. • Check the cords and connections. Press , then insert the disc correctly. Connect the antenna firmly. Make...
Instruction Manual
Page 33
... the unit and the Bluetooth device, then perform pairing again. ( 14) Bluetooth® Echo or noise occurs. • Adjust the microphone unit's position. ( 14) • Check the [ECHO CANCEL] setting. ( 16) Phone sound quality is not deliverable. "CH LOCKED LOCK CODE?" Enter the correct pass code to unlock. ( 13) SiriusXM® Radio "CHAN UNSUB" The selected channel is insufficient content to PRESS ENTER TO CONTINUE." "CODE ERROR" Make...
... the unit and the Bluetooth device, then perform pairing again. ( 14) Bluetooth® Echo or noise occurs. • Adjust the microphone unit's position. ( 14) • Check the [ECHO CANCEL] setting. ( 16) Phone sound quality is not deliverable. "CH LOCKED LOCK CODE?" Enter the correct pass code to unlock. ( 13) SiriusXM® Radio "CHAN UNSUB" The selected channel is insufficient content to PRESS ENTER TO CONTINUE." "CODE ERROR" Make...
Instruction Manual
Page 34
... & Flutter Frequency Response (±1 dB) Total Harmonic Distortion (1 kHz) Signal-to use the Bluetooth function. "PAIRING FULL" "PLEASE WAIT" "NOT SUPPORT" "ERROR" "H/W ERROR" Remedy • Check whether the connected Bluetooth audio player supports Audio/Video Remote Control Profile (AVRCP). (Refer to the instructions of registered devices has reached its limit. The connected phone does not support Voice Recognition feature. TROUBLESHOOTING SPECIFICATIONS Bluetooth® Symptom The connected Bluetooth audio player cannot be controlled. The number of your nearest service center.
... & Flutter Frequency Response (±1 dB) Total Harmonic Distortion (1 kHz) Signal-to use the Bluetooth function. "PAIRING FULL" "PLEASE WAIT" "NOT SUPPORT" "ERROR" "H/W ERROR" Remedy • Check whether the connected Bluetooth audio player supports Audio/Video Remote Control Profile (AVRCP). (Refer to the instructions of registered devices has reached its limit. The connected phone does not support Voice Recognition feature. TROUBLESHOOTING SPECIFICATIONS Bluetooth® Symptom The connected Bluetooth audio player cannot be controlled. The number of your nearest service center.
Instruction Manual
Page 36
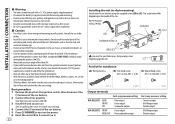
...; Mount the unit at an angle of less than 50 W. If the maximum power of the speakers is installed, check whether the brake lamps, blinkers, wipers, etc. Part list for installation (A) Wiring harness (B) Flat head screw (C) Round head screw M5 × 8 mm (M5 × 3/8") M5 × 8 mm (M5 × 3/8") Output terminals KW-R925BTS REAR FRONT SW KW-R920BTS FRONT REAR/SW For 2-way crossover setting : Rear output : Front output : Subwoofer output : Front output : Rear/subwoofer output For...
...; Mount the unit at an angle of less than 50 W. If the maximum power of the speakers is installed, check whether the brake lamps, blinkers, wipers, etc. Part list for installation (A) Wiring harness (B) Flat head screw (C) Round head screw M5 × 8 mm (M5 × 3/8") M5 × 8 mm (M5 × 3/8") Output terminals KW-R925BTS REAR FRONT SW KW-R920BTS FRONT REAR/SW For 2-way crossover setting : Rear output : Front output : Subwoofer output : Front output : Rear/subwoofer output For...
Instruction Manual
Page 37
... KW-R925BTS) USB cable (DC 5 V 1.5 A) (approx. 1.2 m/4 feet) MIC (Microphone input terminal) ( 14) Expansion port (12 V 500 mA) To the optional SiriusXM Vehicle Tuner (commercially available) ( 11) Remote wire (not supplied) Ignition switch Car fuse block Separate red wire Make this lead without an external subwoofer amplifier. Blue: To power antenna Blue/white: To amplifier Blue/white: Remote (200 mA max.) Orange/white: Illumination Fuse (10 A) Brown (Not used) *1 Firmly connect the ground wire of the amplifier...
... KW-R925BTS) USB cable (DC 5 V 1.5 A) (approx. 1.2 m/4 feet) MIC (Microphone input terminal) ( 14) Expansion port (12 V 500 mA) To the optional SiriusXM Vehicle Tuner (commercially available) ( 11) Remote wire (not supplied) Ignition switch Car fuse block Separate red wire Make this lead without an external subwoofer amplifier. Blue: To power antenna Blue/white: To amplifier Blue/white: Remote (200 mA max.) Orange/white: Illumination Fuse (10 A) Brown (Not used) *1 Firmly connect the ground wire of the amplifier...


