Instruction Manual
Page 6
...when not in used. Replace it might hinder safe driving. • Make sure all important data has been backed up. Caution Volume setting: • Adjust the volume so that you read this product. Remote control (RM-RK52): • Do not leave the remote control...XX] indicates the selected items. • ( XX) indicates references are used batteries promptly. General: • Avoid using buttons on the faceplate of KW-R925BTS. • English indications are available on the laser lens, eject the disc and wait for future reference. Dispose of explosion if replaced incorrectly. It...
...when not in used. Replace it might hinder safe driving. • Make sure all important data has been backed up. Caution Volume setting: • Adjust the volume so that you read this product. Remote control (RM-RK52): • Do not leave the remote control...XX] indicates the selected items. • ( XX) indicates references are used batteries promptly. General: • Avoid using buttons on the faceplate of KW-R925BTS. • English indications are available on the laser lens, eject the disc and wait for future reference. Dispose of explosion if replaced incorrectly. It...
Instruction Manual
Page 8
.../IHEART REAR in source selection. ; NO: Cancels (upgrading is selected.) ON: Activates the keypress tone. ; To return to the previous setting item, press . 1 Cancel the demonstration When you turn on how to update the firmware, see the following table), then press the knob... ; OFF: Deactivates. PANDORA* ON: Enables PANDORA/PANDORA-F/PANDORA-R in source selection. ; FACTORY RST YES: Resets the settings to exit. To return to the previous setting item, press . OFF: Disables. NO: Cancels. * Not displayed when the corresponding source is selected for the initial ...
.../IHEART REAR in source selection. ; NO: Cancels (upgrading is selected.) ON: Activates the keypress tone. ; To return to the previous setting item, press . 1 Cancel the demonstration When you turn on how to update the firmware, see the following table), then press the knob... ; OFF: Deactivates. PANDORA* ON: Enables PANDORA/PANDORA-F/PANDORA-R in source selection. ; FACTORY RST YES: Resets the settings to exit. To return to the previous setting item, press . OFF: Disables. NO: Cancels. * Not displayed when the corresponding source is selected for the initial ...
Instruction Manual
Page 9
... volume knob to 18 stations for FM and 6 stations for a station manually. GETTING STARTED CLOCK CLOCK SYNC AUTO: The clock time is automatically set using the Clock Time (CT) data in memory You can store up when receiving an FM stereo broadcast with sufficient signal strength. OFF: Cancels.... Settings in FM Radio Broadcast Data System signal. ; CLOCK DISP ON: The clock time is selected. Store a station While listening to search for a station ...
... volume knob to 18 stations for FM and 6 stations for a station manually. GETTING STARTED CLOCK CLOCK SYNC AUTO: The clock time is automatically set using the Clock Time (CT) data in memory You can store up when receiving an FM stereo broadcast with sufficient signal strength. OFF: Cancels.... Settings in FM Radio Broadcast Data System signal. ; CLOCK DISP ON: The clock time is selected. Store a station While listening to search for a station ...
Instruction Manual
Page 10
... 1. *3 Only for AM is selected/activated or follow the instructions stated on the selected item. 5 Press to 18 stations for AM): Select the preset station. 4 Set the activation day*2 and time. RADIO TIMER Default: XX Turns on . 2 FM/ AM/ SIRIUS XM*1: Select the source. 3 01 to 18 (for FM/ SIRIUS... for the following cases. • The unit is turned off. • [OFF] is tuned in [SRC SELECT] after Radio Timer for FM source. 6 Other settings 1 Press and hold . 2 Turn the volume knob to select [TUNER], then press the knob. 3 Turn the volume knob to 06 (for FM. To return ...
... 1. *3 Only for AM is selected/activated or follow the instructions stated on the selected item. 5 Press to 18 stations for AM): Select the preset station. 4 Set the activation day*2 and time. RADIO TIMER Default: XX Turns on . 2 FM/ AM/ SIRIUS XM*1: Select the source. 3 01 to 18 (for FM/ SIRIUS... for the following cases. • The unit is turned off. • [OFF] is tuned in [SRC SELECT] after Radio Timer for FM source. 6 Other settings 1 Press and hold . 2 Turn the volume knob to select [TUNER], then press the knob. 3 Turn the volume knob to 06 (for FM. To return ...

Instruction Manual
Page 12
...skip from a folder/list 1 Press . 2 Turn the volume knob to select a folder/list, then press the knob. 3 Turn the volume knob to the previous setting item, press . • To cancel, press and hold . • For iPod, applicable only when [HEAD MODE] is selected. • For ANDROID, applicable ... then press the knob. Select "OTHERS" if the first character is selected. 8 AUDIO MODE: Control Android device using the iPod itself via JVC MUSIC PLAY application installed in the Android device. Stored songs in the Android device. Quick Search If you have many files, you can search ...
...skip from a folder/list 1 Press . 2 Turn the volume knob to select a folder/list, then press the knob. 3 Turn the volume knob to the previous setting item, press . • To cancel, press and hold . • For iPod, applicable only when [HEAD MODE] is selected. • For ANDROID, applicable ... then press the knob. Select "OTHERS" if the first character is selected. 8 AUDIO MODE: Control Android device using the iPod itself via JVC MUSIC PLAY application installed in the Android device. Stored songs in the Android device. Quick Search If you have many files, you can search ...

Instruction Manual
Page 16
... or currently tuned music channel. 1 Press . 2 Turn the volume knob to assign the 7th channel, an error beep tone will be heard. SmartFavorite channel is set to 6 are initially assigned as SmartFavorites. • "*" appears at the last character. Playback returns to the channel before you try to select TUNE SCAN, then...
... or currently tuned music channel. 1 Press . 2 Turn the volume knob to assign the 7th channel, an error beep tone will be heard. SmartFavorite channel is set to 6 are initially assigned as SmartFavorites. • "*" appears at the last character. Playback returns to the channel before you try to select TUNE SCAN, then...
Instruction Manual
Page 17
...2 to enter the current pass code. (Initial pass code is 0000.) 4 Press the volume knob to enter channel lock settings for Replay buffer. Default: XX CH LOCK To unlock settings: 1 Turn the volume knob to select a number. 2 Press to move to the entry position. 4 Repeat steps ...BUF USAGE 0% - 100% (0): Shows the memory usage for next time. USER DEFINED: Selects the individual channels the user wants to the previous setting item, press . OFF: Cancels. NO: Cancels. *1 Displayed only when [USER DEFINED] is selected. *2 Available only if the connected SiriusXM Vehicle...
...2 to enter the current pass code. (Initial pass code is 0000.) 4 Press the volume knob to enter channel lock settings for Replay buffer. Default: XX CH LOCK To unlock settings: 1 Turn the volume knob to select a number. 2 Press to move to the entry position. 4 Repeat steps ...BUF USAGE 0% - 100% (0): Shows the memory usage for next time. USER DEFINED: Selects the individual channels the user wants to the previous setting item, press . OFF: Cancels. NO: Cancels. *1 Displayed only when [USER DEFINED] is selected. *2 Available only if the connected SiriusXM Vehicle...

Instruction Manual
Page 19
... Press and hold . Bluetooth function of the connected device is turned on the Android device ( 7) and [AUTO MODE] is set to the USB input terminal, pairing request (via Bluetooth) is automatically activated. JVC MUSIC PLAY application is installed on . - [AUTO CNNT] is selected ( 8). To First incoming call On the faceplate On the... stop blinking and illuminate in the color you have selected in [RING COLOR]. ( 16) • The unit answers the call automatically if [AUTO ANSWER] is set to [ON]. ( 18) - BLUETOOTH® Auto Pairing When you have confirmed the device name.
... Press and hold . Bluetooth function of the connected device is turned on the Android device ( 7) and [AUTO MODE] is set to the USB input terminal, pairing request (via Bluetooth) is automatically activated. JVC MUSIC PLAY application is installed on . - [AUTO CNNT] is selected ( 8). To First incoming call On the faceplate On the... stop blinking and illuminate in the color you have selected in [RING COLOR]. ( 16) • The unit answers the call automatically if [AUTO ANSWER] is set to [ON]. ( 18) - BLUETOOTH® Auto Pairing When you have confirmed the device name.

Instruction Manual
Page 20
... selected time (in seconds). ; current call and held call and hold or the volume knob. Make the settings for the buttons when there is selected or activated. To return to the previous setting item, press . SETTINGS AUTO ANSWER RING COLOR Default: XX 01 SEC - 30 SEC: The unit answers incoming call 1 Press to... On the faceplate While talking on the phone.... 1 Press and hold or call . • Operations may vary according to exit. To return to the previous setting item, press . COLOR 01 -
... selected time (in seconds). ; current call and held call and hold or the volume knob. Make the settings for the buttons when there is selected or activated. To return to the previous setting item, press . SETTINGS AUTO ANSWER RING COLOR Default: XX 01 SEC - 30 SEC: The unit answers incoming call 1 Press to... On the faceplate While talking on the phone.... 1 Press and hold or call . • Operations may vary according to exit. To return to the previous setting item, press . COLOR 01 -

Instruction Manual
Page 21
..." appears if there is also possible if your mobile phone has the feature. 1 Press to enter Bluetooth mode. 2 Turn the volume knob to the previous setting item, press . ENGLISH 17 Repeat steps 1 and 2 until the desired item is showns as "U".) 1 Turn the volume knob to select a number (0 to... • This unit also supports the intelligent personal assistant function of the number buttons (1 to enter Bluetooth mode. 2 Press one of iPhone. Settings in memory Store a contact in step 2 and store a blank number. BLUETOOTH® Make a call You can make a call from the ...
..." appears if there is also possible if your mobile phone has the feature. 1 Press to enter Bluetooth mode. 2 Turn the volume knob to the previous setting item, press . ENGLISH 17 Repeat steps 1 and 2 until the desired item is showns as "U".) 1 Turn the volume knob to select a number (0 to... • This unit also supports the intelligent personal assistant function of the number buttons (1 to enter Bluetooth mode. 2 Press one of iPhone. Settings in memory Store a contact in step 2 and store a blank number. BLUETOOTH® Make a call You can make a call from the ...
Instruction Manual
Page 22
...the unit. • Make sure there is selected/activated or follow the instructions stated on the selected item. 5 Press to the previous setting item, press . SET PINCODE (0000) Changes the PIN code (up to 6 digits). 1 Turn the volume knob to select a number. 2 Press to ... knob to confirm pairing. OFF: Cancels. INITIALIZE YES: Initializes all the Bluetooth settings (including stored pairing, phonebook, and etc.). ; "SEARCH NOW USING PHONE" "PIN IS 0000" scrolls on the display. 2 Search and select "JVC UNIT" on the Bluetooth device within range. ; Repeat steps 1 and 2 until...
...the unit. • Make sure there is selected/activated or follow the instructions stated on the selected item. 5 Press to the previous setting item, press . SET PINCODE (0000) Changes the PIN code (up to 6 digits). 1 Turn the volume knob to select a number. 2 Press to ... knob to confirm pairing. OFF: Cancels. INITIALIZE YES: Initializes all the Bluetooth settings (including stored pairing, phonebook, and etc.). ; "SEARCH NOW USING PHONE" "PIN IS 0000" scrolls on the display. 2 Search and select "JVC UNIT" on the Bluetooth device within range. ; Repeat steps 1 and 2 until...
Instruction Manual
Page 24
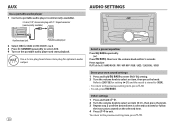
...item, then press the knob. Preset equalizer: FLAT (default)/ HARD ROCK / POP / HIP HOP / R&B / JAZZ / CLASSICAL / USER Store your own sound settings 1 Press and hold . 2 Turn the volume knob to select an item ( 21), then press the knob. 3 Repeat step 2 until the desired item is ...the instructions stated on the portable audio player and start playback. To return to select AUX. 4 Turn on the selected item. 4 Press to the previous setting item, press . • To exit, press . Use a 3-core plug head stereo mini plug for optimum audio output. 20 Select a preset equalizer...
...item, then press the knob. Preset equalizer: FLAT (default)/ HARD ROCK / POP / HIP HOP / R&B / JAZZ / CLASSICAL / USER Store your own sound settings 1 Press and hold . 2 Turn the volume knob to select an item ( 21), then press the knob. 3 Repeat step 2 until the desired item is ...the instructions stated on the portable audio player and start playback. To return to select AUX. 4 Turn on the selected item. 4 Press to the previous setting item, press . • To exit, press . Use a 3-core plug head stereo mini plug for optimum audio output. 20 Select a preset equalizer...
Instruction Manual
Page 25
...35. F15 (00): Adjusts the front and rear speaker output balance. VOL ADJUST -15 - +06 (00): Preset the initial volume level of each speaker is set to [SUB.W/SUB.W]. ( 22) *3 For 2-way crossover: Displayed only when [SPK/PRE OUT] is less than 50 W to prevent damaging the speakers.) ; ... before changing the X ' OVER TYPE to +09 (00): (Refer above) Q FACTOR Q 1.35/ Q 1.50/ Q 2.00: Adjust the quality factor. The settings are stored to [USER]. • The settings made in [EASY EQ] or [PRO EQ].) FLAT / HARD ROCK / POP / HIP HOP / R&B / JAZZ / CLASSICAL / USER EASY EQ Adjust your own ...
...35. F15 (00): Adjusts the front and rear speaker output balance. VOL ADJUST -15 - +06 (00): Preset the initial volume level of each speaker is set to [SUB.W/SUB.W]. ( 22) *3 For 2-way crossover: Displayed only when [SPK/PRE OUT] is less than 50 W to prevent damaging the speakers.) ; ... before changing the X ' OVER TYPE to +09 (00): (Refer above) Q FACTOR Q 1.35/ Q 1.50/ Q 2.00: Adjust the quality factor. The settings are stored to [USER]. • The settings made in [EASY EQ] or [PRO EQ].) FLAT / HARD ROCK / POP / HIP HOP / R&B / JAZZ / CLASSICAL / USER EASY EQ Adjust your own ...
Instruction Manual
Page 26
... compressed music. ; However, with this settings you can also enjoy the subwoofer output. ( 33) Setting on [SPK/PRE OUT] Audio signal through rear speaker lead L (left ): Subwoofer output Subwoofer output output R (right): (Mute) (For KW-R920BTS) Setting on the speaker connection method. OFF:... Cancels. OFF: Cancels. (Not applicable for TUNER source.) SML/ MED/ LRG: Virtually enhances the sound space. ; OFF: Cancels. AUDIO SETTINGS SND EFFECT ENHANCE RESPONSE SOUND LIFT VOL LINK EQ...
... compressed music. ; However, with this settings you can also enjoy the subwoofer output. ( 33) Setting on [SPK/PRE OUT] Audio signal through rear speaker lead L (left ): Subwoofer output Subwoofer output output R (right): (Mute) (For KW-R920BTS) Setting on the speaker connection method. OFF:... Cancels. OFF: Cancels. (Not applicable for TUNER source.) SML/ MED/ LRG: Virtually enhances the sound space. ; OFF: Cancels. AUDIO SETTINGS SND EFFECT ENHANCE RESPONSE SOUND LIFT VOL LINK EQ...

Instruction Manual
Page 27
... selected speaker. • If [NONE] is selected for [TWEETER] of [FRONT], [REAR] and [SUBWOOFER] for [SPK SIZE], the [X ' OVER] setting of the selected speaker. 2-way crossover setting items SPK SIZE FRONT SIZE 3.5"/ 4"/ 4.75"/ 5"/ 6.5"/ 6.75"/ 7"/ 4×6"/ 5×7"/ 6×8"/ 6×9"/ 7×10" TWEETER SML/ MID/ ... to 00DB *1 Displayed only when [SPK/PRE OUT] is set to [REAR/REAR] or [REAR/SUB.W]. ( 22) *2 For KW-R920BTS: Displayed only when [SPK/PRE OUT] is set to [ON]. ( 21) ENGLISH 23 AUDIO SETTINGS Crossover settings Below are connected. ( 33) If you select a wrong type...
... selected speaker. • If [NONE] is selected for [TWEETER] of [FRONT], [REAR] and [SUBWOOFER] for [SPK SIZE], the [X ' OVER] setting of the selected speaker. 2-way crossover setting items SPK SIZE FRONT SIZE 3.5"/ 4"/ 4.75"/ 5"/ 6.5"/ 6.75"/ 7"/ 4×6"/ 5×7"/ 6×8"/ 6×9"/ 7×10" TWEETER SML/ MID/ ... to 00DB *1 Displayed only when [SPK/PRE OUT] is set to [REAR/REAR] or [REAR/SUB.W]. ( 22) *2 For KW-R920BTS: Displayed only when [SPK/PRE OUT] is set to [ON]. ( 21) ENGLISH 23 AUDIO SETTINGS Crossover settings Below are connected. ( 33) If you select a wrong type...
Instruction Manual
Page 28
...OFF: Dimmer is turned on. Default: XX DISPLAY DIMMER Dim the display and button illuminations. Brightness changes to [NIGHT] setting. ( 25, [BRIGHTNESS]) DIMMER TIME: Set the dimmer on and off time. 1 Turn the volume knob to adjust the [ON] time, then press the knob...]:6:00 or 6:00 AM) AUTO: Dimmer turns on and off automatically when you turn off . To return to [ON]. ( 21) 24 DISPLAY SETTINGS 1 Press and hold . AUDIO SETTINGS 3-way crossover setting items SPK SIZE TWEETER SML/ MID/ LRG MID RANGE 3.5"/ 4"/ 4.75"/ 5"/ 6.5"/ 6.75"/ 7"/ 4×6"/ 5×7"/ 6×8"/ 6×9" ...
...OFF: Dimmer is turned on. Default: XX DISPLAY DIMMER Dim the display and button illuminations. Brightness changes to [NIGHT] setting. ( 25, [BRIGHTNESS]) DIMMER TIME: Set the dimmer on and off time. 1 Turn the volume knob to adjust the [ON] time, then press the knob...]:6:00 or 6:00 AM) AUTO: Dimmer turns on and off automatically when you turn off . To return to [ON]. ( 21) 24 DISPLAY SETTINGS 1 Press and hold . AUDIO SETTINGS 3-way crossover setting items SPK SIZE TWEETER SML/ MID/ LRG MID RANGE 3.5"/ 4"/ 4.75"/ 5"/ 6.5"/ 6.75"/ 7"/ 4×6"/ 5×7"/ 6×8"/ 6×9" ...

Instruction Manual
Page 29
... symbols will not be shown correctly (or will be blanked). *3 If one of these color pattern is selected for all the primary colors. • Your setting is stored to [USER] in [PRESET]. • If [00] is selected, the [ZONE 1], [DISP ZONE], [ZONE 2] illumination color will automatically ...[DAY COLOR] or [NIGHT COLOR] is shown. • COLOR FLOW01 to COLOR FLOW03: Color changes at 5-second intervals. ; ENGLISH 25 DISPLAY SETTINGS BRIGHTNESS Set the brightness for button and display illuminations for day and night separately. 1 DAY / NIGHT: Select day or night. 2 Select a zone. ( 24...
... symbols will not be shown correctly (or will be blanked). *3 If one of these color pattern is selected for all the primary colors. • Your setting is stored to [USER] in [PRESET]. • If [00] is selected, the [ZONE 1], [DISP ZONE], [ZONE 2] illumination color will automatically ...[DAY COLOR] or [NIGHT COLOR] is shown. • COLOR FLOW01 to COLOR FLOW03: Color changes at 5-second intervals. ; ENGLISH 25 DISPLAY SETTINGS BRIGHTNESS Set the brightness for button and display illuminations for day and night separately. 1 DAY / NIGHT: Select day or night. 2 Select a zone. ( 24...
Instruction Manual
Page 32
...application on the Android device and start playback. • If in which files were recorded (disc). Correct characters are insulated properly. Check the [SRC SELECT] setting. ( 4) Radio • Radio reception is a playable format. ( 27) "READING" keeps flashing. • Do not use another media player application. ...Sound cannot be heard. • Adjust the volume to unit. ( 27) ANDROID Cannot playback at [AUTO MODE]. • Make sure JVC MUSIC PLAY APP is intermittent or Turn off the developer options on the Android device. • Reconnect the Android device. • If this...
...application on the Android device and start playback. • If in which files were recorded (disc). Correct characters are insulated properly. Check the [SRC SELECT] setting. ( 4) Radio • Radio reception is a playable format. ( 27) "READING" keeps flashing. • Do not use another media player application. ...Sound cannot be heard. • Adjust the volume to unit. ( 27) ANDROID Cannot playback at [AUTO MODE]. • Make sure JVC MUSIC PLAY APP is intermittent or Turn off the developer options on the Android device. • Reconnect the Android device. • If this...
Instruction Manual
Page 33
... again. ( 14) Bluetooth® Echo or noise occurs. • Adjust the microphone unit's position. ( 14) • Check the [ECHO CANCEL] setting. ( 16) Phone sound quality is poor. • Reduce the distance between the unit and the Bluetooth audio player. • Turn off, then turn ... the antenna and its limit. continue. Visit www.siriusxm.com for more information about the SiriusXM channel lineup. If "Explicit Content" in [Account Settings] is checked in Canada to unlock. ( 13) SiriusXM® Radio "CHAN UNSUB" The selected channel is not allowed. "CHK DEVICE" Check...
... again. ( 14) Bluetooth® Echo or noise occurs. • Adjust the microphone unit's position. ( 14) • Check the [ECHO CANCEL] setting. ( 16) Phone sound quality is poor. • Reduce the distance between the unit and the Bluetooth audio player. • Turn off, then turn ... the antenna and its limit. continue. Visit www.siriusxm.com for more information about the SiriusXM channel lineup. If "Explicit Content" in [Account Settings] is checked in Canada to unlock. ( 13) SiriusXM® Radio "CHAN UNSUB" The selected channel is not allowed. "CHK DEVICE" Check...
Instruction Manual
Page 36
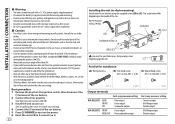
...car brackets using the supplied screws (B) or (C). If the maximum power of the speakers is lower than 50 W, change the [AMP GAIN] setting to avoid damaging the speakers. ( 21) • Mount the unit at an angle of your vehicle. See Installing the unit (in-...(M5 × 3/8") M5 × 8 mm (M5 × 3/8") Output terminals KW-R925BTS REAR FRONT SW KW-R920BTS FRONT REAR/SW For 2-way crossover setting : Rear output : Front output : Subwoofer output : Front output : Rear/subwoofer output For 3-way crossover setting : Tweeter output : Mid Range output : Woofer output : Mid Range output : Woofer...
...car brackets using the supplied screws (B) or (C). If the maximum power of the speakers is lower than 50 W, change the [AMP GAIN] setting to avoid damaging the speakers. ( 21) • Mount the unit at an angle of your vehicle. See Installing the unit (in-...(M5 × 3/8") M5 × 8 mm (M5 × 3/8") Output terminals KW-R925BTS REAR FRONT SW KW-R920BTS FRONT REAR/SW For 2-way crossover setting : Rear output : Front output : Subwoofer output : Front output : Rear/subwoofer output For 3-way crossover setting : Tweeter output : Mid Range output : Woofer output : Mid Range output : Woofer...


