
Instructions
Page 4
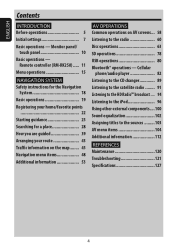
... INTRODUCTION Before operations 5 Initial settings 7 Basic operations - Remote controller (RM-RK250) ..... 11 Menu operations 15 NAVIGATION SYSTEM Safety instructions for the Navigation System 18 Basic operations 19 Registering your home/favorite points 22 Starting guidance 25 Searching for a place 28 How you... are guided 39 Arranging your route 43 Traffic information on the map........ 45 Navigation menu items 48 Additional information 53 AV OPERATIONS Common operations on AV screens... 58 Listening to the sources ......... 103...
... INTRODUCTION Before operations 5 Initial settings 7 Basic operations - Remote controller (RM-RK250) ..... 11 Menu operations 15 NAVIGATION SYSTEM Safety instructions for the Navigation System 18 Basic operations 19 Registering your home/favorite points 22 Starting guidance 25 Searching for a place 28 How you... are guided 39 Arranging your route 43 Traffic information on the map........ 45 Navigation menu items 48 Additional information 53 AV OPERATIONS Common operations on AV screens... 58 Listening to the sources ......... 103...
Instructions
Page 5
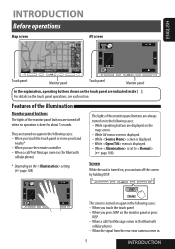
...the monitor panel buttons are turned off the screen by holding DISP. [Hold] The screen is displayed. - ENGLISH INTRODUCTION Before operations Map screen AV screen Touch panel Monitor panel Touch panel Monitor panel In the explanation, operating buttons shown on the touch panel are always ... call /Text Message comes in the following cases: - When you touch the touch panel or move your hand nearby* - When you press MAP on the map screen. - For details on again in (for about 5 seconds. They are displayed on the monitor panel or press DISP - While operating buttons...
...the monitor panel buttons are turned off the screen by holding DISP. [Hold] The screen is displayed. - ENGLISH INTRODUCTION Before operations Map screen AV screen Touch panel Monitor panel Touch panel Monitor panel In the explanation, operating buttons shown on the touch panel are always ... call /Text Message comes in the following cases: - When you touch the touch panel or move your hand nearby* - When you press MAP on the map screen. - For details on again in (for about 5 seconds. They are displayed on the monitor panel or press DISP - While operating buttons...
Instructions
Page 8
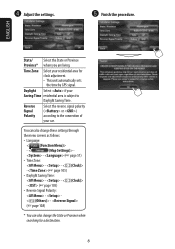
... to the connection of your residential area for a destination. 8 You can also change these settings through the menu screens as follows: • Language: < (Function Menu)> - < (Map Settings)> - - (☞ page 51) • Time Zone: - - < (Clock)> - (☞ page 105) • Daylight Saving Time: - - < (Clock)> - (☞ page 105) • Reverse Signal Polarity: - - < (Others)> - (☞...
... to the connection of your residential area for a destination. 8 You can also change these settings through the menu screens as follows: • Language: < (Function Menu)> - < (Map Settings)> - - (☞ page 51) • Time Zone: - - < (Clock)> - (☞ page 105) • Daylight Saving Time: - - < (Clock)> - (☞ page 105) • Reverse Signal Polarity: - - < (Others)> - (☞...

Instructions
Page 9
If the map is displayed, switch the screen to the AV screen by pressing DISP. 2 3 4 Cancel the demonstration. Setup Demonstration Wall Paper Color Scroll Dimmer Dimmer Time Set Back Metal Blue Once Auto 6 Auto 7 Exit Exit 9 INTRODUCTION ENGLISH Canceling demonstration You can cancel the demonstration on the screen. 1 Turn on the power. Select . Setup Demonstration Wall Paper Color Scroll Dimmer Dimmer Time Set Back Metal Blue Once Auto 6 Auto 7 Exit 5 Finish the procedure.
If the map is displayed, switch the screen to the AV screen by pressing DISP. 2 3 4 Cancel the demonstration. Setup Demonstration Wall Paper Color Scroll Dimmer Dimmer Time Set Back Metal Blue Once Auto 6 Auto 7 Exit Exit 9 INTRODUCTION ENGLISH Canceling demonstration You can cancel the demonstration on the screen. 1 Turn on the power. Select . Setup Demonstration Wall Paper Color Scroll Dimmer Dimmer Time Set Back Metal Blue Once Auto 6 Auto 7 Exit 5 Finish the procedure.

Instructions
Page 10
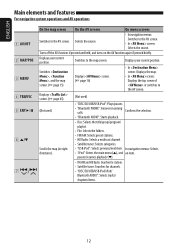
...Exit • Shaded items cannot be used. [Open] [Eject] [Close] [Tilt +/-] [Detach] [Exit] Opens the monitor panel. Closes the monitor panel. Map screen 10 AV screen 2 menu Open/Tilt Open Tilt + Eject Tilt - Resets the unit. ☞ page 3 • Use only when the internal system ...screen only): Move your 15 finger on the touch panel as illustrated. *2 Each time you press DISP, the display changes to the map screen. • Changes the map view. • Changes the display information.*2 • Turns off the screen. [Hold] • Turns on the power. •...
...Exit • Shaded items cannot be used. [Open] [Eject] [Close] [Tilt +/-] [Detach] [Exit] Opens the monitor panel. Closes the monitor panel. Map screen 10 AV screen 2 menu Open/Tilt Open Tilt + Eject Tilt - Resets the unit. ☞ page 3 • Use only when the internal system ...screen only): Move your 15 finger on the touch panel as illustrated. *2 Each time you press DISP, the display changes to the map screen. • Changes the map view. • Changes the display information.*2 • Turns off the screen. [Hold] • Turns on the power. •...
Instructions
Page 11
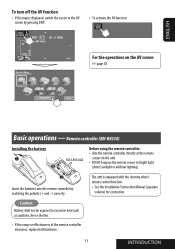
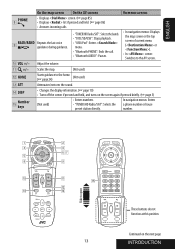
... is displayed, switch the screen to the AV screen by matching the polarity (+ and -) correctly. ENGLISH To turn off the AV function • If the map is equipped with the steering wheel remote control function. • See the Installation/Connection Manual (separate volume) for connection. Insert the batteries into the remote...
... is displayed, switch the screen to the AV screen by matching the polarity (+ and -) correctly. ENGLISH To turn off the AV function • If the map is equipped with the steering wheel remote control function. • See the Installation/Connection Manual (separate volume) for connection. Insert the batteries into the remote...
Instructions
Page 12
... of or switches to the AV screen. Switches to the AV screen. • In screen: Selects the source. In navigation menus: Selects • "iPod": Enters the main menu (5), and an item. Scrolls the map (in eight directions). • Satellite tuner: Selects categories. • "USB iPod": Selects previous/next item. ENGLISH Main elements...
... of or switches to the AV screen. Switches to the AV screen. • In screen: Selects the source. In navigation menus: Selects • "iPod": Enters the main menu (5), and an item. Scrolls the map (in eight directions). • Satellite tuner: Selects categories. • "USB iPod": Selects previous/next item. ENGLISH Main elements...
Instructions
Page 13
.... • "DISC/SD/USB": Stops playback. • "USB iPod": Enters menu. • "Bluetooth PHONE": Ends the call. • "Bluetooth AUDIO": Pauses. • In navigation menus: Displays the map screen or the top screen of current menu ( or ). • In screen: Switches to open These buttons do not function at this position. Continued...
.... • "DISC/SD/USB": Stops playback. • "USB iPod": Enters menu. • "Bluetooth PHONE": Ends the call. • "Bluetooth AUDIO": Pauses. • In navigation menus: Displays the map screen or the top screen of current menu ( or ). • In screen: Switches to open These buttons do not function at this position. Continued...
Instructions
Page 15
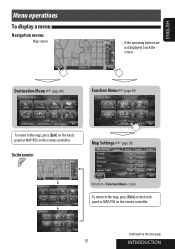
Continued on the remote controller. On the remote: Map Settings (☞ page 50) Returns to screen To return to the map, press [Exit] on the touch panel or MAP/POS on the remote controller. ENGLISH Menu operations To display a menu Navigation menus Map screen • If the operating buttons are not displayed, touch the screen. Destination Menu (☞ page 48) Function Menu (☞ page 49) To return to the map, press [Exit] on the touch panel or MAP/POS on the next page 15 INTRODUCTION
Continued on the remote controller. On the remote: Map Settings (☞ page 50) Returns to screen To return to the map, press [Exit] on the touch panel or MAP/POS on the remote controller. ENGLISH Menu operations To display a menu Navigation menus Map screen • If the operating buttons are not displayed, touch the screen. Destination Menu (☞ page 48) Function Menu (☞ page 49) To return to the map, press [Exit] on the touch panel or MAP/POS on the next page 15 INTRODUCTION
Instructions
Page 16
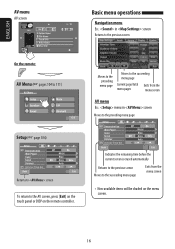
ENGLISH AV menu AV screen Basic menu operations Navigation menu Ex.: in screen Moves to the preceding menu page Setup Demonstration Wall Paper Color Scroll Dimmer Dimmer Time Set Back Metal Blue Once Auto 6 ...
ENGLISH AV menu AV screen Basic menu operations Navigation menu Ex.: in screen Moves to the preceding menu page Setup Demonstration Wall Paper Color Scroll Dimmer Dimmer Time Set Back Metal Blue Once Auto 6 ...
Instructions
Page 18
... NAVTEQ All rights reserved. To clear the data, perform . (☞ page 52) On map updating If "Your map data is only permitted in road traffic. The requirements of the car radio/ Navigation System must always be available. Inaccurate or incorrect instructions may occur in traffic. The volume of... Traffic Regulations must be adjusted so that no risk, obstruction or inconvenience will be observed carefully while driving using the Navigation System. JVC does not accept liability for your unit, visit (English website only). 18 Terms of the data is more information, please visit...
... NAVTEQ All rights reserved. To clear the data, perform . (☞ page 52) On map updating If "Your map data is only permitted in road traffic. The requirements of the car radio/ Navigation System must always be available. Inaccurate or incorrect instructions may occur in traffic. The volume of... Traffic Regulations must be adjusted so that no risk, obstruction or inconvenience will be observed carefully while driving using the Navigation System. JVC does not accept liability for your unit, visit (English website only). 18 Terms of the data is more information, please visit...
Instructions
Page 19
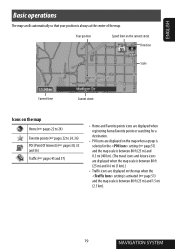
... (25 m) and 0.3 mi (400 m). (The travel icons and leisure icons are displayed when the map scale is between 80 ft (25 m) and 1.5 mi (2.5 km). 19 NAVIGATION SYSTEM ENGLISH Basic operations The map scrolls automatically so that your position is between 80 ft (25 m) and 0.6 mi (1 km).) •...; Traffic icons are displayed on the map when the setting is activated (☞ page 51) and the map scale is always at the center...
... (25 m) and 0.3 mi (400 m). (The travel icons and leisure icons are displayed when the map scale is between 80 ft (25 m) and 1.5 mi (2.5 km). 19 NAVIGATION SYSTEM ENGLISH Basic operations The map scrolls automatically so that your position is between 80 ft (25 m) and 0.6 mi (1 km).) •...; Traffic icons are displayed on the map when the setting is activated (☞ page 51) and the map scale is always at the center...

Instructions
Page 20
... disappear if no operation is done for about 5 seconds. 2 Zoom in Scale buttons Zoom out The map scrolls to the direction you are touching and holding . • Touch and hold the map to display the operating buttons. Outer area: fast • You can also display the buttons by pressing... one of the scale buttons. ENGLISH To change the map scale 1 Touch the screen to keep scrolling the map. • The scrolling speed varies depending on the position you touched is centered on the map. • You can also select a scale directly by moving your current...
... disappear if no operation is done for about 5 seconds. 2 Zoom in Scale buttons Zoom out The map scrolls to the direction you are touching and holding . • Touch and hold the map to display the operating buttons. Outer area: fast • You can also display the buttons by pressing... one of the scale buttons. ENGLISH To change the map scale 1 Touch the screen to keep scrolling the map. • The scrolling speed varies depending on the position you touched is centered on the map. • You can also select a scale directly by moving your current...
Instructions
Page 21
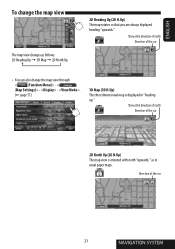
... up." Shows the direction of north Direction of the car 21 NAVIGATION SYSTEM ENGLISH To change the map view through < (Function Menu)> - < (Map Settings)> - - . (☞ page 51) 3D Map (3D H.Up) The three dimensional map is oriented with north "upwards," as follows: 2D Heading Up = 3D Map = 2D North Up 2D Heading Up (2D H.Up) The...
... up." Shows the direction of north Direction of the car 21 NAVIGATION SYSTEM ENGLISH To change the map view through < (Function Menu)> - < (Map Settings)> - - . (☞ page 51) 3D Map (3D H.Up) The three dimensional map is oriented with north "upwards," as follows: 2D Heading Up = 3D Map = 2D North Up 2D Heading Up (2D H.Up) The...

Instructions
Page 22
... 51) Information on the cursor-pointed position The selected position is saved as a favorite point and the favorite point is marked with icon on the map. • When the home is already registered, you are asked if you want to register. (☞ page 20) 2 • If there are already ... the list. - ENGLISH Registering your home/favorite points Registering your home/favorite points You can display the map of selected area on the position where you press more than once, the map scrolls.) To display above screen again, press [Select]. To register the selected position as your home and...
... 51) Information on the cursor-pointed position The selected position is saved as a favorite point and the favorite point is marked with icon on the map. • When the home is already registered, you are asked if you want to register. (☞ page 20) 2 • If there are already ... the list. - ENGLISH Registering your home/favorite points Registering your home/favorite points You can display the map of selected area on the position where you press more than once, the map scrolls.) To display above screen again, press [Select]. To register the selected position as your home and...
Instructions
Page 23
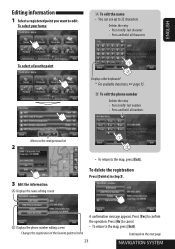
... keyboards* * For available characters, ☞ page 55. A Displays the name editing screen • To return to edit. Press [Yes] to the map, press [Exit]. Press [No] to cancel. • To return to confirm the operation. B Displays the phone number editing screen Changes the registration of... to the next/previous list 2 3 Edit the information. To delete the registration Press [Delete] in step 3. Continued on the next page 23 NAVIGATION SYSTEM B To edit the phone number Deletes the entry • Press briefly: last number • Press and hold : all numbers Moves to ...
... keyboards* * For available characters, ☞ page 55. A Displays the name editing screen • To return to edit. Press [Yes] to the map, press [Exit]. Press [No] to cancel. • To return to confirm the operation. B Displays the phone number editing screen Changes the registration of... to the next/previous list 2 3 Edit the information. To delete the registration Press [Delete] in step 3. Continued on the next page 23 NAVIGATION SYSTEM B To edit the phone number Deletes the entry • Press briefly: last number • Press and hold : all numbers Moves to ...

Instructions
Page 24
ENGLISH To delete all registered items 1 2 To go home When you have registered your home [Favorite]: Deletes all favorite points A confirmation message appears. On the remote: On the map screen only Your home • To cancel guidance, ☞ page 26. 24 Press [No] to cancel. • To return to confirm the operation. Press [Yes] to the map, press [Exit]. While not guided... On the unit: 1 3 2 4 3 [Home]: Deletes your home, you can easily get guided to home.
ENGLISH To delete all registered items 1 2 To go home When you have registered your home [Favorite]: Deletes all favorite points A confirmation message appears. On the remote: On the map screen only Your home • To cancel guidance, ☞ page 26. 24 Press [No] to cancel. • To return to confirm the operation. Press [Yes] to the map, press [Exit]. While not guided... On the unit: 1 3 2 4 3 [Home]: Deletes your home, you can easily get guided to home.
Instructions
Page 25
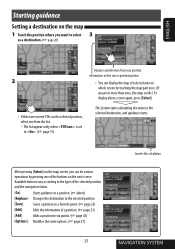
...[Add]: Adds a position to via points. (☞ page 43) [Options]: Modifies the route options. (☞ page 27) 25 Cancels the calculation NAVIGATION SYSTEM The list appears only when is set to . (☞ page 51) The System starts calculating the route to the selected destination, and guidance starts...page 20) Distance and direction from your position Information on the cursor-pointed position 2 • You can do various operations by touching the map part once. (If you want to select 3 as a favorite point. (☞ page 22) [Edit]: Edits the information of the buttons on...
...[Add]: Adds a position to via points. (☞ page 43) [Options]: Modifies the route options. (☞ page 27) 25 Cancels the calculation NAVIGATION SYSTEM The list appears only when is set to . (☞ page 51) The System starts calculating the route to the selected destination, and guidance starts...page 20) Distance and direction from your position Information on the cursor-pointed position 2 • You can do various operations by touching the map part once. (If you want to select 3 as a favorite point. (☞ page 22) [Edit]: Edits the information of the buttons on...

Instructions
Page 26
.... Searches by a telephone number. ENGLISH To cancel guidance 1 2 A confirmation message appears. Press [Yes] to cancel. Searches from your current position, the position selected on the map, the destination, or the route you are taking.
.... Searches by a telephone number. ENGLISH To cancel guidance 1 2 A confirmation message appears. Press [Yes] to cancel. Searches from your current position, the position selected on the map, the destination, or the route you are taking.
Instructions
Page 27
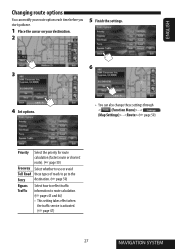
... Select whether to route calculation. (☞ pages 45 and 46) • This setting takes effect when the traffic service is activated. (☞ page 47) 27 NAVIGATION SYSTEM ENGLISH Changing route options You can modify your route options each time before you start guidance. 1 Place the cursor on your destination. 2 5 Finish the... the Ferry destination. (☞ page 50) Bypass Select how to reflect traffic Traffic information to use or avoid Toll Road these settings through < (Function Menu)> - < (Map Settings)> - (☞ page 50).
... Select whether to route calculation. (☞ pages 45 and 46) • This setting takes effect when the traffic service is activated. (☞ page 47) 27 NAVIGATION SYSTEM ENGLISH Changing route options You can modify your route options each time before you start guidance. 1 Place the cursor on your destination. 2 5 Finish the... the Ferry destination. (☞ page 50) Bypass Select how to reflect traffic Traffic information to use or avoid Toll Road these settings through < (Function Menu)> - < (Map Settings)> - (☞ page 50).
