
Instructions
Page 2
... preset adjustments will not occur in a particular installation. IMPORTANT FOR LASER PRODUCTS 1. REPRODUCTION OF LABEL: CAUTION LABEL, PLACED OUTSIDE THE UNIT. [European Union only] How to reset your unit. • Be careful not to qualified service personnel. 3. If this does not work, reset your unit How to forcibly eject a disc • If this equipment does cause harmful interference to which can radiate radio frequency...
... preset adjustments will not occur in a particular installation. IMPORTANT FOR LASER PRODUCTS 1. REPRODUCTION OF LABEL: CAUTION LABEL, PLACED OUTSIDE THE UNIT. [European Union only] How to reset your unit. • Be careful not to qualified service personnel. 3. If this does not work, reset your unit How to forcibly eject a disc • If this equipment does cause harmful interference to which can radiate radio frequency...
Instructions
Page 3
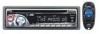
... 19 Connecting a Bluetooth device for the first time ... 19 Using the Bluetooth cellular phone 21 Using the Bluetooth audio player 23 Bluetooth settings 24 Satellite radio operations 25 iPod operations 28 Other external component operations 30 More about this will block outside sounds, making driving dangerous. • Stop the car before operating the unit. 3 ENGLISH How to use these buttons for their original functions again after pressing the M MODE button, wait for 5 seconds without pressing any complicated operations. : Built-in CD player operations. : External CD changer...
... 19 Connecting a Bluetooth device for the first time ... 19 Using the Bluetooth cellular phone 21 Using the Bluetooth audio player 23 Bluetooth settings 24 Satellite radio operations 25 iPod operations 28 Other external component operations 30 More about this will block outside sounds, making driving dangerous. • Stop the car before operating the unit. 3 ENGLISH How to use these buttons for their original functions again after pressing the M MODE button, wait for 5 seconds without pressing any complicated operations. : Built-in CD player operations. : External CD changer...
Instructions
Page 5
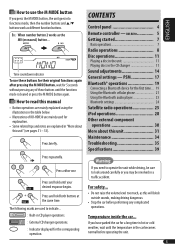
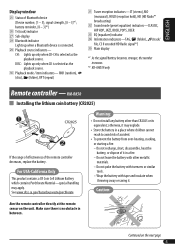
... Radio™ broadcasting) x Sound mode (preset equalizer) indicators-CLASSIC, HIP HOP, JAZZ, ROCK, POPS, USER c EQ (equalizer) indicator v Information indicators-TAG, (folder), (track/ file, CS II encoded HD Radio signal*2) b Main display *1 As the signal/battery becomes stronger, the number increases. *2 KD-AHD39 only Remote controller - Caution: Aim the remote controller directly at the remote sensor on the next page 5 Make sure there is selected as the playback source. l Playback source indicators...
... Radio™ broadcasting) x Sound mode (preset equalizer) indicators-CLASSIC, HIP HOP, JAZZ, ROCK, POPS, USER c EQ (equalizer) indicator v Information indicators-TAG, (folder), (track/ file, CS II encoded HD Radio signal*2) b Main display *1 As the signal/battery becomes stronger, the number increases. *2 KD-AHD39 only Remote controller - Caution: Aim the remote controller directly at the remote sensor on the next page 5 Make sure there is selected as the playback source. l Playback source indicators...
Instructions
Page 6
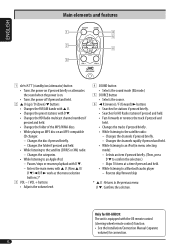
... and features ENGLISH 1 (standby/on/attenuator) button • Turns the power on if pressed briefly or attenuates the sound when the power is equipped with the OE remote control (steering wheel remote control) function. • See the Installation/Connection Manual (separate volume) for connection. 6 Changes the channels if pressed briefly. - Only for KD-AHD39: The unit is on. • Turns the power off if pressed and held . • While listening to a Bluetooth audio player -
... and features ENGLISH 1 (standby/on/attenuator) button • Turns the power on if pressed briefly or attenuates the sound when the power is equipped with the OE remote control (steering wheel remote control) function. • See the Installation/Connection Manual (separate volume) for connection. 6 Changes the channels if pressed briefly. - Only for KD-AHD39: The unit is on. • Turns the power off if pressed and held . • While listening to a Bluetooth audio player -
Instructions
Page 7
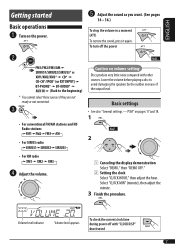
... cannot select these sources if they are not ready or not connected. ! • For conventional FM/AM stations and HD Radio stations Caution on volume setting: Discs produce very little noise compared with "CLOCK DISP" deactivated 7 Volume level indicator Volume level appears. ENGLISH Getting started Basic operations ~ Turn on pages 17 and 18. 1 2 • For SIRIUS radio • For XM radio ⁄ Adjust the volume. 1 Canceling the display demonstration Select "DEMO," then "DEMO OFF." 2 Setting the clock Select "CLOCK...
... cannot select these sources if they are not ready or not connected. ! • For conventional FM/AM stations and HD Radio stations Caution on volume setting: Discs produce very little noise compared with "CLOCK DISP" deactivated 7 Volume level indicator Volume level appears. ENGLISH Getting started Basic operations ~ Turn on pages 17 and 18. 1 2 • For SIRIUS radio • For XM radio ⁄ Adjust the volume. 1 Canceling the display demonstration Select "DEMO," then "DEMO OFF." 2 Setting the clock Select "CLOCK...

Instructions
Page 9
.... HOLD indicator When an HD Radio station is activated. When an FM stereo broadcast is hard to receive Lights up . ANALOG: For playing analog audio only. To change the setting to "ANALOG" or "DIGITAL." • The setting automatically returns to "AUTO" in the following cases: - ENGLISH 2 Select the desired station frequency. • When you tune in to another source. - When you can use HD Search (see page 18...
.... HOLD indicator When an HD Radio station is activated. When an FM stereo broadcast is hard to receive Lights up . ANALOG: For playing analog audio only. To change the setting to "ANALOG" or "DIGITAL." • The setting automatically returns to "AUTO" in the following cases: - ENGLISH 2 Select the desired station frequency. • When you tune in to another source. - When you can use HD Search (see page 18...

Instructions
Page 10
Clock: Shows the clock. When you want to preset (see pages 8 and 9). 2 Press and hold a number button (1 - 6) to select a preset number. Frequency: Shows the station frequency. Manual presetting 1 Tune in . 2 Select the preset station (1 - 6) you change the band. *1 No information appears when a Call Sign is not received. *2 When no text is received, "HD RADIO" appears for HD Radio broadcasting, and "ANALOG" appears for a while... - The preset number flashes for and stored automatically in . Local stations with the...
Clock: Shows the clock. When you want to preset (see pages 8 and 9). 2 Press and hold a number button (1 - 6) to select a preset number. Frequency: Shows the station frequency. Manual presetting 1 Tune in . 2 Select the preset station (1 - 6) you change the band. *1 No information appears when a Call Sign is not received. *2 When no text is received, "HD RADIO" appears for HD Radio broadcasting, and "ANALOG" appears for a while... - The preset number flashes for and stored automatically in . Local stations with the...
Instructions
Page 11
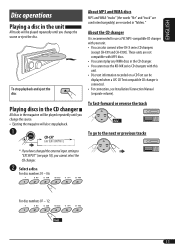
... displayed when a JVC CD Text compatible CD changer is recommended to "EXT INPUT" (see Installation/Connection Manual (separate volume). About the CD changer It is connected. • For connection, see page 18), you change the source or eject the disc. To stop playback. ~ To fast-forward or reverse the track To go to the next or previous tracks * If you have changed the external input setting to use the KD-MK series CD changers with your unit...
... displayed when a JVC CD Text compatible CD changer is recommended to "EXT INPUT" (see Installation/Connection Manual (separate volume). About the CD changer It is connected. • For connection, see page 18), you change the source or eject the disc. To stop playback. ~ To fast-forward or reverse the track To go to the next or previous tracks * If you have changed the external input setting to use the KD-MK series CD changers with your unit...
Instructions
Page 15
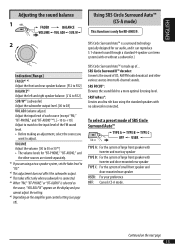
... sound of CD, AM/FM radio broadcast and other sources are stored separately. *1 If you are using the standard speakers with or without a subwoofer.) Indication [Range] FADER*1 *2 Adjust the front and rear speaker balance. [F12 to R12] BALANCE*2 Adjust the left and right speaker balance. [L12 to R12] SUB.W*3 (subwoofer) Adjust the subwoofer output level. [00 to 08] VOL ADJ (volume adjust) Adjust the input level of each source (except "FM," "BT-PHONE," and "BT-AUDIO"*4). [-10 to +10] Adjust...
... sound of CD, AM/FM radio broadcast and other sources are stored separately. *1 If you are using the standard speakers with or without a subwoofer.) Indication [Range] FADER*1 *2 Adjust the front and rear speaker balance. [F12 to R12] BALANCE*2 Adjust the left and right speaker balance. [L12 to R12] SUB.W*3 (subwoofer) Adjust the subwoofer output level. [00 to 08] VOL ADJ (volume adjust) Adjust the input level of each source (except "FM," "BT-PHONE," and "BT-AUDIO"*4). [-10 to +10] Adjust...

Instructions
Page 16
...® Rear) Adjust the SRS TruBass® of the rear speaker. [0 to 9] TRUBASS W (SRS TruBass® Subwoofer) Adjust the SRS TruBass® of the subwoofer. [0 to 9] M TO R (Mix to Rear) Adjust the level of the front channel signals mixed to the rear for richer sound in memory. 1 Select your desired CS-A mode to adjust, referring to "To select a preset mode of each preset CS-A mode and store your own adjustments in the rear seat...
...® Rear) Adjust the SRS TruBass® of the rear speaker. [0 to 9] TRUBASS W (SRS TruBass® Subwoofer) Adjust the SRS TruBass® of the subwoofer. [0 to 9] M TO R (Mix to Rear) Adjust the level of the front channel signals mixed to the rear for richer sound in memory. 1 Select your desired CS-A mode to adjust, referring to "To select a preset mode of each preset CS-A mode and store your own adjustments in the rear seat...
Instructions
Page 18
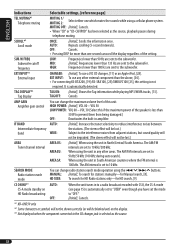
...: [Initial]; AMP GAIN Amplifier gain control You can change radio station search mode operation using a cellular phone system. When using the unit in South American countries where the FM interval is less than one which mutes the sounds while using the 4 /¢ buttons. When using the unit in North/Central/South America. The AM interval is selected as the source, playback pauses during auto search). CHANGER: [Initial]; It is automatically set to "USER" even...
...: [Initial]; AMP GAIN Amplifier gain control You can change radio station search mode operation using a cellular phone system. When using the unit in South American countries where the FM interval is less than one which mutes the sounds while using the 4 /¢ buttons. When using the unit in North/Central/South America. The AM interval is selected as the source, playback pauses during auto search). CHANGER: [Initial]; It is automatically set to "USER" even...

Instructions
Page 19
... operating the Bluetooth device. Select a desired item. The connection is required to connect the Bluetooth Adapter (KS-BTA200) to the CD changer jack on the rear. • Refer also to the instructions supplied with a device. • Select "BT-PHONE" or "BT-AUDIO" as the source to establish a Bluetooth wireless connection between the unit and the device. • Once the connection is established, it is established by operating the unit. 2 Enter a PIN (Personal Identification Number)* code into the unit...
... operating the Bluetooth device. Select a desired item. The connection is required to connect the Bluetooth Adapter (KS-BTA200) to the CD changer jack on the rear. • Refer also to the instructions supplied with a device. • Select "BT-PHONE" or "BT-AUDIO" as the source to establish a Bluetooth wireless connection between the unit and the device. • Once the connection is established, it is established by operating the unit. 2 Enter a PIN (Personal Identification Number)* code into the unit...

Instructions
Page 21
... cellular phone is compatible with a device (see page 24). • You can adjust the volume level for "BT-PHONE" without affecting the volume level for the other sources. Enter the Bluetooth menu. 2 Select the registered device you of the arrival of the message. • You cannot edit or send a message through the unit. 21 When the sound is stopped or interrupted while using a Bluetooth device, turn off, then turn on the display...
... cellular phone is compatible with a device (see page 24). • You can adjust the volume level for "BT-PHONE" without affecting the volume level for the other sources. Enter the Bluetooth menu. 2 Select the registered device you of the arrival of the message. • You cannot edit or send a message through the unit. 21 When the sound is stopped or interrupted while using a Bluetooth device, turn off, then turn on the display...

Instructions
Page 23
... using a Bluetooth device, turn off, then turn on page 22... 1 Select "RECEIVED," "PHONE BOOK," or "MISSED." 2 Select the phone number you want to preset. 3 Select a number. In step 2 of "Making a call a preset phone number 1 Using the Bluetooth audio player ~ If playback does not start automatically, operate the Bluetooth audio player to start playback. • See pages 19 and 20 for connecting a new device. • See page 20 for connecting/disconnecting a registered device. • See page 21 for deleting a registered device. When the sound...
... using a Bluetooth device, turn off, then turn on page 22... 1 Select "RECEIVED," "PHONE BOOK," or "MISSED." 2 Select the phone number you want to preset. 3 Select a number. In step 2 of "Making a call a preset phone number 1 Using the Bluetooth audio player ~ If playback does not start automatically, operate the Bluetooth audio player to start playback. • See pages 19 and 20 for connecting a new device. • See page 20 for connecting/disconnecting a registered device. • See page 21 for deleting a registered device. When the sound...

Instructions
Page 24
... to the Bluetooth Adapter, [LEVEL 01/02*/03]. 7 VERSION The Bluetooth software and hardware versions are shown. * Initial setting @ Change the setting. Select "SETTINGS." ⁄ Select a desired setting item. 7 AUTO CNNCT (connect) When the unit is turned on, the connection is established automatically with... ENGLISH Bluetooth settings You can change the settings listed in the right column according to receive more information about Bluetooth, visit the following JVC web site: 24 MANUAL: The unit does...
... to the Bluetooth Adapter, [LEVEL 01/02*/03]. 7 VERSION The Bluetooth software and hardware versions are shown. * Initial setting @ Change the setting. Select "SETTINGS." ⁄ Select a desired setting item. 7 AUTO CNNCT (connect) When the unit is turned on, the connection is established automatically with... ENGLISH Bluetooth settings You can change the settings listed in the right column according to receive more information about Bluetooth, visit the following JVC web site: 24 MANUAL: The unit does...

Instructions
Page 30
... external input ("EXT INPUT"). Ÿ Turn on the connected component and start playing the source. ! If "EXT INPUT" does not appear, see Installation/Connection Manual (separate volume). ~ Portable audio player ~ or Stereo mini plug Ÿ Turn on the connected component and start playing the source. ! ENGLISH Other external component operations Connecting to the AUX input jack You can connect an external component to the AUX (auxiliary) input jack on the control panel. To check the clock time Clock Ô EXT INPUT ⁄ Adjust the sound...
... external input ("EXT INPUT"). Ÿ Turn on the connected component and start playing the source. ! If "EXT INPUT" does not appear, see Installation/Connection Manual (separate volume). ~ Portable audio player ~ or Stereo mini plug Ÿ Turn on the connected component and start playing the source. ! ENGLISH Other external component operations Connecting to the AUX input jack You can connect an external component to the AUX (auxiliary) input jack on the control panel. To check the clock time Clock Ô EXT INPUT ⁄ Adjust the sound...

Instructions
Page 32
... unit can show the actual elapsed time. or ). - MP3 files encoded with lossless, professional, and voice format. - If "ERROR" appears again, check if the device supports the function you change the source, playback also stops (without ejecting the disc). If the message does not disappear, turn on the unit, then connect the device again (or reset the unit). Disc format: ISO 9660 Level 1/Level 2, Romeo, Joliet • The maximum number...
... unit can show the actual elapsed time. or ). - MP3 files encoded with lossless, professional, and voice format. - If "ERROR" appears again, check if the device supports the function you change the source, playback also stops (without ejecting the disc). If the message does not disappear, turn on the unit, then connect the device again (or reset the unit). Disc format: ISO 9660 Level 1/Level 2, Romeo, Joliet • The maximum number...

Instructions
Page 33
... characters. iPod with dock connector (3rd Generation) - otherwise, no sound is heard. *2 It is not possible to browse video files on the "Videos" menu while the iPod is connected to the interface adapter. • If the iPod does not play correctly, please update your iPod, visit . • When you turn on/off the power of Japan, Limited (JVC) is incorporated under license. For details about SIRIUS Satellite radio or...
... characters. iPod with dock connector (3rd Generation) - otherwise, no sound is heard. *2 It is not possible to browse video files on the "Videos" menu while the iPod is connected to the interface adapter. • If the iPod does not play correctly, please update your iPod, visit . • When you turn on/off the power of Japan, Limited (JVC) is incorporated under license. For details about SIRIUS Satellite radio or...

Instructions
Page 35
... before calling a service center. Select "DIGITAL" or "AUTO" (see page 2). • Disc sound is inaccurate. Insert the disc correctly. • CD-R/CD-RW cannot be heard from the speakers. • Adjust the volume to the optimum level. • Check the cords and connections. • The unit does not work . The clock data provided via the HD Radio broadcast may be played back. Set "CLOCK ADJ" to conventional radio broadcasting. Select "ANALOG" or "AUTO" (see...
... before calling a service center. Select "DIGITAL" or "AUTO" (see page 2). • Disc sound is inaccurate. Insert the disc correctly. • CD-R/CD-RW cannot be heard from the speakers. • Adjust the volume to the optimum level. • Check the cords and connections. • The unit does not work . The clock data provided via the HD Radio broadcast may be played back. Set "CLOCK ADJ" to conventional radio broadcasting. Select "ANALOG" or "AUTO" (see...

Instructions
Page 36
... Bluetooth setting of the CD changer. • The CD changer does not work at a time. keeps flashing on the display. While connecting a device, the unit cannot be played back. • Use a disc with ISO 9660 Level 1, Level 2, Romeo, or Joliet. • Add the extension code or to play. • Elapsed playing time is required ("READING" Do not use too many hierarchies and folders. This is not indicated on the display. Press the reset button of the device...
... Bluetooth setting of the CD changer. • The CD changer does not work at a time. keeps flashing on the display. While connecting a device, the unit cannot be played back. • Use a disc with ISO 9660 Level 1, Level 2, Romeo, or Joliet. • Add the extension code or to play. • Elapsed playing time is required ("READING" Do not use too many hierarchies and folders. This is not indicated on the display. Press the reset button of the device...


