
Instructions
Page 3
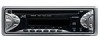
...your unit 2 How to use these buttons as number buttons again after pressing MODE, wait for purchasing a JVC product. MODE 7 8 MO 9 10 11 RPT 12 RND Time countdown indicator To use the MODE button 3 LOCATION OF THE BUTTONS 4 Control panel 4 BASIC OPERATIONS 5 Turning... Memory (SCM) .. 13 Storing your complete understanding and to a preset station 8 CD OPERATIONS 9 Playing a CD 9 Locating a track or a particular portion on a CD 10 Selecting CD playback modes 10 Prohibiting CD ejection 11 SOUND ADJUSTMENTS 12 Adjusting the sound 12 Turning on the power 5 RADIO ...
...your unit 2 How to use these buttons as number buttons again after pressing MODE, wait for purchasing a JVC product. MODE 7 8 MO 9 10 11 RPT 12 RND Time countdown indicator To use the MODE button 3 LOCATION OF THE BUTTONS 4 Control panel 4 BASIC OPERATIONS 5 Turning... Memory (SCM) .. 13 Storing your complete understanding and to a preset station 8 CD OPERATIONS 9 Playing a CD 9 Locating a track or a particular portion on a CD 10 Selecting CD playback modes 10 Prohibiting CD ejection 11 SOUND ADJUSTMENTS 12 Adjusting the sound 12 Turning on the power 5 RADIO ...
Instructions
Page 5
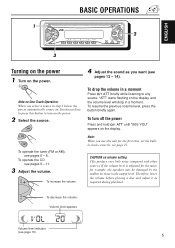
... example, the speakers may be damaged by the sudden increase in step 2 below, the power automatically comes on the power. 2 Select the source. FM CD AM To operate the tuner (FM or AM), see pages 12 - 14). CAUTION on One-Touch Operation: When you select a source in the output ...level. To resume the previous volume level, press the button briefly again. If the volume level is adjusted for the tuner, for the first time, set the builtin clock correctly, see page 15. Note on volume setting CDs produce very little noise compared with other sources. To decrease the volume.
... example, the speakers may be damaged by the sudden increase in step 2 below, the power automatically comes on the power. 2 Select the source. FM CD AM To operate the tuner (FM or AM), see pages 12 - 14). CAUTION on One-Touch Operation: When you select a source in the output ...level. To resume the previous volume level, press the button briefly again. If the volume level is adjusted for the tuner, for the first time, set the builtin clock correctly, see page 15. Note on volume setting CDs produce very little noise compared with other sources. To decrease the volume.
Instructions
Page 7
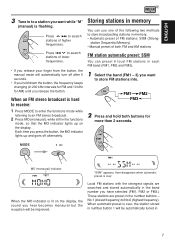
... and hold down the button, the frequency keeps changing (in . 7 When the MO indicator is over . When automatic preset is lit on the display. Each time you press the button, the MO indicator lights up on the display, the sound you hear becomes monaural but the reception will automatically turn off...
... and hold down the button, the frequency keeps changing (in . 7 When the MO indicator is over . When automatic preset is lit on the display. Each time you press the button, the MO indicator lights up on the display, the sound you hear becomes monaural but the reception will automatically turn off...
Instructions
Page 8
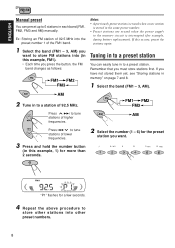
... band (FM1, FM2, FM3 and AM) manually. Tuning in to a preset station You can preset up to a preset station. If this example, FM1). • Each time you want. 7 8 MO 9 10 11 RPT 12 RND "P1" flashes for example, during battery replacement). FM FM1 FM2 FM3 Press ¢ to tune AM AM...
... band (FM1, FM2, FM3 and AM) manually. Tuning in to a preset station You can preset up to a preset station. If this example, FM1). • Each time you want. 7 8 MO 9 10 11 RPT 12 RND "P1" flashes for example, during battery replacement). FM FM1 FM2 FM3 Press ¢ to tune AM AM...
Instructions
Page 9
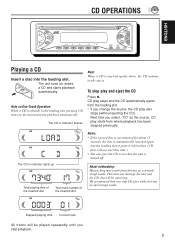
... rough roads. About mistracking: Mistracking may result from the loading slot. • If you stop CD play and eject the CD Press 0. The CD-in indicator lights up Total playing time of the inserted disc Total track number of the inserted disc Notes: • If the ejected...again into the loading slot. The CD-in indicator flashes Note: When a CD is already in the loading slot, pressing CD turns on One-Touch Operation: When a CD is inserted upside down, the CD automatically ejects. Next time you stop playback. 9 Elapsed playing time Current track All tracks will not ...
... rough roads. About mistracking: Mistracking may result from the loading slot. • If you stop CD play and eject the CD Press 0. The CD-in indicator lights up Total playing time of the inserted disc Total track number of the inserted disc Notes: • If the ejected...again into the loading slot. The CD-in indicator flashes Note: When a CD is already in the loading slot, pressing CD turns on One-Touch Operation: When a CD is inserted upside down, the CD automatically ejects. Next time you stop playback. 9 Elapsed playing time Current track All tracks will not ...
Instructions
Page 10
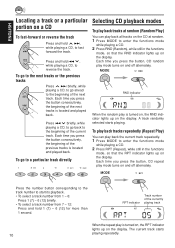
... or reverse the track Press and hold 1 (7) - 6 (12) for more than 1 second. Each time you press the button consecutively, the beginning of the current track. Each time you press the button, CD random play back the current track repeatedly. 1 Press MODE to fast forward the track. A track randomly selected...next track. RPT indicator Track number of the previous tracks is turned on, the RND indicator lights up on the display. Each time you press the button, CD repeat play is located and played back. MODE RND RND indicator When the random play back all tracks on the...
... or reverse the track Press and hold 1 (7) - 6 (12) for more than 1 second. Each time you press the button consecutively, the beginning of the current track. Each time you press the button, CD random play back the current track repeatedly. 1 Press MODE to fast forward the track. A track randomly selected...next track. RPT indicator Track number of the previous tracks is turned on, the RND indicator lights up on the display. Each time you press the button, CD repeat play is located and played back. MODE RND RND indicator When the random play back all tracks on the...
Instructions
Page 12
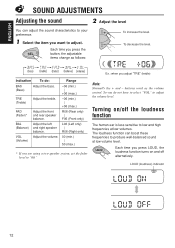
... only) L06 (Left only) | R06 (Right only) 00 (min.) | 50 (max.) * If you want to "00." buttons work as follows: To increase the level. Each time you do : BAS (Bass) Adjust the bass. TRE (Treble) Adjust the treble. Adjust the left and right speaker balance. Each... time you adjust "TRE" (treble) Indication To do not have to select "VOL" to adjust the volume level. LOUD (loudness) indicator @A 12 Adjust the volume. Ex.: ...
... only) L06 (Left only) | R06 (Right only) 00 (min.) | 50 (max.) * If you want to "00." buttons work as follows: To increase the level. Each time you do : BAS (Bass) Adjust the bass. TRE (Treble) Adjust the treble. Adjust the left and right speaker balance. Each... time you adjust "TRE" (treble) Indication To do not have to select "VOL" to adjust the volume level. LOUD (loudness) indicator @A 12 Adjust the volume. Ex.: ...

Instructions
Page 13
SCM CD AM Each time you select the same source and will be cancelled if another source is selected.) • ... When "SCM LINK" is set to "LINK ON," select the source. FM1, FM2, FM3, AM, and CD. • If you want . • Each time you select a sound mode, it in memory. The sound mode stored in memory for all the sources, see page...see "Storing your preference, and store it is set to "LINK ON", the selected sound mode can be recalled every time you change the playback source, the SCM indicator flashes on the display. ENGLISH Using the Sound Control Memory (SCM) You...
SCM CD AM Each time you select the same source and will be cancelled if another source is selected.) • ... When "SCM LINK" is set to "LINK ON," select the source. FM1, FM2, FM3, AM, and CD. • If you want . • Each time you select a sound mode, it in memory. The sound mode stored in memory for all the sources, see page...see "Storing your preference, and store it is set to "LINK ON", the selected sound mode can be recalled every time you change the playback source, the SCM indicator flashes on the display. ENGLISH Using the Sound Control Memory (SCM) You...
Instructions
Page 14
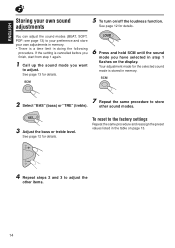
ENGLISH Storing your own adjustments in memory. • There is a time limit in the table on page 13. 4 Repeat steps 2 and 3 to adjust the other sound modes. 3 Adjust the bass or treble level. See page 12 ...
ENGLISH Storing your own adjustments in memory. • There is a time limit in the table on page 13. 4 Repeat steps 2 and 3 to adjust the other sound modes. 3 Adjust the bass or treble level. See page 12 ...
Instructions
Page 15
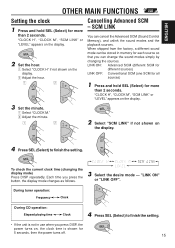
... sources) LINK OFF: Conventional SCM (one SCM for all sources) 1 Press and hold SEL (Select) for more than 2 seconds. To check the current clock time (changing the display mode) Press DISP repeatedly. "CLOCK H", "CLOCK M", "SCM LINK" or "LEVEL" appears on the display. 3 Set the minute. 1 Select...), and unlink the sound modes and the playback sources. "LINK ON" or "LINK OFF". During tuner operation: Frequency Clock During CD operation: Elapsed playing time Clock 4 Press SEL (Select) to finish the setting. SCM LINK You can change the sound modes simply by changing the sources...
... sources) LINK OFF: Conventional SCM (one SCM for all sources) 1 Press and hold SEL (Select) for more than 2 seconds. To check the current clock time (changing the display mode) Press DISP repeatedly. "CLOCK H", "CLOCK M", "SCM LINK" or "LEVEL" appears on the display. 3 Set the minute. 1 Select...), and unlink the sound modes and the playback sources. "LINK ON" or "LINK OFF". During tuner operation: Frequency Clock During CD operation: Elapsed playing time Clock 4 Press SEL (Select) to finish the setting. SCM LINK You can change the sound modes simply by changing the sources...


