Instruction Manual
Page 6
... settings RADIO 5 CD / USB / iPod / ANDROID 7 Pandora® 9 iHeartRadio® 10 SiriusXM® Radio (for KD-R975BTS / KD-R970BTS / KD-R97MBS / KD-R875BTS) 11 BLUETOOTH® 14 AUX 20 AUDIO SETTINGS 20 DISPLAY SETTINGS 24 REFERENCES 26 Maintenance More information TROUBLESHOOTING 28 SPECIFICATIONS 31 INSTALLATION / CONNECTION 32 2 BEFORE USE IMPORTANT • To ensure proper use, please read through this manual before playing digital sources to avoid damaging the speakers by the sudden increase of the output level. Remote control...
... settings RADIO 5 CD / USB / iPod / ANDROID 7 Pandora® 9 iHeartRadio® 10 SiriusXM® Radio (for KD-R975BTS / KD-R970BTS / KD-R97MBS / KD-R875BTS) 11 BLUETOOTH® 14 AUX 20 AUDIO SETTINGS 20 DISPLAY SETTINGS 24 REFERENCES 26 Maintenance More information TROUBLESHOOTING 28 SPECIFICATIONS 31 INSTALLATION / CONNECTION 32 2 BEFORE USE IMPORTANT • To ensure proper use, please read through this manual before playing digital sources to avoid damaging the speakers by the sudden increase of the output level. Remote control...
Instruction Manual
Page 7
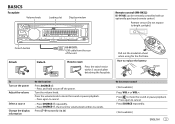
....) Detach button Attach Detach KD-R975BTS: USB cable from the rear of the unit How to cancel. Press the volume knob to mute the sound or pause playback. • Press again to turn the volume knob within 5 seconds after detaching the faceplate. repeatedly. ( 26) On the remote control ( Not available ) Press or . How to replace the battery To Turn on the power Adjust the volume Select a source Change the display information On the faceplate Press...
....) Detach button Attach Detach KD-R975BTS: USB cable from the rear of the unit How to cancel. Press the volume knob to mute the sound or pause playback. • Press again to turn the volume knob within 5 seconds after detaching the faceplate. repeatedly. ( 26) On the remote control ( Not available ) Press or . How to replace the battery To Turn on the power Adjust the volume Select a source Change the display information On the faceplate Press...
Instruction Manual
Page 8
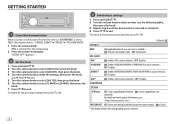
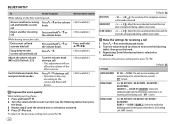
.... 3 Turn the volume knob to select [CLOCK SET], then press the knob. 4 Turn the volume knob to make the settings, then press the knob. To return to exit. OFF: Deactivates. IHEART * ON: Enables IHEARTRADIO/IHEART FRONT/IHEART REAR in source selection. ; F/W UPDATE SYSTEM F/W xxxx YES: Starts upgrading the firmware. ; NO: Cancels. * Not displayed when the corresponding source is selected.) ON: Activates the keypress tone. ; For details on the power for...
.... 3 Turn the volume knob to select [CLOCK SET], then press the knob. 4 Turn the volume knob to make the settings, then press the knob. To return to exit. OFF: Deactivates. IHEART * ON: Enables IHEARTRADIO/IHEART FRONT/IHEART REAR in source selection. ; F/W UPDATE SYSTEM F/W xxxx YES: Starts upgrading the firmware. ; NO: Cancels. * Not displayed when the corresponding source is selected.) ON: Activates the keypress tone. ; For details on the power for...
Instruction Manual
Page 13
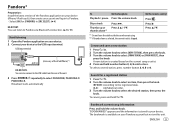
... on this unit. Pandora® Preparation: Install the latest version of the Pandora application on your device (iPhone/ iPod touch), then create an account and log in [SRC SELECT]. ( 4) KD-R770BT: You can also connect to the USB cable from the rear of the unit. 3 Press repeatedly to select PANDORA/ PANDORA-F/ PANDORA-R. Broadcast starts automatically To On the faceplate Playback / pause Press the volume knob. Press...
... on this unit. Pandora® Preparation: Install the latest version of the Pandora application on your device (iPhone/ iPod touch), then create an account and log in [SRC SELECT]. ( 4) KD-R770BT: You can also connect to the USB cable from the rear of the unit. 3 Press repeatedly to select PANDORA/ PANDORA-F/ PANDORA-R. Broadcast starts automatically To On the faceplate Playback / pause Press the volume knob. Press...
Instruction Manual
Page 14
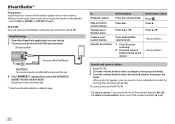
... of the iPod/iPhone)* KD-R975BTS: You can listen to iHeartRadio via Bluetooth connection. ( 14, 19) Start listening 1 Open the iHeartAuto application on your device to the USB input terminal. Press and hold one of the number buttons (4 to 6). • To select a stored station: Press one of the number buttons (4 to 6). 10 Broadcast starts automatically * Do not leave the cable inside the car when not using. Press...
... of the iPod/iPhone)* KD-R975BTS: You can listen to iHeartRadio via Bluetooth connection. ( 14, 19) Start listening 1 Open the iHeartAuto application on your device to the USB input terminal. Press and hold one of the number buttons (4 to 6). • To select a stored station: Press one of the number buttons (4 to 6). 10 Broadcast starts automatically * Do not leave the cable inside the car when not using. Press...
Instruction Manual
Page 17
... of the song. ; NO: Cancels. *1 Displayed only when [USER DEFINED] is selected. *2 Available only if the connected SiriusXM Vehical Tuner is selected/activated or follow the instructions stated on the selected item. 5 Press to exit. BUF USAGE 0% - 100% (0): Shows the memory usage for Replay buffer. Default: XX CH LOCK To unlock settings: 1 Turn the volume knob to select a number. 2 Press to move to the entry...
... of the song. ; NO: Cancels. *1 Displayed only when [USER DEFINED] is selected. *2 Available only if the connected SiriusXM Vehical Tuner is selected/activated or follow the instructions stated on the selected item. 5 Press to exit. BUF USAGE 0% - 100% (0): Shows the memory usage for Replay buffer. Default: XX CH LOCK To unlock settings: 1 Turn the volume knob to select a number. 2 Press to move to the entry...
Instruction Manual
Page 18
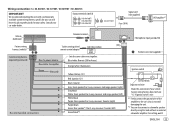
...Connect the device to the unit manually. • Refer to the instruction manual of two Bluetooth phones and one Bluetooth audio device can change to a desired PIN code before pairing. ( 18) • If only "PAIRING" appears, operate the Bluetooth device to the microphone input terminal. ( 34) Pair and connect a Bluetooth device for more information. 14 Connection Supported Bluetooth profiles - Hands-Free Profile (HFP) - "BT PAIRING" flashes on the display. For some Bluetooth devices, pairing sequence may not automatically connect to turn on the unit. 2 Search and select "JVC UNIT...
...Connect the device to the unit manually. • Refer to the instruction manual of two Bluetooth phones and one Bluetooth audio device can change to a desired PIN code before pairing. ( 18) • If only "PAIRING" appears, operate the Bluetooth device to the microphone input terminal. ( 34) Pair and connect a Bluetooth device for more information. 14 Connection Supported Bluetooth profiles - Hands-Free Profile (HFP) - "BT PAIRING" flashes on the display. For some Bluetooth devices, pairing sequence may not automatically connect to turn on the unit. 2 Search and select "JVC UNIT...

Instruction Manual
Page 19
... device ( 7) and [AUTO MODE] is set to a selected time. ( 16) During a call: • For KD-R975BTS / KD-R970BTS / KD-RD97BT / KD-R97MBS: The buttons stop blinking. • If you turn off the unit or detach the faceplate, the Bluetooth connection is activated only if: - KD-R770BT: Android device Other models: iPhone/ iPod touch/ Android device Press the volume knob to pair once you connect the following device to [ON]. ( 18) - BLUETOOTH - To First incoming call On the faceplate On the remote control...
... device ( 7) and [AUTO MODE] is set to a selected time. ( 16) During a call: • For KD-R975BTS / KD-R970BTS / KD-RD97BT / KD-R97MBS: The buttons stop blinking. • If you turn off the unit or detach the faceplate, the Bluetooth connection is activated only if: - KD-R770BT: Android device Other models: iPhone/ iPod touch/ Android device Press the volume knob to pair once you connect the following device to [ON]. ( 18) - BLUETOOTH - To First incoming call On the faceplate On the remote control...
Instruction Manual
Page 20
... a call . • This adjustment will not affect the volume of the other sources. To return to the previous setting item, press . SETTINGS AUTO ANSWER RING COLOR RING ILLUMI Default: XX 01 SEC - 30 SEC: The unit answers incoming call the volume knob. While having two active calls... Make the settings for receiving a call 1 Press to enter Bluetooth mode. 2 Turn the volume knob to select an item (see the...
... a call . • This adjustment will not affect the volume of the other sources. To return to the previous setting item, press . SETTINGS AUTO ANSWER RING COLOR RING ILLUMI Default: XX 01 SEC - 30 SEC: The unit answers incoming call the volume knob. While having two active calls... Make the settings for receiving a call 1 Press to enter Bluetooth mode. 2 Turn the volume knob to select an item (see the...
Instruction Manual
Page 22
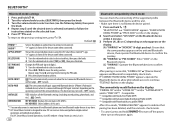
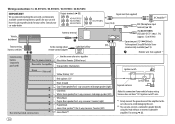
... PIN code. 3 Press the volume knob to view JVC car receiver status and perform simple control operations on Android smart phones. "SEARCH NOW USING PHONE" "PIN IS 0000" scrolls on the display. 2 Search and select "JVC UNIT" on the Bluetooth device within range. ; DELETE PAIR 1 Turn the volume knob to select a device to delete, then press the knob. 2 Turn the volume knob to confirm pairing. BLUETOOTH® Bluetooth mode settings 1 Press and hold then turn off the power, " " appears in front of this function...
... PIN code. 3 Press the volume knob to view JVC car receiver status and perform simple control operations on Android smart phones. "SEARCH NOW USING PHONE" "PIN IS 0000" scrolls on the display. 2 Search and select "JVC UNIT" on the Bluetooth device within range. ; DELETE PAIR 1 Turn the volume knob to select a device to delete, then press the knob. 2 Turn the volume knob to confirm pairing. BLUETOOTH® Bluetooth mode settings 1 Press and hold then turn off the power, " " appears in front of this function...
Instruction Manual
Page 25
... each source. (Before making an adjustment, select the source you want to +09 00) PRO EQ Adjust your preferred bass boost level. ; F15 (00): Adjusts the front and rear speaker output balance. BALANCE *4 L15 - VOL ADJUST -15 - +06 (00): Preset the initial volume level of the subwoofer connected to produce a well-balanced sound at low volume. ; X ' OVER TYPE Caution: Adjust the volume before changing the X ' OVER TYPE to the FM volume level). Before adjustment, select the source you want to use the settings...
... each source. (Before making an adjustment, select the source you want to +09 00) PRO EQ Adjust your preferred bass boost level. ; F15 (00): Adjusts the front and rear speaker output balance. BALANCE *4 L15 - VOL ADJUST -15 - +06 (00): Preset the initial volume level of the subwoofer connected to produce a well-balanced sound at low volume. ; X ' OVER TYPE Caution: Adjust the volume before changing the X ' OVER TYPE to the FM volume level). Before adjustment, select the source you want to use the settings...
Instruction Manual
Page 26
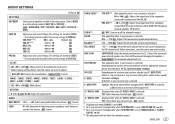
... Rear speakers output REAR/SUB.W (default) Front speakers output Subwoofer output SUB.W/SUB.W Front speakers output Subwoofer output (For KD-R770BT) Setting on [SPK/PRE OUT] Audio signal through lineout terminal REAR/SW Rear speakers output Subwoofer output Subwoofer output Connection via speaker leads For connections without using an external amplifier. LV1/ LV2/ LV3: Virtually adjust the sound position heard from outside the car or running noise of compressed music. ; ON: Boosts the frequency to [00]. 22 Speaker output settings (Only for X ' OVER 2-WAY) Select the output...
... Rear speakers output REAR/SUB.W (default) Front speakers output Subwoofer output SUB.W/SUB.W Front speakers output Subwoofer output (For KD-R770BT) Setting on [SPK/PRE OUT] Audio signal through lineout terminal REAR/SW Rear speakers output Subwoofer output Subwoofer output Connection via speaker leads For connections without using an external amplifier. LV1/ LV2/ LV3: Virtually adjust the sound position heard from outside the car or running noise of compressed music. ; ON: Boosts the frequency to [00]. 22 Speaker output settings (Only for X ' OVER 2-WAY) Select the output...
Instruction Manual
Page 28
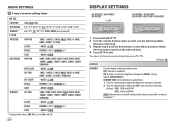
... to 00DB * Displayed only when [SUB.W] is set to [ON]. ( 21) 24 DISPLAY SETTINGS KD-R975BTS / KD-R970BTS / KD-RD97BT KD-R97MBS / KD-R875BTS / KD-R870BT / KD-R770BT / KD-RD87BT 1 Press and hold . 2 Turn the volume knob to select an item (see the following table), then press the knob. 3 Repeat step 2 until the desired item is turned on. ON: Dimmer is selected/activated or follow the instructions stated on the selected item. 4 Press...
... to 00DB * Displayed only when [SUB.W] is set to [ON]. ( 21) 24 DISPLAY SETTINGS KD-R975BTS / KD-R970BTS / KD-RD97BT KD-R97MBS / KD-R875BTS / KD-R870BT / KD-R770BT / KD-RD87BT 1 Press and hold . 2 Turn the volume knob to select an item (see the following table), then press the knob. 3 Repeat step 2 until the desired item is turned on. ON: Dimmer is selected/activated or follow the instructions stated on the selected item. 4 Press...
Instruction Manual
Page 31
.... More information Visit also the following website . Latest firmware updates and latest compatible item list - Android™ application JVC MUSIC PLAY - Therefore, the use of Non-DVD side of a "DualDisc" does not comply with coloring on this unit, pull them out horizontally. • Remove burrs from the center hole and disc edge before inserting a disc. iPhone 3G, 3GS, 4, 4S, 5, 5S, 5C, 6, 6 Plus • It...
.... More information Visit also the following website . Latest firmware updates and latest compatible item list - Android™ application JVC MUSIC PLAY - Therefore, the use of Non-DVD side of a "DualDisc" does not comply with coloring on this unit, pull them out horizontally. • Remove burrs from the center hole and disc edge before inserting a disc. iPhone 3G, 3GS, 4, 4S, 5, 5S, 5C, 6, 6 Plus • It...

Instruction Manual
Page 32
... radio. "PLEASE" and "EJECT" appear Press , then insert the disc correctly. Elapsed playing time is poor. • Static noise while listening to the optimum level. • Check the cords and connections. Send the unit to forcibly eject the disc. Make sure nothing is determined by the file name (USB) or the order in which files were recorded (disc). Accordingly, compatibility may be impaired, or some Bluetooth devices...
... radio. "PLEASE" and "EJECT" appear Press , then insert the disc correctly. Elapsed playing time is poor. • Static noise while listening to the optimum level. • Check the cords and connections. Send the unit to forcibly eject the disc. Make sure nothing is determined by the file name (USB) or the order in which files were recorded (disc). Accordingly, compatibility may be impaired, or some Bluetooth devices...
Instruction Manual
Page 33
... to unit. ( 28) Cannot playback at [AUTO MODE]. • Make sure JVC MUSIC PLAY APP is not allowed. If "Explicit Content" in Canada to unlock. ( 13) SiriusXM® Radio "CHAN UNSUB" The selected channel is unsubscribed. Enter the correct pass code to subscribe. or 1-877-438-9677 in [Account Settings] is unavailable. turn on the display language you enter search mode by pressing . "CHK DEVICE" Check...
... to unit. ( 28) Cannot playback at [AUTO MODE]. • Make sure JVC MUSIC PLAY APP is not allowed. If "Explicit Content" in Canada to unlock. ( 13) SiriusXM® Radio "CHAN UNSUB" The selected channel is unsubscribed. Enter the correct pass code to subscribe. or 1-877-438-9677 in [Account Settings] is unavailable. turn on the display language you enter search mode by pressing . "CHK DEVICE" Check...
Instruction Manual
Page 34
... device. ( 18, DELETE PAIR) The unit is connected to the unit. If "ERROR" appears again, check if the device supports the function you have tried. Reset the unit and try to connect again. • Other Bluetooth devices might be controlled. "CHECK TUNER" Make sure the SiriusXM Vehicle Tuner is preparing to PRESS ENTER TO CONTINUE." Your subscription is mounted outside the vehicle. "SUBSCRIPTION UPDATED - Turn on the unit and try the operation again. TROUBLESHOOTING...
... device. ( 18, DELETE PAIR) The unit is connected to the unit. If "ERROR" appears again, check if the device supports the function you have tried. Reset the unit and try to connect again. • Other Bluetooth devices might be controlled. "CHECK TUNER" Make sure the SiriusXM Vehicle Tuner is preparing to PRESS ENTER TO CONTINUE." Your subscription is mounted outside the vehicle. "SUBSCRIPTION UPDATED - Turn on the unit and try the operation again. TROUBLESHOOTING...
Instruction Manual
Page 36
... vehicle's fuse box which provides 12 V DC power supply and is turned on and off by the ignition key. • Keep all cables away from the ignition switch, then disconnect the terminal of the car battery. 2 Connect the wires properly. Basic procedure 1 Remove the key from heat dissipate metal parts. • After the unit is lower than 50 W, change the [AMP GAIN] setting to avoid...
... vehicle's fuse box which provides 12 V DC power supply and is turned on and off by the ignition key. • Keep all cables away from the ignition switch, then disconnect the terminal of the car battery. 2 Connect the wires properly. Basic procedure 1 Remove the key from heat dissipate metal parts. • After the unit is lower than 50 W, change the [AMP GAIN] setting to avoid...
Instruction Manual
Page 38
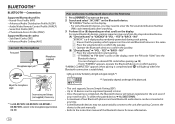
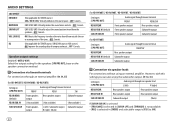
... cord (not supplied) JVC Amplifier*1 Fuse (10 A) MIC (Microphone input terminal) ( 14) (For KD-R975BTS) USB cable (DC 5 V 1.5 A) (approx. 1.2 m/4 feet) Expansion port (12 V 500 mA) To the optional SiriusXM Vehicle Tuner (commercially available) ( 11) Remote wire (not supplied) Custom wiring harness (separately purchased) Blue: To power antenna Blue/white: To amplifier Brown (Not used) Join the same color wires together. Blue/white: Remote (200 mA max.) Orange/white: Illumination Yellow: Battery 12 V Ignition switch Recommended connection...
... cord (not supplied) JVC Amplifier*1 Fuse (10 A) MIC (Microphone input terminal) ( 14) (For KD-R975BTS) USB cable (DC 5 V 1.5 A) (approx. 1.2 m/4 feet) Expansion port (12 V 500 mA) To the optional SiriusXM Vehicle Tuner (commercially available) ( 11) Remote wire (not supplied) Custom wiring harness (separately purchased) Blue: To power antenna Blue/white: To amplifier Brown (Not used) Join the same color wires together. Blue/white: Remote (200 mA max.) Orange/white: Illumination Yellow: Battery 12 V Ignition switch Recommended connection...
Instruction Manual
Page 39
... car audio dealer. For setting, 22. Output terminals ( 33) Signal cord (not supplied) Fuse (10 A) JVC Amplifier*1 Vehicle dashboard Antenna terminal Microphone input jack ( 14) Factory wiring harness (vehicle) To the steering wheel remote control adapter Light blue/yellow STEERING WHEEL REMOTE Custom wiring harness (separately purchased) Blue: To power antenna Blue/white: To amplifier Join the same color wires together. Blue/white: Remote (200 mA max.) Orange/white: Illumination Brown (Not used) Yellow: Battery 12 V Red: Ignition 12 V Black: Ground Recommended connection...
... car audio dealer. For setting, 22. Output terminals ( 33) Signal cord (not supplied) Fuse (10 A) JVC Amplifier*1 Vehicle dashboard Antenna terminal Microphone input jack ( 14) Factory wiring harness (vehicle) To the steering wheel remote control adapter Light blue/yellow STEERING WHEEL REMOTE Custom wiring harness (separately purchased) Blue: To power antenna Blue/white: To amplifier Join the same color wires together. Blue/white: Remote (200 mA max.) Orange/white: Illumination Brown (Not used) Yellow: Battery 12 V Red: Ignition 12 V Black: Ground Recommended connection...


