Instruction Manual
Page 2
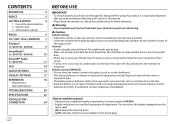
... the demonstration 2 Set the clock 3 Set the basic settings RADIO 5 CD / USB / iPod / ANDROID 7 Pandora® (for KD-R775S / KD-R670) 9 iHeartRadio® (for KD-R775S / KD-R670) 10 SiriusXM® Radio (for KD-R775S) 11 AUX 14 AUDIO SETTINGS 14 DISPLAY SETTINGS 17 REFERENCES 18 Maintenance More information TROUBLESHOOTING 20 SPECIFICATIONS 22 INSTALLATION / CONNECTION 24 2 BEFORE USE IMPORTANT • To ensure proper use, please read through this manual before playing digital sources to avoid damaging the speakers by the...
... the demonstration 2 Set the clock 3 Set the basic settings RADIO 5 CD / USB / iPod / ANDROID 7 Pandora® (for KD-R775S / KD-R670) 9 iHeartRadio® (for KD-R775S / KD-R670) 10 SiriusXM® Radio (for KD-R775S) 11 AUX 14 AUDIO SETTINGS 14 DISPLAY SETTINGS 17 REFERENCES 18 Maintenance More information TROUBLESHOOTING 20 SPECIFICATIONS 22 INSTALLATION / CONNECTION 24 2 BEFORE USE IMPORTANT • To ensure proper use, please read through this manual before playing digital sources to avoid damaging the speakers by the...

Instruction Manual
Page 4
... is connected to the AUX jack. ( 14) ; Default: XX SETTINGS BEEP ON: Activates the keypress tone. ; To return to exit. IHEART*1 (For KD-R775S / KD-R670) ON: Enables IHEARTRADIO in source selection. ; OFF: Disables. ON: Enables AUX in source selection. ; GETTING STARTED KD-R370 1 Cancel the demonstration When you turn on the power (or after you reset the unit), the display shows: "CANCEL DEMO" "PRESS" "VOLUME KNOB" 1 Press the volume knob...
... is connected to the AUX jack. ( 14) ; Default: XX SETTINGS BEEP ON: Activates the keypress tone. ; To return to exit. IHEART*1 (For KD-R775S / KD-R670) ON: Enables IHEARTRADIO in source selection. ; OFF: Disables. ON: Enables AUX in source selection. ; GETTING STARTED KD-R370 1 Cancel the demonstration When you turn on the power (or after you reset the unit), the display shows: "CANCEL DEMO" "PRESS" "VOLUME KNOB" 1 Press the volume knob...

Instruction Manual
Page 5
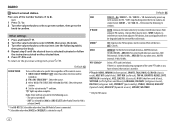
... clock time is shown on how to a station.... Settings in FM Radio Broadcast Data System signal. ; The preset number flashes and "MEMORY" appears. OFF: Cancels. By default, ENGLISH is turned off. ; Select the display language for KD-R370) SYSTEM F/W xxxx CLOCK YES: Starts upgrading the firmware. ; "ST" lights up to search for AM. Store a station While listening to update the firmware, see: . For details on the display even when the unit is selected...
... clock time is shown on how to a station.... Settings in FM Radio Broadcast Data System signal. ; The preset number flashes and "MEMORY" appears. OFF: Cancels. By default, ENGLISH is turned off. ; Select the display language for KD-R370) SYSTEM F/W xxxx CLOCK YES: Starts upgrading the firmware. ; "ST" lights up to search for AM. Store a station While listening to update the firmware, see: . For details on the display even when the unit is selected...
Instruction Manual
Page 6
... intervals: 9 kHz/50 kHz. PTY SEARCH* Select a PTY code (see the following 12 stations. "M" lights up to select an item (see below). OFF: Cancels. Other settings 1 Press and hold . 2 Turn the volume knob to select [TUNER], then press the knob. 3 Turn the volume knob to 18 stations for AM): Select the preset station. 4 Set the activation day*2 and time. IF BAND AUTO: Increases the tuner selectivity to 06 (for FM. Default: XX...
... intervals: 9 kHz/50 kHz. PTY SEARCH* Select a PTY code (see the following 12 stations. "M" lights up to select an item (see below). OFF: Cancels. Other settings 1 Press and hold . 2 Turn the volume knob to select [TUNER], then press the knob. 3 Turn the volume knob to 18 stations for AM): Select the preset station. 4 Set the activation day*2 and time. IF BAND AUTO: Increases the tuner selectivity to 06 (for FM. Default: XX...

Instruction Manual
Page 7
... the iPod/iPhone)*1 ANDROID*2 Micro USB 2.0 cable*1 (commercially available) To On the faceplate Reverse / Fast-forward*3 Press and hold . CD Eject disc Label side Selectable source: KD-R775S / KD-R670: CD/ USB/ USB-IPOD/ ANDROID KD-R570 / KD-R470: CD/ USB/ ANDROID KD-R370: CD KD-R775S KD-R670 KD-R775S / KD-R670 / KD-R570 / KD-R470: To directly select USB/ USB-IPOD/ ANDROID source, press or . Press . Press repeatedly. USB input terminal USB USB 2.0 cable*1 (commercially available) iPod/iPhone (Accessory of JVC MUSIC PLAY application on your Android device before connecting. ( 18...
... the iPod/iPhone)*1 ANDROID*2 Micro USB 2.0 cable*1 (commercially available) To On the faceplate Reverse / Fast-forward*3 Press and hold . CD Eject disc Label side Selectable source: KD-R775S / KD-R670: CD/ USB/ USB-IPOD/ ANDROID KD-R570 / KD-R470: CD/ USB/ ANDROID KD-R370: CD KD-R775S KD-R670 KD-R775S / KD-R670 / KD-R570 / KD-R470: To directly select USB/ USB-IPOD/ ANDROID source, press or . Press . Press repeatedly. USB input terminal USB USB 2.0 cable*1 (commercially available) iPod/iPhone (Accessory of JVC MUSIC PLAY application on your Android device before connecting. ( 18...
Instruction Manual
Page 8
...; Selected drive of the Audiobooks sound file in the Android device. While in USB-IPOD source, press repeatedly. AUDIO MODE: Control Android device using the iPod itself via JVC MUSIC PLAY application installed in your iPod/iPhone. (Default: Depends on your iPod/iPhone setting.) 5 Press to select an item, then press the knob. 0.5× SPEED / 1× SPEED / 2× SPEED: Select the desired playback speed of a multiple drives device. Change the playback speed of the Audiobook (For KD-R775S / KD-R670...
...; Selected drive of the Audiobooks sound file in the Android device. While in USB-IPOD source, press repeatedly. AUDIO MODE: Control Android device using the iPod itself via JVC MUSIC PLAY application installed in your iPod/iPhone. (Default: Depends on your iPod/iPhone setting.) 5 Press to select an item, then press the knob. 0.5× SPEED / 1× SPEED / 2× SPEED: Select the desired playback speed of a multiple drives device. Change the playback speed of the Audiobook (For KD-R775S / KD-R670...
Instruction Manual
Page 9
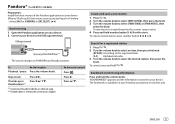
... log in to Pandora. • Select [ON] for [PANDORA] in [SRC SELECT]. ( 4) Start listening 1 Open the Pandora application on your device. 2 Connect your Pandora account but not on this unit. Bookmark current song information Press and hold the volume knob. Pandora® (for KD-R775S / KD-R670) Preparation: Install the latest version of the iPod/iPhone)*1 The source changes to PANDORA and broadcast starts...
... log in to Pandora. • Select [ON] for [PANDORA] in [SRC SELECT]. ( 4) Start listening 1 Open the Pandora application on your device. 2 Connect your Pandora account but not on this unit. Bookmark current song information Press and hold the volume knob. Pandora® (for KD-R775S / KD-R670) Preparation: Install the latest version of the iPod/iPhone)*1 The source changes to PANDORA and broadcast starts...

Instruction Manual
Page 11
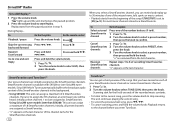
... channels, including commercial-free music plus the best sports, news, talk, comedy and entertainment. The SiriusXM Radio ID is selected, a pass code input screen appears. " " lights up to , all the available channels will be found on the SiriusXM Connect tuner and its' packaging. To Store a channel Select a stored channel Do this Press and hold one of the number buttons (1 to 6). 1 Press and hold the volume knob until "PRESET MODE" flashes. 2 Turn the volume...
... channels, including commercial-free music plus the best sports, news, talk, comedy and entertainment. The SiriusXM Radio ID is selected, a pass code input screen appears. " " lights up to , all the available channels will be found on the SiriusXM Connect tuner and its' packaging. To Store a channel Select a stored channel Do this Press and hold one of the number buttons (1 to 6). 1 Press and hold the volume knob until "PRESET MODE" flashes. 2 Turn the volume...
Instruction Manual
Page 12
... returns to the channel before you try to select a preset number, then press and hold the knob. To On the faceplate On the remote control Playback / pause Press the volume knob. Rewind / Fast-forward Press and hold . SiriusXM Vehicle Tuner automatically buffers the broadcast audio content of the SmartFavorites channels in step 1. " " lights up to [ON] ( 13) for most music channels stored as SmartFavorites...
... returns to the channel before you try to select a preset number, then press and hold the knob. To On the faceplate On the remote control Playback / pause Press the volume knob. Rewind / Fast-forward Press and hold . SiriusXM Vehicle Tuner automatically buffers the broadcast audio content of the SmartFavorites channels in step 1. " " lights up to [ON] ( 13) for most music channels stored as SmartFavorites...
Instruction Manual
Page 13
... code. • Make a note of the channel number. 3 Press and hold . 2 Turn the volume knob to select [SIRIUS XM], then press the knob. 3 Turn the volume knob to select an item (see the following table), then press the knob. 4 Repeat step 3 until the desired item is selected/activated or follow the instructions stated on the selected item. 5 Press to exit. SXM RESET YES: Resets stored channel and lock setting...
... code. • Make a note of the channel number. 3 Press and hold . 2 Turn the volume knob to select [SIRIUS XM], then press the knob. 3 Turn the volume knob to select an item (see the following table), then press the knob. 4 Repeat step 3 until the desired item is selected/activated or follow the instructions stated on the selected item. 5 Press to exit. SXM RESET YES: Resets stored channel and lock setting...
Instruction Manual
Page 14
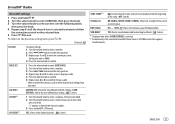
...a preset equalizer Press (or) Press repeatedly. , then turn the volume knob within 5 seconds. For details, refer to the instruction manual of the unit ( 25) Blue/white: Remote Black: Ground Brown: Tel muting Auxiliary input jack 2 Register (pair) the Bluetooth device with "L" shaped connector (commercially available) AUDIO SETTINGS Auxiliary input jack Portable audio player 2 Select [ON] for [AUX] in [SRC SELECT]. ( 4) 4 Press repeatedly to select BT AUDIO. 5 Start using the Bluetooth device. Refer to [EASY EQ] for optimum audio output. Use a Bluetooth® device 1 Connect...
...a preset equalizer Press (or) Press repeatedly. , then turn the volume knob within 5 seconds. For details, refer to the instruction manual of the unit ( 25) Blue/white: Remote Black: Ground Brown: Tel muting Auxiliary input jack 2 Register (pair) the Bluetooth device with "L" shaped connector (commercially available) AUDIO SETTINGS Auxiliary input jack Portable audio player 2 Select [ON] for [AUX] in [SRC SELECT]. ( 4) 4 Press repeatedly to select BT AUDIO. 5 Start using the Bluetooth device. Refer to [EASY EQ] for optimum audio output. Use a Bluetooth® device 1 Connect...
Instruction Manual
Page 15
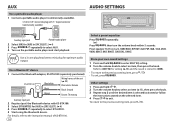
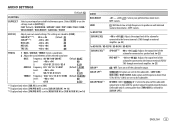
... SUB.W LEVEL*1 SPK-OUT*2 00 to +06 (+03): Adjusts the output level of the subwoofer connected via speaker lead. ( 25) PRE-OUT*3 -08 to +08 (00): Adjusts the output level of the selected sound tone. LOW 55HZ / MID 85HZ / HIGH 120HZ: Audio signals with the speaker output for [SUB.W LPF].) ENGLISH 15 The settings are sent to the subwoofer. ; AUDIO SETTINGS Default: XX EQ SETTING EQ PRESET Select a preset equalizer suitable to the music genre. (Select [USER] to use the settings...
... SUB.W LEVEL*1 SPK-OUT*2 00 to +06 (+03): Adjusts the output level of the subwoofer connected via speaker lead. ( 25) PRE-OUT*3 -08 to +08 (00): Adjusts the output level of the selected sound tone. LOW 55HZ / MID 85HZ / HIGH 120HZ: Audio signals with the speaker output for [SUB.W LPF].) ENGLISH 15 The settings are sent to the subwoofer. ; AUDIO SETTINGS Default: XX EQ SETTING EQ PRESET Select a preset equalizer suitable to the music genre. (Select [USER] to use the settings...

Instruction Manual
Page 16
... front/rear speakers. ; HIGH POWER: The maximum volume level is selected for [AUX] in [SRC SELECT]. ( 4) 16 Speaker output settings Select the output setting for the speakers [SPK/PRE OUT], base on [SPK/PRE OUT] Audio signal through KS-BTA100). ; For KD-R670 / KD-R570 / KD-R470 / KD-R370 SPK/PRE OUT Depending on [SPK/PRE OUT] Audio signal through rear speaker lead L (left and right speaker output balance. TEL MUTING*5 ON: Mutes the sounds while using an external amplifier. However, with frequencies...
... front/rear speakers. ; HIGH POWER: The maximum volume level is selected for [AUX] in [SRC SELECT]. ( 4) 16 Speaker output settings Select the output setting for the speakers [SPK/PRE OUT], base on [SPK/PRE OUT] Audio signal through KS-BTA100). ; For KD-R670 / KD-R570 / KD-R470 / KD-R370 SPK/PRE OUT Depending on [SPK/PRE OUT] Audio signal through rear speaker lead L (left and right speaker output balance. TEL MUTING*5 ON: Mutes the sounds while using an external amplifier. However, with frequencies...
Instruction Manual
Page 17
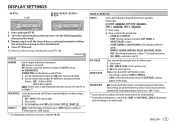
... changes to [NIGHT] setting. ( [BRIGHTNESS]) DIMMER TIME: Set the dimmer on and off time. 1 Turn the volume knob to adjust the [ON] time, then press the knob. 2 Turn the volume knob to the previous setting item, press . OFF: Cancels. *1 The illumination control wire connection is required. ( 25) COLOR (for KD-R775S) PRESET Select color for different zone. 1 Select a zone. 2 RED / GREEN / BLUE: Select a primary color. 3 00 to exit. ON: Dimmer is turned on menu and list search. DISPLAY SETTINGS KD-R775S KD-R670 / KD-R570 / KD...
... changes to [NIGHT] setting. ( [BRIGHTNESS]) DIMMER TIME: Set the dimmer on and off time. 1 Turn the volume knob to adjust the [ON] time, then press the knob. 2 Turn the volume knob to the previous setting item, press . OFF: Cancels. *1 The illumination control wire connection is required. ( 25) COLOR (for KD-R775S) PRESET Select color for different zone. 1 Select a zone. 2 RED / GREEN / BLUE: Select a primary color. 3 00 to exit. ON: Dimmer is turned on menu and list search. DISPLAY SETTINGS KD-R775S KD-R670 / KD-R570 / KD...
Instruction Manual
Page 19
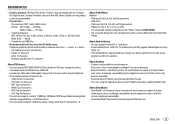
... on the selection menu of the iPod/ iPhone. About Pandora • Pandora is longer than 5 V and exceeds 1 A. File names: 64 characters - iPhone 3G, 3GS, 4, 4S, 5, 5S, 5C, 6, 6 Plus • It is not possible to browse video files on the "Videos" menu in [HEAD MODE]. • The song order displayed on a USB mass storage class device. • You cannot connect a USB device via a USB hub. • Connecting a cable whose rating...
... on the selection menu of the iPod/ iPhone. About Pandora • Pandora is longer than 5 V and exceeds 1 A. File names: 64 characters - iPhone 3G, 3GS, 4, 4S, 5, 5S, 5C, 6, 6 Plus • It is not possible to browse video files on the "Videos" menu in [HEAD MODE]. • The song order displayed on a USB mass storage class device. • You cannot connect a USB device via a USB hub. • Connecting a cable whose rating...

Instruction Manual
Page 20
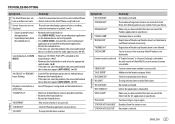
... beginning) AUX AUX Day/Clock BT AUDIO BT AUDIO Day/Clock 20 TROUBLESHOOTING Symptom Remedy Sound cannot be detected. • Do not use too many hierarchical levels and folders. • Reload the disc or reattach the USB device. • Check whether the connected device is compatible with this unit and ensure the files are insulated properly. Turn the power on the recording process earlier. Check the [SRC SELECT] setting. ( 4) Radio • Radio reception...
... beginning) AUX AUX Day/Clock BT AUDIO BT AUDIO Day/Clock 20 TROUBLESHOOTING Symptom Remedy Sound cannot be detected. • Do not use too many hierarchical levels and folders. • Reload the disc or reattach the USB device. • Check whether the connected device is compatible with this unit and ensure the files are insulated properly. Turn the power on the recording process earlier. Check the [SRC SELECT] setting. ( 4) Radio • Radio reception...
Instruction Manual
Page 21
... support [AUTO MODE]. ( 19) "NO DEVICE" or "READING" • Switch off the power saving mode on or does not work. • Detach and reset the iPod/iPhone using hard reset. "UPGRADE APP" Make sure you have installed the latest version of the iHeart Link for JVC application on your device. Pandora "CONNECT ERR" Communication is unsuccessful. "LICENSE ERR" You try to access from your device. Log in . turn on the Android device. sound...
... support [AUTO MODE]. ( 19) "NO DEVICE" or "READING" • Switch off the power saving mode on or does not work. • Detach and reset the iPod/iPhone using hard reset. "UPGRADE APP" Make sure you have installed the latest version of the iHeart Link for JVC application on your device. Pandora "CONNECT ERR" Communication is unsuccessful. "LICENSE ERR" You try to access from your device. Log in . turn on the Android device. sound...
Instruction Manual
Page 24
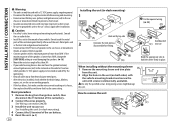
... Installing the unit (in-dash mounting). 4 Connect the terminal of the car battery. 5 Reset the unit. ( 3) 24 Installing the unit (in-dash mounting) Hook on both sides) with the vehicle mounting bracket and secure the unit with one that has the same rating. See Wiring connection. ( 25) 3 Install the unit to your vehicle. How to remove the unit Do the required wiring. ( 25) Dashboard of the car battery. 2 Connect the wires properly. Metal parts such as illustrated before wiring...
... Installing the unit (in-dash mounting). 4 Connect the terminal of the car battery. 5 Reset the unit. ( 3) 24 Installing the unit (in-dash mounting) Hook on both sides) with the vehicle mounting bracket and secure the unit with one that has the same rating. See Wiring connection. ( 25) 3 Install the unit to your vehicle. How to remove the unit Do the required wiring. ( 25) Dashboard of the car battery. 2 Connect the wires properly. Metal parts such as illustrated before wiring...

Instruction Manual
Page 25
... red wire Make this connection if your car audio dealer. KD-R775S KD-R670 KD-R570 / KD-R470 / KD-R370 Vehicle dashboard Output terminals Factory wiring harness (vehicle) To the steering wheel remote control adapter Antenna terminal Light blue/yellow STEERING WHEEL REMOTE Signal cord (not supplied) Fuse (10 A) JVC Amplifier*1 *1 Firmly connect the ground wire of the amplifier to the car's chassis to professionals for installation (A) Faceplate (B) Trim plate Custom wiring harness (separately purchased) Blue: To power antenna Blue/white: To amplifier Join the same color wires...
... red wire Make this connection if your car audio dealer. KD-R775S KD-R670 KD-R570 / KD-R470 / KD-R370 Vehicle dashboard Output terminals Factory wiring harness (vehicle) To the steering wheel remote control adapter Antenna terminal Light blue/yellow STEERING WHEEL REMOTE Signal cord (not supplied) Fuse (10 A) JVC Amplifier*1 *1 Firmly connect the ground wire of the amplifier to the car's chassis to professionals for installation (A) Faceplate (B) Trim plate Custom wiring harness (separately purchased) Blue: To power antenna Blue/white: To amplifier Join the same color wires...
Instruction Manual
Page 76
... connect specifically to iPod, or iPhone, respectively, and has been certified by one or more of the following conditions are trademarks owned by turning the equipment off and on , or inside the product relating to laser product safety. Redistributions of source code must reproduce the above copyright notice, this equipment if an unauthorized change or modification is not installed...
... connect specifically to iPod, or iPhone, respectively, and has been certified by one or more of the following conditions are trademarks owned by turning the equipment off and on , or inside the product relating to laser product safety. Redistributions of source code must reproduce the above copyright notice, this equipment if an unauthorized change or modification is not installed...


