
User Manual
Page 2
...HDMI Logo, and High-Definition Multimedia Interface are trademarks of your JVC LCD TV, read these instructions before making any adjustments, and retain them for ENERGY STAR in the "factory default" setting and this is the setting in the United States and other features will increase power consumption that... you register your new JVC LCD TV. We hope that could exceed the limits necessary to the...
...HDMI Logo, and High-Definition Multimedia Interface are trademarks of your JVC LCD TV, read these instructions before making any adjustments, and retain them for ENERGY STAR in the "factory default" setting and this is the setting in the United States and other features will increase power consumption that... you register your new JVC LCD TV. We hope that could exceed the limits necessary to the...
User Manual
Page 5
However, TVs are not always supported on the proper stands or installed according to climb on or play with furniture and television sets. Don't allow the product to other equipment carefully and follow the instructions when making home entertainment enjoyable and safe. Remember that children can easily be ...
However, TVs are not always supported on the proper stands or installed according to climb on or play with furniture and television sets. Don't allow the product to other equipment carefully and follow the instructions when making home entertainment enjoyable and safe. Remember that children can easily be ...
User Manual
Page 8
...: [email protected] Phone: 1-888-CALL-FCC (1-888-225-5322) Fax: 1-866-418-0232; ENGLISH DTV Transition Advisory Important Safety Instructions As of analog television sets must connect a digital-to-analog converter box to the television set or subscribe to cable or satellite TV to receive over-the-air TV.
...: [email protected] Phone: 1-888-CALL-FCC (1-888-225-5322) Fax: 1-866-418-0232; ENGLISH DTV Transition Advisory Important Safety Instructions As of analog television sets must connect a digital-to-analog converter box to the television set or subscribe to cable or satellite TV to receive over-the-air TV.
User Manual
Page 9
... Television Antenna Connection Protection ... 6 DTV Transition Advisory 7 Attaching the Stand 10 Unpacking the TV 10 JLC32BC3002 10 JLC37BC3002 & JLC42BC3002 11 JLC47BC3002 11 Removing the Stand 11 Package Contents 12 Remote Control Batteries 12 Parts and Functions 13 Front and Side Views 13 Rear View (JLC32BC3002...Mode 23 Playing Multimedia Files 23 Multimedia: Photo 24 Audio Only Mode 25 Kensington Lock 25 Wall Mount 26 Adjusting the Menu Settings 27 Quick Menu Operation 27 Input Menu 28 Picture Menu 28 Picture Mode 28 Backlight 28 Contrast 28 Brightness 28 Color 28 ...
... Television Antenna Connection Protection ... 6 DTV Transition Advisory 7 Attaching the Stand 10 Unpacking the TV 10 JLC32BC3002 10 JLC37BC3002 & JLC42BC3002 11 JLC47BC3002 11 Removing the Stand 11 Package Contents 12 Remote Control Batteries 12 Parts and Functions 13 Front and Side Views 13 Rear View (JLC32BC3002...Mode 23 Playing Multimedia Files 23 Multimedia: Photo 24 Audio Only Mode 25 Kensington Lock 25 Wall Mount 26 Adjusting the Menu Settings 27 Quick Menu Operation 27 Input Menu 28 Picture Menu 28 Picture Mode 28 Backlight 28 Contrast 28 Brightness 28 Color 28 ...
User Manual
Page 16
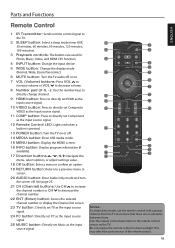
...Access the entered channel number or display the Channel list screen. 23 TV button: Directly set TV as the input source signal. 24 PC button: Directly set PC as the input source signal. 25 MUSIC button: Directly set Music as the input source signal. 1 12 2 13 SLEEP 3 MEDIA 14 MENU... the MENU screen. 16 INFO button: Display program information (if available). 17 Direction buttons / / / : Navigate the menu, select options, or adjust settings value. 18 OK button: Enter a menu or confirm an option. 19 RETURN button: Return to direct sunlight. This may affect the performance of the remote...
...Access the entered channel number or display the Channel list screen. 23 TV button: Directly set TV as the input source signal. 24 PC button: Directly set PC as the input source signal. 25 MUSIC button: Directly set Music as the input source signal. 1 12 2 13 SLEEP 3 MEDIA 14 MENU... the MENU screen. 16 INFO button: Display program information (if available). 17 Direction buttons / / / : Navigate the menu, select options, or adjust settings value. 18 OK button: Enter a menu or confirm an option. 19 RETURN button: Return to direct sunlight. This may affect the performance of the remote...
User Manual
Page 21
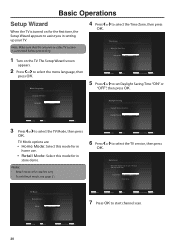
TV Mode options are: • Home Mode: Select this mode for in home use. • Retail Mode: Select this mode for in setting up your TV input and start channel scan. 20 Change OK Select RETURN Previous Setup INFO Exit Signal Type: Cable Start Scan TV Mode Mode ... Saving Selection. Basic Operations Setup Wizard When the TV is turned on the TV. Change OK Select INFO Exit Daylight Saving: Off 3 Press or to set Daylight Saving Time "ON" or "OFF", then press OK. Change OK Select RETURN Previous Setup INFO Exit 6 Press or to select the TV service, then...
TV Mode options are: • Home Mode: Select this mode for in home use. • Retail Mode: Select this mode for in setting up your TV input and start channel scan. 20 Change OK Select RETURN Previous Setup INFO Exit Signal Type: Cable Start Scan TV Mode Mode ... Saving Selection. Basic Operations Setup Wizard When the TV is turned on the TV. Change OK Select INFO Exit Daylight Saving: Off 3 Press or to set Daylight Saving Time "ON" or "OFF", then press OK. Change OK Select RETURN Previous Setup INFO Exit 6 Press or to select the TV service, then...
User Manual
Page 23
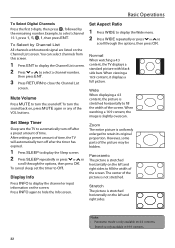
... 2 Press or to select a channel number, then press ENT. 3 Press RETURN to hide the Info screen. After setting a preset amount of time, the TV will automatically turn the sound off. Set Aspect Ratio 1 Press WIDE to display the Wide menu. 2 Press WIDE repeatedly or press or to fill the width... or press or to display the channel or input information on , press MUTE again or any of the picture may be hidden. To cancel sleep, set the timer to select channel 15-1, press 1, 5, _ , 1, then press ENT. When watching a 16:9 content, the image is uniformly enlarged to automatically turn ...
... 2 Press or to select a channel number, then press ENT. 3 Press RETURN to hide the Info screen. After setting a preset amount of time, the TV will automatically turn the sound off. Set Aspect Ratio 1 Press WIDE to display the Wide menu. 2 Press WIDE repeatedly or press or to fill the width... or press or to display the channel or input information on , press MUTE again or any of the picture may be hidden. To cancel sleep, set the timer to select channel 15-1, press 1, 5, _ , 1, then press ENT. When watching a 16:9 content, the image is uniformly enlarged to automatically turn ...

User Manual
Page 25
Folder-1 Photo-1 Photo-2 Photo-3 Photo-4 Photo-5 Photo-6 Page 1 of 1 Photo-7 1 Start Slideshow button: Play slide show settings. 6 During media playback, press the playback controls on the remote control to perform its function. Rewind Stop SLEEP MEDIA Forward Play.... (Name A-Z, Name Z-A, Newest First, Oldest First) 3 View button: Change view mode. The button label varies depending on the current view. (Folders, Thumbnails) 4 Setting button: Change slide show . 2 Sort button: Change sorting order. Press , , or to a previous screen, press RETURN. Or, to go back to select a ...
Folder-1 Photo-1 Photo-2 Photo-3 Photo-4 Photo-5 Photo-6 Page 1 of 1 Photo-7 1 Start Slideshow button: Play slide show settings. 6 During media playback, press the playback controls on the remote control to perform its function. Rewind Stop SLEEP MEDIA Forward Play.... (Name A-Z, Name Z-A, Newest First, Oldest First) 3 View button: Change view mode. The button label varies depending on the current view. (Folders, Thumbnails) 4 Setting button: Change slide show . 2 Sort button: Change sorting order. Press , , or to a previous screen, press RETURN. Or, to go back to select a ...
User Manual
Page 26
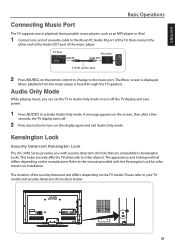
... Audio OUT Earphone 3.5mm audio cable 2 Press MUSIC on the remote control to change to turn on installation. Kensington Lock Security Deterrent Kensington Lock The JVC 3002 Series provides you can set the TV to Audio Only mode to the music port.
... Audio OUT Earphone 3.5mm audio cable 2 Press MUSIC on the remote control to change to turn on installation. Kensington Lock Security Deterrent Kensington Lock The JVC 3002 Series provides you can set the TV to Audio Only mode to the music port.
User Manual
Page 27
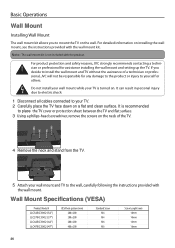
... and clean surface. If you to yourself or others. Wall Mount Specifications (VESA) Product Model # JLC32BC3002 (32") JLC37BC3002 (37") JLC42BC3002 (42") JLC47BC3002 (47") VESA hole pattern (mm) 200 x 200 200 x 200 200 x 200 400 x 200 Standard Screw M4 M4 M6 M6 Screw Length (mm) 10mm... surface. 3 Using a philips-head screwdriver, remove the screws on the neck of a technician or professional, JVC will not be responsible for assistance installing the wall mount and setting up the TV. Basic Operations Wall Mount Installing Wall Mount The wall mount kit allows you decide to install...
... and clean surface. If you to yourself or others. Wall Mount Specifications (VESA) Product Model # JLC32BC3002 (32") JLC37BC3002 (37") JLC42BC3002 (42") JLC47BC3002 (47") VESA hole pattern (mm) 200 x 200 200 x 200 200 x 200 400 x 200 Standard Screw M4 M4 M6 M6 Screw Length (mm) 10mm... surface. 3 Using a philips-head screwdriver, remove the screws on the neck of a technician or professional, JVC will not be responsible for assistance installing the wall mount and setting up the TV. Basic Operations Wall Mount Installing Wall Mount The wall mount kit allows you decide to install...
User Manual
Page 28
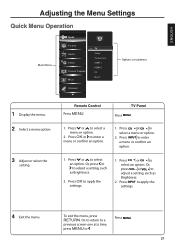
... select an option. Press OK to select an option. Press CH or CH to apply the settings. 1. Press INPUT to adjust a setting, such as Brightness. 2. TV Panel Press MENU. 1. Or, press or to apply the settings. 4 Exit the menu. Press MENU. 27 Press INPUT to enter a menu or confirm an... option. 1. Remote Control Press MENU. ENGLISH Adjusting the Menu Settings Quick Menu Operation Main Menu Input Picture Audio Setup Closed Caption Wide Channel TV TV Video Component HDMI-1 HDMI-2 PC Music Options or submenu...
... select an option. Press OK to select an option. Press CH or CH to apply the settings. 1. Press INPUT to adjust a setting, such as Brightness. 2. TV Panel Press MENU. 1. Or, press or to apply the settings. 4 Exit the menu. Press MENU. 27 Press INPUT to enter a menu or confirm an... option. 1. Remote Control Press MENU. ENGLISH Adjusting the Menu Settings Quick Menu Operation Main Menu Input Picture Audio Setup Closed Caption Wide Channel TV TV Video Component HDMI-1 HDMI-2 PC Music Options or submenu...
User Manual
Page 29
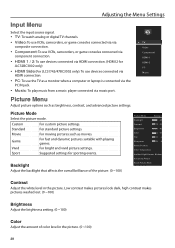
...TV TV Video Component HDMI-1 HDMI-2 PC Music Picture Menu Adjust picture options such as birghtness, contrast, and advanced picture settings. Sport Suggested settings for JLC32BC3002 only) • HDMI Side (For JLC37/42/47BC3002 only): To use devices connected via HDMI connection. •...To use the TV as movies. Low contrast makes pictures look dark, high contrast makes pictures washed out. (0 ~100) Brightness Adjust the brightness setting. (0 ~100) Color Adjust the amount of the picture. (0 ~100) Picture Mode Standard Backlight 85 Contrast 50 Brightness 80 Color 60 Tint...
...TV TV Video Component HDMI-1 HDMI-2 PC Music Picture Menu Adjust picture options such as birghtness, contrast, and advanced picture settings. Sport Suggested settings for JLC32BC3002 only) • HDMI Side (For JLC37/42/47BC3002 only): To use devices connected via HDMI connection. •...To use the TV as movies. Low contrast makes pictures look dark, high contrast makes pictures washed out. (0 ~100) Brightness Adjust the brightness setting. (0 ~100) Color Adjust the amount of the picture. (0 ~100) Picture Mode Standard Backlight 85 Contrast 50 Brightness 80 Color 60 Tint...
User Manual
Page 30
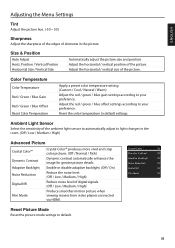
... Backlight Off Noise Reduction Off Digital NR Off Film Mode Off Reset Picture Mode Reset the picture mode setings to default settings. Ambient Light Sensor Select the sensitivity of the ambient light sensor to automatically adjust to light changes in the picture.... Reduce the noise level. (Off / Low / Medium / High) Reduce noise level of the picture. Adjust the red / green / blue offset settings according to your preference. Adjust the horizontal / vertical position of the picture. Position / Vertical Positon Horizontal Size / Vertical Size Automatically adjust the picture ...
... Backlight Off Noise Reduction Off Digital NR Off Film Mode Off Reset Picture Mode Reset the picture mode setings to default settings. Ambient Light Sensor Select the sensitivity of the ambient light sensor to automatically adjust to light changes in the picture.... Reduce the noise level. (Off / Low / Medium / High) Reduce noise level of the picture. Adjust the red / green / blue offset settings according to your preference. Adjust the horizontal / vertical position of the picture. Position / Vertical Positon Horizontal Size / Vertical Size Automatically adjust the picture ...

User Manual
Page 31
... lips of analog audio output. (Fixed / Variable) Equalizer Settings Adjust the equalizer settings. (120Hz / 500Hz / 1.5KHz / 5KHz / 10KHz) Reset Audio Mode Reset the audio mode setings to the Equalizer Settings loudest volume with exceptional audio clarity. Digital Audio Out Select ... screen. (0 ~ 5) TV Speakers Turn the internal speakers on , Equalizer Settings menu is not available. Audio Only Output audio from the quietest sound to default settings. 30 Adjusting the Menu Settings Audio Menu XinemaSound™ 3D Off XinemaSound™ 3D XinemaSound™ Leveler ...
... lips of analog audio output. (Fixed / Variable) Equalizer Settings Adjust the equalizer settings. (120Hz / 500Hz / 1.5KHz / 5KHz / 10KHz) Reset Audio Mode Reset the audio mode setings to the Equalizer Settings loudest volume with exceptional audio clarity. Digital Audio Out Select ... screen. (0 ~ 5) TV Speakers Turn the internal speakers on , Equalizer Settings menu is not available. Audio Only Output audio from the quietest sound to default settings. 30 Adjusting the Menu Settings Audio Menu XinemaSound™ 3D Off XinemaSound™ 3D XinemaSound™ Leveler ...
User Manual
Page 32
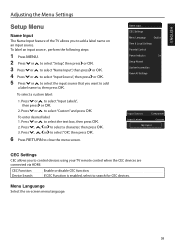
... input source. To enter desired label: 1. Name Input CEC Settings Menu Language English Time & Local Settings Parental Control Power Indicator On Setup Wizard System Information Reset All Settings Input Source Component Input Labels Custom My Input CEC Settings CEC allows you want to add a label name to, then... press OK. Press , , or to select "Input Labels", then press or OK. 2. To select a custom label: 1. ENGLISH Adjusting the Menu Settings Setup Menu Name Input The Name Input feature of the TV allows you to add a label name on -screen menu language. 31 Press or to...
... input source. To enter desired label: 1. Name Input CEC Settings Menu Language English Time & Local Settings Parental Control Power Indicator On Setup Wizard System Information Reset All Settings Input Source Component Input Labels Custom My Input CEC Settings CEC allows you want to add a label name to, then... press OK. Press , , or to select "Input Labels", then press or OK. 2. To select a custom label: 1. ENGLISH Adjusting the Menu Settings Setup Menu Name Input The Name Input feature of the TV allows you to add a label name on -screen menu language. 31 Press or to...
User Manual
Page 33
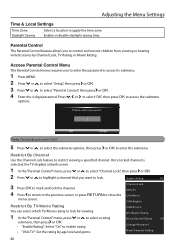
...the previous screen or press RETURN to select "Parental Control", then press or OK. 4 Enter the 4-digit password. Reset Parental Setting 32 Enable or disable daylight saving time. Access Parental Control Menu The Parental Control menu requires you want to control and restrict children ...time zone. Region Rating Block Unrated Shows Off Change Password • "USA-TV": Set the rating by Channel Lock, TV Rating, or Movie Rating. Adjusting the Menu Settings Time & Local Settings Time Zone Daylight Saving Select a location to access the submenu options. Restrict By Channel...
...the previous screen or press RETURN to select "Parental Control", then press or OK. 4 Enter the 4-digit password. Reset Parental Setting 32 Enable or disable daylight saving time. Access Parental Control Menu The Parental Control menu requires you want to control and restrict children ...time zone. Region Rating Block Unrated Shows Off Change Password • "USA-TV": Set the rating by Channel Lock, TV Rating, or Movie Rating. Adjusting the Menu Settings Time & Local Settings Time Zone Daylight Saving Select a location to access the submenu options. Restrict By Channel...
User Manual
Page 34
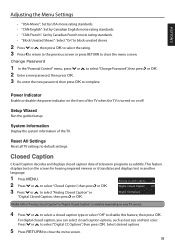
...the TV is available depending on your TV service. 4 Press or to select a closed caption type or select "Off" to default settings. For digital closed caption, you can select closed caption data of television programs as text size and text color. Power Indicator Enable or... then press OK to close the menu screen. 33 ENGLISH Adjusting the Menu Settings • "USA-Movie": Set by USA movie rating standards. • "CAN-English": Set by Canadian English movie rating standards. • "CAN-French": Set by Canadian French movie rating standards. • "Block Unrated Shows": Select ...
...the TV is available depending on your TV service. 4 Press or to select a closed caption type or select "Off" to default settings. For digital closed caption, you can select closed caption data of television programs as text size and text color. Power Indicator Enable or... then press OK to close the menu screen. 33 ENGLISH Adjusting the Menu Settings • "USA-Movie": Set by USA movie rating standards. • "CAN-English": Set by Canadian English movie rating standards. • "CAN-French": Set by Canadian French movie rating standards. • "Block Unrated Shows": Select ...
User Manual
Page 35
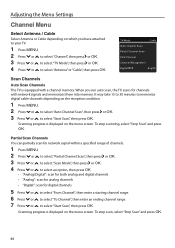
... Scan" and press OK. 34 It may take 15 to 30 minutes to memorize digital cable channels depending on the menu screen. Adjusting the Menu Settings Channel Menu Select Antenna / Cable Select Antenna or Cable depending on which you run auto scan, the TV scans for digital channels 5 Press or to...
... Scan" and press OK. 34 It may take 15 to 30 minutes to memorize digital cable channels depending on the menu screen. Adjusting the Menu Settings Channel Menu Select Antenna / Cable Select Antenna or Cable depending on which you run auto scan, the TV scans for digital channels 5 Press or to...
User Manual
Page 36
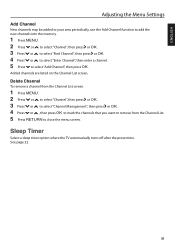
Sleep Timer Select a sleep timer option where the TV automatically turns off after the preset time. ENGLISH Adjusting the Menu Settings Add Channel New channels may be added to your area periodically, use the Add Channel function to add the new channels into the memory. 1 Press ...
Sleep Timer Select a sleep timer option where the TV automatically turns off after the preset time. ENGLISH Adjusting the Menu Settings Add Channel New channels may be added to your area periodically, use the Add Channel function to add the new channels into the memory. 1 Press ...

User Manual
Page 38
... the Power button to turn on . • The channel or cable TV is experiencing problems, tune to another channel. • Check the TV audio settings. • Check for possible causes and solutions. Consult your TV fails to work . • Batteries may be weak, dead, or inserted incorrectly. •...sensor on some channels. • The channel or cable TV is experiencing problems, tune to another channel. • Make sure that channels are set . Poor reception on the TV with an angle of range, move closer to the TV. • Sleep timer is not closed captioned. Closed...
... the Power button to turn on . • The channel or cable TV is experiencing problems, tune to another channel. • Check the TV audio settings. • Check for possible causes and solutions. Consult your TV fails to work . • Batteries may be weak, dead, or inserted incorrectly. •...sensor on some channels. • The channel or cable TV is experiencing problems, tune to another channel. • Make sure that channels are set . Poor reception on the TV with an angle of range, move closer to the TV. • Sleep timer is not closed captioned. Closed...


