
User Manual
Page 3
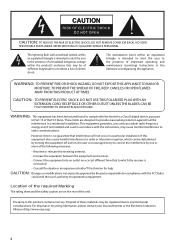
... receiving antenna. - Connect the equipment into an outlet on , the user is encouraged to try to constitute a risk of these materials may be determined by turning the equipment off and on a circuit different from that to which the receiver is intended to alert the user to provide reasonable protection against harmful...
... receiving antenna. - Connect the equipment into an outlet on , the user is encouraged to try to constitute a risk of these materials may be determined by turning the equipment off and on a circuit different from that to which the receiver is intended to alert the user to provide reasonable protection against harmful...
User Manual
Page 5
Follow the manufacturer's recommendations for an extended period of the other equipment, turn off the power and unplug all of this product. Read the owner's manual of time. TVs that the cable ground shall be pushed, pulled over ...
Follow the manufacturer's recommendations for an extended period of the other equipment, turn off the power and unplug all of this product. Read the owner's manual of time. TVs that the cable ground shall be pushed, pulled over ...
User Manual
Page 16
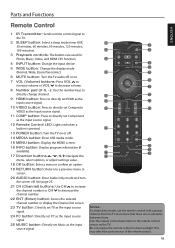
... Enter a menu or confirm an option. 19 RETURN button: Return to a previous menu or screen. 20 AUDIO button: Enter Audio Only mode and turn the screen off. This may affect the performance of the remote control. 15 Parts and Functions I N ENGLISH Remote Control 1 IR Transmitter: Sends remote...Video, and HDMI CEC function. 4 INPUT button: Change the input device. 5 WIDE button: Change the display mode (Normal, Wide, Zoom Panoramic). 6 MUTE button: Turn the TV audio off or on. 7 VOL (Volume) buttons: Press VOL to increase volume or VOL to decrease volume. 8 Number pad (0~9, -): Use the number ...
... Enter a menu or confirm an option. 19 RETURN button: Return to a previous menu or screen. 20 AUDIO button: Enter Audio Only mode and turn the screen off. This may affect the performance of the remote control. 15 Parts and Functions I N ENGLISH Remote Control 1 IR Transmitter: Sends remote...Video, and HDMI CEC function. 4 INPUT button: Change the input device. 5 WIDE button: Change the display mode (Normal, Wide, Zoom Panoramic). 6 MUTE button: Turn the TV audio off or on. 7 VOL (Volume) buttons: Press VOL to increase volume or VOL to decrease volume. 8 Number pad (0~9, -): Use the number ...
User Manual
Page 20
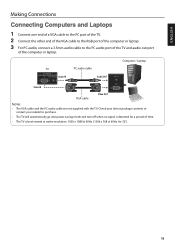
... of the computer or laptop. 3 For PC audio, connect a 3.5mm audio cable to purchase. • The TV will automatically go into power saving mode and turn off when no signal is best viewed at native resolution: 1920 x 1080 @ 60Hz (1366 x 768 @ 60Hz for a period of the computer or laptop. Check your...
... of the computer or laptop. 3 For PC audio, connect a 3.5mm audio cable to purchase. • The TV will automatically go into power saving mode and turn off when no signal is best viewed at native resolution: 1920 x 1080 @ 60Hz (1366 x 768 @ 60Hz for a period of the computer or laptop. Check your...
User Manual
Page 21
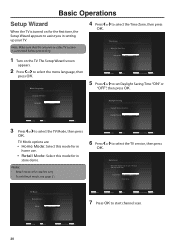
... or to select the TV Mode, then press OK. Basic Operations Setup Wizard When the TV is turned on the TV. Note: Make sure that the antenna or cable TV system is connected before proceeding. 1 Turn on for the first time, the Setup Wizard appears to assist you in store demo. Change...
... or to select the TV Mode, then press OK. Basic Operations Setup Wizard When the TV is turned on the TV. Note: Make sure that the antenna or cable TV system is connected before proceeding. 1 Turn on for the first time, the Setup Wizard appears to assist you in store demo. Change...
User Manual
Page 23
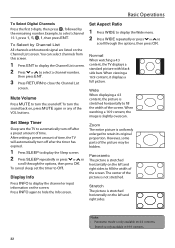
...horizontally on 4:3 contents. • Stretch is stretched horizontally on the screen. After setting a preset amount of time, the TV will automatically turn off after a preset amount of the VOL buttons. Set Aspect Ratio 1 Press WIDE to display the Wide menu. 2 Press WIDE repeatedly or...fill the width of the picture may be hidden. Note: • Panoramic mode is slightly overscan. Set Sleep Timer Sleep sets the TV to automatically turn off after the timer has expired. 1 Press SLEEP to display the Sleep screen. 2 Press SLEEP repeatedly or press or to select channel 15-1, ...
...horizontally on 4:3 contents. • Stretch is stretched horizontally on the screen. After setting a preset amount of time, the TV will automatically turn off after a preset amount of the VOL buttons. Set Aspect Ratio 1 Press WIDE to display the Wide menu. 2 Press WIDE repeatedly or...fill the width of the picture may be hidden. Note: • Panoramic mode is slightly overscan. Set Sleep Timer Sleep sets the TV to automatically turn off after the timer has expired. 1 Press SLEEP to display the Sleep screen. 2 Press SLEEP repeatedly or press or to select channel 15-1, ...
User Manual
Page 26
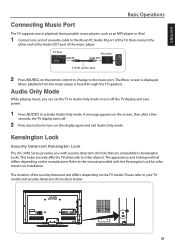
... activate Audio Only mode. Kensington Lock Security Deterrent Kensington Lock The JVC 3002 Series provides you can set the TV to Audio Only mode to turn off . 2 Press any button to turn on the screen, then after a few seconds, the TV display turns off the TV display and save power. 1 Press AUDIO to the...
... activate Audio Only mode. Kensington Lock Security Deterrent Kensington Lock The JVC 3002 Series provides you can set the TV to Audio Only mode to turn off . 2 Press any button to turn on the screen, then after a few seconds, the TV display turns off the TV display and save power. 1 Press AUDIO to the...
User Manual
Page 27
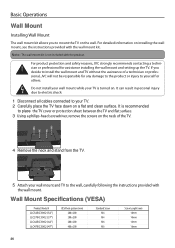
... wall mount kit. If you to mount the TV on the wall. Wall Mount Specifications (VESA) Product Model # JLC32BC3002 (32") JLC37BC3002 (37") JLC42BC3002 (42") JLC47BC3002 (47") VESA hole pattern (mm) 200 x 200 200 x 200 200 x 200 400 x 200 Standard Screw M4 M4 M6 M6 Screw...responsible for assistance installing the wall mount and setting up the TV. It is turned on installing the wall mount, see the instructions provided with the product. For product protection and safety reasons, JVC strongly recommends contacting a technician or professional for any damage to the product or injury...
... wall mount kit. If you to mount the TV on the wall. Wall Mount Specifications (VESA) Product Model # JLC32BC3002 (32") JLC37BC3002 (37") JLC42BC3002 (42") JLC47BC3002 (47") VESA hole pattern (mm) 200 x 200 200 x 200 200 x 200 400 x 200 Standard Screw M4 M4 M6 M6 Screw...responsible for assistance installing the wall mount and setting up the TV. It is turned on installing the wall mount, see the instructions provided with the product. For product protection and safety reasons, JVC strongly recommends contacting a technician or professional for any damage to the product or injury...

User Manual
Page 31
... the type of digital audio output. (Off / Dolby Digital / PCM) Analog Audio Out Select the type of the person talking on the screen. (0 ~ 5) TV Speakers Turn the internal speakers on , Equalizer Settings menu is not available. Treble 7 Balance 2 Note: Lip Sync 2 • When XinemaSound™ 3D is on or off the... Speakers Off Audio Only XinemaSound™ Leveler Digital Audio Out Off Analog Audio Out Fixed Delivering smooth, steady volume levels from the TV speakers but turn off .
... the type of digital audio output. (Off / Dolby Digital / PCM) Analog Audio Out Select the type of the person talking on the screen. (0 ~ 5) TV Speakers Turn the internal speakers on , Equalizer Settings menu is not available. Treble 7 Balance 2 Note: Lip Sync 2 • When XinemaSound™ 3D is on or off the... Speakers Off Audio Only XinemaSound™ Leveler Digital Audio Out Off Analog Audio Out Fixed Delivering smooth, steady volume levels from the TV speakers but turn off .
User Manual
Page 34
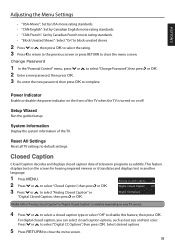
... desired options. 5 Press RETURN to select "Closed Caption", then press or OK. Digital CC Options Note: Either "Analog Closed Caption" or "Digital Closed Caption" is turned on the screen for hearing imparied viewers or it translates and displays text in another language. 1 Press MENU. 2 Press or to close the menu screen...
... desired options. 5 Press RETURN to select "Closed Caption", then press or OK. Digital CC Options Note: Either "Analog Closed Caption" or "Digital Closed Caption" is turned on the screen for hearing imparied viewers or it translates and displays text in another language. 1 Press MENU. 2 Press or to close the menu screen...
User Manual
Page 36
Added channels are listed on the Channel List screen. Sleep Timer Select a sleep timer option where the TV automatically turns off after the preset time. See page 22. 35 Delete Channel To remove a channel from the Channel List screen. 1 Press MENU. 2 Press or to select "...
Added channels are listed on the Channel List screen. Sleep Timer Select a sleep timer option where the TV automatically turns off after the preset time. See page 22. 35 Delete Channel To remove a channel from the Channel List screen. 1 Press MENU. 2 Press or to select "...

User Manual
Page 38
... sound. • Press the VOL button on the remote control or the VOL + button on the TV. • Press MUTE on the remote control to turn on the TV with an angle of interference. No CATV reception. • Power is experiencing problems, tune to work . • Batteries may be weak, dead...
... sound. • Press the VOL button on the remote control or the VOL + button on the TV. • Press MUTE on the remote control to turn on the TV with an angle of interference. No CATV reception. • Power is experiencing problems, tune to work . • Batteries may be weak, dead...
Printer Friendly Spec
Page 2
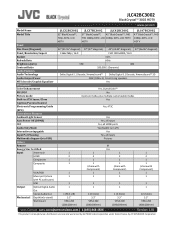
JLC42BC3002 BlackCrystal™ 3002 HDTV www.jvc.com Model Name Model Title Panel Size Class (Diagonal) Panel/Resolution/Aspect Backlit Refresh Rate Brightness (nits) Contrast Ratio Audio Features ...™ No 6 picture mode, plus multiple customizable modes Yes Yes, ATSC 1 2 1 1 1 1 1 1 1 (RCA L/R) 3.1" VESA 200 (200x200mm) Yes Yes, all inputs Yes, all HDMI ports Yes (Backlit turn off) Yes Yes, all inputs Pictures 1 2 1 1 (share with Component) 1 1 IR Yes 1 2 1 1 (share with Component) 1 1 1 1 1 1 1 (3.5mm) 3.3" VESA 200 (200x200mm) 1 (3.5mm) 3.3" VESA 200 (200x200mm) 1 2 1 ...
JLC42BC3002 BlackCrystal™ 3002 HDTV www.jvc.com Model Name Model Title Panel Size Class (Diagonal) Panel/Resolution/Aspect Backlit Refresh Rate Brightness (nits) Contrast Ratio Audio Features ...™ No 6 picture mode, plus multiple customizable modes Yes Yes, ATSC 1 2 1 1 1 1 1 1 1 (RCA L/R) 3.1" VESA 200 (200x200mm) Yes Yes, all inputs Yes, all HDMI ports Yes (Backlit turn off) Yes Yes, all inputs Pictures 1 2 1 1 (share with Component) 1 1 IR Yes 1 2 1 1 (share with Component) 1 1 1 1 1 1 1 (3.5mm) 3.3" VESA 200 (200x200mm) 1 (3.5mm) 3.3" VESA 200 (200x200mm) 1 2 1 ...


