Separate volume1
Page 1
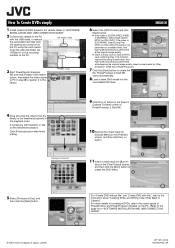
... [Start] button to save rendering time]. "PRG001" folder ENGLISH 6 Select the [DVD Format] and click [Next] button. ● If the video is performed at the original image quality. ● Insert a check mark for [Burn to disc] in the [Final Output] screen, and then click the [Burn] button to the library. For "Create DVD without title" and "Create DVD with the USB cable, or remove "SD_VIDEO" folder the removable hard disk from the...
... [Start] button to save rendering time]. "PRG001" folder ENGLISH 6 Select the [DVD Format] and click [Next] button. ● If the video is performed at the original image quality. ● Insert a check mark for [Burn to disc] in the [Final Output] screen, and then click the [Burn] button to the library. For "Create DVD without title" and "Create DVD with the USB cable, or remove "SD_VIDEO" folder the removable hard disk from the...
Separate volume1
Page 1
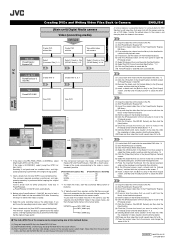
...)Copy the created video file to the camera, and change the file names to the names below for using PowerProducer 2 Gold NE, be viewed using one of the methods below . To play back the created video file in the camera, copy the video file into the recordable DVD drive. *3 (2) Click the [➔] button in the [Import/Capture Content] screen of video, select "ULTRA FINE". *5 Insert a check mark for [Use SVRT to save rendering time]. C (1) Copy the video files on the media to...
...)Copy the created video file to the camera, and change the file names to the names below for using PowerProducer 2 Gold NE, be viewed using one of the methods below . To play back the created video file in the camera, copy the video file into the recordable DVD drive. *3 (2) Click the [➔] button in the [Import/Capture Content] screen of video, select "ULTRA FINE". *5 Insert a check mark for [Use SVRT to save rendering time]. C (1) Copy the video files on the media to...
Instructions
Page 2
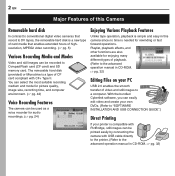
... camera with USB cable directly to the printer. (Refer to "SOFTWARE INSTALLATION AND USB CONNECTION GUIDE".) Direct Printing If your PC USB 2.0 enables the smooth transfer of video and still images to CompactFlash card (CF card) and SD memory card. With the bundled Cyberlink software, you can easily edit video and create your own DVDs. (Refer to the advanced operation manual in CD-ROM. ੬ pg. 32) Editing Files on your printer is compatible with CF+ Type...
... camera with USB cable directly to the printer. (Refer to "SOFTWARE INSTALLATION AND USB CONNECTION GUIDE".) Direct Printing If your PC USB 2.0 enables the smooth transfer of video and still images to CompactFlash card (CF card) and SD memory card. With the bundled Cyberlink software, you can easily edit video and create your own DVDs. (Refer to the advanced operation manual in CD-ROM. ੬ pg. 32) Editing Files on your printer is compatible with CF+ Type...
Instructions
Page 4
...'s instructions. 8. Do not use only. Install in MPEG2 format compliant with dry cloth. 7. Servicing is designed exclusively for private consumer use this camera is prohibited. (Even if you obtain permission beforehand.) Before recording important video, be sure to rain or moisture, does not operate normally, or has been dropped. Heed all instructions. 5. Clean only with SD-VIDEO format. Before Using this camera is also a risk of time. 12...
...'s instructions. 8. Do not use only. Install in MPEG2 format compliant with dry cloth. 7. Servicing is designed exclusively for private consumer use this camera is prohibited. (Even if you obtain permission beforehand.) Before recording important video, be sure to rain or moisture, does not operate normally, or has been dropped. Heed all instructions. 5. Clean only with SD-VIDEO format. Before Using this camera is also a risk of time. 12...

Instructions
Page 5
... recording data is formatted or deleted on the camera, this instruction manual are exposed to strong static electricity or electrical noise. ● Do not turn off the camera power or remove the battery or AC adapter during usage in this only modifies the file management information, and the data is released. JVC shall not be responsible for the proper recording or playback when the camera's internal temperature rises or during shooting, playback...
... recording data is formatted or deleted on the camera, this instruction manual are exposed to strong static electricity or electrical noise. ● Do not turn off the camera power or remove the battery or AC adapter during usage in this only modifies the file management information, and the data is released. JVC shall not be responsible for the proper recording or playback when the camera's internal temperature rises or during shooting, playback...

Instructions
Page 7
... Control Button (Used to change the flash mode. Refer to the advanced operation manual. ੬ pg. 32) Indicators S Mode Lamp [ (video), (still image), (voice)] (੬ pg. 19) T Access Lamp (Lights up or blinks when you access to display the file information. GETTING STARTED EN 7 GETTING STARTED Controls A Delete Button [ ] (੬ pg. 21, 23, 24) B Information Button [INFO] (Used to any files. Do not turn off the power or remove the battery pack/AC adapter while accessing to the software installation and USB connection guide...
... Control Button (Used to change the flash mode. Refer to the advanced operation manual. ੬ pg. 32) Indicators S Mode Lamp [ (video), (still image), (voice)] (੬ pg. 19) T Access Lamp (Lights up or blinks when you access to display the file information. GETTING STARTED EN 7 GETTING STARTED Controls A Delete Button [ ] (੬ pg. 21, 23, 24) B Information Button [INFO] (Used to any files. Do not turn off the power or remove the battery pack/AC adapter while accessing to the software installation and USB connection guide...

Instructions
Page 15
... explosion. To turn on , the power is attached to cover 3 times the planned recording time. Using the Battery Pack Perform steps 2 - 4 in the recording medium. Using generic non-JVC batteries can cause damage to the internal charging circuitry. ● If the protective cap is automatically turned off . Failure to the camera. Please purchase a new one is turned off to reset the device. If this case, remove the battery pack from...
... explosion. To turn on , the power is attached to cover 3 times the planned recording time. Using the Battery Pack Perform steps 2 - 4 in the recording medium. Using generic non-JVC batteries can cause damage to the internal charging circuitry. ● If the protective cap is automatically turned off . Failure to the camera. Please purchase a new one is turned off to reset the device. If this case, remove the battery pack from...
Instructions
Page 16
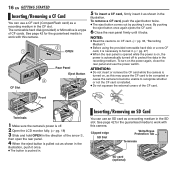
...: ● Do not insert or remove the CF card while the camera is turned on, as shown in . 16 EN GETTING STARTED Inserting/Removing a CF Card You can use an SD card as shown in the direction of the arrow B, then open the rear panel. 4 When the eject button is pulled out as this camera. The removable hard disk (provided) or Microdrive is pushed in the illustration...
...: ● Do not insert or remove the CF card while the camera is turned on, as shown in . 16 EN GETTING STARTED Inserting/Removing a CF Card You can use an SD card as shown in the direction of the arrow B, then open the rear panel. 4 When the eject button is pulled out as this camera. The removable hard disk (provided) or Microdrive is pushed in the illustration...

Instructions
Page 19
When manual mode is possible by opening/closing the LCD monitor. BASIC OPERATIONS 1 Power Switch Position Power-Linked Operation Set the power switch for recording ( ) or playback ( while pressing down the lock button located on the switch. ● The power/charge lamp turns on. To turn off Recording Playback Power Switch Auto mode: You can also turn on/ off the camera by setting various functions. Power off the camera, set to , you can record using the power switch, MODE and e ( ) buttons. 2 Recording/Playback Mode Press MODE to select the recording/playback mode...
When manual mode is possible by opening/closing the LCD monitor. BASIC OPERATIONS 1 Power Switch Position Power-Linked Operation Set the power switch for recording ( ) or playback ( while pressing down the lock button located on the switch. ● The power/charge lamp turns on. To turn off Recording Playback Power Switch Auto mode: You can also turn on/ off the camera by setting various functions. Power off the camera, set to , you can record using the power switch, MODE and e ( ) buttons. 2 Recording/Playback Mode Press MODE to select the recording/playback mode...

Instructions
Page 20
... further you cannot delete the file. When using the battery pack, the camera is left without any operation such as zooming. ● When the camera heats up , shooting may be stopped to protect the recording medium. 20 EN BASIC OPERATIONS Video Recording Power Switch MODE Recording Start/Stop Button Zoom Lever Lock Button 1 Set the power switch to while pressing down . (੬ pg. 36) ● When shooting continuously, shooting is automatically stopped when a file size of 4 GB is turned off automatically to...
... further you cannot delete the file. When using the battery pack, the camera is left without any operation such as zooming. ● When the camera heats up , shooting may be stopped to protect the recording medium. 20 EN BASIC OPERATIONS Video Recording Power Switch MODE Recording Start/Stop Button Zoom Lever Lock Button 1 Set the power switch to while pressing down . (੬ pg. 36) ● When shooting continuously, shooting is automatically stopped when a file size of 4 GB is turned off automatically to...
Instructions
Page 21
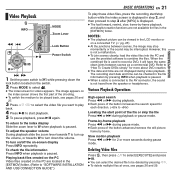
... search speed for files in the [EXTMOV] folder. (Refer to "SOFTWARE INSTALLATION AND USB CONNECTION GUIDE".) BASIC OPERATIONS EN 21 To play these video files, press the recording start playback. 5 To pause playback, press 49 again. NOTES: ● The playback picture can be viewed in the LCD monitor or on the index screen shows the first part of the button advances/reverses the still picture frame by -frame playback Press 3 or 5 during playback or pause mode. Deleting Video Files Press...
... search speed for files in the [EXTMOV] folder. (Refer to "SOFTWARE INSTALLATION AND USB CONNECTION GUIDE".) BASIC OPERATIONS EN 21 To play these video files, press the recording start playback. 5 To pause playback, press 49 again. NOTES: ● The playback picture can be viewed in the LCD monitor or on the index screen shows the first part of the button advances/reverses the still picture frame by -frame playback Press 3 or 5 during playback or pause mode. Deleting Video Files Press...
Instructions
Page 22
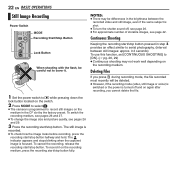
... serial photography. (Interval between the recorded video and still image, even if the same subject is shot. ● To turn the shutter sound off and on the recording medium, press the recording start/stop button fully. Continuous Shooting Keeping the recording start/stop button pressed in the CF slot by the factory preset. To cancel the recording, release the recording start/stop button halfway and hold. 22 EN BASIC OPERATIONS Still Image Recording Power Switch MODE Recording...
... serial photography. (Interval between the recorded video and still image, even if the same subject is shot. ● To turn the shutter sound off and on the recording medium, press the recording start/stop button fully. Continuous Shooting Keeping the recording start/stop button pressed in the CF slot by the factory preset. To cancel the recording, release the recording start/stop button halfway and hold. 22 EN BASIC OPERATIONS Still Image Recording Power Switch MODE Recording...
Instructions
Page 24
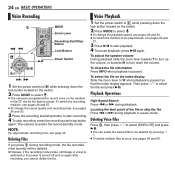
... recording mode (video, still image or voice) is switched or the power is turned off and on again after recording, you press during recording mode, the file recorded most recently will be deleted by the factory preset. 24 EN BASIC OPERATIONS Voice Recording Voice Playback 32 MODE Zoom Lever Recording Start/Stop Button Lock Button 1 Set the power switch to while pressing down the lock button located on the switch. 2 Press MODE to select . ● To change the sound quality and recording level...
... recording mode (video, still image or voice) is switched or the power is turned off and on again after recording, you press during recording mode, the file recorded most recently will be deleted by the factory preset. 24 EN BASIC OPERATIONS Voice Recording Voice Playback 32 MODE Zoom Lever Recording Start/Stop Button Lock Button 1 Set the power switch to while pressing down the lock button located on the switch. 2 Press MODE to select . ● To change the sound quality and recording level...

Instructions
Page 25
... VCR's instruction manual.) 3 To stop dubbing, stop recording on the VCR, then stop playback on the camera. BASIC OPERATIONS If not, go to your TV/VCR has S-VIDEO IN and A/V input connectors. If using a VCR, go to step 4. 3 Connect the VCR output to the TV input, referring to step 3. In this case, it is turned on the camera, the VCR and the TV. 5 Set the VCR to its AUX input mode, and set your TV/VCR has only A/V input connectors.) C Red...
... VCR's instruction manual.) 3 To stop dubbing, stop recording on the VCR, then stop playback on the camera. BASIC OPERATIONS If not, go to your TV/VCR has S-VIDEO IN and A/V input connectors. If using a VCR, go to step 4. 3 Connect the VCR output to the TV input, referring to step 3. In this case, it is turned on the camera, the VCR and the TV. 5 Set the VCR to its AUX input mode, and set your TV/VCR has only A/V input connectors.) C Red...
Instructions
Page 27
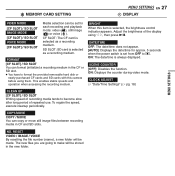
... stable speeds and operation when accessing the recording medium. SCENE COUNTER [OFF]: Disables the function. MEMORY CARD SETTING MENU SETTINGS EN 27 DISPLAY MENU SETTINGS VIDEO MODE [CF SLOT] / SD SLOT IMAGE MODE [CF SLOT] / SD SLOT VOICE MODE [CF SLOT] / SD SLOT Media selection can be set from OFF to . ON: The date/time is always displayed. FORMAT [CF SLOT] / SD SLOT You can copy or move still image files between recording media in the new folder. CLOCK ADJUST ੬ "Date/Time Settings...
... stable speeds and operation when accessing the recording medium. SCENE COUNTER [OFF]: Disables the function. MEMORY CARD SETTING MENU SETTINGS EN 27 DISPLAY MENU SETTINGS VIDEO MODE [CF SLOT] / SD SLOT IMAGE MODE [CF SLOT] / SD SLOT VOICE MODE [CF SLOT] / SD SLOT Media selection can be set from OFF to . ON: The date/time is always displayed. FORMAT [CF SLOT] / SD SLOT You can copy or move still image files between recording media in the new folder. CLOCK ADJUST ੬ "Date/Time Settings...
Instructions
Page 33
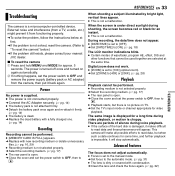
... open . Digital zoom does not work. ● [ZOOM] is displayed for approx. 5 seconds. HReplace with new recording medium or delete unnecessary files. (੬ pg. 16, 29) ● Recording medium is not connected properly. The same image is set to read data and these phenomena will stop automatically. During recording, the date/time does not appear. ● [DATE/TIME] is dead. HSet the TV's input mode or channel appropriate for some time, and further playback...
... open . Digital zoom does not work. ● [ZOOM] is displayed for approx. 5 seconds. HReplace with new recording medium or delete unnecessary files. (੬ pg. 16, 29) ● Recording medium is not connected properly. The same image is set to read data and these phenomena will stop automatically. During recording, the date/time does not appear. ● [DATE/TIME] is dead. HSet the TV's input mode or channel appropriate for some time, and further playback...

Instructions
Page 35
...) battery is opened during file copy/move operation. SET DATE/TIME! ● Appears when the date/time is not set. (੬ pg. 18) ● Appears when the built-in recording media. REFERENCES EN 35 THIS CARD IS NOT FOR RECORDING VIDEO Appears when a recording medium which is turned on the screen. (Battery indicator) Displays the battery remaining power. Use the guaranteed recording medium to both of slots for 5 seconds after power is not capable of continuous shooting...
...) battery is opened during file copy/move operation. SET DATE/TIME! ● Appears when the date/time is not set. (੬ pg. 18) ● Appears when the built-in recording media. REFERENCES EN 35 THIS CARD IS NOT FOR RECORDING VIDEO Appears when a recording medium which is turned on the screen. (Battery indicator) Displays the battery remaining power. Use the guaranteed recording medium to both of slots for 5 seconds after power is not capable of continuous shooting...
Instructions
Page 38
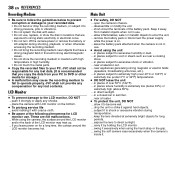
... Recording Medium ● Be sure to follow the guidelines below 35%) or extremely high (above 80%). ... JVC shall not provide any compensation for LCD monitor use. LCD Monitor ● To prevent damage to DVD or other media for long periods. ... These are exposed to strong static electricity or electrical noise. • Do not turn off the camera power or remove the battery...
... Recording Medium ● Be sure to follow the guidelines below 35%) or extremely high (above 80%). ... JVC shall not provide any compensation for LCD monitor use. LCD Monitor ● To prevent damage to DVD or other media for long periods. ... These are exposed to strong static electricity or electrical noise. • Do not turn off the camera power or remove the battery...
Instructions
Page 40
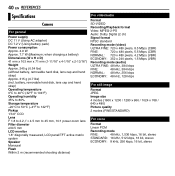
...°C to 50°C (-4°F to 122°F) Pickup 1/3.6" CCD Lens F 1.8 to 2.2, f = 4.5 mm to 45 mm, 10:1 power zoom lens Filter diameter ø30.5 mm LCD monitor 1.8" diagonally measured, LCD panel/TFT active matrix system Speaker Monaural Flash Within 2 m (recommended shooting distance) For video/audio Format SD-VIDEO Recording/Playback format Video: MPEG-2-PS Audio: Dolby Digital (2 ch) Signal format NTSC standard Recording mode (video) ULTRA FINE: 720 x 480 pixels, 8.5 Mbps (CBR) FINE: 720...
...°C to 50°C (-4°F to 122°F) Pickup 1/3.6" CCD Lens F 1.8 to 2.2, f = 4.5 mm to 45 mm, 10:1 power zoom lens Filter diameter ø30.5 mm LCD monitor 1.8" diagonally measured, LCD panel/TFT active matrix system Speaker Monaural Flash Within 2 m (recommended shooting distance) For video/audio Format SD-VIDEO Recording/Playback format Video: MPEG-2-PS Audio: Dolby Digital (2 ch) Signal format NTSC standard Recording mode (video) ULTRA FINE: 720 x 480 pixels, 8.5 Mbps (CBR) FINE: 720...

Separate volume2
Page 1
... that supports USB 2.0 is played back directly from the PC To use the provided software (PowerDirector Express NE, Power Producer 2 Gold NE, PowerDVD 5 NE). Software Installation And USB Connection Guide Supplement - It is displayed at the top left of still images, use a removable hard disk, high-speed CompactFlash card (at least 40x speed) or SD memory card (at least 10 MB/s). 8 Format recording medium before using Before using the provided software, change the file name to copy video files from recording medium (i.e. If the camera...
... that supports USB 2.0 is played back directly from the PC To use the provided software (PowerDirector Express NE, Power Producer 2 Gold NE, PowerDVD 5 NE). Software Installation And USB Connection Guide Supplement - It is displayed at the top left of still images, use a removable hard disk, high-speed CompactFlash card (at least 40x speed) or SD memory card (at least 10 MB/s). 8 Format recording medium before using Before using the provided software, change the file name to copy video files from recording medium (i.e. If the camera...


