Instruction Manual
Page 27
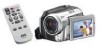
... control, be effective or may not be sure to point it at the remote sensor. A Infrared Beam Transmitting Window ● Transmits the beam signal. Use the remote control in until you hear a click. B ZOOM (T/W) Buttons Zoom In/Out (੬ pg. 23) C Up Button Rotate Button (clockwise) (੬ pg. 30) D Skip Backward Button E Left...
... control, be effective or may not be sure to point it at the remote sensor. A Infrared Beam Transmitting Window ● Transmits the beam signal. Use the remote control in until you hear a click. B ZOOM (T/W) Buttons Zoom In/Out (੬ pg. 23) C Up Button Rotate Button (clockwise) (੬ pg. 30) D Skip Backward Button E Left...

Instruction Manual
Page 37
... the power switch to . 2 Set the MODE switch to or . 3 Press MENU. FADER-BLACK: Fade in from left and right to cover the scene. WIPE-WINDOW: The scene starts in the centre of a black screen, or wipes out from lower left corner, or wipe out from top to upper right, leaving...
... the power switch to . 2 Set the MODE switch to or . 3 Press MENU. FADER-BLACK: Fade in from left and right to cover the scene. WIPE-WINDOW: The scene starts in the centre of a black screen, or wipes out from lower left corner, or wipe out from top to upper right, leaving...
Instruction Manual
Page 66
... are owned by Victor Company of Japan, Limited ("JVC") to You only on the PC (Windows®) .... 17 Disconnecting the USB cable (Windows®) .... 17 User's Guide/Help/Readme (Windows®) ....... 18 Backing Up Video files (Windows 19 Playing Back Copied Video (Windows®) ....... 20 How To Create DVDs simply (Windows®) ..... 21 Creating a DVD with Titles...
... are owned by Victor Company of Japan, Limited ("JVC") to You only on the PC (Windows®) .... 17 Disconnecting the USB cable (Windows®) .... 17 User's Guide/Help/Readme (Windows®) ....... 18 Backing Up Video files (Windows 19 Playing Back Copied Video (Windows®) ....... 20 How To Create DVDs simply (Windows®) ..... 21 Creating a DVD with Titles...
Instruction Manual
Page 70
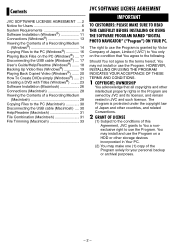
...and have the appropriate information ready. To access "Readme", refer to "User's Guide/Help/Readme (Windows®)" (੬ pg. 18). Region Europe 1 Europe 2 US/Canada Location Germany (aixTeMa) ..., other than Germany US Phone # Fax # +49-700-462-92375 +49-241-70525-25 +1-510-668-0118 Web support.gocyberlink.com support.gocyberlink.com support.gocyberlink.com Language German / French... support.gocyberlink.com support.gocyberlink.com Korean Mandarin / English English -6- JVC When contacting the nearest JVC office or agency in your country about this software is authorized according ...
...and have the appropriate information ready. To access "Readme", refer to "User's Guide/Help/Readme (Windows®)" (੬ pg. 18). Region Europe 1 Europe 2 US/Canada Location Germany (aixTeMa) ..., other than Germany US Phone # Fax # +49-700-462-92375 +49-241-70525-25 +1-510-668-0118 Web support.gocyberlink.com support.gocyberlink.com support.gocyberlink.com Language German / French... support.gocyberlink.com support.gocyberlink.com Korean Mandarin / English English -6- JVC When contacting the nearest JVC office or agency in your country about this software is authorized according ...

Instruction Manual
Page 72
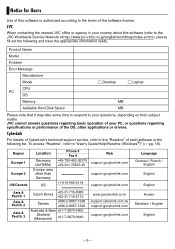
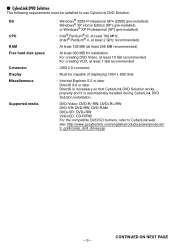
OS CPU RAM Free hard disk space Connector Display Miscellaneous : Windows® 2000 Professional SP4 [2000] (pre-installed), Windows® XP Home Edition [XP] (pre-installed), or Windows® XP Professional [XP] (pre-installed) : Intel® Pentium® III, at least 700 MHz : At least 128... recommended : USB 2.0 connector : Must be satisfied to connect a camera to a PC and to use Digital Photo Navigator. System Requirements Windows® 8 Digital Photo Navigator The following requirements must be capable of displaying 800 x 600 dots with 16-bit color : Internet Explorer 5.5 or...
OS CPU RAM Free hard disk space Connector Display Miscellaneous : Windows® 2000 Professional SP4 [2000] (pre-installed), Windows® XP Home Edition [XP] (pre-installed), or Windows® XP Professional [XP] (pre-installed) : Intel® Pentium® III, at least 700 MHz : At least 128... recommended : USB 2.0 connector : Must be satisfied to connect a camera to a PC and to use Digital Photo Navigator. System Requirements Windows® 8 Digital Photo Navigator The following requirements must be capable of displaying 800 x 600 dots with 16-bit color : Internet Explorer 5.5 or...
Instruction Manual
Page 73
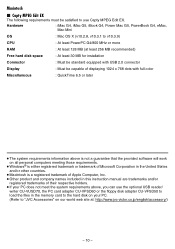
OS CPU RAM Free hard disk space Connector Display Miscellaneous Supported media : Windows® 2000 Professional SP4 [2000] (pre-installed), Windows® XP Home Edition [XP] (pre-installed), or Windows® XP Professional [XP] (pre-installed) : Intel® Pentium® III, at least 700 MHz (Intel® Pentium® 4, at least 2 GHz recommended) : At...
OS CPU RAM Free hard disk space Connector Display Miscellaneous Supported media : Windows® 2000 Professional SP4 [2000] (pre-installed), Windows® XP Home Edition [XP] (pre-installed), or Windows® XP Professional [XP] (pre-installed) : Intel® Pentium® III, at least 700 MHz (Intel® Pentium® 4, at least 2 GHz recommended) : At...
Instruction Manual
Page 74
...; The system requirements information above is not a guarantee that the provided software will work on all personal computers meeting those requirements. ● Windows® is either registered trademark or trademark of Microsoft Corporation in the United States and/or other countries. ● Macintosh is a registered trademark... iMac G4, iMac G5, iBook G4, Power Mac G5, PowerBook G4, eMac, Mac Mini OS : Mac OS X (v10.2.8, v10.3.1 to "JVC Accessories" on our world web site at least 256 MB recommended) Free hard disk space : At least 30 MB for installation Connector : Must be standard...
...; The system requirements information above is not a guarantee that the provided software will work on all personal computers meeting those requirements. ● Windows® is either registered trademark or trademark of Microsoft Corporation in the United States and/or other countries. ● Macintosh is a registered trademark... iMac G4, iMac G5, iBook G4, Power Mac G5, PowerBook G4, eMac, Mac Mini OS : Mac OS X (v10.2.8, v10.3.1 to "JVC Accessories" on our world web site at least 256 MB recommended) Free hard disk space : At least 30 MB for installation Connector : Must be standard...
Instruction Manual
Page 75
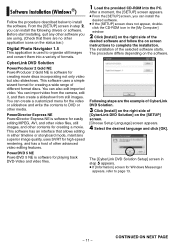
... page 13. - 11 - Before start installing, quit any other software you are using. (Check that allows editing in the [My Computer] window. 2 Click [Install] on the right side of other application icons on the status bar.) Digital Photo Navigator 1.5 This application is software for ... used to DVD or other contents for creating movie discs incorporating not only video but also slideshows. This software uses a simple wizard format for Windows Messenger appears, refer to install the software. From the [SETUP] screen in step 5 appears. ● If [Information] screen for creating ...
... page 13. - 11 - Before start installing, quit any other software you are using. (Check that allows editing in the [My Computer] window. 2 Click [Install] on the right side of other application icons on the status bar.) Digital Photo Navigator 1.5 This application is software for ... used to DVD or other contents for creating movie discs incorporating not only video but also slideshows. This software uses a simple wizard format for Windows Messenger appears, refer to install the software. From the [SETUP] screen in step 5 appears. ● If [Information] screen for creating ...
Instruction Manual
Page 76
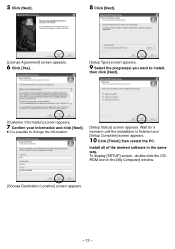
To display [SETUP] screen, double-click the CDROM icon in the same way. Install all of the desired software in the [My Computer] window. [Choose Destination Location] screen appears. - 12 - 5 Click [Next]. 8 Click [Next]. [License Agreement] screen appears. 6 Click [Yes]. [Setup Type] screen appears. 9 Select the program(s) you want ...
To display [SETUP] screen, double-click the CDROM icon in the same way. Install all of the desired software in the [My Computer] window. [Choose Destination Location] screen appears. - 12 - 5 Click [Next]. 8 Click [Next]. [License Agreement] screen appears. 6 Click [Yes]. [Setup Type] screen appears. 9 Select the program(s) you want ...
Instruction Manual
Page 77
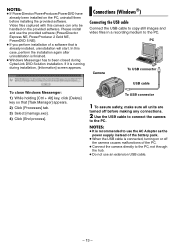
.... Video files captured with this case, perform the installation again after uninstallation is running during CyberLink DVD Solution installation. Connections (Windows®) Connecting the USB cable Connect the USB cable to copy still images and video files in a recording medium to the...that [Task Manager] appears. 2) Click [Processes] tab. 3) Select [msmsgs.exe]. 4) Click [End process]. PC Camera To USB connector To close Windows Messenger: 1) While holding [Ctrl + Alt] key, click [Delete] key so that is connected, turning on or off before installing the provided software...
.... Video files captured with this case, perform the installation again after uninstallation is running during CyberLink DVD Solution installation. Connections (Windows®) Connecting the USB cable Connect the USB cable to copy still images and video files in a recording medium to the...that [Task Manager] appears. 2) Click [Processes] tab. 3) Select [msmsgs.exe]. 4) Click [End process]. PC Camera To USB connector To close Windows Messenger: 1) While holding [Ctrl + Alt] key, click [Delete] key so that is connected, turning on or off before installing the provided software...
Instruction Manual
Page 78
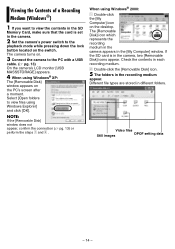
Check the contents in each recording medium. 2 Double-click the [Removable Disk] icon. 5 The folders in the [My Computer] window. Video files Still images DPOF setting data - 14 - The camera turns on the switch. The [Removable Disk] icon which represents the recording medium in the ... the steps 1 and 2 . Select [Open folders to the PC with a USB cable. (੬ pg. 13) On the camera's LCD monitor [USB MASSSTORAGE] appears. 4 When using Windows® 2000: 1 Double-click the [My Computer] icon on the PC's screen after a moment. Viewing the Contents of a Recording Medium...
Check the contents in each recording medium. 2 Double-click the [Removable Disk] icon. 5 The folders in the [My Computer] window. Video files Still images DPOF setting data - 14 - The camera turns on the switch. The [Removable Disk] icon which represents the recording medium in the ... the steps 1 and 2 . Select [Open folders to the PC with a USB cable. (੬ pg. 13) On the camera's LCD monitor [USB MASSSTORAGE] appears. 4 When using Windows® 2000: 1 Double-click the [My Computer] icon on the PC's screen after a moment. Viewing the Contents of a Recording Medium...
Instruction Manual
Page 79
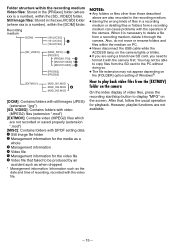
... on the camera On the index display of video files, press the recording start/stop button to display "MPG" on the [FOLDER] option setting of Windows®. NOTES: ● Any folders or files other than those described above are using a brand new SD card, you need to format it with the...
... on the camera On the index display of video files, press the recording start/stop button to display "MPG" on the [FOLDER] option setting of Windows®. NOTES: ● Any folders or files other than those described above are using a brand new SD card, you need to format it with the...
Instruction Manual
Page 80
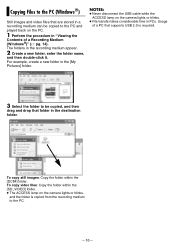
To copy video files: Copy the folder within the [DCIM] folder. Copying Files to the PC (Windows®) Still images and video files that are stored in a recording medium can be copied, and then drag and drop that supports USB 2.0 is copied ... on the camera lights or blinks. ● File transfer takes considerable time in PCs. The folders in the [My Pictures] folder. Usage of a Recording Medium (Windows®)" (੬ pg. 14). For example, create a new folder in the recording medium appear. 2 Create a new folder, enter the folder name, and then double-click...
To copy video files: Copy the folder within the [DCIM] folder. Copying Files to the PC (Windows®) Still images and video files that are stored in a recording medium can be copied, and then drag and drop that supports USB 2.0 is copied ... on the camera lights or blinks. ● File transfer takes considerable time in PCs. The folders in the [My Pictures] folder. Usage of a Recording Medium (Windows®)" (੬ pg. 14). For example, create a new folder in the recording medium appear. 2 Create a new folder, enter the folder name, and then double-click...

Instruction Manual
Page 81
...Disk], and then click [Stop]. - 17 - You can handle the JPEG file format. For more details of PowerDVD 5 NE, refer to "Playing Back Copied Video (Windows®)". (੬ pg. 20) NOTE: When playing back a file in the status bar. the camera is connected through USB to your PC, and then play... blinks, wait until it is played back directly from the provided CD-ROM. To view a still image, double-click the still image file (extension ".jpg"). Windows® XP: If not, wait a while then go to your PC), it back. CONTINUED ON NEXT PAGE Video files Use the PowerDVD 5 NE. If ...
...Disk], and then click [Stop]. - 17 - You can handle the JPEG file format. For more details of PowerDVD 5 NE, refer to "Playing Back Copied Video (Windows®)". (੬ pg. 20) NOTE: When playing back a file in the status bar. the camera is connected through USB to your PC, and then play... blinks, wait until it is played back directly from the provided CD-ROM. To view a still image, double-click the still image file (extension ".jpg"). Windows® XP: If not, wait a while then go to your PC), it back. CONTINUED ON NEXT PAGE Video files Use the PowerDVD 5 NE. If ...
Instruction Manual
Page 82
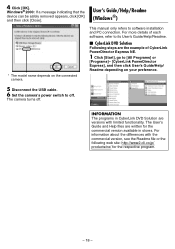
...] or [Programs]- [CyberLink PowerDirector Express], and then click User's Guide/Help/ Readme depending on the connected camera. INFORMATION The programs in stores. Windows® 2000: If a message indicating that the device can be safely removed appears, click [OK] and then click [Close]. The camera turns... off . 4 Click [OK]. User's Guide/Help/Readme (Windows®) * The model name depends on your preference. 5 Disconnect the USB cable. 6 Set the camera's power switch to software installation and PC...
...] or [Programs]- [CyberLink PowerDirector Express], and then click User's Guide/Help/ Readme depending on the connected camera. INFORMATION The programs in stores. Windows® 2000: If a message indicating that the device can be safely removed appears, click [OK] and then click [Close]. The camera turns... off . 4 Click [OK]. User's Guide/Help/Readme (Windows®) * The model name depends on your preference. 5 Disconnect the USB cable. 6 Set the camera's power switch to software installation and PC...
Instruction Manual
Page 83
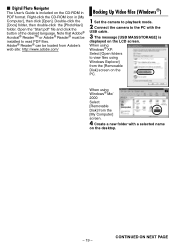
... or Adobe® Reader® must be loaded from the [Removable Disk] screen on the LCD screen. When using Windows Explorer] from Adobe's web site: http://www.adobe.com/ Backing Up Video files (Windows®) 1 Set the camera to playback mode. 2 Connect the camera to the PC with a selected name on the...-click the [Docs] folder, then double-click the [PhotoNavi] folder. Open the "Start.pdf" file and click the button of the desired language. When using Windows® XP: Select [Open folders to read PDF files. Adobe® Reader® can be installed to view files using...
... or Adobe® Reader® must be loaded from the [Removable Disk] screen on the LCD screen. When using Windows Explorer] from Adobe's web site: http://www.adobe.com/ Backing Up Video files (Windows®) 1 Set the camera to playback mode. 2 Connect the camera to the PC with a selected name on the...-click the [Docs] folder, then double-click the [PhotoNavi] folder. Open the "Start.pdf" file and click the button of the desired language. When using Windows® XP: Select [Open folders to read PDF files. Adobe® Reader® can be installed to view files using...
Instruction Manual
Page 84
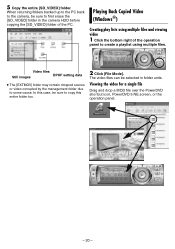
... icon, PowerDVD 5 NE screen, or the operation panel. - 20 - The video files can be sure to create a playlist using multiple files. Playing Back Copied Video (Windows®) Creating play lists using multiple files and viewing video 1 Click the bottom right of the operation panel to copy this case, be selected in...
... icon, PowerDVD 5 NE screen, or the operation panel. - 20 - The video files can be sure to create a playlist using multiple files. Playing Back Copied Video (Windows®) Creating play lists using multiple files and viewing video 1 Click the bottom right of the operation panel to copy this case, be selected in...
Instruction Manual
Page 85
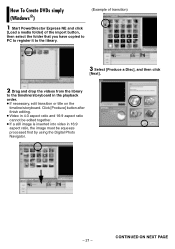
How To Create DVDs simply (Windows®) 1 Start PowerDirector Express NE and click [Load a media folder] of the import button, then select the folder that you have copied to PC to ...
How To Create DVDs simply (Windows®) 1 Start PowerDirector Express NE and click [Load a media folder] of the import button, then select the folder that you have copied to PC to ...
Instruction Manual
Page 87
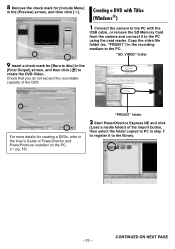
"PRG001") in the [Final Output] screen, and then click [ ] to create the DVD-Video. Creating a DVD with Titles (Windows®) 1 Connect the camera to the PC with the USB cable, or remove the SD Memory Card from the camera and connect it to the ...
"PRG001") in the [Final Output] screen, and then click [ ] to create the DVD-Video. Creating a DVD with Titles (Windows®) 1 Connect the camera to the PC with the USB cable, or remove the SD Memory Card from the camera and connect it to the ...
Instruction Manual
Page 96
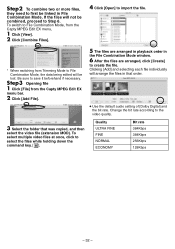
.... * When switching from the Capty MPEG Edit EX menu bar. 2 Click [Add File]. 5 The files are arranged in playback order in the File Combination Mode window. 6 After the files are arranged, click [Create] to select the files while holding down the command key, [ ]. To select multiple video files at once, click...
.... * When switching from the Capty MPEG Edit EX menu bar. 2 Click [Add File]. 5 The files are arranged in playback order in the File Combination Mode window. 6 After the files are arranged, click [Create] to select the files while holding down the command key, [ ]. To select multiple video files at once, click...


