Instruction Manual
Page 2
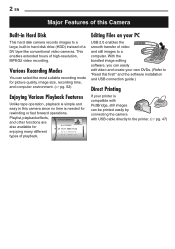
2 EN Major Features of this Camera Built-in Hard Disk This hard disk camera records images to a large, built-in this first!" PLAYLIST CONTENTS ALL SCENES 01 10.11 2005 11:30 02 15.11 2005 23:00 03 25.11 2005 11:00 Editing Files on your PC USB 2.0 enables the smooth transfer... of a DV tape like conventional video cameras. Playlist, playback effects, and other functions are also available for enjoying many different types of...
2 EN Major Features of this Camera Built-in Hard Disk This hard disk camera records images to a large, built-in this first!" PLAYLIST CONTENTS ALL SCENES 01 10.11 2005 11:30 02 15.11 2005 23:00 03 25.11 2005 11:00 Editing Files on your PC USB 2.0 enables the smooth transfer... of a DV tape like conventional video cameras. Playlist, playback effects, and other functions are also available for enjoying many different types of...
Instruction Manual
Page 3
... Drop Detection 21 VIDEO RECORDING & PLAYBACK 22 Video Recording 22 Zooming 23 Video Playback 24 How to Use the Scroll Bar 25 Date Index Screen 25 Various Playback Operations 25 Playback Zoom 25 Connecting to a TV, VCR or VDR 26 Playback on a...Files 29 How to Use the Scroll Bar 30 Date Index Screen 30 Image Rotation 30 Playback Zoom 30 ADVANCED OPERATIONS 31 RECORDING FEATURES 31 Backlight Compensation 31 Spot Exposure Control 31 LED Light ...REFERENCES 52 Troubleshooting 52 Warning Indications 55 Cleaning the Camera 57 Cautions 57 Specifications 60 TERMS Back cover
... Drop Detection 21 VIDEO RECORDING & PLAYBACK 22 Video Recording 22 Zooming 23 Video Playback 24 How to Use the Scroll Bar 25 Date Index Screen 25 Various Playback Operations 25 Playback Zoom 25 Connecting to a TV, VCR or VDR 26 Playback on a...Files 29 How to Use the Scroll Bar 30 Date Index Screen 30 Image Rotation 30 Playback Zoom 30 ADVANCED OPERATIONS 31 RECORDING FEATURES 31 Backlight Compensation 31 Spot Exposure Control 31 LED Light ...REFERENCES 52 Troubleshooting 52 Warning Indications 55 Cleaning the Camera 57 Cautions 57 Specifications 60 TERMS Back cover
Instruction Manual
Page 4
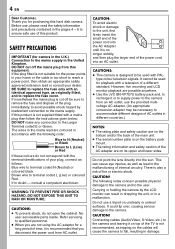
...is not suitable for purchasing this product. Refer servicing to qualified personnel. ● When you are possible anywhere. ● Use the JVC BN-VF707U battery pack and, to recharge it is designed to be used with a mains plug then follow the instructions given below: DO...to the user. Before use of a different standard. SAFETY PRECAUTIONS IMPORTANT (for playback with the following notes concern possible physical damage to the camera and to the malfunctioning of AC outlets in a malfunction. If this equipment. CAUTIONS: ● To prevent shock, do not correspond with ...
...is not suitable for purchasing this product. Refer servicing to qualified personnel. ● When you are possible anywhere. ● Use the JVC BN-VF707U battery pack and, to recharge it is designed to be used with a mains plug then follow the instructions given below: DO...to the user. Before use of a different standard. SAFETY PRECAUTIONS IMPORTANT (for playback with the following notes concern possible physical damage to the camera and to the malfunctioning of AC outlets in a malfunction. If this equipment. CAUTIONS: ● To prevent shock, do not correspond with ...
Instruction Manual
Page 6
...arrangements may be formatted. ABOVE ALL ● NEVER let anyone especially children push anything into holes, slots or any kind - Before Using this Camera This camera records video in the case - Make a backup of HI CORPORATION in Japan. If one of road safety. "Dolby" and double-D symbol ...it is strongly recommended that you want to make a trial recording. If a problem occurs with the SD Memory Card, bring your dealer or JVC service centre, be made properly. The data is not completely erased from your family knows how to be safe than sorry! Also read "...
...arrangements may be formatted. ABOVE ALL ● NEVER let anyone especially children push anything into holes, slots or any kind - Before Using this Camera This camera records video in the case - Make a backup of HI CORPORATION in Japan. If one of road safety. "Dolby" and double-D symbol ...it is strongly recommended that you want to make a trial recording. If a problem occurs with the SD Memory Card, bring your dealer or JVC service centre, be made properly. The data is not completely erased from your family knows how to be safe than sorry! Also read "...
Instruction Manual
Page 7
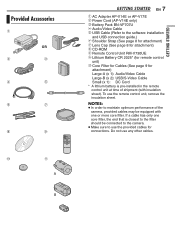
... performance of shipment (with one core filter, the end that is pre-installed in the remote control unit at time of the camera, provided cables may be connected to the camera. ● Make sure to the filter should be equipped with insulation sheet). Do not use the remote control unit, remove the...
... performance of shipment (with one core filter, the end that is pre-installed in the remote control unit at time of the camera, provided cables may be connected to the camera. ● Make sure to the filter should be equipped with insulation sheet). Do not use the remote control unit, remove the...
Instruction Manual
Page 8
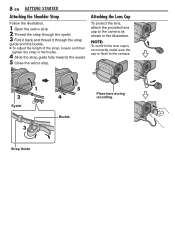
Buckle NOTE: To confirm the lens cap is on correctly, make sure the cap is flush to the camera as shown in the buckle. 4 Slide the strap guide fully towards the eyelet. 5 Close the velcro strip. 8 EN GETTING STARTED Attaching the Shoulder Strap Follow ... strap, loosen and then tighten the strap in the illustration. Attaching the Lens Cap To protect the lens, attach the provided lens cap to the camera. 1 2 Eyelet 3 Strap Guide 5 4 Place here during recording.
Buckle NOTE: To confirm the lens cap is on correctly, make sure the cap is flush to the camera as shown in the buckle. 4 Slide the strap guide fully towards the eyelet. 5 Close the velcro strip. 8 EN GETTING STARTED Attaching the Shoulder Strap Follow ... strap, loosen and then tighten the strap in the illustration. Attaching the Lens Cap To protect the lens, attach the provided lens cap to the camera. 1 2 Eyelet 3 Strap Guide 5 4 Place here during recording.

Instruction Manual
Page 9
... that it is not slack. 3 Close the core filter until it clicks shut. GETTING STARTED Attaching the Core Filter Attach the core filters to the camera.
... that it is not slack. 3 Close the core filter until it clicks shut. GETTING STARTED Attaching the Core Filter Attach the core filters to the camera.
Instruction Manual
Page 11
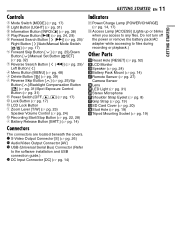
...] (੬ pg. 52) X LCD Monitor Y Speaker (੬ pg. 24) a Battery Pack Mount (੬ pg. 14) b Remote Sensor (੬ pg. 27) Camera Sensor c Lens d LED Light (੬ pg. 31) e Stereo Microphone f Shoulder Strap Eyelet (੬ pg. 8) g Grip Strap (੬ pg. 19) h SD ...pg. 39) j Reverse Skip Button [ ] (੬ pg. 25)/Up Button [ ]/Backlight Compensation Button [ ] (੬ pg. 31)/Spot Exposure Control Button (੬ pg. 31) k Power Switch [OFF, , ] (੬ pg. 17) l Lock Button (੬ pg. 17) m LCD Lock Button n Zoom Lever [T/W] (੬ pg. 23) Speaker Volume Control (੬ ...
...] (੬ pg. 52) X LCD Monitor Y Speaker (੬ pg. 24) a Battery Pack Mount (੬ pg. 14) b Remote Sensor (੬ pg. 27) Camera Sensor c Lens d LED Light (੬ pg. 31) e Stereo Microphone f Shoulder Strap Eyelet (੬ pg. 8) g Grip Strap (੬ pg. 19) h SD ...pg. 39) j Reverse Skip Button [ ] (੬ pg. 25)/Up Button [ ]/Backlight Compensation Button [ ] (੬ pg. 31)/Spot Exposure Control Button (੬ pg. 31) k Power Switch [OFF, , ] (੬ pg. 17) l Lock Button (੬ pg. 17) m LCD Lock Button n Zoom Lever [T/W] (੬ pg. 23) Speaker Volume Control (੬ ...

Instruction Manual
Page 14
...Approx. 2 hr. 40 min. To AC outlet BATT. AC Adapter (ex. AP-V17E) 1 Set the power switch to OFF. 2 With the arrow on the camera blinks to indicate charging has started. 7 When the power/charge lamp goes out, charging is attached, remove it by sliding BATT. 3 Slide down the battery...time Approx. 1 hr. 30 min. Battery Pack Arrow Battery Pack Mount Disconnect the AC adapter from the AC outlet. Unplug the power cord from the camera. Approx. 5 hr. 40 min. To detach the battery pack While sliding BATT., remove the battery pack. Do not use provided power supply units with...
...Approx. 2 hr. 40 min. To AC outlet BATT. AC Adapter (ex. AP-V17E) 1 Set the power switch to OFF. 2 With the arrow on the camera blinks to indicate charging has started. 7 When the power/charge lamp goes out, charging is attached, remove it by sliding BATT. 3 Slide down the battery...time Approx. 1 hr. 30 min. Battery Pack Arrow Battery Pack Mount Disconnect the AC adapter from the AC outlet. Unplug the power cord from the camera. Approx. 5 hr. 40 min. To detach the battery pack While sliding BATT., remove the battery pack. Do not use provided power supply units with...
Instruction Manual
Page 15
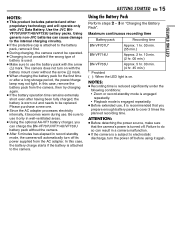
... to use the battery pack with JVC Data Battery. ATTENTION: ● Before detaching the power source, make sure that the camera's power is worn out and needs to the camera. NOTES: ● This product includes... patented and other proprietary technology and will automatically turn off . NOTES: ● Recording time is reduced significantly under the following conditions: • Zoom or record-standby mode is engaged repeatedly. • Playback mode is engaged repeatedly. ● Before extended use . Using generic non-JVC...
... to use the battery pack with JVC Data Battery. ATTENTION: ● Before detaching the power source, make sure that the camera's power is worn out and needs to the camera. NOTES: ● This product includes... patented and other proprietary technology and will automatically turn off . NOTES: ● Recording time is reduced significantly under the following conditions: • Zoom or record-standby mode is engaged repeatedly. • Playback mode is engaged repeatedly. ● Before extended use . Using generic non-JVC...

Instruction Manual
Page 17
... the power switch to or while pressing down the lock button. GETTING STARTED Operation Mode To turn on the camera, set the power switch to OFF. 1 Power Switch Power/Charge Lamp GETTING STARTED EN 17 2 Recording/Playback Mode Select the recording/playback mode using the... for recording ( ) or playback ( ) while pressing down the lock button located on the switch. ● The power/charge lamp turns on. To turn off the camera by setting various functions. (੬ pg. 31 - 37) To return to the auto recording mode Press ( / ) again so that the indicator appears. 4 Power-Linked ...
... the power switch to or while pressing down the lock button. GETTING STARTED Operation Mode To turn on the camera, set the power switch to OFF. 1 Power Switch Power/Charge Lamp GETTING STARTED EN 17 2 Recording/Playback Mode Select the recording/playback mode using the... for recording ( ) or playback ( ) while pressing down the lock button located on the switch. ● The power/charge lamp turns on. To turn off the camera by setting various functions. (੬ pg. 31 - 37) To return to the auto recording mode Press ( / ) again so that the indicator appears. 4 Power-Linked ...
Instruction Manual
Page 18
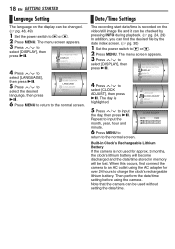
... to select the desired SCENE COUNTER LANGUAGE CLOCK ADJUST BRIGHT language, then press 49. 6 Press MENU to return to select [DISPLAY], then CAMERA SETTING BASIC SETTING press 49. Date/Time Settings The recording start date/time is highlighted. REC MEDIA SETTING DISPLAY QUALITY WIDE MODE WIND CUT 4... to select [CLOCK ADJUST], then press 49. SCENE COUNTER LANGUAGE CLOCK ADJUST BRIGHT DATE/TIME 5 Press / to select [DISPLAY], then CAMERA SETTING BASIC SETTING press 49. The menu screen appears. 3 Press / to input the day, then press 49. When this occurs, first connect ...
... to select the desired SCENE COUNTER LANGUAGE CLOCK ADJUST BRIGHT language, then press 49. 6 Press MENU to return to select [DISPLAY], then CAMERA SETTING BASIC SETTING press 49. Date/Time Settings The recording start date/time is highlighted. REC MEDIA SETTING DISPLAY QUALITY WIDE MODE WIND CUT 4... to select [CLOCK ADJUST], then press 49. SCENE COUNTER LANGUAGE CLOCK ADJUST BRIGHT DATE/TIME 5 Press / to select [DISPLAY], then CAMERA SETTING BASIC SETTING press 49. The menu screen appears. 3 Press / to input the day, then press 49. When this occurs, first connect ...

Instruction Manual
Page 19
... sure to fasten the velcro strip to your thumb and fingers through the grip to easily operate the recording start/stop button, power switch and zoom lever. The menu screen appears. 4 Press / to select [DISPLAY], then press 49. 5 Press / to or while pressing down the lock button located... on the camera. GETTING STARTED EN 19 GETTING STARTED Brightness Adjustment of the Display The brightness of the display can be adjusted. 1 Set the power switch to select [...
... sure to fasten the velcro strip to your thumb and fingers through the grip to easily operate the recording start/stop button, power switch and zoom lever. The menu screen appears. 4 Press / to select [DISPLAY], then press 49. 5 Press / to or while pressing down the lock button located... on the camera. GETTING STARTED EN 19 GETTING STARTED Brightness Adjustment of the Display The brightness of the display can be adjusted. 1 Set the power switch to select [...
Instruction Manual
Page 20
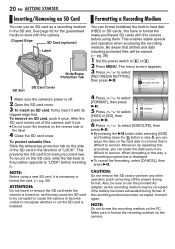
...SD card comes out of "LOCK". If the recording medium becomes corrupted, format it out. ● Do not touch the terminal on the camera. To protect valuable files Slide the write/erase protection tab on , as this may be corrupted if the battery becomes exhausted during format. You...sure to or . 2 Press MENU. Clipped Edge SD Card (optional) Label Write/Erase Protection Tab SD Card Cover SD Slot 1 Make sure the camera's power is difficult to recover. 20 EN GETTING STARTED Inserting/Removing an SD Card Formatting a Recording Medium You can use the provided AC adapter, ...
...SD card comes out of "LOCK". If the recording medium becomes corrupted, format it out. ● Do not touch the terminal on the camera. To protect valuable files Slide the write/erase protection tab on , as this may be corrupted if the battery becomes exhausted during format. You...sure to or . 2 Press MENU. Clipped Edge SD Card (optional) Label Write/Erase Protection Tab SD Card Cover SD Slot 1 Make sure the camera's power is difficult to recover. 20 EN GETTING STARTED Inserting/Removing an SD Card Formatting a Recording Medium You can use the provided AC adapter, ...

Instruction Manual
Page 21
...48, 49) Example: When checking the HDD space 1 Set the power switch to on at time of damaging the internal hard disk if the camera is accidentally dropped. Before checking, set to . 2 Press INFO/ . If the power is set the recording media that you to select [REC... INFO/ repeatedly. GETTING STARTED EN 21 Drop Detection This function turns off the power automatically to off this function to prevent HDD damage when the camera is accidentally dropped. The indicator appears. (੬ pg. 49) CAUTION: Setting this function Set [DROP DETECTION] to or . 2 Press MENU....
...48, 49) Example: When checking the HDD space 1 Set the power switch to on at time of damaging the internal hard disk if the camera is accidentally dropped. Before checking, set to . 2 Press INFO/ . If the power is set the recording media that you to select [REC... INFO/ repeatedly. GETTING STARTED EN 21 Drop Detection This function turns off the power automatically to off this function to prevent HDD damage when the camera is accidentally dropped. The indicator appears. (੬ pg. 49) CAUTION: Setting this function Set [DROP DETECTION] to or . 2 Press MENU....

Instruction Manual
Page 22
...of contiuous shooting. 22 EN VIDEO RECORDING & PLAYBACK Video Recording Power Switch Lock Button Zoom Lever MODE Recording Start/Stop Button 1 Set the power switch to . 2 Set the MODE switch to . ● The camera is programmed to record videos on the built-in the brightness between the recorded video... and still image, even if the same subject is shot. ● Video file names are assigned as zooming. ● When the camera heats up , shooting may be recorded or saved properly, the video files are not saved to the [SD_VIDEO] folder for recording...
...of contiuous shooting. 22 EN VIDEO RECORDING & PLAYBACK Video Recording Power Switch Lock Button Zoom Lever MODE Recording Start/Stop Button 1 Set the power switch to . 2 Set the MODE switch to . ● The camera is programmed to record videos on the built-in the brightness between the recorded video... and still image, even if the same subject is shot. ● Video file names are assigned as zooming. ● When the camera heats up , shooting may be recorded or saved properly, the video files are not saved to the [SD_VIDEO] folder for recording...
Instruction Manual
Page 23
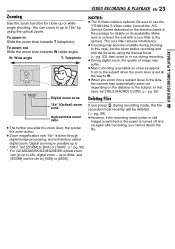
...2668; pg. 33), then zoom in up to 25x, digital zoom - To zoom out Slide the zoom lever towards T (telephoto). Set [ZOOM] to [60X] or [700X]*. (੬ pg. 50) * For GZ-MG30E/EK/GZ-MG20E/EK optical zoom can zoom in or out during zooming. Be sure to the camera. The core filter reduces ... after recording, you slide the zoom lever, the quicker the zoom action. ● Zoom magnification over 15x* is done through digital image processing, and is therefore called digital zoom. Consult the JVC Service Centre described on the sheet included in Slide the zoom lever towards W (wide-angle...
...2668; pg. 33), then zoom in up to 25x, digital zoom - To zoom out Slide the zoom lever towards T (telephoto). Set [ZOOM] to [60X] or [700X]*. (੬ pg. 50) * For GZ-MG30E/EK/GZ-MG20E/EK optical zoom can zoom in or out during zooming. Be sure to the camera. The core filter reduces ... after recording, you slide the zoom lever, the quicker the zoom action. ● Zoom magnification over 15x* is done through digital image processing, and is therefore called digital zoom. Consult the JVC Service Centre described on the sheet included in Slide the zoom lever towards W (wide-angle...
Instruction Manual
Page 24
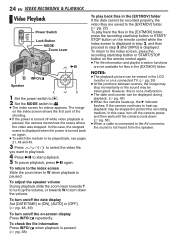
...: ● The playback picture can be displayed during playback. (੬ pg. 49) ● When the camera heats up, the U indicator flashes. 24 EN VIDEO RECORDING & PLAYBACK Video Playback Power Switch Lock Button MODE Zoom Lever 49 Speaker INFO/ 1 Set the power switch to . 2 Set the MODE switch to turn down ....STOP button on the index screen shows the first part of the shooting. ● If the power is turned off the camera power, and then wait until the camera cools down the volume. To check the file information Press INFO/ when playback is not heard from the speaker. In this...
...: ● The playback picture can be displayed during playback. (੬ pg. 49) ● When the camera heats up, the U indicator flashes. 24 EN VIDEO RECORDING & PLAYBACK Video Playback Power Switch Lock Button MODE Zoom Lever 49 Speaker INFO/ 1 Set the power switch to . 2 Set the MODE switch to turn down ....STOP button on the index screen shows the first part of the shooting. ● If the power is turned off the camera power, and then wait until the camera cools down the volume. To check the file information Press INFO/ when playback is not heard from the speaker. In this...
Instruction Manual
Page 26
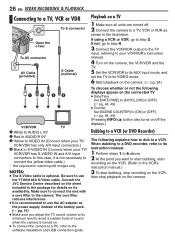
...If not, go to use the AC adapter as shown in the package for watching still images only. Consult the JVC Service Centre described on its VIDEO mode. 6 Start playback on the camera. Be sure to step 3. Make sure to connect the end with a core filter to a TV, VCR or... has only A/V input connectors.) D Black to use the YTU94146A S-Video cable. NOTES: ● The S-Video cable is turned on /off . 2 Connect the camera to its availability. To choose whether or not the following explains how to dub to connect the yellow video cable.) * Not required for details on...
...If not, go to use the AC adapter as shown in the package for watching still images only. Consult the JVC Service Centre described on its VIDEO mode. 6 Start playback on the camera. Be sure to step 3. Make sure to connect the end with a core filter to a TV, VCR or... has only A/V input connectors.) D Black to use the YTU94146A S-Video cable. NOTES: ● The S-Video cable is turned on /off . 2 Connect the camera to its availability. To choose whether or not the following explains how to dub to connect the yellow video cable.) * Not required for details on...
Instruction Manual
Page 27
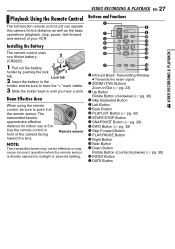
Lock tab 2 Insert the battery in the holder, and be sure to point it at the remote sensor. B ZOOM (T/W) Buttons Zoom In/Out (੬ pg. 23) C Up Button Rotate Button (clockwise) (੬ pg. 30) D Skip Backward Button E Left Button F Back Button G PLAYLIST Button (੬... the Remote Control Buttons and Functions The full-function remote control unit can operate this camera from a distance as well as the basic operations (playback, stop, pause, fast-forward and rewind) of the camera facing toward the lens. Installing the Battery VIDEO RECORDING & PLAYBACK The remote control uses...
Lock tab 2 Insert the battery in the holder, and be sure to point it at the remote sensor. B ZOOM (T/W) Buttons Zoom In/Out (੬ pg. 23) C Up Button Rotate Button (clockwise) (੬ pg. 30) D Skip Backward Button E Left Button F Back Button G PLAYLIST Button (੬... the Remote Control Buttons and Functions The full-function remote control unit can operate this camera from a distance as well as the basic operations (playback, stop, pause, fast-forward and rewind) of the camera facing toward the lens. Installing the Battery VIDEO RECORDING & PLAYBACK The remote control uses...


