

Instructions
Page 4
In addition, the support for the built-in or external microphone. Ⅵ Three video output terminals This camcorder comes with an HDMI terminal, a component terminal, and an A/V OUT (video/audio output) terminal, which can be used as audio input terminals for MP4 file format enables the video files to... display on an SD card, and also playback of these videos or still pictures. Ⅵ Supports various HD video recording formats (1080i, 1080p, and 720p) Shooting can be performed in different HD recording modes, thus supporting a wide variety of content production. Ⅵ QuickTime(MOV)/...
In addition, the support for the built-in or external microphone. Ⅵ Three video output terminals This camcorder comes with an HDMI terminal, a component terminal, and an A/V OUT (video/audio output) terminal, which can be used as audio input terminals for MP4 file format enables the video files to... display on an SD card, and also playback of these videos or still pictures. Ⅵ Supports various HD video recording formats (1080i, 1080p, and 720p) Shooting can be performed in different HD recording modes, thus supporting a wide variety of content production. Ⅵ QuickTime(MOV)/...
Instructions
Page 22
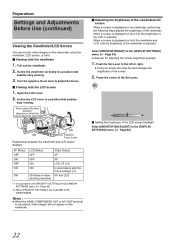
...and Adjustments Before Use (continued) Viewing the Viewfinder/LCD Screen You can monitor video images on this camcorder using the viewfinder, LCD screen, or both the viewfinder and LCD, only the brightness of the ...ON OFF ON ON LCD Status OFF OFF ON ON ON (Face-to-face shooting direction) Video Output VF VF LCD, VF (T2) In accordance with the menu settings (T1) VF and LCD T1...the LCD is adjusted. Turn the eyepiece focus lever to [ALWAYS-ON VIEWFINDER] Memo : ● When the HDMI, COMPONENT OUT or A/V OUT terminal is connected, video images will not appear on both . Ⅵ Viewing ...
...and Adjustments Before Use (continued) Viewing the Viewfinder/LCD Screen You can monitor video images on this camcorder using the viewfinder, LCD screen, or both the viewfinder and LCD, only the brightness of the ...ON OFF ON ON LCD Status OFF OFF ON ON ON (Face-to-face shooting direction) Video Output VF VF LCD, VF (T2) In accordance with the menu settings (T1) VF and LCD T1...the LCD is adjusted. Turn the eyepiece focus lever to [ALWAYS-ON VIEWFINDER] Memo : ● When the HDMI, COMPONENT OUT or A/V OUT terminal is connected, video images will not appear on both . Ⅵ Viewing ...
Instructions
Page 39
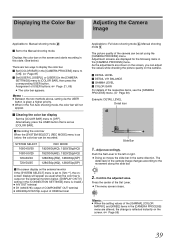
... [OFF]. As the adjustments are altered, the change is invalid.) ● A/V OUT terminal ● D1 (480i/576i) output of COMPONENT OUT terminal ● 480i/480p/576i/576p output of HDMI terminal Applicable to the Manual shooting mode. Confirm the adjusted value. Memo : ● Between the two methods above, setting via...), 1280/60p(SP) 1280/50p(HQ), 1280/50p(SP) Ⅵ On-screen display on the external monitor If the [SYSTEM SELECT] menu is output on the screen and starts recording in this state. (See below . ([DISPLAY ON TV] setting in the [CAMERA PROCESS] menu. Press the center...
... [OFF]. As the adjustments are altered, the change is invalid.) ● A/V OUT terminal ● D1 (480i/576i) output of COMPONENT OUT terminal ● 480i/480p/576i/576p output of HDMI terminal Applicable to the Manual shooting mode. Confirm the adjusted value. Memo : ● Between the two methods above, setting via...), 1280/60p(SP) 1280/50p(HQ), 1280/50p(SP) Ⅵ On-screen display on the external monitor If the [SYSTEM SELECT] menu is output on the screen and starts recording in this state. (See below . ([DISPLAY ON TV] setting in the [CAMERA PROCESS] menu. Press the center...
Instructions
Page 47
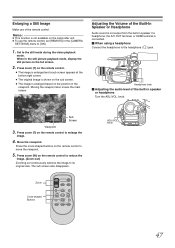
...in the still picture playback mode, display the still picture on the position of the built-in speaker if a headphone, the A/V OUT terminal, or HDMI terminal is connected. Ⅵ When using a headphone Connect the headphone to its original size. MIC Headphone Jack Ⅵ Adjusting the audio level of... the viewpoint. Sub Screen Viewpoint 3 . Press zoom (T) on the camcorder unit. ● To use of the Built-In Speaker or Headphone Audio sound is not output from the built-in speaker or headphone Turn the ADJ./VOL. Set to enlarge the image. 4 . ...
...in the still picture playback mode, display the still picture on the position of the built-in speaker if a headphone, the A/V OUT terminal, or HDMI terminal is connected. Ⅵ When using a headphone Connect the headphone to its original size. MIC Headphone Jack Ⅵ Adjusting the audio level of... the viewpoint. Sub Screen Viewpoint 3 . Press zoom (T) on the camcorder unit. ● To use of the Built-In Speaker or Headphone Audio sound is not output from the built-in speaker or headphone Turn the ADJ./VOL. Set to enlarge the image. 4 . ...
Instructions
Page 49
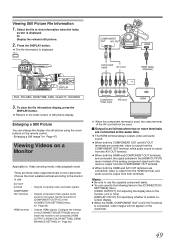
...[CONNECTION SETTINGS] menu to match the monitor to be connected. [HDMI OUTPUT], [HDMI COLOR SETTING], [HDMI ENHANCE SETTING] (A Page 63) Component Cable AV Cord HDMI Cable (Optional) T1 Component Video Input AV Input HDMI T1 When the component terminal is used, the video terminal of the... and audio sound is output from both the HDMI and A/V OUT terminals are three video output terminals on the remote control. A- Audio sound is displayed. Memo : ● Be sure to the monitor in [COMPONENT OUTPUT] of a still picture using the zoom buttons on this camcorder. A CAM / MEDIA...
...[CONNECTION SETTINGS] menu to match the monitor to be connected. [HDMI OUTPUT], [HDMI COLOR SETTING], [HDMI ENHANCE SETTING] (A Page 63) Component Cable AV Cord HDMI Cable (Optional) T1 Component Video Input AV Input HDMI T1 When the component terminal is used, the video terminal of the... and audio sound is output from both the HDMI and A/V OUT terminals are three video output terminals on the remote control. A- Audio sound is displayed. Memo : ● Be sure to the monitor in [COMPONENT OUTPUT] of a still picture using the zoom buttons on this camcorder. A CAM / MEDIA...
Instructions
Page 58
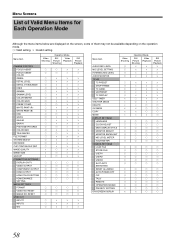
... BAR TELE MACRO FILE FORMAT SYSTEM SELECT REC MODE CLIP CONTINUOUS REC IMAGE QUALITY IMAGE SIZE GAIN UP CONNECTION SETTINGS DISPLAY ON TV VIDEO OUTPUT COMPONENT OUTPUT HDMI OUTPUT HDMI COLOR SETTING HDMI ENHANCE SETTING MEDIA SETTINGS FORMAT VIDEO NO. Menu Item CAMERA PROCESS FOCUS ASSIST FOCUS ASSIST COLOR ZEBRA DETAIL LEVEL DETAIL V/H BALANCE KNEE GAMMA...
... BAR TELE MACRO FILE FORMAT SYSTEM SELECT REC MODE CLIP CONTINUOUS REC IMAGE QUALITY IMAGE SIZE GAIN UP CONNECTION SETTINGS DISPLAY ON TV VIDEO OUTPUT COMPONENT OUTPUT HDMI OUTPUT HDMI COLOR SETTING HDMI ENHANCE SETTING MEDIA SETTINGS FORMAT VIDEO NO. Menu Item CAMERA PROCESS FOCUS ASSIST FOCUS ASSIST COLOR ZEBRA DETAIL LEVEL DETAIL V/H BALANCE KNEE GAMMA...
Instructions
Page 63
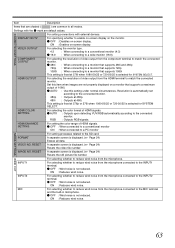
... conventional monitor (4:3) R 16:9 : When connecting to a wide monitor (16:9) COMPONENT OUTPUT For selecting the resolution of video output from the component terminal to the SD card. HDMI COLOR SETTING For selecting the color format of HDMI signals. R OFF : When connected to a conventional monitor ON : When connected to a... is displayed. (A Page 24) Erases all modes. For setting connections with the R mark are default values. HDMI OUTPUT For selecting the resolution of 1080i. R AUTO : Use this item when images are not properly displayed on -screen display. R AUTO...
... conventional monitor (4:3) R 16:9 : When connecting to a wide monitor (16:9) COMPONENT OUTPUT For selecting the resolution of video output from the component terminal to the SD card. HDMI COLOR SETTING For selecting the color format of HDMI signals. R OFF : When connected to a conventional monitor ON : When connected to a... is displayed. (A Page 24) Erases all modes. For setting connections with the R mark are default values. HDMI OUTPUT For selecting the resolution of 1080i. R AUTO : Use this item when images are not properly displayed on -screen display. R AUTO...
Instructions
Page 71
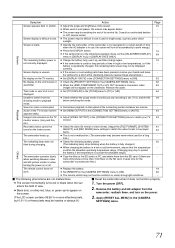
...1000 files) on the SD card, it takes time for long periods of its service life. Playback A part of the TV monitor screen ● Set [HDMI OUTPUT] in the [TC/UB] menu to [TC] or [UB]. 64 displayed. is within the allowable operating temperature range. (Charging may stop to protect ...in a hot or cold environment, ensure that the temperature - Remove the battery and AC adapter from the camcorder, reattach them from the shooting mode to [DISPLAY ALL] or [DISPLAY DATE ONLY]. or JVC service center. Remove the cable. Unable to process the files.) turning the power on or off automatically ...
...1000 files) on the SD card, it takes time for long periods of its service life. Playback A part of the TV monitor screen ● Set [HDMI OUTPUT] in the [TC/UB] menu to [TC] or [UB]. 64 displayed. is within the allowable operating temperature range. (Charging may stop to protect ...in a hot or cold environment, ensure that the temperature - Remove the battery and AC adapter from the camcorder, reattach them from the shooting mode to [DISPLAY ALL] or [DISPLAY DATE ONLY]. or JVC service center. Remove the cable. Unable to process the files.) turning the power on or off automatically ...
Instructions
Page 74
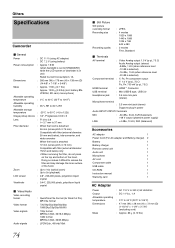
...215; 28 mm (H) × 72 mm (D) (1-15/16" × 1-1/8" × 2-7/8") (excluding cord) : Approx. 86 g (0.19 lbs) Others Specifications Camcorder Ⅵ General Power : DC 11 V (using AC adapter) DC 7.2 V (using battery) Power consumption : Approx 7.8 W (when backlight is set to [...STANDARD] while the LCD screen or viewfinder is selected) Component terminal : Y, PB, PR component output Y: 1.0 V (p-p), 75 K PB, PR: 700 mV (p-p), 75 K HDMI terminal : HDMIீ Connector USB terminal : Mini USB-B type, USB 2.0 Headphone jack : 3.5 mm mini-jack (stereo) Microphone...
...215; 28 mm (H) × 72 mm (D) (1-15/16" × 1-1/8" × 2-7/8") (excluding cord) : Approx. 86 g (0.19 lbs) Others Specifications Camcorder Ⅵ General Power : DC 11 V (using AC adapter) DC 7.2 V (using battery) Power consumption : Approx 7.8 W (when backlight is set to [...STANDARD] while the LCD screen or viewfinder is selected) Component terminal : Y, PB, PR component output Y: 1.0 V (p-p), 75 K PB, PR: 700 mV (p-p), 75 K HDMI terminal : HDMIீ Connector USB terminal : Mini USB-B type, USB 2.0 Headphone jack : 3.5 mm mini-jack (stereo) Microphone...


