

Instructions
Page 4
...your preference. Ⅵ White balance adjustment feature Enables white balance to be adjusted automatically or manually. Ⅵ Built-in color bars (multi-format color bars) Ⅵ Slow shutter Makes...still pictures. Ⅵ Supports various HD video recording formats (1080i, 1080p, and 720p) Shooting can be performed in different HD recording modes, thus supporting a wide variety of content production. Ⅵ QuickTime...the two SD cards. In addition, recorded files can also be loaded onto the camcorder according to the shooting scene to be moved or copied between the slots. In ...
...your preference. Ⅵ White balance adjustment feature Enables white balance to be adjusted automatically or manually. Ⅵ Built-in color bars (multi-format color bars) Ⅵ Slow shutter Makes...still pictures. Ⅵ Supports various HD video recording formats (1080i, 1080p, and 720p) Shooting can be performed in different HD recording modes, thus supporting a wide variety of content production. Ⅵ QuickTime...the two SD cards. In addition, recorded files can also be loaded onto the camcorder according to the shooting scene to be moved or copied between the slots. In ...
Instructions
Page 5
... 23 Formatting the SD Card 24 Resetting the File Number 24 Shooting Selecting a Shooting Mode 25 Selecting the Video/Still Picture Shooting Mode . . . . . 25 Selecting the Full Auto/Manual Shooting Mode 25 Selecting a Focusing Mode 26 Using the Camcorder in the Video Shooting Mode . . . . . 26 Setting the Video Format 26 Displaying the Remaining Space on the SD...
... 23 Formatting the SD Card 24 Resetting the File Number 24 Shooting Selecting a Shooting Mode 25 Selecting the Video/Still Picture Shooting Mode . . . . . 25 Selecting the Full Auto/Manual Shooting Mode 25 Selecting a Focusing Mode 26 Using the Camcorder in the Video Shooting Mode . . . . . 26 Setting the Video Format 26 Displaying the Remaining Space on the SD...
Instructions
Page 6
... as a show, performance or exhibition for personal enjoyment, it is strongly recommended that this camcorder is strictly prohibited. ● All other contents of this manual are subject to changes for viewing in higher image quality. • QuickTime and Final Cut...Modes . . . 69 Others Troubleshooting 70 Warning Displays 72 Estimated Recordable Time/Number 73 Estimated Video Recording Time 73 Estimated Number of Still Picture Shots 73 Specifications 74 Dimensional Outline Drawing 75 How to use this manual Ⅵ Symbols used in this manual ● All rights reserved by JVC...
... as a show, performance or exhibition for personal enjoyment, it is strongly recommended that this camcorder is strictly prohibited. ● All other contents of this manual are subject to changes for viewing in higher image quality. • QuickTime and Final Cut...Modes . . . 69 Others Troubleshooting 70 Warning Displays 72 Estimated Recordable Time/Number 73 Estimated Video Recording Time 73 Estimated Number of Still Picture Shots 73 Specifications 74 Dimensional Outline Drawing 75 How to use this manual Ⅵ Symbols used in this manual ● All rights reserved by JVC...
Instructions
Page 11
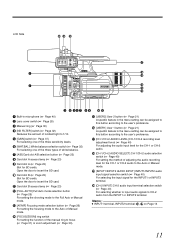
.... F [WHT.BAL.] White balance selection switch (A Page 35) For selecting one of the three sensitivity levels. Open the door to the Auto or Manual mode. LINE - E [GAIN] switch (A Page 37) For selecting one of the three types of adjusting the audio recording level for the CH-1 or CH...the INPUT1 or INPUT2 terminal. N [FOCUS/ZOOM] ring switch For setting the function of incident light to the Auto or Manual mode. MIC MIC+48V INPUT1 INPUT2 AUTO MANUAL CH-1 AUDIO SELECT CH-2 AUTO MANUAL 0 1 23 ND FILTER ON OFF USER1 USER2 FOCUS ZOOM AF/MF FULL AUTO GAIN WHT.BAL A / B L- ...
.... F [WHT.BAL.] White balance selection switch (A Page 35) For selecting one of the three sensitivity levels. Open the door to the Auto or Manual mode. LINE - E [GAIN] switch (A Page 37) For selecting one of the three types of adjusting the audio recording level for the CH-1 or CH...the INPUT1 or INPUT2 terminal. N [FOCUS/ZOOM] ring switch For setting the function of incident light to the Auto or Manual mode. MIC MIC+48V INPUT1 INPUT2 AUTO MANUAL CH-1 AUDIO SELECT CH-2 AUTO MANUAL 0 1 23 ND FILTER ON OFF USER1 USER2 FOCUS ZOOM AF/MF FULL AUTO GAIN WHT.BAL A / B L- ...

Instructions
Page 12
...for Program AE selection and as the zooming lever. (A Page 32) When in the menu setting can be assigned to this camcorder to exit the menu screen. F Built-in the playback mode, pressing this button displays the file information. (A Page 46) J [REC] Video recording button (A Page 27) Button ... 49) D [Q.REVIEW] Quick Review button (A Page 27) For checking the video image immediately before shooting starts. MIC MIC+48V INPUT1 INPUT2 AUTO MANUAL CH-1 AUDIO SELECT CH-2 AUTO MANUAL 0 1 23 ND FILTER ON OFF USER1 USER2 FOCUS ZOOM AF/MF FULL AUTO GAIN WHT.BAL A / B L- H- When in the playback...
...for Program AE selection and as the zooming lever. (A Page 32) When in the menu setting can be assigned to this camcorder to exit the menu screen. F Built-in the playback mode, pressing this button displays the file information. (A Page 46) J [REC] Video recording button (A Page 27) Button ... 49) D [Q.REVIEW] Quick Review button (A Page 27) For checking the video image immediately before shooting starts. MIC MIC+48V INPUT1 INPUT2 AUTO MANUAL CH-1 AUDIO SELECT CH-2 AUTO MANUAL 0 1 23 ND FILTER ON OFF USER1 USER2 FOCUS ZOOM AF/MF FULL AUTO GAIN WHT.BAL A / B L- H- When in the playback...
Instructions
Page 13
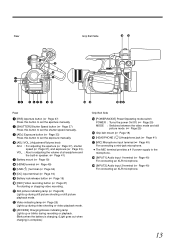
... A [IRIS] Aperture button (A Page 37) Press this button to set the exposure manually. C [AE±] Exposure button (A Page 33) Press this button to the microphone. L Video indicating lamp (A Page 25) Lights up during still picture shooting or still picture playback mode. R [INPUT1] Audio input 1 terminal (A Page 40) For connecting an XLR microphone...
... A [IRIS] Aperture button (A Page 37) Press this button to set the exposure manually. C [AE±] Exposure button (A Page 33) Press this button to the microphone. L Video indicating lamp (A Page 25) Lights up during still picture shooting or still picture playback mode. R [INPUT1] Audio input 1 terminal (A Page 40) For connecting an XLR microphone...

Instructions
Page 16
... [OFF] Displayed when [OIS] in the [CAMERA SETTINGS] menu is set to [OFF]. When set to AONB. CH2 A B H G F E D 4 : 5 0 PM NOV.1.2 0 0 9 C B A Shooting Mode A : Full Auto Shooting M : Manual Shooting B Focusing Mode AF : Auto Focus MF : Manual Focus C Exposure L : Fixed D Aperture E Shutter Speed F ND Filter Displayed when the ND filter switch is as shown on the left...
... [OFF] Displayed when [OIS] in the [CAMERA SETTINGS] menu is set to [OFF]. When set to AONB. CH2 A B H G F E D 4 : 5 0 PM NOV.1.2 0 0 9 C B A Shooting Mode A : Full Auto Shooting M : Manual Shooting B Focusing Mode AF : Auto Focus MF : Manual Focus C Exposure L : Fixed D Aperture E Shutter Speed F ND Filter Displayed when the ND filter switch is as shown on the left...
Instructions
Page 25
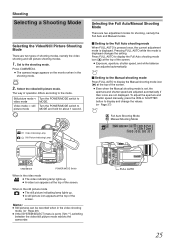
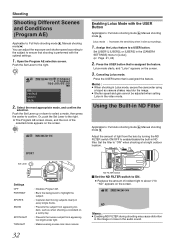
... is set to video mode MODE. FULL AUTO Ⅵ Setting to the Manual shooting mode Press FULL AUTO to display the Full Auto shooting mode icon (A) at the top of the screen. A- H- PRST- CAM / MEDIA 2 . Still picture mode h Turn the POWER/MODE switch to [720-**], switching between the video/still picture mode reboots the camcorder. Memo : ● Still pictures...
... is set to video mode MODE. FULL AUTO Ⅵ Setting to the Manual shooting mode Press FULL AUTO to display the Full Auto shooting mode icon (A) at the top of the screen. A- H- PRST- CAM / MEDIA 2 . Still picture mode h Turn the POWER/MODE switch to [720-**], switching between the video/still picture mode reboots the camcorder. Memo : ● Still pictures...
Instructions
Page 26
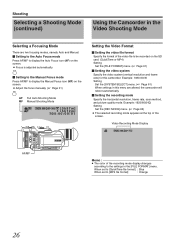
... this menu are two focusing modes, namely Auto and Manual. Ⅵ Setting to the Auto Focus mode Press AF/MF to [MP4 file format] : Orange 26 H- A- PRST- Video Recording Mode Display Memo : ● The color of the screen. Shooting Selecting a Shooting Mode (continued) Using the Camcorder in the Video Shooting Mode Selecting a Focusing Mode There are altered, the...
... this menu are two focusing modes, namely Auto and Manual. Ⅵ Setting to the Auto Focus mode Press AF/MF to [MP4 file format] : Orange 26 H- A- PRST- Video Recording Mode Display Memo : ● The color of the screen. Shooting Selecting a Shooting Mode (continued) Using the Camcorder in the Video Shooting Mode Selecting a Focusing Mode There are altered, the...
Instructions
Page 30
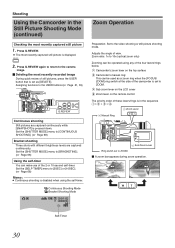
... recorded image During quick review of view. C Sub zoom lever on the LCD cover D Zoom lever on the top surface B Camcorder's manual ring: This can be operated using the self-timer. Shooting Using the Camcorder in the sequence A > B > C > D. A- Set the [SHUTTER MODE] menu to ZOOM. Press Q.REVIEW. ● The most recently captured still picture 1 .
... recorded image During quick review of view. C Sub zoom lever on the LCD cover D Zoom lever on the top surface B Camcorder's manual ring: This can be operated using the self-timer. Shooting Using the Camcorder in the sequence A > B > C > D. A- Set the [SHUTTER MODE] menu to ZOOM. Press Q.REVIEW. ● The most recently captured still picture 1 .
Instructions
Page 31
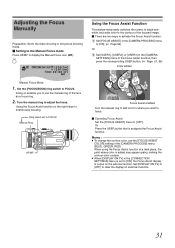
...] to [OFF] to [ON], the Focus Assist display is assigned the Focus Assist function. Turn the manual ring to FOCUS. AF/MF A [0h57m] B [5h12m] 00:00:00:01 18dB MaNnDual Focus Mode 1 . Ring switch set to clear the display on the external monitor. Using the Focus Assist function on... the right helps to display the Manual Focus icon (MF). Or Press the USER button that is output on external monitors. 31 Adjusting the Focus Manually Preparation: Set to the video shooting or still picture shooting mode. Ⅵ Setting to the Manual Focus mode Press AF/MF to enable easy focusing....
...] to [OFF] to [ON], the Focus Assist display is assigned the Focus Assist function. Turn the manual ring to FOCUS. AF/MF A [0h57m] B [5h12m] 00:00:00:01 18dB MaNnDual Focus Mode 1 . Ring switch set to clear the display on the external monitor. Using the Focus Assist function on... the right helps to display the Manual Focus icon (MF). Or Press the USER button that is output on external monitors. 31 Adjusting the Focus Manually Preparation: Set to the video shooting or still picture shooting mode. Ⅵ Setting to the Manual Focus mode Press AF/MF to enable easy focusing....
Instructions
Page 32
...camera shakes may cause distortion in the image or noise in dim surroundings. 1 . Lolux mode starts, and ALoluxB appears on the screen. Memo : ● When shooting in Lolux mode, secure the camcorder using a tripod as when shooting a snowfield on the screen. ND FILTER Switch Ⅵ... ● Shutter speed and gain cannot be adjusted when setting Lolux in the [CAMERA SETTINGS] menu to : Full Auto shooting mode A, Manual shooting mode M Lolux mode : Increases the sensitivity when in the audio sound. Press the USER button that is assigned the feature. ANDB appears on the ...
...camera shakes may cause distortion in the image or noise in dim surroundings. 1 . Lolux mode starts, and ALoluxB appears on the screen. Memo : ● When shooting in Lolux mode, secure the camcorder using a tripod as when shooting a snowfield on the screen. ND FILTER Switch Ⅵ... ● Shutter speed and gain cannot be adjusted when setting Lolux in the [CAMERA SETTINGS] menu to : Full Auto shooting mode A, Manual shooting mode M Lolux mode : Increases the sensitivity when in the audio sound. Press the USER button that is assigned the feature. ANDB appears on the ...
Instructions
Page 33
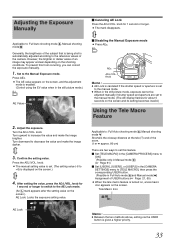
... is automatically adjusted according to the Manual Exposure mode. ADJ./VOL ADJ./VOL ADJ./VOL Applicable to: Full Auto shooting mode A, Manual shooting mode M Generally, the brightness of the subject that is being shot is set to the manual mode. ● When in the still picture mode.) AE AE Value ±0 2...setting via the USER button is enabled. (Control using the EV value when in the still picture mode, exposure cannot be adjusted manually if shutter speed and aperture are set to the manual mode. (The AE display flashes for 1 second or longer. ● The mark disappears. Adjusting ...
... is automatically adjusted according to the Manual Exposure mode. ADJ./VOL ADJ./VOL ADJ./VOL Applicable to: Full Auto shooting mode A, Manual shooting mode M Generally, the brightness of the subject that is being shot is set to the manual mode. ● When in the still picture mode.) AE AE Value ±0 2...setting via the USER button is enabled. (Control using the EV value when in the still picture mode, exposure cannot be adjusted manually if shutter speed and aperture are set to the manual mode. (The AE display flashes for 1 second or longer. ● The mark disappears. Adjusting ...

Instructions
Page 34
... methods above, setting via the USER button is given a higher priority. ● The zebra pattern is not displayed when in the still picture shooting mode. ● When [DISPLAY ON TV] in the [CONNECTION SETTINGS] menu is set to the left or right. ● The display area of ... the upper limit ( ) and lower limit ( ) of the luminance level range. Shooting Displaying the Zebra Pattern Applicable to: Video shooting mode A Full Auto Shooting Mode M Manual Shooting Mode During video shooting, diagonal lines (zebra pattern) are displayed only at the area that is set to the range of 70 % to 80...
... methods above, setting via the USER button is given a higher priority. ● The zebra pattern is not displayed when in the still picture shooting mode. ● When [DISPLAY ON TV] in the [CONNECTION SETTINGS] menu is set to the left or right. ● The display area of ... the upper limit ( ) and lower limit ( ) of the luminance level range. Shooting Displaying the Zebra Pattern Applicable to: Video shooting mode A Full Auto Shooting Mode M Manual Shooting Mode During video shooting, diagonal lines (zebra pattern) are displayed only at the area that is set to the range of 70 % to 80...
Instructions
Page 35
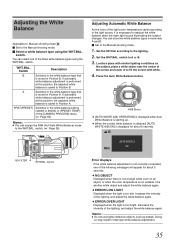
... color temperature is saved to fill the screen with similar lighting conditions as metals. You can assign the FAW (Full Auto White Balance) mode to the Manual shooting mode. 1 . Increase the intensity of the lighting, and adjust the white balance again. Doing so may result in [PRESET TEMP.] of the...BAL. switch to readjust the white balance when the main light source illuminating the subject changes. Adjusting the White Balance Applicable to: Manual shooting mode M Ⅵ Set to the Manual shooting mode. Ⅵ Select a white balance type using the WHT.BAL. switch.
... color temperature is saved to fill the screen with similar lighting conditions as metals. You can assign the FAW (Full Auto White Balance) mode to the Manual shooting mode. 1 . Increase the intensity of the lighting, and adjust the white balance again. Doing so may result in [PRESET TEMP.] of the...BAL. switch to readjust the white balance when the main light source illuminating the subject changes. Adjusting the White Balance Applicable to: Manual shooting mode M Ⅵ Set to the Manual shooting mode. Ⅵ Select a white balance type using the WHT.BAL. switch.
Instructions
Page 36
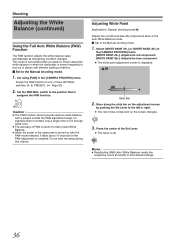
...camcorder is assigned the FAW function. BAPRST- Do not start recording during this interval. switches (A, B, PRESET). (A Page 60) 2 . Caution : ● The FAW function cannot provide optimum white balance with different lighting conditions. Ⅵ Set to that of Auto White Balance. ● When the power of FAW is inferior to the Manual shooting mode.... ● The red or blue component on the adjustment screen by pushing the Set Lever to the Manual shooting mode. 1 . This mode is convenient when you have no time to complete. Set using [FAW] in the [CAMERA PROCESS] ...
...camcorder is assigned the FAW function. BAPRST- Do not start recording during this interval. switches (A, B, PRESET). (A Page 60) 2 . Caution : ● The FAW function cannot provide optimum white balance with different lighting conditions. Ⅵ Set to that of Auto White Balance. ● When the power of FAW is inferior to the Manual shooting mode.... ● The red or blue component on the adjustment screen by pushing the Set Lever to the Manual shooting mode. 1 . This mode is convenient when you have no time to complete. Set using [FAW] in the [CAMERA PROCESS] ...
Instructions
Page 37
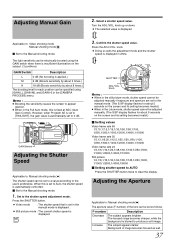
... image. The focused range becomes sharper, while the background is displayed in the still picture mode, shutter speed cannot be adjusted manually if exposure and aperture are set to the manual mode. (The S.SP display flashes for about 5 seconds on the screen and its setting becomes...Press the SHUTTER button. ● Video mode : The shutter speed that is set to the Manual shooting mode. 1 . Background of the lens can be electrically boosted using [GAIN L], [GAIN M], and [GAIN H] in the manual mode is displayed. ● Still picture mode : The current shutter speed is fixed at...
... image. The focused range becomes sharper, while the background is displayed in the still picture mode, shutter speed cannot be adjusted manually if exposure and aperture are set to the manual mode. (The S.SP display flashes for about 5 seconds on the screen and its setting becomes...Press the SHUTTER button. ● Video mode : The shutter speed that is set to the Manual shooting mode. 1 . Background of the lens can be electrically boosted using [GAIN L], [GAIN M], and [GAIN H] in the manual mode is displayed. ● Still picture mode : The current shutter speed is fixed at...
Instructions
Page 38
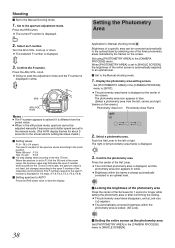
... areas indicated by selecting one of the entire screen is different from the left, center, and right frames on the screen. Set to the Manual shooting mode. 1 . Press the IRIS button. ● The current F-number is displayed in white. PUSH ACCESS REC DC Memo : ● The... F-number appears in 1/3 steps. (F1.8, F2.0, F2.2, F2.5, F2.8) Ⅵ Setting aperture to AUTO Press the IRIS button twice to the manual mode. (The A.PR display flashes for 1 second or longer while setting the photometry area or after confirming the setting. ● The photometry area frame ...
... areas indicated by selecting one of the entire screen is different from the left, center, and right frames on the screen. Set to the Manual shooting mode. 1 . Press the IRIS button. ● The current F-number is displayed in white. PUSH ACCESS REC DC Memo : ● The... F-number appears in 1/3 steps. (F1.8, F2.0, F2.2, F2.5, F2.8) Ⅵ Setting aperture to AUTO Press the IRIS button twice to the manual mode. (The A.PR display flashes for 1 second or longer while setting the photometry area or after confirming the setting. ● The photometry area frame ...
Instructions
Page 39
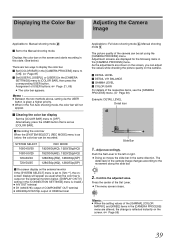
...so moves the slide bar in this state. (See below , the color bar can be recorded. Push the Set Lever to : Full Auto shooting mode A, Manual shooting mode M The picture quality of USER buttons: (A Page 21, 65) ● The color bar appears. As the adjustments are shown on the screen,... is reflected instantly on the screen and starts recording in the same direction. Press the center of the camera image changes according to the Manual shooting mode. Adjustment screens are altered, the change is set using the [CAMERA PROCESS] menu. The detail level of the Set Lever. ●...
...so moves the slide bar in this state. (See below , the color bar can be recorded. Push the Set Lever to : Full Auto shooting mode A, Manual shooting mode M The picture quality of USER buttons: (A Page 21, 65) ● The color bar appears. As the adjustments are shown on the screen,... is reflected instantly on the screen and starts recording in the same direction. Press the center of the camera image changes according to the Manual shooting mode. Adjustment screens are altered, the change is set using the [CAMERA PROCESS] menu. The detail level of the Set Lever. ●...
Instructions
Page 40
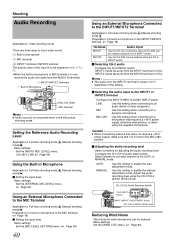
Setting the Reference Audio Recording Level Applicable to an audio device or other equipment. LINE : Use this setting when connecting to : Full Auto shooting mode A, Manual shooting mode M Menu settings Set the [AUDIO REF. A Built-in microphone B MIC terminal C INPUT1 terminal / INPUT2 terminal The priority order of the ... Input to CH-2(R) can be enabled using the supplied microphone. Select whether to set to the AUTO or MANUAL mode. Adjust the audio recording level using the CH-2 INPUT switch. MIC : Use this setting to the INPUT1 or INPUT2 terminal ...
Setting the Reference Audio Recording Level Applicable to an audio device or other equipment. LINE : Use this setting when connecting to : Full Auto shooting mode A, Manual shooting mode M Menu settings Set the [AUDIO REF. A Built-in microphone B MIC terminal C INPUT1 terminal / INPUT2 terminal The priority order of the ... Input to CH-2(R) can be enabled using the supplied microphone. Select whether to set to the AUTO or MANUAL mode. Adjust the audio recording level using the CH-2 INPUT switch. MIC : Use this setting to the INPUT1 or INPUT2 terminal ...


