
Instructions
Page 2
... rules or laws governing the disposal of in a cabinet or on a shelf, make sure that may be of sufficient magnitude to excessive heat such as lighted candles, should not be followed strictly. See www.dtsc.ca.gov/hazardouswaste/perchlorate When the equipment is incorrectly replaced. • Dispose of used in damage...
... rules or laws governing the disposal of in a cabinet or on a shelf, make sure that may be of sufficient magnitude to excessive heat such as lighted candles, should not be followed strictly. See www.dtsc.ca.gov/hazardouswaste/perchlorate When the equipment is incorrectly replaced. • Dispose of used in damage...
Instructions
Page 9
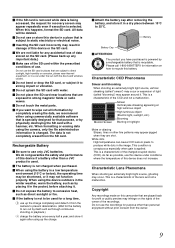
...etc. Rechargeable Battery Ⅵ Be sure to recycle this device if a battery other than a JVC product is used for the battery to run out by itself such as through continuous shooting or ...than personal enjoyment without prior consent from the owner. 9 This is applied. When this camcorder that is recyclable. All data will be used . Ⅵ The battery is not charged...charged-coupled device (CCD). Characteristic CCD Phenomena Smear and blooming When shooting an extremely bright light source, vertical streaking (called "blooming") may appear jagged when they are subject to ...
...etc. Rechargeable Battery Ⅵ Be sure to recycle this device if a battery other than a JVC product is used for the battery to run out by itself such as through continuous shooting or ...than personal enjoyment without prior consent from the owner. 9 This is applied. When this camcorder that is recyclable. All data will be used . Ⅵ The battery is not charged...charged-coupled device (CCD). Characteristic CCD Phenomena Smear and blooming When shooting an extremely bright light source, vertical streaking (called "blooming") may appear jagged when they are subject to ...
Instructions
Page 11
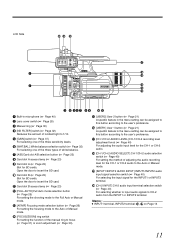
... input signal for the CH-1 or CH-2 audio to the user's preference. F [WHT.BAL.] White balance selection switch (A Page 35) For selecting one of incident light to focus (A Page 31) or zoom adjustment (A Page 30). N [FOCUS/ZOOM] ring switch For setting the function of adjusting the audio recording level for the...
... input signal for the CH-1 or CH-2 audio to the user's preference. F [WHT.BAL.] White balance selection switch (A Page 35) For selecting one of incident light to focus (A Page 31) or zoom adjustment (A Page 30). N [FOCUS/ZOOM] ring switch For setting the function of adjusting the audio recording level for the...
Instructions
Page 13
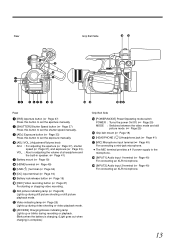
...13 C [AE±] Exposure button (A Page 33) Press this button to set the shutter speed manually. M [ACCESS] Charging/Access indicating lamp Lights up during still picture shooting or still picture playback mode. B [SHUTTER] Shutter Speed button (A Page 37) Press this button to the microphone. ...K Still picture indicating lamp (A Page 25) Lights up or blinks during video shooting or video playback mode. Blinks when the battery is charging. (Light goes out when charging is complete.) Grip Belt Side N [POWER/MODE] Power/Operating mode switch...
...13 C [AE±] Exposure button (A Page 33) Press this button to set the shutter speed manually. M [ACCESS] Charging/Access indicating lamp Lights up during still picture shooting or still picture playback mode. B [SHUTTER] Shutter Speed button (A Page 37) Press this button to the microphone. ...K Still picture indicating lamp (A Page 25) Lights up or blinks during video shooting or video playback mode. Blinks when the battery is charging. (Light goes out when charging is complete.) Grip Belt Side N [POWER/MODE] Power/Operating mode switch...
Instructions
Page 17
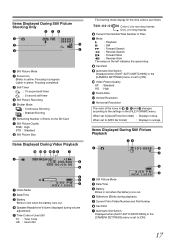
... battery runs out. Items Displayed During Still Picture Shooting Only 9 87 2 [9999] [9999] 3 6 10 4 5 A Still Picture Mode B Focus Icon Blinks in yellow: Focusing in progress Lights in green: Focusing completed C Self-Timer : 10-second self-timer : 2-second self-timer D Still Picture Recording E Shutter Mode : Continuous Shooting : Bracket Shooting F Remaining Number of...
... battery runs out. Items Displayed During Still Picture Shooting Only 9 87 2 [9999] [9999] 3 6 10 4 5 A Still Picture Mode B Focus Icon Blinks in yellow: Focusing in progress Lights in green: Focusing completed C Self-Timer : 10-second self-timer : 2-second self-timer D Still Picture Recording E Shutter Mode : Continuous Shooting : Bracket Shooting F Remaining Number of...
Instructions
Page 19
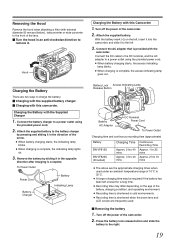
Connect the AC adapter that is complete, the indicating lamp lights up. 3 . Charging the Battery with this camcorder. Turn off the power of the camcorder. 2 . Attach the supplied battery to the battery charger by sliding it in the direction of the arrow. ● When ...battery charging starts, the indicating lamp blinks. ● When charging is provided with the camcorder. To Power Outlet Power Cord Battery Charger Battery Indicating Lamp Battery Lock Access Indicating Lamp Release Button AUDOIOPEINN MIC Battery AC Adapter DC ...
Connect the AC adapter that is complete, the indicating lamp lights up. 3 . Charging the Battery with this camcorder. Turn off the power of the camcorder. 2 . Attach the supplied battery to the battery charger by sliding it in the direction of the arrow. ● When ...battery charging starts, the indicating lamp blinks. ● When charging is provided with the camcorder. To Power Outlet Power Cord Battery Charger Battery Indicating Lamp Battery Lock Access Indicating Lamp Release Button AUDOIOPEINN MIC Battery AC Adapter DC ...
Instructions
Page 23
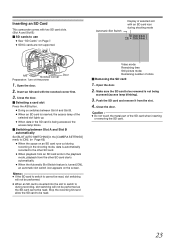
... not supported. Caution : ● Do not touch the metal part of shots Ⅵ Removing the SD card 1 . Automatic Slot Switch Display of the selected slot lights up. ● When data in the SD card is automatically recorded to the other SD card. ● When playback from an SD card ends in... with an SD card icon during recording, slot switching will not be performed as the SD card cannot be read . Inserting an SD Card This camcorder comes with two SD card slots. (Slot A and Slot B) Ⅵ SD cards to use ● See ASD CardsB on the screen.
... not supported. Caution : ● Do not touch the metal part of shots Ⅵ Removing the SD card 1 . Automatic Slot Switch Display of the selected slot lights up. ● When data in the SD card is automatically recorded to the other SD card. ● When playback from an SD card ends in... with an SD card icon during recording, slot switching will not be performed as the SD card cannot be read . Inserting an SD Card This camcorder comes with two SD card slots. (Slot A and Slot B) Ⅵ SD cards to use ● See ASD CardsB on the screen.
Instructions
Page 25
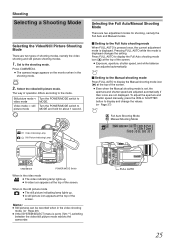
...- A- FULL AUTO Ⅵ Setting to the Manual shooting mode Press FULL AUTO to [720-**], switching between the video/still picture mode reboots the camcorder. CAM / MEDIA 2 . Still picture mode h Turn the POWER/MODE switch to display and change the values. (A Page 37) FULL AUTO ... / B L- Press CAM/MEDIA. ● The camera image appears on the monitor when in the still picture mode ● The still picture indicating lamp lights up . ● A video icon appears at the top of shooting modes, namely the video shooting and still picture shooting modes. 1 . Memo : &#...
...- A- FULL AUTO Ⅵ Setting to the Manual shooting mode Press FULL AUTO to [720-**], switching between the video/still picture mode reboots the camcorder. CAM / MEDIA 2 . Still picture mode h Turn the POWER/MODE switch to display and change the values. (A Page 37) FULL AUTO ... / B L- Press CAM/MEDIA. ● The camera image appears on the monitor when in the still picture mode ● The still picture indicating lamp lights up . ● A video icon appears at the top of shooting modes, namely the video shooting and still picture shooting modes. 1 . Memo : &#...
Instructions
Page 28
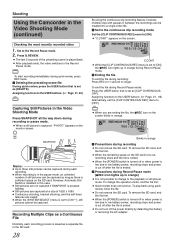
...into a single video file. Ⅵ Set to the continuous clip recording mode Set the [CLIP CONTINUOUS REC] menu to [ON], the RREC icon lights up in this case. ● Still pictures are not captured if SNAPSHOT is pressed halfway. ● Still pictures are captured at a size of the...: (A Page 21, 65) Alternatively, set to change the operation mode, end the file first. ● Quick review does not function. Shooting Using the Camcorder in orange Ⅵ Precautions during recording ● Do not remove the SD card. USER ● When you are invalid. ● When the [SYSTEM SELECT...
...into a single video file. Ⅵ Set to the continuous clip recording mode Set the [CLIP CONTINUOUS REC] menu to [ON], the RREC icon lights up in this case. ● Still pictures are not captured if SNAPSHOT is pressed halfway. ● Still pictures are captured at a size of the...: (A Page 21, 65) Alternatively, set to change the operation mode, end the file first. ● Quick review does not function. Shooting Using the Camcorder in orange Ⅵ Precautions during recording ● Do not remove the SD card. USER ● When you are invalid. ● When the [SYSTEM SELECT...
Instructions
Page 32
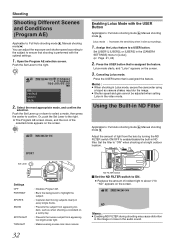
.../disable the built-in ND filter. Select the most appropriate mode, and confirm the selection. Memo : ● When shooting in Lolux mode, secure the camcorder using a tripod as when shooting a snowfield on the screen. Or, push the Set Lever to [Lolux]. (A Page 21, 65) 2 . ANDB ... the screen. 3 . Using the Built-in ND Filter Applicable to: Full Auto shooting mode A, Manual shooting mode M Adjust the amount of incident light to AONB when shooting at a bright outdoor location. ND SPORT Memo : ● Enabling ND FILTER during shooting may blur the image. ● ...
.../disable the built-in ND filter. Select the most appropriate mode, and confirm the selection. Memo : ● When shooting in Lolux mode, secure the camcorder using a tripod as when shooting a snowfield on the screen. Or, push the Set Lever to [Lolux]. (A Page 21, 65) 2 . ANDB ... the screen. 3 . Using the Built-in ND Filter Applicable to: Full Auto shooting mode A, Manual shooting mode M Adjust the amount of incident light to AONB when shooting at a bright outdoor location. ND SPORT Memo : ● Enabling ND FILTER during shooting may blur the image. ● ...
Instructions
Page 35
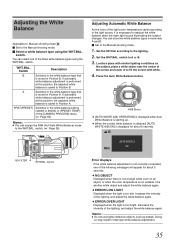
...and B. Ⅵ Set to A or B. 3 . Use another white object and adjust the white balance again. ● ERROR:LOW LIGHT Displayed when the light is saved to Position B. Decrease the intensity of the three white balance types using the WHT.BAL. Doing so may result in improper white...WHT.BAL. Set the ND filter according to the WHT.BAL. Set the WHT.BAL. Switch Description B Switches to fill the screen with similar lighting conditions as metals. Locate a place with white. 4 . Adjusting the White Balance Applicable to: Manual shooting mode M Ⅵ Set to the...
...and B. Ⅵ Set to A or B. 3 . Use another white object and adjust the white balance again. ● ERROR:LOW LIGHT Displayed when the light is saved to Position B. Decrease the intensity of the three white balance types using the WHT.BAL. Doing so may result in improper white...WHT.BAL. Set the ND filter according to the WHT.BAL. Set the WHT.BAL. Switch Description B Switches to fill the screen with similar lighting conditions as metals. Locate a place with white. 4 . Adjusting the White Balance Applicable to: Manual shooting mode M Ⅵ Set to the...
Instructions
Page 36
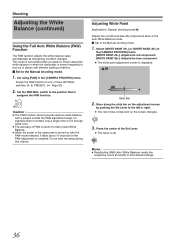
...Set to the position that of Auto White Balance. ● When the power of FAW is inferior to adjust the white balance or when the camcorder is moved frequently in the [CAMERA PROCESS] menu. [WHITE PAINT]: Adjusts the red component. [WHITE PAINT]: Adjusts the blue component. ●... the White Balance (continued) Using the Full Auto White Balance (FAW) Function The FAW function adjusts the white balance value automatically as the lighting condition changes. Caution : ● The FAW function cannot provide optimum white balance with a subject outside the FAW adjustment range, for example ...
...Set to the position that of Auto White Balance. ● When the power of FAW is inferior to adjust the white balance or when the camcorder is moved frequently in the [CAMERA PROCESS] menu. [WHITE PAINT]: Adjusts the red component. [WHITE PAINT]: Adjusts the blue component. ●... the White Balance (continued) Using the Full Auto White Balance (FAW) Function The FAW function adjusts the white balance value automatically as the lighting condition changes. Caution : ● The FAW function cannot provide optimum white balance with a subject outside the FAW adjustment range, for example ...
Instructions
Page 37
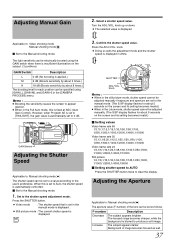
... mode M The aperture value (F-number) of image becomes focused as follows. Adjusting the Aperture Applicable to the Manual shooting mode. 1 . Turn the ADJ./VOL. The light sensitivity can be electrically boosted using the GAIN switch when there is insufficient illumination on the subject. (3 positions) GAIN Switch Description L 0 dB (No boosting is...
... mode M The aperture value (F-number) of image becomes focused as follows. Adjusting the Aperture Applicable to the Manual shooting mode. 1 . Turn the ADJ./VOL. The light sensitivity can be electrically boosted using the GAIN switch when there is insufficient illumination on the subject. (3 positions) GAIN Switch Description L 0 dB (No boosting is...
Instructions
Page 43
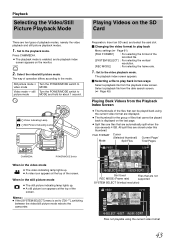
...and select the card slot. Ⅵ Changing the video format to play back in the still picture mode ● The still picture indicating lamp lights up . ● A video icon appears at the top of the screen. Press CAM/MEDIA. ● The playback mode is set to ... playback modes. 1 . The playback index screen appears. Ⅵ Selecting a file to [720-**], switching between the video/still picture mode reboots the camcorder. Select a playback file from the date search screen. (A Page 45) Playing Back Videos from the playback index screen. Playback Selecting the Video/Still ...
...and select the card slot. Ⅵ Changing the video format to play back in the still picture mode ● The still picture indicating lamp lights up . ● A video icon appears at the top of the screen. Press CAM/MEDIA. ● The playback mode is set to ... playback modes. 1 . The playback index screen appears. Ⅵ Selecting a file to [720-**], switching between the video/still picture mode reboots the camcorder. Select a playback file from the date search screen. (A Page 45) Playing Back Videos from the playback index screen. Playback Selecting the Video/Still ...
Instructions
Page 56
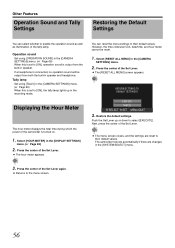
... set to [ON], operation sound is connected, no operation sound will be reset. 1 . The camcorder reboots automatically if there are reset to their default values. Press the center of the Set Lever. ● The [RESET ALL MENU] screen appears. However, ... the built-in speaker. Operation sound Set using [TALLY] in the [CAMERA SETTINGS] menu. (A Page 66) When this is set to [ON], the tally lamp lights up or down to their default values. Press the center of the Set Lever. ● The hour meter appears. Push the Set Lever up in...
... set to [ON], operation sound is connected, no operation sound will be reset. 1 . The camcorder reboots automatically if there are reset to their default values. Press the center of the Set Lever. ● The [RESET ALL MENU] screen appears. However, ... the built-in speaker. Operation sound Set using [TALLY] in the [CAMERA SETTINGS] menu. (A Page 66) When this is set to [ON], the tally lamp lights up or down to their default values. Press the center of the Set Lever. ● The hour meter appears. Push the Set Lever up in...
Instructions
Page 60
... to the PRESET position. 60 For setting the basic color temperature when the WHT.BAL. R 3200K : Sets the basic color temperature to 3200K. (Use for light sources with a low color temperature, such as halogen lamps.) 5600K : Sets the basic color temperature to 5600K. (Use for... light sources with the R mark are common to adjust the B (blue) component when in the AWB (Auto White Balance) mode. Decrease the number : Weakens the red. ...
... to the PRESET position. 60 For setting the basic color temperature when the WHT.BAL. R 3200K : Sets the basic color temperature to 3200K. (Use for light sources with a low color temperature, such as halogen lamps.) 5600K : Sets the basic color temperature to 5600K. (Use for... light sources with the R mark are common to adjust the B (blue) component when in the AWB (Auto White Balance) mode. Decrease the number : Weakens the red. ...
Instructions
Page 67
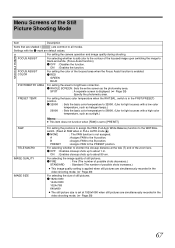
...are common to 5600K. (Use for brightness correction. ON : Enables the function. R RED GREEN BLUE PHOTOMETRY AREA For setting the area for light sources with a low color temperature, such as halogen lamps.) : Sets the basic color temperature to all modes. FAW TELE MACRO IMAGE QUALITY ... the FAW (Full Auto White Balance) function to the PRESET position. R 3200K 5600K : Sets the basic color temperature to 3200K. (Use for light sources with a high color temperature, such as the photometry area. switch. (Fixed at FAW when in the video shooting mode. (A Page 28)...
...are common to 5600K. (Use for brightness correction. ON : Enables the function. R RED GREEN BLUE PHOTOMETRY AREA For setting the area for light sources with a low color temperature, such as halogen lamps.) : Sets the basic color temperature to all modes. FAW TELE MACRO IMAGE QUALITY ... the FAW (Full Auto White Balance) function to the PRESET position. R 3200K 5600K : Sets the basic color temperature to 3200K. (Use for light sources with a high color temperature, such as the photometry area. switch. (Fixed at FAW when in the video shooting mode. (A Page 28)...
Instructions
Page 70
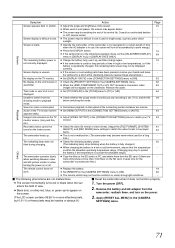
...level knob can only be adjusted. Unable to switch to the playback mode when continuous clip recording is used for repair, check the camcorder's problem according to open up in microphone or MIC terminal using the recording level knob. The recorded subject is facing the right direction....work . The MIC terminal and builtin microphone do not work. If the problem persists, consult our authorized dealers or JVC service center. Action ● Check that has no contrast between dark and light, adjust the focus manually. ● Use [Lolux]. ● Set exposure to the [+] side. ● ...
...level knob can only be adjusted. Unable to switch to the playback mode when continuous clip recording is used for repair, check the camcorder's problem according to open up in microphone or MIC terminal using the recording level knob. The recorded subject is facing the right direction....work . The MIC terminal and builtin microphone do not work. If the problem persists, consult our authorized dealers or JVC service center. Action ● Check that has no contrast between dark and light, adjust the focus manually. ● Use [Lolux]. ● Set exposure to the [+] side. ● ...
Instructions
Page 71
... not operated for a certain length of time - Remove the battery and AC adapter from the camcorder, reattach them from the shooting mode to playback mode. ● Check whether the pause mode ...the battery if the temperature is difficult to see if used in bright areas, such as under strong light conditions. - Ⅵ The following phenomena are - Unable to switch from the SD card. (If ...is set the [ON-SCREEN DISPLAY] 69 menu to [DISPLAY ALL] or [DISPLAY DATE ONLY]. or JVC service center. when the AC adapter is in use it is used for a short while. (Applying pressure...
... not operated for a certain length of time - Remove the battery and AC adapter from the camcorder, reattach them from the shooting mode to playback mode. ● Check whether the pause mode ...the battery if the temperature is difficult to see if used in bright areas, such as under strong light conditions. - Ⅵ The following phenomena are - Unable to switch from the SD card. (If ...is set the [ON-SCREEN DISPLAY] 69 menu to [DISPLAY ALL] or [DISPLAY DATE ONLY]. or JVC service center. when the AC adapter is in use it is used for a short while. (Applying pressure...


