User Manual
Page 1
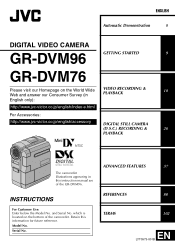
ENGLISH Automatic Demonstration 8 DIGITAL VIDEO CAMERA GR-DVM96 GETTING STARTED 9 GR-DVM76 Please visit our Homepage on the bottom of the GR-DVM96. Model No. Retain this instruction manual are of the camcorder. Serial No. and Serial No. INSTRUCTIONS For Customer Use: Enter ...VIDEO RECORDING & PLAYBACK 18 English only): http://www.jvc-victor.co.jp/english/index-e.html For Accessories: http://www.jvc-victor.co.jp/english/accessory DIGITAL STILL CAMERA (D.S.C.) RECORDING & 26 PLAYBACK The camcorder illustrations appearing in this information for future reference.
ENGLISH Automatic Demonstration 8 DIGITAL VIDEO CAMERA GR-DVM96 GETTING STARTED 9 GR-DVM76 Please visit our Homepage on the bottom of the GR-DVM96. Model No. Retain this instruction manual are of the camcorder. Serial No. and Serial No. INSTRUCTIONS For Customer Use: Enter ...VIDEO RECORDING & PLAYBACK 18 English only): http://www.jvc-victor.co.jp/english/index-e.html For Accessories: http://www.jvc-victor.co.jp/english/accessory DIGITAL STILL CAMERA (D.S.C.) RECORDING & 26 PLAYBACK The camcorder illustrations appearing in this information for future reference.
User Manual
Page 2
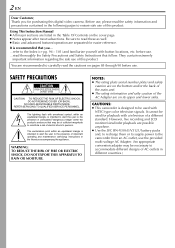
...upper and lower sides. The lightning flash with button locations, etc. CAUTIONS: ● This camcorder is recommended that you for purchasing this product. You are separated for easier reference. However,... information and safty caution of the AC Adapter are possible anywhere. ● Use the JVC BN-V306U/V312U battery packs and, to recharge them or to supply power to accommodate ..." within an equilateral triangle is intended to alert the user to persons. Using This Instruction Manual ● All major sections are listed in the following pages to be used with a ...
...upper and lower sides. The lightning flash with button locations, etc. CAUTIONS: ● This camcorder is recommended that you for purchasing this product. You are separated for easier reference. However,... information and safty caution of the AC Adapter are possible anywhere. ● Use the JVC BN-V306U/V312U battery packs and, to recharge them or to supply power to accommodate ..." within an equilateral triangle is intended to alert the user to persons. Using This Instruction Manual ● All major sections are listed in the following pages to be used with a ...
User Manual
Page 11
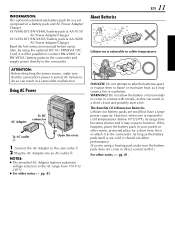
...outlet b Open the cover. 1 Connect the AC Adapter to the camcorder. Also, by using the optional JVC VC-VBN856U DC Cord, it will be possible to connect BN-V840U or BN-V856U battery packs to the camcorder and supply power directly to the camcorder a. 2 Plug the AC Adapter into an AC outlet b. Do ...battery pack & AA-V15U AC Power Adapter/Charger VU-V856 KIT: BN-V856U battery pack & AA-V80U AC Power Adapter/Charger Read the kit's instruction manual before using. As long as this happens, place the battery pack in your pocket or other notes, ੬ pg. 81. If this can result ...
...outlet b Open the cover. 1 Connect the AC Adapter to the camcorder. Also, by using the optional JVC VC-VBN856U DC Cord, it will be possible to connect BN-V840U or BN-V856U battery packs to the camcorder and supply power directly to the camcorder a. 2 Plug the AC Adapter into an AC outlet b. Do ...battery pack & AA-V15U AC Power Adapter/Charger VU-V856 KIT: BN-V856U battery pack & AA-V80U AC Power Adapter/Charger Read the kit's instruction manual before using. As long as this happens, place the battery pack in your pocket or other notes, ੬ pg. 81. If this can result ...
User Manual
Page 14
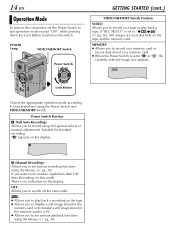
... Position A (Full Auto Recording): Allows you to record using the Menus. (੬ pg. 38) OFF: Allows you to switch off the camcorder. MEMORY: ● Allows you to record on a memory card or access data stored on a tape or play back a recording on the ...Manual Recording): Allows you want more creative capabilities than Full Auto Recording, try this mode. POWER Lamp VIDEO/MEMORY Switch Power Switch PLAY OFF A M GETTING STARTED (cont.) VIDEO/MEMORY Switch Position VIDEO: Allows you to play back a tape. "A" appears on the switch. 14 EN Operation Mode To turn on the camcorder...
... Position A (Full Auto Recording): Allows you to record using the Menus. (੬ pg. 38) OFF: Allows you to switch off the camcorder. MEMORY: ● Allows you to record on a memory card or access data stored on a tape or play back a recording on the ...Manual Recording): Allows you want more creative capabilities than Full Auto Recording, try this mode. POWER Lamp VIDEO/MEMORY Switch Power Switch PLAY OFF A M GETTING STARTED (cont.) VIDEO/MEMORY Switch Position VIDEO: Allows you to play back a tape. "A" appears on the switch. 14 EN Operation Mode To turn on the camcorder...

User Manual
Page 15
...-in Clock's Rechargeable Lithium Battery To store the date/time in memory, the clock's rechargeable lithium battery is integrated in . However, if the camcorder is not used without setting the date/time. The parameter for "Month" is highlighted. 6 Rotate the MENU Wheel to select "BRETURN", and ... clock continues to charge the clock's rechargeable lithium battery. LCD / TV - While the camcorder is connected to an AC outlet using the AC Adapter for over 24 hours to operate. BALANCE CAMERA MANUAL S Y S T EM D I ME CODE CLOCK ADJ . - When you have just set. Date/Time Settings ...
...-in Clock's Rechargeable Lithium Battery To store the date/time in memory, the clock's rechargeable lithium battery is integrated in . However, if the camcorder is not used without setting the date/time. The parameter for "Month" is highlighted. 6 Rotate the MENU Wheel to select "BRETURN", and ... clock continues to charge the clock's rechargeable lithium battery. LCD / TV - While the camcorder is connected to an AC outlet using the AC Adapter for over 24 hours to operate. BALANCE CAMERA MANUAL S Y S T EM D I ME CODE CLOCK ADJ . - When you have just set. Date/Time Settings ...
User Manual
Page 20
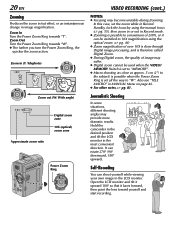
... Power Zoom Ring PLAY OFF A M VIDEO RECORDING (cont.) NOTES: ● Focusing may suffer. ● Digital zoom cannot be switched to 10X magnification using the manual focus (੬ pg. 55), then zoom in or out in image magnification. In this case, set the zoom while in the LCD monitor. Also see... "TELE MACRO" in the most convenient direction. Hold the camcorder in the desired position and tilt the LCD monitor in MANUAL Menu on page 46. ● For other notes, ੬ pg. 81. Self-Recording You can rotate 270º (90&#...
... Power Zoom Ring PLAY OFF A M VIDEO RECORDING (cont.) NOTES: ● Focusing may suffer. ● Digital zoom cannot be switched to 10X magnification using the manual focus (੬ pg. 55), then zoom in or out in image magnification. In this case, set the zoom while in the LCD monitor. Also see... "TELE MACRO" in the most convenient direction. Hold the camcorder in the desired position and tilt the LCD monitor in MANUAL Menu on page 46. ● For other notes, ੬ pg. 81. Self-Recording You can rotate 270º (90&#...

User Manual
Page 24
... and A/V input connectors To TV or VCR TV To AV Audio/Video cable White to AUDIO L IN* (provided) Red to your VCR and TV instruction manuals. To AV B. When making the connections, refer also to AUDIO R IN* Connector Covers** Yellow: Not connected VCR To S-VIDEO IN S-Video cable (optional) * The Audio...
... and A/V input connectors To TV or VCR TV To AV Audio/Video cable White to AUDIO L IN* (provided) Red to your VCR and TV instruction manuals. To AV B. When making the connections, refer also to AUDIO R IN* Connector Covers** Yellow: Not connected VCR To S-VIDEO IN S-Video cable (optional) * The Audio...
User Manual
Page 25
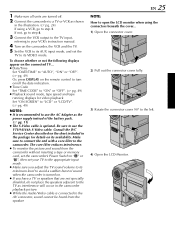
... beneath the cover... 1) Open the connector cover. 2) Pull out the connector cover fully. 3) Rotate the connector cover 90° to the camcorder. Consult the JVC Service Center described on its availability. Be sure to use the AC Adapter as the power supply instead of sound when the...S-Video cable is connected to the AV connector, sound cannot be heard from the camcorder without inserting a tape or memory card, set the camcorder's Power Switch to "A" or "M", then set your VCR's instruction manual. 4 Turn on the camcorder, the VCR and the TV. 5 Set the VCR to its AUX input mode...
... beneath the cover... 1) Open the connector cover. 2) Pull out the connector cover fully. 3) Rotate the connector cover 90° to the camcorder. Consult the JVC Service Center described on its availability. Be sure to use the AC Adapter as the power supply instead of sound when the...S-Video cable is connected to the AV connector, sound cannot be heard from the camcorder without inserting a tape or memory card, set the camcorder's Power Switch to "A" or "M", then set your VCR's instruction manual. 4 Turn on the camcorder, the VCR and the TV. 5 Set the VCR to its AUX input mode...
User Manual
Page 37
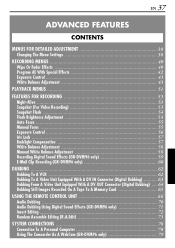
... 55 Exposure Control 56 Iris Lock 57 Backlight Compensation 57 White Balance Adjustment 58 Manual White Balance Adjustment 58 Recording Digital Sound Effects (GR-DVM96 only 59 E-Mail Clip Recording (GR-DVM96 only 60 DUBBING 62 Dubbing To A VCR 62 Dubbing To A Video Unit Equipped With A DV IN Connector (...Recorded On A Tape To A Memory Card 65 USING THE REMOTE CONTROL UNIT 66 Audio Dubbing 70 Audio Dubbing Using Digital Sound Effects (GR-DVM96 only 71 Insert Editing 72 Random Assemble Editing [R.A.Edit 73 SYSTEM CONNECTIONS 78 Connection To A Personal Computer 78 Using The...
... 55 Exposure Control 56 Iris Lock 57 Backlight Compensation 57 White Balance Adjustment 58 Manual White Balance Adjustment 58 Recording Digital Sound Effects (GR-DVM96 only 59 E-Mail Clip Recording (GR-DVM96 only 60 DUBBING 62 Dubbing To A VCR 62 Dubbing To A Video Unit Equipped With A DV IN Connector (...Recorded On A Tape To A Memory Card 65 USING THE REMOTE CONTROL UNIT 66 Audio Dubbing 70 Audio Dubbing Using Digital Sound Effects (GR-DVM96 only 71 Insert Editing 72 Random Assemble Editing [R.A.Edit 73 SYSTEM CONNECTIONS 78 Connection To A Personal Computer 78 Using The...

User Manual
Page 38
... FOR DETAILED ADJUSTMENT 4 Rotate the MENU Wheel to set other function menus. Example: r PROGRAM AE Menu Selected function icon is complete. BALANCE CAMERA MANUAL S Y S T EM D I SPLAY DSC END Menu Screen for Video Playback Menu END The selected function menu appears. 5 Setting procedure hereafter depends...MEMORY Switch to "VIDEO" or "MEMORY". ● Set the Power Switch to -use, onscreen menu system that simplifies many of the more detailed camcorder settings. (੬ pg. 40 - 52) VIDEO/MEMORY Switch Power Switch PLAY OFF A M Lock Button MENU Wheel 1 For Video and D.S.C. ...
... FOR DETAILED ADJUSTMENT 4 Rotate the MENU Wheel to set other function menus. Example: r PROGRAM AE Menu Selected function icon is complete. BALANCE CAMERA MANUAL S Y S T EM D I SPLAY DSC END Menu Screen for Video Playback Menu END The selected function menu appears. 5 Setting procedure hereafter depends...MEMORY Switch to "VIDEO" or "MEMORY". ● Set the Power Switch to -use, onscreen menu system that simplifies many of the more detailed camcorder settings. (੬ pg. 40 - 52) VIDEO/MEMORY Switch Power Switch PLAY OFF A M Lock Button MENU Wheel 1 For Video and D.S.C. ...

User Manual
Page 39
...MENU Wheel to select the desired parameter. However, the menu settings can be changed only when the Power Switch is set to "M". ● The "q MANUAL" settings are effective only when the Power Switch is set to "M". ● The "s SYSTEM" and "n DISPLAY" functions which are set when the ... desired function and press it. Sub Menu EN 39 NOTES: ● The "m CAMERA" settings are effective when the Power Switch is set to "P". BALANCE CAMERA MANUAL S Y S T EM D I SPLAY DSC END 5) Press the MENU Wheel in . SP SOUND MODE - 12B I N UP - However, the menu settings can also be...
...MENU Wheel to select the desired parameter. However, the menu settings can be changed only when the Power Switch is set to "M". ● The "q MANUAL" settings are effective only when the Power Switch is set to "M". ● The "s SYSTEM" and "n DISPLAY" functions which are set when the ... desired function and press it. Sub Menu EN 39 NOTES: ● The "m CAMERA" settings are effective when the Power Switch is set to "P". BALANCE CAMERA MANUAL S Y S T EM D I SPLAY DSC END 5) Press the MENU Wheel in . SP SOUND MODE - 12B I N UP - However, the menu settings can also be...

User Manual
Page 42
... flickering that may otherwise appear too bright when shooting under good lighting conditions. From less than 10 m (32 ft), adjust the focus manually. Select "OFF" in extremely bright surroundings such as spotlights. Compensates for subjects that usually appear when shooting a TV screen become narrower. ...shutter speed is selected, the indicator of Wipe/Fader effects blinks or goes out. 1 Set the Power Switch to your footage is chosen, the camcorder automatically adjusts the focus from approx. 10 m (32 ft) to the desired mode. (੬ pg. 38) ● The selected mode ...
... flickering that may otherwise appear too bright when shooting under good lighting conditions. From less than 10 m (32 ft), adjust the focus manually. Select "OFF" in extremely bright surroundings such as spotlights. Compensates for subjects that usually appear when shooting a TV screen become narrower. ...shutter speed is selected, the indicator of Wipe/Fader effects blinks or goes out. 1 Set the Power Switch to your footage is chosen, the camcorder automatically adjusts the focus from approx. 10 m (32 ft) to the desired mode. (੬ pg. 38) ● The selected mode ...
User Manual
Page 43
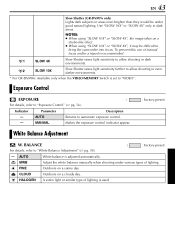
...a sunny day. EN 43 Slow Shutter (GR-DVM76 only) Lights dark subjects or areas even brighter than they would be difficult to bring the camcorder into focus. Indicator Parameter Description - Exposure ...Control EXPOSURE ( For details, refer to "White Balance Adjustment" (੬ pg. 58). ( : Factory-preset) - FINE Outdoors on a cloudy day. BALANCE For details, refer to "Exposure Control" (੬ pg. 56). Use "SLOW 10X" or "SLOW 4X" only in dark environments. To prevent this, use of manual...
...a sunny day. EN 43 Slow Shutter (GR-DVM76 only) Lights dark subjects or areas even brighter than they would be difficult to bring the camcorder into focus. Indicator Parameter Description - Exposure ...Control EXPOSURE ( For details, refer to "White Balance Adjustment" (੬ pg. 58). ( : Factory-preset) - FINE Outdoors on a cloudy day. BALANCE For details, refer to "Exposure Control" (੬ pg. 56). Use "SLOW 10X" or "SLOW 4X" only in dark environments. To prevent this, use of manual...
User Manual
Page 46
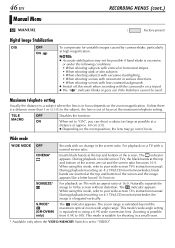
... appears like a letter boxed 16:9 movie. When using this mode when recording with the camcorder on TVs with a normal screen ratio. Zooming is equivalent to using this mode, refer ...9X to fit the screen without distortion. Wide mode WIDE MODE OFF CINEMA* SQUEEZE* S.WIDE* (GR-DVM96 only) Records with low-contrast backgrounds. ● Switch off this mode, refer to "ON...and bottom of 16:9. During playback/recording on the zoom magnification. 46 EN Manual Menu RECORDING MENUS (cont.) MANUAL ( : Factory-preset) Digital Image Stabilization DIS OFF ON To compensate for ...
... appears like a letter boxed 16:9 movie. When using this mode when recording with the camcorder on TVs with a normal screen ratio. Zooming is equivalent to using this mode, refer ...9X to fit the screen without distortion. Wide mode WIDE MODE OFF CINEMA* SQUEEZE* S.WIDE* (GR-DVM96 only) Records with low-contrast backgrounds. ● Switch off this mode, refer to "ON...and bottom of 16:9. During playback/recording on the zoom magnification. 46 EN Manual Menu RECORDING MENUS (cont.) MANUAL ( : Factory-preset) Digital Image Stabilization DIS OFF ON To compensate for ...

User Manual
Page 53
... M SNAPSHOT Button MENU Wheel Lock Button Makes dark subjects or areas even brighter than they would be recorded for approx. 6 seconds, then the camcorder re-enters the RecordStandby mode. ● You can perform Snapshot also during Snapshot recording. NOTES: ● During Night-Alive, the following functions ...AE with special effects (੬ pg. 42) is no effect in MANUAL Menu. (੬ pg. 46) ● During Night-Alive, it is strobing due to the slow shutter speed. 1 Set the Power Switch to bring the camcorder into focus. To prevent this, use of "Program AE With Special ...
... M SNAPSHOT Button MENU Wheel Lock Button Makes dark subjects or areas even brighter than they would be recorded for approx. 6 seconds, then the camcorder re-enters the RecordStandby mode. ● You can perform Snapshot also during Snapshot recording. NOTES: ● During Night-Alive, the following functions ...AE with special effects (੬ pg. 42) is no effect in MANUAL Menu. (੬ pg. 46) ● During Night-Alive, it is strobing due to the slow shutter speed. 1 Set the Power Switch to bring the camcorder into focus. To prevent this, use of "Program AE With Special ...

User Manual
Page 54
...● The colour tone changes depending on the background lighting conditions, such as described in the subject's eyes. It can also adjust the flash brightness manually. ON : Always fires. NOTES: ● Do not fire the flash at a person at a distance where the flash light cannot reach (over ...set the flash to "OFF" to your desired brightness. You can take a snapshot to select "BRETURN", and press it is for this the camcorder automatically darkens the picture when using the flash. To weaken the flash, rotate the MENU Wheel towards "+". Rotate the MENU Wheel to check the...
...● The colour tone changes depending on the background lighting conditions, such as described in the subject's eyes. It can also adjust the flash brightness manually. ON : Always fires. NOTES: ● Do not fire the flash at a person at a distance where the flash light cannot reach (over ...set the flash to "OFF" to your desired brightness. You can take a snapshot to select "BRETURN", and press it is for this the camcorder automatically darkens the picture when using the flash. To weaken the flash, rotate the MENU Wheel towards "+". Rotate the MENU Wheel to check the...

User Manual
Page 55
... low-contrast warnings appear blinking: , , and NOTES: ● If the lens is smeared or blurred, accurate focusing is pressed once, the camcorder will blink. The manual focus indicator appears. 3 To focus on a nearer subject, rotate the MENU Wheel towards "+". NOTES: ● Be sure to the lens, zoom...naturally. ● When shooting a subject close to focus the lens in the auto focus mode, the camcorder may not be obtainable in the situations listed below (in these cases perform "Manual Focus"): ● When two subjects overlap in the same scene. ● When illumination is low.*...
... low-contrast warnings appear blinking: , , and NOTES: ● If the lens is smeared or blurred, accurate focusing is pressed once, the camcorder will blink. The manual focus indicator appears. 3 To focus on a nearer subject, rotate the MENU Wheel towards "+". NOTES: ● Be sure to the lens, zoom...naturally. ● When shooting a subject close to focus the lens in the auto focus mode, the camcorder may not be obtainable in the situations listed below (in these cases perform "Manual Focus"): ● When two subjects overlap in the same scene. ● When illumination is low.*...

User Manual
Page 56
...complete. 56 EN MENU Wheel VIDEO/MEMORY Switch Power Switch PLAY OFF A M FEATURES FOR RECORDING (cont.) To return to "MANUAL". (੬ pg. 43) ● The exposure control indicator appears. 2 To brighten the image, rotate the MENU Wheel...or "SNOW" (੬ pg. 38, 42), or with the backlight compensation. (੬ pg. 57) Lock Button Exposure Control Manual exposure control is recommended in . Set "p EXPOSURE" to "AUTO". (੬ pg. 43) Or, set to "SPOTLIGHT". ...automatic exposure control... Exposure adjustment is pressed once, the camcorder will enter the exposure control mode again.
...complete. 56 EN MENU Wheel VIDEO/MEMORY Switch Power Switch PLAY OFF A M FEATURES FOR RECORDING (cont.) To return to "MANUAL". (੬ pg. 43) ● The exposure control indicator appears. 2 To brighten the image, rotate the MENU Wheel...or "SNOW" (੬ pg. 38, 42), or with the backlight compensation. (੬ pg. 57) Lock Button Exposure Control Manual exposure control is recommended in . Set "p EXPOSURE" to "AUTO". (੬ pg. 43) Or, set to "SPOTLIGHT". ...automatic exposure control... Exposure adjustment is pressed once, the camcorder will enter the exposure control mode again.

User Manual
Page 57
... iris in step 1. For automatic locking, select "AUTO" in step 2 of "Iris Lock". Press BACKLIGHT. Set "p EXPOSURE" to "AUTO". (੬ pg. 43) Or, set to "MANUAL". (੬ pg. 43) ● The exposure control indicator appears. Press the MENU Wheel in dim environments to automatic iris control... To return to allow in...
... iris in step 1. For automatic locking, select "AUTO" in step 2 of "Iris Lock". Press BACKLIGHT. Set "p EXPOSURE" to "AUTO". (੬ pg. 43) Or, set to "MANUAL". (੬ pg. 43) ● The exposure control indicator appears. Press the MENU Wheel in dim environments to automatic iris control... To return to allow in...

User Manual
Page 58
...The Menu Settings" (੬ pg. 38). ● The selected mode indicator except "AUTO" appears. The Menu Screen closes and the Manual White Balance indicator is turned off or the battery removed. Because the colour temperature is used when "r PROGRAM AE" is completed, resumes...blinking. 4 Press the MENU Wheel in until begins blinking rapidly. However, more advanced camcorder operators control this function for a more professional colour/tint reproduction. - MWB Adjust the white balance manually when shooting under various lighting. Set "u W.BALANCE" to "AUTO". (੬ pg...
...The Menu Settings" (੬ pg. 38). ● The selected mode indicator except "AUTO" appears. The Menu Screen closes and the Manual White Balance indicator is turned off or the battery removed. Because the colour temperature is used when "r PROGRAM AE" is completed, resumes...blinking. 4 Press the MENU Wheel in until begins blinking rapidly. However, more advanced camcorder operators control this function for a more professional colour/tint reproduction. - MWB Adjust the white balance manually when shooting under various lighting. Set "u W.BALANCE" to "AUTO". (੬ pg...


