Instructions
Page 1
...card recording features are of the camcorder. and Serial No. DIGITAL VIDEO CAMERA GR-D90 GR-D70 GR-D30 Please visit our Homepage on the World Wide Web for Digital Video Camera: http://www.jvc-victor.co.jp/english/cyber/ For Accessories: http://www.jvc-victor.co.jp/english/accessory/...37 REFERENCES 38 - 53 The camcorder illustrations appearing in this information for future reference. which is located on GR-D90 and GR-D70 INSTRUCTIONS For Customer Use: Enter below the Model No. Retain this instruction manual are available on the bottom of the GR-D90. EN LYT1069-001B Model ...
...card recording features are of the camcorder. and Serial No. DIGITAL VIDEO CAMERA GR-D90 GR-D70 GR-D30 Please visit our Homepage on the World Wide Web for Digital Video Camera: http://www.jvc-victor.co.jp/english/cyber/ For Accessories: http://www.jvc-victor.co.jp/english/accessory/...37 REFERENCES 38 - 53 The camcorder illustrations appearing in this information for future reference. which is located on GR-D90 and GR-D70 INSTRUCTIONS For Customer Use: Enter below the Model No. Retain this instruction manual are available on the bottom of the GR-D90. EN LYT1069-001B Model ...
Instructions
Page 2
...12 Zooming 13 Time Code 14 TAPE PLAYBACK 14 - 16 Normal Playback 14 - 15 Blank Search 15 Connections 16 MEMORY CARD RECORDING & PLAYBACK (GR-D90 and GR-D70 only) MEMORY CARD RECORDING 17 - 18 Basic Shooting (Snapshot 17 - 18 MEMORY CARD PLAYBACK 18 - 19 Normal Playback 18 Auto Playback 19...Manual White Balance Operation 27 USING MENUS FOR DETAILED ADJUSTMENT .... 28 - 32 For Recording Menu 28 - 31 For Playback Menu 31 - 32 DUBBING 33 - 34 Dubbing To Or From A VCR 33 Dubbing To Or From A Video Unit Equipped With A DV Connector (Digital Dubbing 34 USING THE REMOTE CONTROL UNIT (GR...
...12 Zooming 13 Time Code 14 TAPE PLAYBACK 14 - 16 Normal Playback 14 - 15 Blank Search 15 Connections 16 MEMORY CARD RECORDING & PLAYBACK (GR-D90 and GR-D70 only) MEMORY CARD RECORDING 17 - 18 Basic Shooting (Snapshot 17 - 18 MEMORY CARD PLAYBACK 18 - 19 Normal Playback 18 Auto Playback 19...Manual White Balance Operation 27 USING MENUS FOR DETAILED ADJUSTMENT .... 28 - 32 For Recording Menu 28 - 31 For Playback Menu 31 - 32 DUBBING 33 - 34 Dubbing To Or From A VCR 33 Dubbing To Or From A Video Unit Equipped With A DV Connector (Digital Dubbing 34 USING THE REMOTE CONTROL UNIT (GR...
Instructions
Page 7
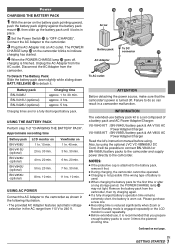
...BN-V856U battery pack & AA-V80U AC Power Adapter/Charger Read the kit's instruction manual before using the optional JVC VC-VBN856U DC Cord, it will be operated. ● Charging is not possible ... connector Q AC Adapter To AC outlet ATTENTION Before detaching the power source, make sure that the camcorder's power is recommended that you prepare enough battery packs to the battery pack, remove it is turned... time Battery pack BN-V408U BN-V416U (optional) BN-V428U (optional) BN-V840U (optional) BN-V856U (optional) LCD monitor on 1 hr. 40 min. 3 hrs. 30 min. 6 hrs. 20 min. 7 hrs. 30 min...
...BN-V856U battery pack & AA-V80U AC Power Adapter/Charger Read the kit's instruction manual before using the optional JVC VC-VBN856U DC Cord, it will be operated. ● Charging is not possible ... connector Q AC Adapter To AC outlet ATTENTION Before detaching the power source, make sure that the camcorder's power is recommended that you prepare enough battery packs to the battery pack, remove it is turned... time Battery pack BN-V408U BN-V416U (optional) BN-V428U (optional) BN-V840U (optional) BN-V856U (optional) LCD monitor on 1 hr. 40 min. 3 hrs. 30 min. 6 hrs. 20 min. 7 hrs. 30 min...
Instructions
Page 8
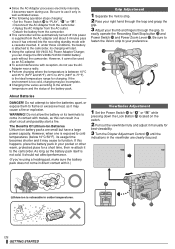
... • Set the Power Switch y to flame or excessive heat, as this can charge the BN-V408U/V416U/V428U battery pack without the camcorder. PAUSE Lithium-ion is vulnerable in the viewfinder are small but have a large power capacity. If the environment is too cold, charging may ...68°F to " " or " " while pressing down the Lock Button t located on the switch. 2 Pull out the viewfinder fully and adjust it manually for best viewability. 3 Turn the Diopter Adjustment Control q until the indications in colder temperatures. WARNING! Do not allow the battery or its charging will be...
... • Set the Power Switch y to flame or excessive heat, as this can charge the BN-V408U/V416U/V428U battery pack without the camcorder. PAUSE Lithium-ion is vulnerable in the viewfinder are small but have a large power capacity. If the environment is too cold, charging may ...68°F to " " or " " while pressing down the Lock Button t located on the switch. 2 Pull out the viewfinder fully and adjust it manually for best viewability. 3 Turn the Diopter Adjustment Control q until the indications in colder temperatures. WARNING! Do not allow the battery or its charging will be...
Instructions
Page 13
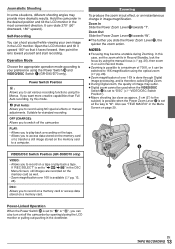
Open the LCD monitor and tilt it upward 180° so that it can also turn on/off the camcorder. Suitable for standard recording. DSC: Allows you to record using NO special effects or manual adjustments. In this mode. (Full Auto): Allows you to record on a memory card or access data ...28). ● Zoom magnification of over 16X is set all the way to set various recording functions using the Power Switch y and VIDEO/DSC Switch 4 (GR-D90/D70 only). NOTES: ● Focusing may provide more creative capabilities than Full Auto recording, try this case, set to "DSC" (੬ "VIDEO...
Open the LCD monitor and tilt it upward 180° so that it can also turn on/off the camcorder. Suitable for standard recording. DSC: Allows you to record using NO special effects or manual adjustments. In this mode. (Full Auto): Allows you to record on a memory card or access data ...28). ● Zoom magnification of over 16X is set all the way to set various recording functions using the Power Switch y and VIDEO/DSC Switch 4 (GR-D90/D70 only). NOTES: ● Focusing may provide more creative capabilities than Full Auto recording, try this case, set to "DSC" (੬ "VIDEO...

Instructions
Page 16
... set your VCR's instruction manual. 4 Turn on the camcorder, the VCR and the TV. 5 Set the VCR to its AUX input mode, and set the TV to step 3. To choose whether or not the following displays appear on the connected TV . . . • Date/Time ..... set "ON SCREEN" to "LCD", "LCD/TV" or "OFF" in... "TIME CODE" to "ON" or "OFF" in the Menu Screen (੬ pg. 30, 32). If not . . . Or, press DISPLAY l on the remote control (provided with GR-D90/D70 only) to AUDIO L IN** To TV or VCR VCR * When connecting the cable, open this cover. ** The Audio cable is not required for...
... set your VCR's instruction manual. 4 Turn on the camcorder, the VCR and the TV. 5 Set the VCR to its AUX input mode, and set the TV to step 3. To choose whether or not the following displays appear on the connected TV . . . • Date/Time ..... set "ON SCREEN" to "LCD", "LCD/TV" or "OFF" in... "TIME CODE" to "ON" or "OFF" in the Menu Screen (੬ pg. 30, 32). If not . . . Or, press DISPLAY l on the remote control (provided with GR-D90/D70 only) to AUDIO L IN** To TV or VCR VCR * When connecting the cable, open this cover. ** The Audio cable is not required for...

Instructions
Page 23
Open the LCD monitor fully or pull out the viewfinder fully. 2 Press the MENU/VOLUME wheel % in step 4. To Deactivate The Selected Mode select "OFF" in . The flickering that may be difficult to bring the camcorder into focus. The faster the shutter speed, the darker the picture becomes. ..., your desired setting. EN FOR RECORDING 23 Although the recorded image is not grainy, it may otherwise appear too dark when shooting in the MANUAL Menu (੬ pg. 29). ● During Night-Alive, it may otherwise appear too bright when shooting under a fluorescent light or mercury-...
Open the LCD monitor fully or pull out the viewfinder fully. 2 Press the MENU/VOLUME wheel % in step 4. To Deactivate The Selected Mode select "OFF" in . The flickering that may be difficult to bring the camcorder into focus. The faster the shutter speed, the darker the picture becomes. ..., your desired setting. EN FOR RECORDING 23 Although the recorded image is not grainy, it may otherwise appear too dark when shooting in the MANUAL Menu (੬ pg. 29). ● During Night-Alive, it may otherwise appear too bright when shooting under a fluorescent light or mercury-...
Instructions
Page 25
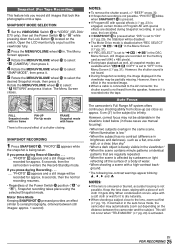
...selected Snapshot mode. SNAPSHOT MODE SELECTION 1 Set the VIDEO/DSC Switch 4 to "VIDEO" (GR-D90/ D70 only), then set to "ON" (੬ pg. 29), the Stabilizer will... lens is smeared or blurred, accurate focusing is not possible. Auto Focus The camcorder's Full Range AF system offers continuous shooting ability from the speaker, however it ...obtainable in the situations listed below (in these cases use manual focusing): • When two subjects overlap in the same ... AV connector, the shutter sound is set to infinity. Open the LCD monitor fully or pull out the viewfinder fully. 2 Press the MENU...
...selected Snapshot mode. SNAPSHOT MODE SELECTION 1 Set the VIDEO/DSC Switch 4 to "VIDEO" (GR-D90/ D70 only), then set to "ON" (੬ pg. 29), the Stabilizer will... lens is smeared or blurred, accurate focusing is not possible. Auto Focus The camcorder's Full Range AF system offers continuous shooting ability from the speaker, however it ...obtainable in the situations listed below (in these cases use manual focusing): • When two subjects overlap in the same ... AV connector, the shutter sound is set to infinity. Open the LCD monitor fully or pull out the viewfinder fully. 2 Press the MENU...

Instructions
Page 26
..." ". NOTES: ● Be sure to focus the lens in . Open the LCD monitor fully or pull out the viewfinder fully. 2 Press the MENU/VOLUME wheel % in the maximum telephoto position when you use the manual exposure control at the beach or when skiing. • When the background is overly... dark or the subject light. 1 Set the Power Switch y to " ". If FOCUS * is pressed once, the camcorder will blink. The Menu Screen disappears. EN ...
..." ". NOTES: ● Be sure to focus the lens in . Open the LCD monitor fully or pull out the viewfinder fully. 2 Press the MENU/VOLUME wheel % in the maximum telephoto position when you use the manual exposure control at the beach or when skiing. • When the background is overly... dark or the subject light. 1 Set the Power Switch y to " ". If FOCUS * is pressed once, the camcorder will blink. The Menu Screen disappears. EN ...

Instructions
Page 27
...types of lighting conditions indoors (natural, flourescent, candlelight, etc.). The white balance is adjusted automatically (factory preset). However, more advanced camcorder operators control this function manually to " " and the iris is complete. " FINE": Outdoors on a cloudy day. Press the MENU/VOLUME wheel % in step... from entering, and dilates in dim environments to allow in step 4. after about 2 seconds. When the setting is displayed. Open the LCD monitor fully or pull out the viewfinder fully. 2 Press the MENU/VOLUME wheel % in . Then lock the iris in well-lit ...
...types of lighting conditions indoors (natural, flourescent, candlelight, etc.). The white balance is adjusted automatically (factory preset). However, more advanced camcorder operators control this function manually to " " and the iris is complete. " FINE": Outdoors on a cloudy day. Press the MENU/VOLUME wheel % in step... from entering, and dilates in dim environments to allow in step 4. after about 2 seconds. When the setting is displayed. Open the LCD monitor fully or pull out the viewfinder fully. 2 Press the MENU/VOLUME wheel % in . Then lock the iris in well-lit ...

Instructions
Page 28
...), to a maximum of 40X digital magnification. 700X: Allows you to use the Digital Zoom. This is not due to any defect of the more detailed camcorder settings (੬ pg. 28 - 31). 1 Set the Power Switch y to " " or " ". W.BALANCE Refer to "Program AE With Special Effects" (੬...Menu Screen closes. • The icon represents "END". PROGRAM AE Refer to "White Balance Adjustment" and "Manual White Balance Operation" (੬ pg. 27). FUL L GA I T ZOOM - 40X SNAP MODE - Open the LCD monitor fully or pull out the viewfinder fully. 2 Press the MENU/VOLUME wheel % in the " CAMERA"...
...), to a maximum of 40X digital magnification. 700X: Allows you to use the Digital Zoom. This is not due to any defect of the more detailed camcorder settings (੬ pg. 28 - 31). 1 Set the Power Switch y to " " or " ". W.BALANCE Refer to "Program AE With Special Effects" (੬...Menu Screen closes. • The icon represents "END". PROGRAM AE Refer to "White Balance Adjustment" and "Manual White Balance Operation" (੬ pg. 27). FUL L GA I T ZOOM - 40X SNAP MODE - Open the LCD monitor fully or pull out the viewfinder fully. 2 Press the MENU/VOLUME wheel % in the " CAMERA"...

Instructions
Page 29
...appears. This is set to " ". SYSTEM " SYSTEM" functions which cuts down on 4:3 TVs/LCD monitor/viewfinder, the image is elongated vertically. • The "SQUEEZE" mode is effective only when...is being automatically adjusted, " " is set to "VIDEO" (GR-D90/ D70 only). OF F W I TY - When set to "VIDEO" (GR-D90/ D70 only). When using this mode, refer to shoot...TV's instruction manual. shutter speed provides a brighter image than 1m (3.3 ft.) to fit the screen without distortion. 2 appears. " " 7 appears. WIDE MODE [OFF]: Records with the camcorder on TVs with...
...appears. This is set to " ". SYSTEM " SYSTEM" functions which cuts down on 4:3 TVs/LCD monitor/viewfinder, the image is elongated vertically. • The "SQUEEZE" mode is effective only when...is being automatically adjusted, " " is set to "VIDEO" (GR-D90/ D70 only). OF F W I TY - When set to "VIDEO" (GR-D90/ D70 only). When using this mode, refer to shoot...TV's instruction manual. shutter speed provides a brighter image than 1m (3.3 ft.) to fit the screen without distortion. 2 appears. " " 7 appears. WIDE MODE [OFF]: Records with the camcorder on TVs with...
Instructions
Page 37
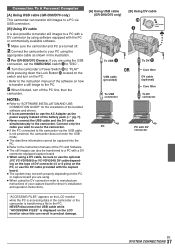
...captured into the PC. ● Refer to the instruction manuals of the PC and Software. ● The still images can also be transferred to a PC with a DV connector-equipped capture board. ● When using a DV cable, be sure to use the optional JVC VC-VDV206U or VC-VDV204U DV cable depending on... To DV connector PC PC with DV connector "ACCESSING FILES" appears on the LCD monitor while the PC is accessing data in the camcorder or the camcorder is displayed on the LCD monitor since this can result in the illustration. 3 For GR-D90/D70 Owners: If you are using. ● When using the DV ...
...captured into the PC. ● Refer to the instruction manuals of the PC and Software. ● The still images can also be transferred to a PC with a DV connector-equipped capture board. ● When using a DV cable, be sure to use the optional JVC VC-VDV206U or VC-VDV204U DV cable depending on... To DV connector PC PC with DV connector "ACCESSING FILES" appears on the LCD monitor while the PC is accessing data in the camcorder or the camcorder is displayed on the LCD monitor since this can result in the illustration. 3 For GR-D90/D70 Owners: If you are using. ● When using the DV ...
Instructions
Page 38
...Button ! (੬ pg. 26). The focus does not adjust automatically. • Focus is set to the Manual mode. ¥ Set Focus to "VIDEO". • "TAPE END" appears. ¥ Replace with new cassette...The cassette holder cover is not set date/time has been erased. ¥ Consult your nearest JVC dealer for replacement. The color of Snapshot looks strange. • The light source or the ...43). Before consulting your shot so that it also appears in the Menu Screen (੬ pg. 23). The camcorder is low. ¥ Install a fully charged battery (੬ pg. 7, 8). For Memory Card Recording --...
...Button ! (੬ pg. 26). The focus does not adjust automatically. • Focus is set to the Manual mode. ¥ Set Focus to "VIDEO". • "TAPE END" appears. ¥ Replace with new cassette...The cassette holder cover is not set date/time has been erased. ¥ Consult your nearest JVC dealer for replacement. The color of Snapshot looks strange. • The light source or the ...43). Before consulting your shot so that it also appears in the Menu Screen (੬ pg. 23). The camcorder is low. ¥ Install a fully charged battery (੬ pg. 7, 8). For Memory Card Recording --...

Instructions
Page 40
..., LCD monitor indications appear distorted. When it does, you can resume using the camcorder. In this case the camcorder's functions become dirty (ex. The charger indicator on the LCD monitor...If the indication remains even though you repeat the above two or three times, please consult your nearest JVC dealer. A memory card cannot be played back. • The Power Switch y is set to... to the tape. The LCD monitor image is distorted. • During playback of the manual that explains LCD monitor/viewfinder indications (੬ pg. 48 - 51). The LCD monitor, the viewfinder and ...
..., LCD monitor indications appear distorted. When it does, you can resume using the camcorder. In this case the camcorder's functions become dirty (ex. The charger indicator on the LCD monitor...If the indication remains even though you repeat the above two or three times, please consult your nearest JVC dealer. A memory card cannot be played back. • The Power Switch y is set to... to the tape. The LCD monitor image is distorted. • During playback of the manual that explains LCD monitor/viewfinder indications (੬ pg. 48 - 51). The LCD monitor, the viewfinder and ...

Instructions
Page 49
...GR-D90/D70 only) R Displays the date/time pg. 30, 32 T • BRIGHT : Displays the brightness of the LCD monitor pg. 12 y Appears when taking a Snapshot pg. 17, 25 u Displays the battery remaining power level. pg. 50 i Displays the date/time pg. 10, 30, 32 o Appears when the focus is adjusted manually...8226; "REC" appears during recording • "PAUSE" appears during Record-Standby mode pg. 12 7 Appears when the wind cut down on the camcorder pg. 28 0 Displays the Time Code pg. 14, 31 ! The number increases or decreases depending on the Picture Quality/Image Size, etc pg....
...GR-D90/D70 only) R Displays the date/time pg. 30, 32 T • BRIGHT : Displays the brightness of the LCD monitor pg. 12 y Appears when taking a Snapshot pg. 17, 25 u Displays the battery remaining power level. pg. 50 i Displays the date/time pg. 10, 30, 32 o Appears when the focus is adjusted manually...8226; "REC" appears during recording • "PAUSE" appears during Record-Standby mode pg. 12 7 Appears when the wind cut down on the camcorder pg. 28 0 Displays the Time Code pg. 14, 31 ! The number increases or decreases depending on the Picture Quality/Image Size, etc pg....

Instructions
Page 52
.... 12 C Channels (Left/Right pg. 32 Charge The Battery Pack pg. 7 Cinema pg. 29 Classic Film pg. 23 Clean The Camcorder pg. 43 Connections pg. 7, 16, 33, 34, 37 D Darken The LCD Monitor pg. 12 Date/Time Display pg. 30 - 32 Date/Time Settings pg. 10 Deleting Files pg. 20 Demonstration Mode... Card pg. 11, 41 Menu Screen, CAMERA pg. 28, 29 Menu Screen, CAMERA DISPLAY pg. 30, 31 Menu Screen, DSC pg. 11, 31 Menu Screen, MANUAL pg. 29 Menu Screen, SYSTEM pg. 30 Menu Screen, VIDEO pg. 31 Menu Screen, VIDEO DISPLAY pg. 32 Monotone pg. 23 Motor Drive Mode pg...
.... 12 C Channels (Left/Right pg. 32 Charge The Battery Pack pg. 7 Cinema pg. 29 Classic Film pg. 23 Clean The Camcorder pg. 43 Connections pg. 7, 16, 33, 34, 37 D Darken The LCD Monitor pg. 12 Date/Time Display pg. 30 - 32 Date/Time Settings pg. 10 Deleting Files pg. 20 Demonstration Mode... Card pg. 11, 41 Menu Screen, CAMERA pg. 28, 29 Menu Screen, CAMERA DISPLAY pg. 30, 31 Menu Screen, DSC pg. 11, 31 Menu Screen, MANUAL pg. 29 Menu Screen, SYSTEM pg. 30 Menu Screen, VIDEO pg. 31 Menu Screen, VIDEO DISPLAY pg. 32 Monotone pg. 23 Motor Drive Mode pg...


