Software Guide
Page 5
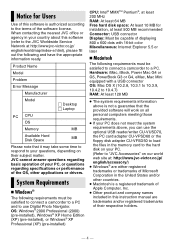
... meeting those requirements. ● If your PC does not meet the system requirements above, you can use Digital Photo Navigator. System Requirements Ⅲ Windows® The following requirements must be satisfied to connect a camcorder to "JVC Accessories" on their respective holders. -4- OS: Windows® 2000 Professional (2000) (pre-installed), Windows® XP Home...
... meeting those requirements. ● If your PC does not meet the system requirements above, you can use Digital Photo Navigator. System Requirements Ⅲ Windows® The following requirements must be satisfied to connect a camcorder to "JVC Accessories" on their respective holders. -4- OS: Windows® 2000 Professional (2000) (pre-installed), Windows® XP Home...
Software Guide
Page 12
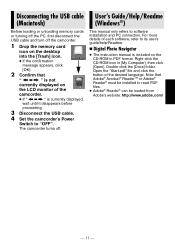
... of each software, refer to its user's guide/help/Readme. Ⅲ Digital Photo Navigator ● The instruction manual is currently displayed, wait until it disappears before proceeding. 3 Disconnect the USB cable. 4 Set the camcorder's Power Switch to "OFF". Right-click the CD-ROM icon in PDF ...can be loaded from Adobe's web site: http://www.adobe.com/ - 11 - Open the "Start.pdf" file and click the button of the camcorder. ● If " " is included on the LCD monitor of the desired language. Disconnecting the USB cable (Macintosh) Before loading or unloading memory...
... of each software, refer to its user's guide/help/Readme. Ⅲ Digital Photo Navigator ● The instruction manual is currently displayed, wait until it disappears before proceeding. 3 Disconnect the USB cable. 4 Set the camcorder's Power Switch to "OFF". Right-click the CD-ROM icon in PDF ...can be loaded from Adobe's web site: http://www.adobe.com/ - 11 - Open the "Start.pdf" file and click the button of the camcorder. ● If " " is included on the LCD monitor of the desired language. Disconnecting the USB cable (Macintosh) Before loading or unloading memory...
Instructions
Page 1
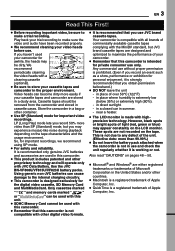
Model No. which is located on the bottom of this digital video camera. ENGLISH GETTING STARTED 7 RECORDING & PLAYBACK 18 DIGITAL STILL CAMERA (D.S.C.) RECORDING & PLAYBACK 26 ADVANCED FEATURES 31 REFERENCES 46 TERMS 52 For Customer Use: Enter below the Model No... and precautions contained in the pages 3 - 5 to "OFF". (੬ pg. 31, 34) LYT1656-001B ENGLISH Before use of the camcorder. Serial No. DIGITAL VIDEO CAMERA GR-D775U INSTRUCTIONS Dear Customer, Thank you for future reference. and Serial No. Retain this information for purchasing this product.
Model No. which is located on the bottom of this digital video camera. ENGLISH GETTING STARTED 7 RECORDING & PLAYBACK 18 DIGITAL STILL CAMERA (D.S.C.) RECORDING & PLAYBACK 26 ADVANCED FEATURES 31 REFERENCES 46 TERMS 52 For Customer Use: Enter below the Model No... and precautions contained in the pages 3 - 5 to "OFF". (੬ pg. 31, 34) LYT1656-001B ENGLISH Before use of the camcorder. Serial No. DIGITAL VIDEO CAMERA GR-D775U INSTRUCTIONS Dear Customer, Thank you for future reference. and Serial No. Retain this information for purchasing this product.
Instructions
Page 3
...camcorder. ● Remember that this camcorder is designed exclusively for private consumer use JVC brand cassette tapes. Store the camcorder in summer. - Using generic non-JVC batteries can cause damage to the internal charging circuitry. ● This camcorder is intended for the digital video cassette, SD Memory Card and MultiMediaCard. Your camcorder... sure to make a trial recording. Use the JVC BN-VF808U/VF815U/VF823U battery packs. near a heater. ● The LCD monitor is strongly recommended that this camcorder is not compatible with other container. ● ...
...camcorder. ● Remember that this camcorder is designed exclusively for private consumer use JVC brand cassette tapes. Store the camcorder in summer. - Using generic non-JVC batteries can cause damage to the internal charging circuitry. ● This camcorder is intended for the digital video cassette, SD Memory Card and MultiMediaCard. Your camcorder... sure to make a trial recording. Use the JVC BN-VF808U/VF815U/VF823U battery packs. near a heater. ● The LCD monitor is strongly recommended that this camcorder is not compatible with other container. ● ...
Instructions
Page 9
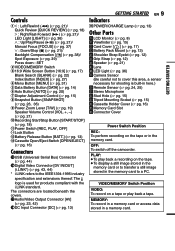
OFF: To switch off the camcorder. The connectors are located beneath the covers. )Audio/Video Output Connector [AV] (੬ pg. 23, 42) ~DC Input Connector [DC] (੬ pg. 13) GETTING STARTED ... $Battery Release Button [BATT.] (੬ pg. 13) %Cassette Open/Eject Switch [OPEN/EJECT] (੬ pg. 16) Connectors &USB (Universal Serial Bus) Connector (੬ pg. 44) (Digital Video Connector [DV IN/OUT] (i.LINK*) (੬ pg. 43, 44) * i.LINK refers to a PC.
OFF: To switch off the camcorder. The connectors are located beneath the covers. )Audio/Video Output Connector [AV] (੬ pg. 23, 42) ~DC Input Connector [DC] (੬ pg. 13) GETTING STARTED ... $Battery Release Button [BATT.] (੬ pg. 13) %Cassette Open/Eject Switch [OPEN/EJECT] (੬ pg. 16) Connectors &USB (Universal Serial Bus) Connector (੬ pg. 44) (Digital Video Connector [DV IN/OUT] (i.LINK*) (੬ pg. 43, 44) * i.LINK refers to a PC.

Instructions
Page 10
...) 6 : Insert (੬ pg. 45) 8 : Insert Pause 7Selected Wipe/Fader Effect Indicator (੬ pg. 40) 8Wind Cut Indicator (੬ pg. 33) 9Time Code (੬ pg. 34) !Digital Image Stabilizer ("DIS") (੬ pg. 32) (only indicator is displayed) 4Tape Remaining Time (੬ pg. 18) 5REC: (Appears during D.S.C. recording.) &PHOTO: (Appears when taking Snapshot...) (੬ pg. 33) (only LP indicator is displayed) "SOUND 12BIT/16BIT: Sound Mode Indicator (੬ pg. 33) (Appears for approx. 5 seconds after turning on the camcorder.) During Both Video And D.S.C.
...) 6 : Insert (੬ pg. 45) 8 : Insert Pause 7Selected Wipe/Fader Effect Indicator (੬ pg. 40) 8Wind Cut Indicator (੬ pg. 33) 9Time Code (੬ pg. 34) !Digital Image Stabilizer ("DIS") (੬ pg. 32) (only indicator is displayed) 4Tape Remaining Time (੬ pg. 18) 5REC: (Appears during D.S.C. recording.) &PHOTO: (Appears when taking Snapshot...) (੬ pg. 33) (only LP indicator is displayed) "SOUND 12BIT/16BIT: Sound Mode Indicator (੬ pg. 33) (Appears for approx. 5 seconds after turning on the camcorder.) During Both Video And D.S.C.

Instructions
Page 19
... (up to 34X by using the optical zoom. ● Zoom magnification over 34X is done through digital image processing, and is therefore called digital zoom. It can even shoot yourself while viewing your own image in the LCD monitor. 1) Open the LCD monitor and tilt it upward to 180&#... W: Wide angle T: Telephoto ● You can zoom in up to 800X) NOTES: ● Macro shooting is possible as close as it faces forward. Hold the camcorder in the desired position and tilt the LCD monitor in the LCD monitor, close to the lens, the camera may automatically zoom out depending on...
... (up to 34X by using the optical zoom. ● Zoom magnification over 34X is done through digital image processing, and is therefore called digital zoom. It can even shoot yourself while viewing your own image in the LCD monitor. 1) Open the LCD monitor and tilt it upward to 180&#... W: Wide angle T: Telephoto ● You can zoom in up to 800X) NOTES: ● Macro shooting is possible as close as it faces forward. Hold the camcorder in the desired position and tilt the LCD monitor in the LCD monitor, close to the lens, the camera may automatically zoom out depending on...
Instructions
Page 26
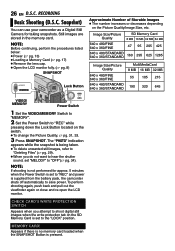
26 EN D.S.C. Still images are stored in the memory card. Snapshot) You can use your camcorder as a Digital Still Camera for approx. 5 minutes when the Power Switch is not performed for taking snapshots. CHECK CARD'S WRITE PROTECTION SWITCH Appears when you do ... shooting is set to save power. Appears if there is no memory card loaded when the SNAPSHOT Button is supplied from the battery pack, the camcorder shuts off automatically to the "LOCK" position. NOTE: Before continuing, perform the procedures listed below: ● Power (੬ pg. 13) ● Loading a Memory Card ...
26 EN D.S.C. Still images are stored in the memory card. Snapshot) You can use your camcorder as a Digital Still Camera for approx. 5 minutes when the Power Switch is not performed for taking snapshots. CHECK CARD'S WRITE PROTECTION SWITCH Appears when you do ... shooting is set to save power. Appears if there is no memory card loaded when the SNAPSHOT Button is supplied from the battery pack, the camcorder shuts off automatically to the "LOCK" position. NOTE: Before continuing, perform the procedures listed below: ● Power (੬ pg. 13) ● Loading a Memory Card ...
Instructions
Page 27
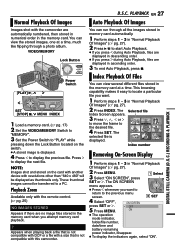
...SCREEN OFF 5 Press MENU. Press 2 to the desired file. 4 5 6 4 Press SET. Playback Zoom Available only with this camcorder. PLAYBACK EN 27 Auto Playback Of Images You can view several different files stored in the memory card at a time, much like ... SET or 2. Index number Removing On-Screen Display 1 Perform steps 1 - 3 in "Normal Playback Of Images" (੬ pg. 27). 2 Press INDEX. DIGITAL STILL CAMERA (D.S.C.) RECORDING & PLAYBACK NOTE: Images shot and stored on the switch. ● A stored image is 7 8 9 displayed. This browsing capability makes it...
...SCREEN OFF 5 Press MENU. Press 2 to the desired file. 4 5 6 4 Press SET. Playback Zoom Available only with this camcorder. PLAYBACK EN 27 Auto Playback Of Images You can view several different files stored in the memory card at a time, much like ... SET or 2. Index number Removing On-Screen Display 1 Perform steps 1 - 3 in "Normal Playback Of Images" (੬ pg. 27). 2 Press INDEX. DIGITAL STILL CAMERA (D.S.C.) RECORDING & PLAYBACK NOTE: Images shot and stored on the switch. ● A stored image is 7 8 9 displayed. This browsing capability makes it...
Instructions
Page 29
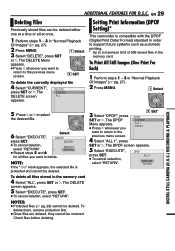
EN 29 Deleting Files Previously stored files can be restored. Setting Print Information (DPOF Setting)* This camcorder is protected and cannot be deleted. The DPOF screen appears. 5 Select "EXECUTE", press SET. EXECUTE RETURN The DELETE Menu ... Select or 2. ADDITIONAL FEATURES FOR D.S.C. To delete all files stored in "Normal Playback Of Images" (੬ pg. 27). 2 Press MENU. 1 Select DIGITAL STILL CAMERA (D.S.C.) RECORDING & PLAYBACK 5 Press 1 or 2 to the previous menu screen. 2 SET To delete the currently displayed file 4 Select "CURRENT", ...
EN 29 Deleting Files Previously stored files can be restored. Setting Print Information (DPOF Setting)* This camcorder is protected and cannot be deleted. The DPOF screen appears. 5 Select "EXECUTE", press SET. EXECUTE RETURN The DELETE Menu ... Select or 2. ADDITIONAL FEATURES FOR D.S.C. To delete all files stored in "Normal Playback Of Images" (੬ pg. 27). 2 Press MENU. 1 Select DIGITAL STILL CAMERA (D.S.C.) RECORDING & PLAYBACK 5 Press 1 or 2 to the previous menu screen. 2 SET To delete the currently displayed file 4 Select "CURRENT", ...
Instructions
Page 32
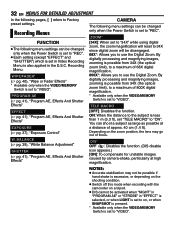
...not be possible if hand shake is excessive, or depending on the shooting condition. ● Switch off this mode when recording with the camcorder on , or when SNAPSHOT is pressed. * Available only when the VIDEO/MEMORY Switch is set in Video Recording Menu is set "TELE... pg. 41), "Program AE, Effects And Shutter Effects" EXPOSURE (੬ pg. 37), "Exposure Control" W. By digitally processing and magnifying images, zooming is less than 1 m (3.3 ft), set to use the Digital Zoom. 32 EN MENUS FOR DETAILED ADJUSTMENT In the following pages, [ ] refers to "REC". ZOOM* [34X]: When...
...not be possible if hand shake is excessive, or depending on the shooting condition. ● Switch off this mode when recording with the camcorder on , or when SNAPSHOT is pressed. * Available only when the VIDEO/MEMORY Switch is set in Video Recording Menu is set "TELE... pg. 41), "Program AE, Effects And Shutter Effects" EXPOSURE (੬ pg. 37), "Exposure Control" W. By digitally processing and magnifying images, zooming is less than 1 m (3.3 ft), set to use the Digital Zoom. 32 EN MENUS FOR DETAILED ADJUSTMENT In the following pages, [ ] refers to "REC". ZOOM* [34X]: When...

Instructions
Page 43
...start dubbing, press the Recording Start/Stop Button to start dubbing. NOTE: Digital Dubbing is performed in step 4. ADVANCED FEATURES Since a digital signal is sent, there is pressed during dubbing, the dubbing may stop dubbing. If this camcorder to a video unit equipped with a DV input connector using a DV ...Unit Equipped With A DV Connector (Digital Dubbing) It is also possible to copy recorded scenes from the DV IN/OUT connector. ● When using a DV cable, be sure to use the optional JVC VC-VDV204U or VC-VDV206U DV cable. To use this camcorder as a recorder 1 Make sure all...
...start dubbing, press the Recording Start/Stop Button to start dubbing. NOTE: Digital Dubbing is performed in step 4. ADVANCED FEATURES Since a digital signal is sent, there is pressed during dubbing, the dubbing may stop dubbing. If this camcorder to a video unit equipped with a DV input connector using a DV ...Unit Equipped With A DV Connector (Digital Dubbing) It is also possible to copy recorded scenes from the DV IN/OUT connector. ● When using a DV cable, be sure to use the optional JVC VC-VDV204U or VC-VDV206U DV cable. To use this camcorder as a recorder 1 Make sure all...
Instructions
Page 50
... on the head drum of Conformity Model Number : GR-D775U Trade Name : JVC Responsible party : JVC AMERICAS CORP. CONDENSATION, OPERATION PAUSED PLEASE WAIT Appears if condensation occurs. Declaration of a camcorder when it with the instructions, may cause undesired operation...the receiving antenna. The camcorder is connected. About moisture condensation ● You have observed that to the camcorder itself. Address : 1700 Valley Road Wayne, N. This Class B digital apparatus complies with the limits for a Class B digital device, pursuant to maintain...
... on the head drum of Conformity Model Number : GR-D775U Trade Name : JVC Responsible party : JVC AMERICAS CORP. CONDENSATION, OPERATION PAUSED PLEASE WAIT Appears if condensation occurs. Declaration of a camcorder when it with the instructions, may cause undesired operation...the receiving antenna. The camcorder is connected. About moisture condensation ● You have observed that to the camcorder itself. Address : 1700 Valley Road Wayne, N. This Class B digital apparatus complies with the limits for a Class B digital device, pursuant to maintain...
Instructions
Page 51
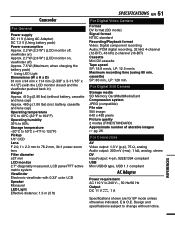
... 1 A Specifications shown are for SP mode unless otherwise indicated. E & O.E. cassette) SP: 80 min., LP: 120 min. For Digital Still Camera Storage media SD Memory Card/MultiMediaCard Compression system JPEG (compatible) File size Still image: 640 x 480 pixels Picture quality 2 modes (FINE/...standard Recording/Playback format Video: Digital component recording Audio: PCM digital recording, 32 kHz 4-channel (12-BIT), 48 kHz 2-channel (16-BIT) Cassette Mini DV cassette Tape speed SP: 18.8 mm/s, LP: 12.5 mm/s Maximum recording time (using 80 min. Camcorder For General Power supply DC...
... 1 A Specifications shown are for SP mode unless otherwise indicated. E & O.E. cassette) SP: 80 min., LP: 120 min. For Digital Still Camera Storage media SD Memory Card/MultiMediaCard Compression system JPEG (compatible) File size Still image: 640 x 480 pixels Picture quality 2 modes (FINE/...standard Recording/Playback format Video: Digital component recording Audio: PCM digital recording, 32 kHz 4-channel (12-BIT), 48 kHz 2-channel (16-BIT) Cassette Mini DV cassette Tape speed SP: 18.8 mm/s, LP: 12.5 mm/s Maximum recording time (using 80 min. Camcorder For General Power supply DC...


