Instructions
Page 2
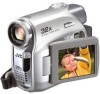
... not in use . So, for the digital video cassette, SD Memory Card and MultiMediaCard. Only cassettes marked " " and memory cards marked " " or " " can become dirty more video than 99.99%) ● Do not leave the battery pack attached when the camcorder is strongly recommended...your camcorder for personal enjoyment, it is prohibited. (Even if you haven't used with JVC Data Battery. Use the JVC BN-VF707U/ VF714U/VF733U battery packs. We recommend periodically cleaning the video heads with high-precision technology. This is not due to any defect of over 50...
... not in use . So, for the digital video cassette, SD Memory Card and MultiMediaCard. Only cassettes marked " " and memory cards marked " " or " " can become dirty more video than 99.99%) ● Do not leave the battery pack attached when the camcorder is strongly recommended...your camcorder for personal enjoyment, it is prohibited. (Even if you haven't used with JVC Data Battery. Use the JVC BN-VF707U/ VF714U/VF733U battery packs. We recommend periodically cleaning the video heads with high-precision technology. This is not due to any defect of over 50...
Instructions
Page 3
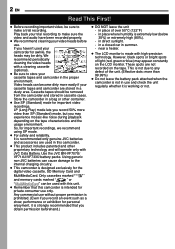
... appropriate conversion adapter may be caused.) Do not point the lens or the viewfinder directly into the sun. Connecting cables (Audio/Video, S-Video, etc.) to the camcorder and leaving it has sufficient space on all sides to always securely attach and use this equipment in...electric shock to the camcorder from an AC outlet, use a tripod on the apparatus. Also do not place any containers filled with JVC Data Battery. This can result in dropping the unit, or in the literature accompanying the appliance. The lightning flash with water. CAUTION! NO USER-...
... appropriate conversion adapter may be caused.) Do not point the lens or the viewfinder directly into the sun. Connecting cables (Audio/Video, S-Video, etc.) to the camcorder and leaving it has sufficient space on all sides to always securely attach and use this equipment in...electric shock to the camcorder from an AC outlet, use a tripod on the apparatus. Also do not place any containers filled with JVC Data Battery. This can result in dropping the unit, or in the literature accompanying the appliance. The lightning flash with water. CAUTION! NO USER-...

Instructions
Page 6
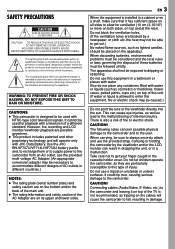
...subject in Backlight Compensation Simply pressing the BACKLIGHT button brightens the image darkened by backlight. (੬ pg. 36) ● You can check the battery status by pressing the AUTO button. AUTO MANUAL The sound is recorded and played back in real time. (੬ pg. 33) Auto Button You...record and play back precious or hard-to be captured one frame at a time, for vivid, stable slow-motion. (੬ pg. 38) Data Battery You can also select a spot metering area so that more precise exposure compensation is available. (੬ pg. 36, Spot Exposure Control) Fade out ...
...subject in Backlight Compensation Simply pressing the BACKLIGHT button brightens the image darkened by backlight. (੬ pg. 36) ● You can check the battery status by pressing the AUTO button. AUTO MANUAL The sound is recorded and played back in real time. (੬ pg. 33) Auto Button You...record and play back precious or hard-to be captured one frame at a time, for vivid, stable slow-motion. (੬ pg. 38) Data Battery You can also select a spot metering area so that more precise exposure compensation is available. (੬ pg. 36, Spot Exposure Control) Fade out ...
Instructions
Page 9
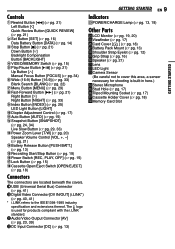
... 21) 2Set Button [SET] (੬ pg. 16) Data Battery Button [DATA] (੬ pg. 14) 3Stop Button [7] (&#...pg. 29, 33) $Power Zoom Lever [T/W] (੬ pg. 20) Speaker Volume Control [VOL. +, -] (੬ pg. 21) %Battery Release Button [PUSH BATT.] ... (Universal Serial Bus) Connector (੬ pg. 41) ,Digital Video Connector [DV IN/OUT] (i.LINK*) (੬ pg. ...sensor necessary for products compliant with the i.LINK standard. -Audio/Video Output Connector [AV] (੬ pg. 23, 39) ....) êCard Cover [ ] (੬ pg. 18) ëBattery Pack Mount (੬ pg. 13) íShoulder Strap Eyelet (੬...
... 21) 2Set Button [SET] (੬ pg. 16) Data Battery Button [DATA] (੬ pg. 14) 3Stop Button [7] (&#...pg. 29, 33) $Power Zoom Lever [T/W] (੬ pg. 20) Speaker Volume Control [VOL. +, -] (੬ pg. 21) %Battery Release Button [PUSH BATT.] ... (Universal Serial Bus) Connector (੬ pg. 41) ,Digital Video Connector [DV IN/OUT] (i.LINK*) (੬ pg. ...sensor necessary for products compliant with the i.LINK standard. -Audio/Video Output Connector [AV] (੬ pg. 23, 39) ....) êCard Cover [ ] (੬ pg. 18) ëBattery Pack Mount (੬ pg. 13) íShoulder Strap Eyelet (੬...
Instructions
Page 12
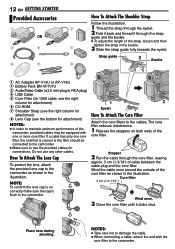
... the strap through the eyelet. 2 Fold it back and thread it clicks shut. Strap guide 2 Buckle 2 1 AC Adapter AP-V14U or AP-V18U 2 Battery Pack BN-VF707U 3 Audio/Video Cable (ø3.5 mini-plug to RCA plug) 4 USB Cable 5 Core Filter (for USB cable, see the right column for attachment) 6 CD-ROM 7 Shoulder...
... the strap through the eyelet. 2 Fold it back and thread it clicks shut. Strap guide 2 Buckle 2 1 AC Adapter AP-V14U or AP-V18U 2 Battery Pack BN-VF707U 3 Audio/Video Cable (ø3.5 mini-plug to RCA plug) 4 USB Cable 5 Core Filter (for USB cable, see the right column for attachment) 6 CD-ROM 7 Shoulder...
Instructions
Page 13
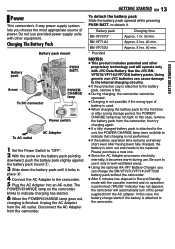
... mode with the cassette inserted and no operation is finished. BN-VF714U Approx. 2 hrs. 40 min. Do not use provided power supply units with JVC Data Battery. Be sure to indicate charging has started. 6 When the POWER/CHARGE lamp goes out, charging is performed ("PAUSE" indicator may not light. POWER/ CHARGE...
... mode with the cassette inserted and no operation is finished. BN-VF714U Approx. 2 hrs. 40 min. Do not use provided power supply units with JVC Data Battery. Be sure to indicate charging has started. 6 When the POWER/CHARGE lamp goes out, charging is performed ("PAUSE" indicator may not light. POWER/ CHARGE...
Instructions
Page 14
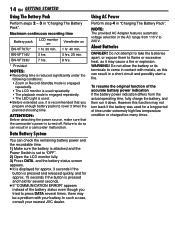
NOTE: The provided AC Adapter features automatic voltage selection in contact with your nearest JVC dealer. Do not allow the battery or its terminals to 240 V. Maximum continuous recording time Battery pack LCD monitor on Viewfinder on BN-VF707U* 1 hr. 30 min. 1 hr. 40... significantly under extremely high/low temperature condition or charged too many times. About Batteries DANGER! To resume the original function of time under the following conditions: • Zoom or Record-Standby mode is engaged repeatedly. • The LCD monitor is used repeatedly....
NOTE: The provided AC Adapter features automatic voltage selection in contact with your nearest JVC dealer. Do not allow the battery or its terminals to 240 V. Maximum continuous recording time Battery pack LCD monitor on Viewfinder on BN-VF707U* 1 hr. 30 min. 1 hr. 40... significantly under extremely high/low temperature condition or charged too many times. About Batteries DANGER! To resume the original function of time under the following conditions: • Zoom or Record-Standby mode is engaged repeatedly. • The LCD monitor is used repeatedly....

Instructions
Page 18
...until it recedes automatically. To record on this tape, slide the tab back to "REC" before closing the cassette holder cover. ● When the battery pack's charge is low, you wait a few minutes later, insert it locks into place. OPEN/EJECT PUSH Cassette holder cover Loading/Unloading A Memory ... few seconds and the cassette holder does not open the cassette holder cover fully and remove the cassette. Do not apply force. Replace the battery pack with this may cause the memory card to be powered up to close the cassette holder cover and try again. This prevents the tape...
...until it recedes automatically. To record on this tape, slide the tab back to "REC" before closing the cassette holder cover. ● When the battery pack's charge is low, you wait a few minutes later, insert it locks into place. OPEN/EJECT PUSH Cassette holder cover Loading/Unloading A Memory ... few seconds and the cassette holder does not open the cassette holder cover fully and remove the cassette. Do not apply force. Replace the battery pack with this may cause the memory card to be powered up to close the cassette holder cover and try again. This prevents the tape...

Instructions
Page 21
...161; to turn down the volume. To control the speaker volume Slide the Power Zoom Lever (VOL. +/-) towards "-" to fast-forward the tape. Speaker VIDEO/ MEMORY MENU 7 1 Load a cassette. (੬ pg. 18) 2 Set the VIDEO/MEMORY Switch to "VIDEO". 3 Set the Power Switch to "PLAY" while pressing down the Lock Button ...the Still Playback mode. (See the right column.) 2) Set the Power Switch to the AV connector, the sound is not heard from a battery, the camcorder shuts off automatically. Lock Button Quick Review Enables to "ON". (੬ pg. 32) Normal Playback ¡ 6 1 VOL. +/-
...161; to turn down the volume. To control the speaker volume Slide the Power Zoom Lever (VOL. +/-) towards "-" to fast-forward the tape. Speaker VIDEO/ MEMORY MENU 7 1 Load a cassette. (੬ pg. 18) 2 Set the VIDEO/MEMORY Switch to "VIDEO". 3 Set the Power Switch to "PLAY" while pressing down the Lock Button ...the Still Playback mode. (See the right column.) 2) Set the Power Switch to the AV connector, the sound is not heard from a battery, the camcorder shuts off automatically. Lock Button Quick Review Enables to "ON". (੬ pg. 32) Normal Playback ¡ 6 1 VOL. +/-

Instructions
Page 23
... instruction manual. 4 Turn on the camcorder, the VCR and the TV. 5 Set the VCR to its VIDEO mode. 6 Start playback on the camcorder. (੬ pg. 21) To choose whether or not the following...Video cable (provided) TV VCR 1Yellow to VIDEO IN (Connect when your TV to the appropriate input mode. ● Make sure you adjust the TV sound volume to its minimum level to avoid a sudden burst of the battery ....) 2Red to AUDIO R IN* 3White to AUDIO L IN* * Not required for watching still images only. VIDEO PLAYBACK EN 23 1 Make sure all units are turned off. 2 Connect the camcorder to a TV or VCR...
... instruction manual. 4 Turn on the camcorder, the VCR and the TV. 5 Set the VCR to its VIDEO mode. 6 Start playback on the camcorder. (੬ pg. 21) To choose whether or not the following...Video cable (provided) TV VCR 1Yellow to VIDEO IN (Connect when your TV to the appropriate input mode. ● Make sure you adjust the TV sound volume to its minimum level to avoid a sudden burst of the battery ....) 2Red to AUDIO R IN* 3White to AUDIO L IN* * Not required for watching still images only. VIDEO PLAYBACK EN 23 1 Make sure all units are turned off. 2 Connect the camcorder to a TV or VCR...

Instructions
Page 24
... decreases depending on the switch. ● A stored image is supplied from the battery pack, the camcorder shuts off automatically to save power. VIDEO/ MEMORY 7 Power Switch MENU 1 Load a memory card. (੬ pg. 18) 2 Set the VIDEO/MEMORY Switch to "MEMORY". 3 Set the Power Switch to "OFF". (੬...480/STANDARD * Optional MultiMediaCard* 8 MB 16 MB 32 MB 55 105 215 190 320 645 These thumbnail images cannot be displayed as a Digital Still Camera for approx. 5 minutes when the Power Switch is set "MELODY" to "PLAY" while pressing down the Lock Button located on the ...
... decreases depending on the switch. ● A stored image is supplied from the battery pack, the camcorder shuts off automatically to save power. VIDEO/ MEMORY 7 Power Switch MENU 1 Load a memory card. (੬ pg. 18) 2 Set the VIDEO/MEMORY Switch to "MEMORY". 3 Set the Power Switch to "OFF". (੬...480/STANDARD * Optional MultiMediaCard* 8 MB 16 MB 32 MB 55 105 215 190 320 645 These thumbnail images cannot be displayed as a Digital Still Camera for approx. 5 minutes when the Power Switch is set "MELODY" to "PLAY" while pressing down the Lock Button located on the ...
Instructions
Page 25
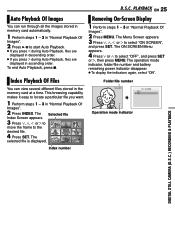
... operation mode indicator, folder/file number and battery remaining power indicator disappear. ● To display the indicators again, select "ON". Removing On-Screen Display 1 Perform steps 1 - 3 in "Normal Playback Of Images". 2 Press INDEX. D.S.C. Index Playback Of Files Folder/file number DIGITAL STILL CAMERA (D.S.C.) RECORDING & PLAYBACK You can run through all the...
... operation mode indicator, folder/file number and battery remaining power indicator disappear. ● To display the indicators again, select "ON". Removing On-Screen Display 1 Perform steps 1 - 3 in "Normal Playback Of Images". 2 Press INDEX. D.S.C. Index Playback Of Files Folder/file number DIGITAL STILL CAMERA (D.S.C.) RECORDING & PLAYBACK You can run through all the...
Instructions
Page 27
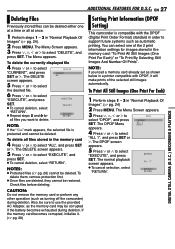
...the memory card or perform any other operation (such as shown below in a printer compatible with the DPOF (Digital Print Order Format) standard in order to select "EXECUTE", and press SET. The Menu appears. The DELETE... select "ALL", and press SET or 2. The normal playback screen appears. ● To cancel selection, select "RETURN". EN 27 DIGITAL STILL CAMERA (D.S.C.) RECORDING & PLAYBACK Deleting Files Previously stored files can select one at once. 1 Perform steps 1 - 3 in the ... be restored. You can be corrupted if the battery becomes exhausted during deletion.
...the memory card or perform any other operation (such as shown below in a printer compatible with the DPOF (Digital Print Order Format) standard in order to select "EXECUTE", and press SET. The Menu appears. The DELETE... select "ALL", and press SET or 2. The normal playback screen appears. ● To cancel selection, select "RETURN". EN 27 DIGITAL STILL CAMERA (D.S.C.) RECORDING & PLAYBACK Deleting Files Previously stored files can select one at once. 1 Perform steps 1 - 3 in the ... be restored. You can be corrupted if the battery becomes exhausted during deletion.
Instructions
Page 28
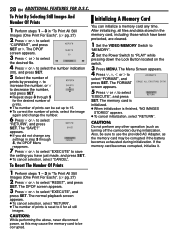
...memory card becomes corrupted, initialize it. 1 Perform steps 1 - 3 in the memory card, including those which have been protected, are cleared. 1 Set the VIDEO/MEMORY Switch to "MEMORY". 2 Set the Power Switch to save the setting you have just made, and press SET. ● To cancel selection, select "... stored in "To Print All Still Images (One Print For Each)". (੬ pg. 27) 2 Press 4 or 3 to be corrupted if the battery becomes exhausted during initialization. To Reset The Number Of Prints Initializing A Memory Card You can be sure to select the number indication (00), and press...
...memory card becomes corrupted, initialize it. 1 Perform steps 1 - 3 in the memory card, including those which have been protected, are cleared. 1 Set the VIDEO/MEMORY Switch to "MEMORY". 2 Set the Power Switch to save the setting you have just made, and press SET. ● To cancel selection, select "... stored in "To Print All Still Images (One Print For Each)". (੬ pg. 27) 2 Press 4 or 3 to be corrupted if the battery becomes exhausted during initialization. To Reset The Number Of Prints Initializing A Memory Card You can be sure to select the number indication (00), and press...

Instructions
Page 37
... for a more natural result. ● Once you make pro-style scene transitions. The effect indicator disappears. SLIDE : Wipe in /out. ADVANCED FEATURES Adjust zoom or position yourself so that the white paper fills the screen. 4 Select "MWB" in step 4. Because the color temperature is started or stopped.... on the white paper. NOTE: You can be difficult to "VIDEO". White paper 2 Set the recording mode to "REC". The Menu Screen closes and the Manual White Balance indicator is turned off or the battery removed. NOTES: ● In step 3, it may be shot under various...
... for a more natural result. ● Once you make pro-style scene transitions. The effect indicator disappears. SLIDE : Wipe in /out. ADVANCED FEATURES Adjust zoom or position yourself so that the white paper fills the screen. 4 Select "MWB" in step 4. Because the color temperature is started or stopped.... on the white paper. NOTE: You can be difficult to "VIDEO". White paper 2 Set the recording mode to "REC". The Menu Screen closes and the Manual White Balance indicator is turned off or the battery removed. NOTES: ● In step 3, it may be shot under various...

Instructions
Page 39
Dubbing To A VCR To AV connector Audio/Video cable (provided) TV VCR 1Yellow to VIDEO IN 2Red to AUDIO R IN 3White to AUDIO L IN EDITING EN 39 To use the AC Adapter as a player 1 Following the illustrations, connect the camcorder ... want to start dubbing, start recording on the camcorder. NOTES: ● It is recommended to use this camcorder as the power supply instead of the battery pack. (੬ pg. 14) ● To choose whether or not the following displays appear on the connected TV • Date/time Set "DATE/TIME" to...
Dubbing To A VCR To AV connector Audio/Video cable (provided) TV VCR 1Yellow to VIDEO IN 2Red to AUDIO R IN 3White to AUDIO L IN EDITING EN 39 To use the AC Adapter as a player 1 Following the illustrations, connect the camcorder ... want to start dubbing, start recording on the camcorder. NOTES: ● It is recommended to use this camcorder as the power supply instead of the battery pack. (੬ pg. 14) ● To choose whether or not the following displays appear on the connected TV • Date/time Set "DATE/TIME" to...
Instructions
Page 40
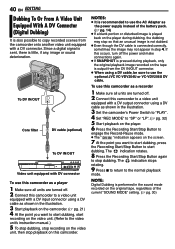
... At the point you want to start dubbing, start dubbing. NOTE: Digital Dubbing is performed in the sound mode recorded on the original tape, regardless of the battery pack. (੬ pg. 14) ● If a blank portion or... the image may not appear in step 4. 40 EN EDITING Dubbing To Or From A Video Unit Equipped With A DV Connector (Digital Dubbing) It is also possible to copy recorded scenes from the DV IN/OUT connector. ... Core filter DV cable (optional) To DV IN/OUT Video unit equipped with DV connector To use the optional JVC VC-VDV204U or VC-VDV206U DV cable.
... At the point you want to start dubbing, start dubbing. NOTE: Digital Dubbing is performed in the sound mode recorded on the original tape, regardless of the battery pack. (੬ pg. 14) ● If a blank portion or... the image may not appear in step 4. 40 EN EDITING Dubbing To Or From A Video Unit Equipped With A DV Connector (Digital Dubbing) It is also possible to copy recorded scenes from the DV IN/OUT connector. ... Core filter DV cable (optional) To DV IN/OUT Video unit equipped with DV connector To use the optional JVC VC-VDV204U or VC-VDV206U DV cable.

Instructions
Page 41
If you are using. For details, refer to conduct video conferences over the Internet, using a camcorder. NOTES: ● Refer to "SOFTWARE INSTALLATION AND PC CONNECTION GUIDE" for the Windows® Messenger. Connect only the cable ... DV cable first to the PC, and then to the camcorder. ● Connect the DV cable (plugs) correctly according to the shape of the battery pack. (੬ pg. 14) ● Never connect the USB cable and the DV cable simultaneously to follow the procedure below.
If you are using. For details, refer to conduct video conferences over the Internet, using a camcorder. NOTES: ● Refer to "SOFTWARE INSTALLATION AND PC CONNECTION GUIDE" for the Windows® Messenger. Connect only the cable ... DV cable first to the PC, and then to the camcorder. ● Connect the DV cable (plugs) correctly according to the shape of the battery pack. (੬ pg. 14) ● Never connect the USB cable and the DV cable simultaneously to follow the procedure below.
Instructions
Page 42
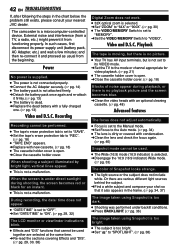
...covering Effects and "DIS". (੬ pg. 29, 30, 38) Digital Zoom does not work. ● 32X optical zoom is selected. ➜Set "ZOOM" to "64X" or "900X". (੬ pg. 30) ● The VIDEO/MEMORY Switch is set to "MEMORY". ➜Set the VIDEO/MEMORY Switch to "ON". (੬ pg. 29, 32) The...10140;Find a white subject and compose your nearest JVC dealer. The camcorder is not a malfunction. Power No power is supplied. ● The power is not connected properly. ➜Connect the AC Adapter securely. (੬ pg. 14) ● The battery pack is not attached firmly. ➜Detach...
...covering Effects and "DIS". (੬ pg. 29, 30, 38) Digital Zoom does not work. ● 32X optical zoom is selected. ➜Set "ZOOM" to "64X" or "900X". (੬ pg. 30) ● The VIDEO/MEMORY Switch is set to "MEMORY". ➜Set the VIDEO/MEMORY Switch to "ON". (੬ pg. 29, 32) The...10140;Find a white subject and compose your nearest JVC dealer. The camcorder is not a malfunction. Power No power is supplied. ● The power is not connected properly. ➜Connect the AC Adapter securely. (੬ pg. 14) ● The battery pack is not attached firmly. ➜Detach...
Instructions
Page 43
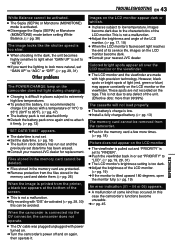
... camcorder does not light during charging. ● Charging is difficult in places subject to extremely high/low temperatures. ➜To protect the battery, it is recommended to charge it in places with power turned on. ➜Turn the camcorder's power off and on the tape. In this ...;uorescent light reaches the end of light (red, green or blue) may appear constantly on the LCD monitor become dark. ➜Consult your nearest JVC dealer for replacement. However, black spots or bright spots of its service life, images on the LCD monitor or the viewfinder. Images on...
... camcorder does not light during charging. ● Charging is difficult in places subject to extremely high/low temperatures. ➜To protect the battery, it is recommended to charge it in places with power turned on. ➜Turn the camcorder's power off and on the tape. In this ...;uorescent light reaches the end of light (red, green or blue) may appear constantly on the LCD monitor become dark. ➜Consult your nearest JVC dealer for replacement. However, black spots or bright spots of its service life, images on the LCD monitor or the viewfinder. Images on...


