Instructions
Page 1
... the pages 2 - 5 to "OFF". (੬ pg. 29, 32) EN LYT1624-001A ENGLISH GETTING STARTED 8 VIDEO RECORDING & PLAYBACK 19 DIGITAL STILL CAMERA (D.S.C.) RECORDING & PLAYBACK 24 ADVANCED FEATURES 29 REFERENCES 42 INSTRUCTIONS TERMS 51 For Customer Use: Enter below the Model No. To deactivate the demonstration, set "DEMO MODE" to ensure safe use of the camcorder. Serial No. DIGITAL VIDEO CAMERA GR-D372U Please visit our Homepage on the bottom of this product...
... the pages 2 - 5 to "OFF". (੬ pg. 29, 32) EN LYT1624-001A ENGLISH GETTING STARTED 8 VIDEO RECORDING & PLAYBACK 19 DIGITAL STILL CAMERA (D.S.C.) RECORDING & PLAYBACK 24 ADVANCED FEATURES 29 REFERENCES 42 INSTRUCTIONS TERMS 51 For Customer Use: Enter below the Model No. To deactivate the demonstration, set "DEMO MODE" to ensure safe use of the camcorder. Serial No. DIGITAL VIDEO CAMERA GR-D372U Please visit our Homepage on the bottom of this product...
Instructions
Page 2
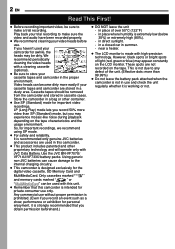
... intended for important video recordings. Using generic non-JVC batteries can cause damage to the internal charging circuitry. ● This camcorder is made with this unit. ● Remember that you record an event such as a show, performance or exhibition for the digital video cassette, SD Memory Card and MultiMediaCard. This is working or not. Play back your trial recording to make a trial recording. near a heater. ● The LCD monitor is...
... intended for important video recordings. Using generic non-JVC batteries can cause damage to the internal charging circuitry. ● This camcorder is made with this unit. ● Remember that you record an event such as a show, performance or exhibition for the digital video cassette, SD Memory Card and MultiMediaCard. This is working or not. Play back your trial recording to make a trial recording. near a heater. ● The LCD monitor is...
Instructions
Page 3
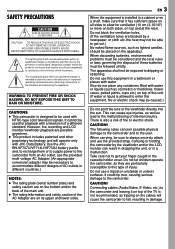
... to constitute a risk of important operating and maintenance (servicing) instructions in a bathroom or places with NTSC-type color television signals. The exclamation point within the product's enclosure that it on the bottom and/or the back of the main unit. ● The rating information and safety caution of internal circuitry. Connecting cables (Audio/Video, S-Video, etc.) to the camcorder and leaving it has suf...
... to constitute a risk of important operating and maintenance (servicing) instructions in a bathroom or places with NTSC-type color television signals. The exclamation point within the product's enclosure that it on the bottom and/or the back of the main unit. ● The rating information and safety caution of internal circuitry. Connecting cables (Audio/Video, S-Video, etc.) to the camcorder and leaving it has suf...
Instructions
Page 7
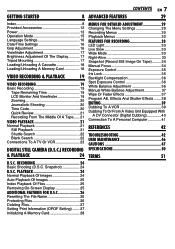
... Accessories 12 Power 13 Operation Mode 15 Language Settings 16 Date/Time Settings 16 Grip Adjustment 16 Viewfinder Adjustment 17 Brightness Adjustment Of The Display........... 17 Tripod Mounting 17 Loading/Unloading A Cassette 18 Loading/Unloading A Memory Card 18 VIDEO RECORDING & PLAYBACK 19 VIDEO RECORDING 19 Basic Recording 19 Tape Remaining Time 19 LCD Monitor And Viewfinder 19 Zooming 20 Journalistic Shooting 20 Time Code 20 Quick Review 21 Recording From The Middle Of A Tape...... 21 VIDEO PLAYBACK 21 Normal Playback 21 Still Playback 21 Shuttle Search...
... Accessories 12 Power 13 Operation Mode 15 Language Settings 16 Date/Time Settings 16 Grip Adjustment 16 Viewfinder Adjustment 17 Brightness Adjustment Of The Display........... 17 Tripod Mounting 17 Loading/Unloading A Cassette 18 Loading/Unloading A Memory Card 18 VIDEO RECORDING & PLAYBACK 19 VIDEO RECORDING 19 Basic Recording 19 Tape Remaining Time 19 LCD Monitor And Viewfinder 19 Zooming 20 Journalistic Shooting 20 Time Code 20 Quick Review 21 Recording From The Middle Of A Tape...... 21 VIDEO PLAYBACK 21 Normal Playback 21 Still Playback 21 Shuttle Search...
Instructions
Page 9
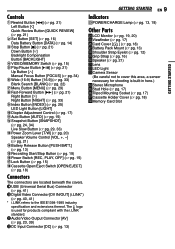
...) Live Slow Button (੬ pg. 29, 33) $Power Zoom Lever [T/W] (੬ pg. 20) Speaker Volume Control [VOL. +, -] (੬ pg. 21) %Battery Release Button [PUSH BATT.] (੬ pg. 13) &Recording Start/Stop Button (੬ pg. 19) (Power Switch [REC, PLAY, OFF] (੬ pg. 15) )Lock Button (੬ pg. 15) ~Cassette Open/Eject Switch [OPEN/EJECT] (੬ pg. 18) Connectors The connectors are located beneath the covers. +USB (Universal Serial Bus) Connector (੬ pg. 41) ,Digital Video Connector...
...) Live Slow Button (੬ pg. 29, 33) $Power Zoom Lever [T/W] (੬ pg. 20) Speaker Volume Control [VOL. +, -] (੬ pg. 21) %Battery Release Button [PUSH BATT.] (੬ pg. 13) &Recording Start/Stop Button (੬ pg. 19) (Power Switch [REC, PLAY, OFF] (੬ pg. 15) )Lock Button (੬ pg. 15) ~Cassette Open/Eject Switch [OPEN/EJECT] (੬ pg. 18) Connectors The connectors are located beneath the covers. +USB (Universal Serial Bus) Connector (੬ pg. 41) ,Digital Video Connector...

Instructions
Page 15
... can record using no special effects or manual adjustments. Operation Mode To turn on the switch. A Auto Mode : You can also turn on the camcorder, set the Power Switch to play back a tape. Power Switch Position REC: ● Allows you to perform recording on the tape and the memory card. If "REC SELECT" is possible by opening/ closing the LCD monitor or pulling out/pushing in a memory card. MEMORY: Allows you to record in a memory card or access data stored in the viewfinder. M Manual Mode : Manual recording is set...
... can record using no special effects or manual adjustments. Operation Mode To turn on the switch. A Auto Mode : You can also turn on the camcorder, set the Power Switch to play back a tape. Power Switch Position REC: ● Allows you to perform recording on the tape and the memory card. If "REC SELECT" is possible by opening/ closing the LCD monitor or pulling out/pushing in a memory card. MEMORY: Allows you to record in a memory card or access data stored in the viewfinder. M Manual Mode : Manual recording is set...

Instructions
Page 19
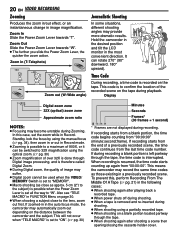
Tape Remaining Time VIDEO RECORDING & PLAYBACK VIDEO/MEMORY Zoom Lever POWER/CHARGE Lamp Lock Button Recording Start/Stop Button 1 Remove the lens cap. (੬ pg. 12) 2 Open the LCD monitor fully. 3 Set the VIDEO/MEMORY Switch to "VIDEO". 4 Set the Power Switch to "REC" while pressing down the Lock Button located on the display while recording is in SYSTEM Menu. (੬ pg. 29, 31) ● Colored bright spots may not appear), the camcorder's power shuts off , ੬ pg. 31. The camcorder re-enters the Record-Standby mode. NOTES...
Tape Remaining Time VIDEO RECORDING & PLAYBACK VIDEO/MEMORY Zoom Lever POWER/CHARGE Lamp Lock Button Recording Start/Stop Button 1 Remove the lens cap. (੬ pg. 12) 2 Open the LCD monitor fully. 3 Set the VIDEO/MEMORY Switch to "VIDEO". 4 Set the Power Switch to "REC" while pressing down the Lock Button located on the display while recording is in SYSTEM Menu. (੬ pg. 29, 31) ● Colored bright spots may not appear), the camcorder's power shuts off , ੬ pg. 31. The camcorder re-enters the Record-Standby mode. NOTES...
Instructions
Page 20
... image magnification. Also see "TELE MACRO" in the auto focus mode, the camcorder may become unstable during shooting. ● When shooting using the optical zoom. (੬ pg. 30) ● Zoom magnification of over 32X is done through the tape. ● When shooting again after playing back a recorded tape. ● When power shuts off during shooting. ● When a tape is removed and re-inserted during Zooming. If zoomed-in in FUNCTION Menu...
... image magnification. Also see "TELE MACRO" in the auto focus mode, the camcorder may become unstable during shooting. ● When shooting using the optical zoom. (੬ pg. 30) ● Zoom magnification of over 32X is done through the tape. ● When shooting again after playing back a recorded tape. ● When power shuts off during shooting. ● When a tape is removed and re-inserted during Zooming. If zoomed-in in FUNCTION Menu...

Instructions
Page 24
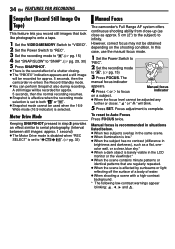
... hear the shutter sound, set "MELODY" to "PLAY" while pressing down the Lock Button located on the Picture Quality/Image Size, etc. VIDEO/ MEMORY 7 Power Switch MENU 1 Load a memory card. (੬ pg. 18) 2 Set the VIDEO/MEMORY Switch to "MEMORY". 3 Set the Power Switch to "OFF". (੬ pg. 29, 31) NOTE: If shooting is not performed for taking snapshots. Press 2 to "REC" while pressing down the Lock Button located on the card with another device with the camcorder are...
... hear the shutter sound, set "MELODY" to "PLAY" while pressing down the Lock Button located on the Picture Quality/Image Size, etc. VIDEO/ MEMORY 7 Power Switch MENU 1 Load a memory card. (੬ pg. 18) 2 Set the VIDEO/MEMORY Switch to "MEMORY". 3 Set the Power Switch to "OFF". (੬ pg. 29, 31) NOTE: If shooting is not performed for taking snapshots. Press 2 to "REC" while pressing down the Lock Button located on the card with another device with the camcorder are...

Instructions
Page 29
... you wish to set in grey/white. Recording Menus: ● Set the VIDEO/MEMORY Switch to "VIDEO" or "MEMORY". ● Set the Power Switch to "REC" while pressing M down the Lock Button located on the switch. ● Set the recording mode to " ". (੬ pg. 15) For Video Playback Menu: ● Set the VIDEO/MEMORY Switch to "VIDEO". ● Set the Power Switch to "PLAY" while pressing down the Lock Button located on the selected function. PLAYBACK" (੬ pg. 24). 2 Open the LCD monitor fully. (੬...
... you wish to set in grey/white. Recording Menus: ● Set the VIDEO/MEMORY Switch to "VIDEO" or "MEMORY". ● Set the Power Switch to "REC" while pressing M down the Lock Button located on the switch. ● Set the recording mode to " ". (੬ pg. 15) For Video Playback Menu: ● Set the VIDEO/MEMORY Switch to "VIDEO". ● Set the Power Switch to "PLAY" while pressing down the Lock Button located on the selected function. PLAYBACK" (੬ pg. 24). 2 Open the LCD monitor fully. (੬...
Instructions
Page 30
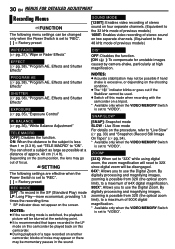
... use the Digital Zoom. By digitally processing and magnifying images, zooming is possible from 32X (the optical zoom limit), to a maximum of focus. 30 EN MENUS FOR DETAILED ADJUSTMENT Recording Menus FUNCTION The following settings are effective when the Power Switch is set to "REC". [ ] = Factory-preset REC MODE [SP]*: To record in the SP (Standard Play) mode LP: Long Play-more economical, providing 1.5 times the recording time. * SP indicator does not appear on the screen. BALANCE (੬ pg. 36), "White Balance Adjustment...
... use the Digital Zoom. By digitally processing and magnifying images, zooming is possible from 32X (the optical zoom limit), to a maximum of focus. 30 EN MENUS FOR DETAILED ADJUSTMENT Recording Menus FUNCTION The following settings are effective when the Power Switch is set to "REC". [ ] = Factory-preset REC MODE [SP]*: To record in the SP (Standard Play) mode LP: Long Play-more economical, providing 1.5 times the recording time. * SP indicator does not appear on the screen. BALANCE (੬ pg. 36), "White Balance Adjustment...

Instructions
Page 31
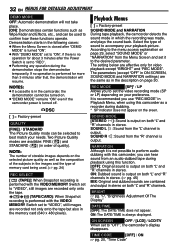
... following menu settings can be grainy. The quality of the sound will change. EXECUTE: Resets all settings to "PLAY". [ ] = Factory-preset MELODY OFF: Even though not heard while shooting, shutter sound is displayed on the connected TV. The overall appearance may be changed . (੬ pg. 16) ADVANCED FEATURES SYSTEM The " SYSTEM" functions which are set when the Power Switch is opened . This is opened . ON SCREEN LCD: Keeps the camcorder's display (except the date, time and time code...
... following menu settings can be grainy. The quality of the sound will change. EXECUTE: Resets all settings to "PLAY". [ ] = Factory-preset MELODY OFF: Even though not heard while shooting, shutter sound is displayed on the connected TV. The overall appearance may be changed . (੬ pg. 16) ADVANCED FEATURES SYSTEM The " SYSTEM" functions which are set when the Power Switch is opened . This is opened . ON SCREEN LCD: Keeps the camcorder's display (except the date, time and time code...
Instructions
Page 32
... tape playback, the camcorder detects the sound mode in the images and the type of memory card being used to confirm how these functions operate. It is recommended you use "REC MODE" in Playback Menu, when using this camcorder as Wipe/Fader and Effects, etc., and can be turned on. ● "DEMO MODE" remains "ON" even if the camcorder power is output on both "L" and "R" channels in the following cases: ● When the Menu Screen...
... tape playback, the camcorder detects the sound mode in the images and the type of memory card being used to confirm how these functions operate. It is recommended you use "REC MODE" in Playback Menu, when using this camcorder as Wipe/Fader and Effects, etc., and can be turned on. ● "DEMO MODE" remains "ON" even if the camcorder power is output on both "L" and "R" channels in the following cases: ● When the Menu Screen...
Instructions
Page 34
... reset to " ". (੬ pg. 15) 3 Press FOCUS. color wall, or a clear, blue sky.* ● When a dark object is barely visible in the LCD monitor or the viewfinder.* ● When the scene contains minute patterns or identical patterns that look like photographs onto a tape. 1 Set the VIDEO/MEMORY Switch to "VIDEO". 2 Set the Power Switch to in step 5 provides an effect similar to focus Manual focus...
... reset to " ". (੬ pg. 15) 3 Press FOCUS. color wall, or a clear, blue sky.* ● When a dark object is barely visible in the LCD monitor or the viewfinder.* ● When the scene contains minute patterns or identical patterns that look like photographs onto a tape. 1 Set the VIDEO/MEMORY Switch to "VIDEO". 2 Set the Power Switch to in step 5 provides an effect similar to focus Manual focus...
Instructions
Page 42
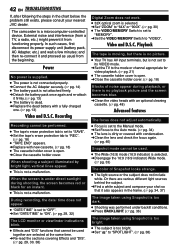
.... The camcorder is set to "SAVE". ➜Set the tape's erase protection tab to "REC". (੬ pg. 18) ● "TAPE END" appears. ➜Replace with a fully charged one. (੬ pg. 13) Video and D.S.C. Playback The tape is moving, but there is no playback picture and the screen becomes blue. ➜Clean the video heads with an optional cleaning cassette. (੬ pg. 48) Advanced features The focus does not adjust automatically. ● Focus is a microcomputer-controlled device.
.... The camcorder is set to "SAVE". ➜Set the tape's erase protection tab to "REC". (੬ pg. 18) ● "TAPE END" appears. ➜Replace with a fully charged one. (੬ pg. 13) Video and D.S.C. Playback The tape is moving, but there is no playback picture and the screen becomes blue. ➜Clean the video heads with an optional cleaning cassette. (੬ pg. 48) Advanced features The focus does not adjust automatically. ● Focus is a microcomputer-controlled device.
Instructions
Page 43
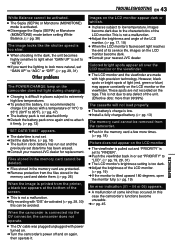
... Monotone (MONOTONE) mode before setting White Balance. (੬ pg. 38) The image looks like the shutter speed is too slow. ● When shooting in the dark, the unit becomes highly sensitive to light when "GAIN UP" is set to "AUTO". ➜If you want the lighting to look more times. (੬ pg. 18) Picture does not appear on the LCD monitor. ● The viewfinder is...
... Monotone (MONOTONE) mode before setting White Balance. (੬ pg. 38) The image looks like the shutter speed is too slow. ● When shooting in the dark, the unit becomes highly sensitive to light when "GAIN UP" is set to "AUTO". ➜If you want the lighting to look more times. (੬ pg. 18) Picture does not appear on the LCD monitor. ● The viewfinder is...

Instructions
Page 44
... appears. Remove the memory card once and insert it has not been initialized. HDV Appears when pictures recorded in the memory card when you attempt memory card playback. Use an optional cleaning cassette. (੬ pg. 48) CONDENSATION, OPERATION PAUSED PLEASE WAIT Appears if condensation occurs. CARD ERROR! Remaining power level High Exhausted As the battery power comes close to "VIDEO". TAPE! 44 EN TROUBLESHOOTING Warning Indications Displays the battery remaining power. LENS CAP Appears for replacement. PLEASE FORMAT Appears when...
... appears. Remove the memory card once and insert it has not been initialized. HDV Appears when pictures recorded in the memory card when you attempt memory card playback. Use an optional cleaning cassette. (੬ pg. 48) CONDENSATION, OPERATION PAUSED PLEASE WAIT Appears if condensation occurs. CARD ERROR! Remaining power level High Exhausted As the battery power comes close to "VIDEO". TAPE! 44 EN TROUBLESHOOTING Warning Indications Displays the battery remaining power. LENS CAP Appears for replacement. PLEASE FORMAT Appears when...
Instructions
Page 48
... heat sources. ... expose the lens and viewfinder's lens to the LCD monitor, DO NOT ... No picture during playback. ... In such cases, use an optional cleaning cassette. Insert it and play back. If the cassette is not in places subject to the video heads may heat up. ... Also refer to maintain a clear picture at extremely bright objects for a long time, the surface around the...
... heat sources. ... expose the lens and viewfinder's lens to the LCD monitor, DO NOT ... No picture during playback. ... In such cases, use an optional cleaning cassette. Insert it and play back. If the cassette is not in places subject to the video heads may heat up. ... Also refer to maintain a clear picture at extremely bright objects for a long time, the surface around the...
Instructions
Page 50
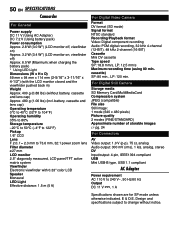
... 0.33" color LCD Speaker Monaural LED Light Effective distance: 1.5 m (5 ft) For Digital Video Camera Format DV format (SD mode) Signal format NTSC standard Recording/Playback format Video: Digital component recording Audio: PCM digital recording, 32 kHz 4-channel (12-BIT), 48 kHz 2-channel (16-BIT) Cassette Mini DV cassette Tape speed SP: 18.8 mm/s, LP: 12.5 mm/s Maximum recording time (using 80 min. For Digital Still Camera Storage media SD Memory Card/MultiMediaCard Compression system JPEG (compatible) File size Still image: 1 mode (640 x 480 pixels) Picture quality 2 modes (FINE/STANDARD...
... 0.33" color LCD Speaker Monaural LED Light Effective distance: 1.5 m (5 ft) For Digital Video Camera Format DV format (SD mode) Signal format NTSC standard Recording/Playback format Video: Digital component recording Audio: PCM digital recording, 32 kHz 4-channel (12-BIT), 48 kHz 2-channel (16-BIT) Cassette Mini DV cassette Tape speed SP: 18.8 mm/s, LP: 12.5 mm/s Maximum recording time (using 80 min. For Digital Still Camera Storage media SD Memory Card/MultiMediaCard Compression system JPEG (compatible) File size Still image: 1 mode (640 x 480 pixels) Picture quality 2 modes (FINE/STANDARD...

Instructions
Page 51
... L LCD Monitor and Viewfinder 15, 19 LED Light 33 Live Slow 33 Loading A Cassette 18 Loading A Memory Card 18 M Manual Focus 34 Memory Card 18 Motor Drive Mode 34 N Night-Alive 33 P Picture Quality 32 Playback Sound 32 Power-Linked Operation 15 Program AE, Effects and Shutter Effects ...... 38 Q Quick Review 21 R Recording Capacity Memory Card 24 Tape 19 Recording Media Selection 32 Resetting The File Name 26 S Snapshot Mode 34 Sound Mode 30, 32 Speaker Volume 21 Specifications 50 Spot Exposure Control 36 T Tape Speed (REC MODE...
... L LCD Monitor and Viewfinder 15, 19 LED Light 33 Live Slow 33 Loading A Cassette 18 Loading A Memory Card 18 M Manual Focus 34 Memory Card 18 Motor Drive Mode 34 N Night-Alive 33 P Picture Quality 32 Playback Sound 32 Power-Linked Operation 15 Program AE, Effects and Shutter Effects ...... 38 Q Quick Review 21 R Recording Capacity Memory Card 24 Tape 19 Recording Media Selection 32 Resetting The File Name 26 S Snapshot Mode 34 Sound Mode 30, 32 Speaker Volume 21 Specifications 50 Spot Exposure Control 36 T Tape Speed (REC MODE...


