Instruction Manual
Page 7
... A Cassette 16 VIDEO RECORDING & PLAYBACK 17 VIDEO RECORDING 17 Basic Recording 17 Tape Remaining Time 17 LCD Monitor And Viewfinder 17 Zooming 18 Journalistic Shooting 18 Time Code 18 Quick Review 19 Recording From The Middle Of A Tape...... 19 VIDEO PLAYBACK 20 Normal Playback 20 Still Playback 20 Shuttle Search 20 Blank...
... A Cassette 16 VIDEO RECORDING & PLAYBACK 17 VIDEO RECORDING 17 Basic Recording 17 Tape Remaining Time 17 LCD Monitor And Viewfinder 17 Zooming 18 Journalistic Shooting 18 Time Code 18 Quick Review 19 Recording From The Middle Of A Tape...... 19 VIDEO PLAYBACK 20 Normal Playback 20 Still Playback 20 Shuttle Search 20 Blank...
Instruction Manual
Page 9
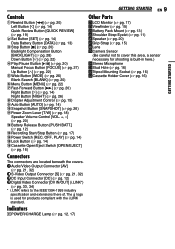
Controls 1Rewind Button [1] (੬ pg. 20) Left Button [1] (੬ pg. 14) Quick Review Button [QUICK REVIEW] (੬ pg. 19) 2Set Button [SET] (੬ pg. 14) Data Battery Button [DATA] (੬ pg. 13) 3Stop Button [7] (੬ pg. 20) Backlight ...Button [NIGHT] (੬ pg. 26) 8Diopter Adjustment Control (੬ pg. 15) 9Auto Button [AUTO] (੬ pg. 14) !Snapshot Button [SNAPSHOT] (੬ pg. 26) "Power Zoom Lever [T/W] (੬ pg. 18) Speaker Volume Control [VOL. +, -] (੬ pg. 20) #Battery Release Button [PUSH BATT.] (੬ pg. 12) $Recording Start/Stop Button (&#...
Controls 1Rewind Button [1] (੬ pg. 20) Left Button [1] (੬ pg. 14) Quick Review Button [QUICK REVIEW] (੬ pg. 19) 2Set Button [SET] (੬ pg. 14) Data Battery Button [DATA] (੬ pg. 13) 3Stop Button [7] (੬ pg. 20) Backlight ...Button [NIGHT] (੬ pg. 26) 8Diopter Adjustment Control (੬ pg. 15) 9Auto Button [AUTO] (੬ pg. 14) !Snapshot Button [SNAPSHOT] (੬ pg. 26) "Power Zoom Lever [T/W] (੬ pg. 18) Speaker Volume Control [VOL. +, -] (੬ pg. 20) #Battery Release Button [PUSH BATT.] (੬ pg. 12) $Recording Start/Stop Button (&#...

Instruction Manual
Page 19
... using a partially recorded tape. ● When shooting on the switch, then start recording. This means the camcorder may occur at which you want to start of the last recording. 1) Press QUICK REVIEW during playback. If recording starts from the last time code number. To prevent this, perform Recording From The... smoothly. ● The time code is displayed only when "TIME CODE" is set to "ON". (੬ pg. 24) VIDEO RECORDING EN 19 Quick Review Enables to find the spot at start recording, then engage the Still Playback mode. (੬ pg. 20) 2) Set the Power Switch to con...
... using a partially recorded tape. ● When shooting on the switch, then start recording. This means the camcorder may occur at which you want to start of the last recording. 1) Press QUICK REVIEW during playback. If recording starts from the last time code number. To prevent this, perform Recording From The... smoothly. ● The time code is displayed only when "TIME CODE" is set to "ON". (੬ pg. 24) VIDEO RECORDING EN 19 Quick Review Enables to find the spot at start recording, then engage the Still Playback mode. (੬ pg. 20) 2) Set the Power Switch to con...

Instruction Manual
Page 42
... M Manual Focus 27 Melody 24 Motor Drive Mode 26 N Night-Scope 26 P Playback Sound 25 Power-Linked Operation 12 Priority 24 Program AE 31 Q Quick Review 19 R Recording Capacity Tape 17 S Shutter Effects 31 Snapshot Mode 26 Sound Mode 23, 25 Speaker Volume 20 Specifications 41 Spot Exposure Control 29 T Tape... Setting 24 Time Code 18, 24 Tripod Mounting 16 Troubleshooting 35 W Warning Indications 37 White Balance 29 Wide Mode 26 Wipe Or Fader Effects 30 Z Zooming 18, 23
... M Manual Focus 27 Melody 24 Motor Drive Mode 26 N Night-Scope 26 P Playback Sound 25 Power-Linked Operation 12 Priority 24 Program AE 31 Q Quick Review 19 R Recording Capacity Tape 17 S Shutter Effects 31 Snapshot Mode 26 Sound Mode 23, 25 Speaker Volume 20 Specifications 41 Spot Exposure Control 29 T Tape... Setting 24 Time Code 18, 24 Tripod Mounting 16 Troubleshooting 35 W Warning Indications 37 White Balance 29 Wide Mode 26 Wipe Or Fader Effects 30 Z Zooming 18, 23