Instruction Manual
Page 1
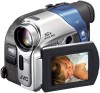
... manual are available on the bottom of the camcorder. INSTRUCTIONS Dear Customer, Thank you for future reference. Before use of this product. and Serial No. Model No. Retain this information for purchasing this digital video camera. DIGITAL VIDEO CAMERA GR-D93 GR-D73 GR-D33 ...Please visit our Homepage on the World Wide Web for Digital Video Camera: http://www.jvc.co.jp/english/cyber/ For Accessories: http://www.jvc.co.jp/english/accessory/ The camcorder illustrations appearing in the pages 2 - 3...
... manual are available on the bottom of the camcorder. INSTRUCTIONS Dear Customer, Thank you for future reference. Before use of this product. and Serial No. Model No. Retain this information for purchasing this digital video camera. DIGITAL VIDEO CAMERA GR-D93 GR-D73 GR-D33 ...Please visit our Homepage on the World Wide Web for Digital Video Camera: http://www.jvc.co.jp/english/cyber/ For Accessories: http://www.jvc.co.jp/english/accessory/ The camcorder illustrations appearing in the pages 2 - 3...
Instruction Manual
Page 4
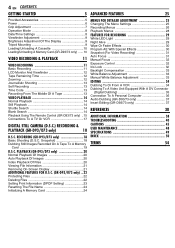
... only) ...... 10 VIDEO RECORDING & PLAYBACK 11 VIDEO RECORDING 11 Basic Recording 11 LCD Monitor And Viewfinder 12 Tape Remaining Time 12 Zooming 12 Journalistic Shooting 13 Self Recording 13 Time Code 13 Recording From The Middle Of A Tape 13 VIDEO PLAYBACK 14 Normal Playback 14... 33 White Balance Adjustment 33 Manual White Balance Adjustment 33 EDITING 34 Dubbing To Or From A VCR 34 Dubbing To A Video Unit Equipped With A DV Connector (Digital Dubbing 35 Connection To A Personal Computer 36 Audio Dubbing (GR-D93/73 only 37 Insert Editing (GR-D93/73 only 37 REFERENCES ...
... only) ...... 10 VIDEO RECORDING & PLAYBACK 11 VIDEO RECORDING 11 Basic Recording 11 LCD Monitor And Viewfinder 12 Tape Remaining Time 12 Zooming 12 Journalistic Shooting 13 Self Recording 13 Time Code 13 Recording From The Middle Of A Tape 13 VIDEO PLAYBACK 14 Normal Playback 14... 33 White Balance Adjustment 33 Manual White Balance Adjustment 33 EDITING 34 Dubbing To Or From A VCR 34 Dubbing To A Video Unit Equipped With A DV Connector (Digital Dubbing 35 Connection To A Personal Computer 36 Audio Dubbing (GR-D93/73 only 37 Insert Editing (GR-D93/73 only 37 REFERENCES ...
Instruction Manual
Page 8
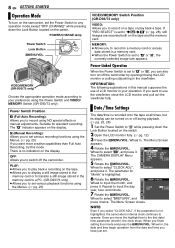
... 6 Rotate the MMENU/VOL. Suitable for "Month" is not highlighted, the camcorder's internal clock continues to a PC. (GR-D93/73 only) ● Allows you want more creative capabilities than Full Auto Recording, try this manual supposes the use the viewfinder, close the LCD monitor and pull out the viewfinder...standard recording. There is recorded onto the tape at all times, but its display can also turn on the camcorder, set various playback functions using NO special effects or manual adjustments. If you to set the Power Switch to input the day, year, hour and minute. NOTE: ...
... 6 Rotate the MMENU/VOL. Suitable for "Month" is not highlighted, the camcorder's internal clock continues to a PC. (GR-D93/73 only) ● Allows you want more creative capabilities than Full Auto Recording, try this manual supposes the use the viewfinder, close the LCD monitor and pull out the viewfinder...standard recording. There is recorded onto the tape at all times, but its display can also turn on the camcorder, set various playback functions using NO special effects or manual adjustments. If you to set the Power Switch to input the day, year, hour and minute. NOTE: ...
Instruction Manual
Page 9
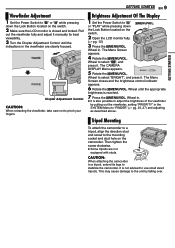
...Open the LCD monitor fully. (੬ pg. 12) 3 Press the MMENU/VOL. Pull out the viewfinder fully and adjust it manually for best viewability. 3 Turn the Diopter Adjustment Control until the appropriate brightness is closed and locked. PAUSE Diopter Adjustment Control CAUTION: When... retracting the viewfinder, take care not to stabilize the camcorder. The CAMERA DISPLAY Menu appears. 5 Rotate the MMENU/VOL. Wheel to "A" or "M" while pressing down the Lock Button located ...
...Open the LCD monitor fully. (੬ pg. 12) 3 Press the MMENU/VOL. Pull out the viewfinder fully and adjust it manually for best viewability. 3 Turn the Diopter Adjustment Control until the appropriate brightness is closed and locked. PAUSE Diopter Adjustment Control CAUTION: When... retracting the viewfinder, take care not to stabilize the camcorder. The CAMERA DISPLAY Menu appears. 5 Rotate the MMENU/VOL. Wheel to "A" or "M" while pressing down the Lock Button located ...
Instruction Manual
Page 12
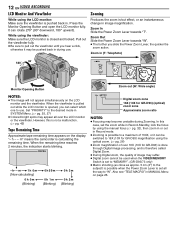
... pulled out while the LCD monitor is opened, you can rotate 270° (90° downward, 180° upward). "- m" means the camcorder is closed and locked. When the remaining time reaches 2 minutes, the indication starts blinking. 0h25m - In this is not a malfunction. (੬...subject) is possible when the Power Zoom Lever is set all over 16X (10X for GR-D93) magnification using the optical zoom. (੬ pg. 26) ● Zoom magnification of image may become unstable during use . Zoom Out Slide the Power Zoom Lever towards "T". Zoom in MANUAL Menu on the LCD monitor and...
... pulled out while the LCD monitor is opened, you can rotate 270° (90° downward, 180° upward). "- m" means the camcorder is closed and locked. When the remaining time reaches 2 minutes, the indication starts blinking. 0h25m - In this is not a malfunction. (੬...subject) is possible when the Power Zoom Lever is set all over 16X (10X for GR-D93) magnification using the optical zoom. (੬ pg. 26) ● Zoom magnification of image may become unstable during use . Zoom Out Slide the Power Zoom Lever towards "T". Zoom in MANUAL Menu on the LCD monitor and...
Instruction Manual
Page 17
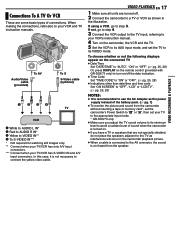
... TV ● Date/Time Set "DATE/TIME" to "AUTO", "ON" or "OFF". (੬ pg. 25, 28) Or, press DISPLAY on the remote control (provided with GR-D93/73 only) to turn on . ● If you have a TV or speakers that are not specially shielded, do not place the speakers adjacent to... picture and sound from the speaker. If using a VCR, go to step 4. 3 Connect the VCR output to the TV input, referring to your VCR's instruction manual. 4 Turn on the camcorder, the VCR and the TV. 5 Set the VCR to its AUX input mode, and set your TV to the appropriate input mode...
... TV ● Date/Time Set "DATE/TIME" to "AUTO", "ON" or "OFF". (੬ pg. 25, 28) Or, press DISPLAY on the remote control (provided with GR-D93/73 only) to turn on . ● If you have a TV or speakers that are not specially shielded, do not place the speakers adjacent to... picture and sound from the speaker. If using a VCR, go to step 4. 3 Connect the VCR output to the TV input, referring to your VCR's instruction manual. 4 Turn on the camcorder, the VCR and the TV. 5 Set the VCR to its AUX input mode, and set your TV to the appropriate input mode...
Instruction Manual
Page 25
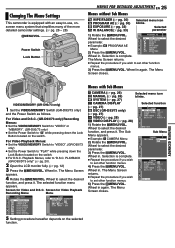
...Setting procedure hereafter depends on the switch. ● For D.S.C. Wheel in again. Wheel in . Selected menu icon blinks. SOUND MODE - 1 2 b i t ZOOM - 40x SNAP MODE - FUL L GA I NPUT - RETURN CAMERA REC MODE - The Menu Screen closes. Playback Menus, refer to -use, onscreen menu system ... CAMERA Menu 2) Rotate the MMENU/VOL. Changing The Menu Settings This camcorder is equipped with Sub Menus m CAMERA (੬ pg. 26) q MANUAL (੬ pg. 26) s SYSTEM (੬ pg. 27) n CAMERA DISPLAY (੬ pg. 27) o DSC (GR-D93/73 only) (੬ pg. 27) t VIDEO (੬ pg...
...Setting procedure hereafter depends on the switch. ● For D.S.C. Wheel in again. Wheel in . Selected menu icon blinks. SOUND MODE - 1 2 b i t ZOOM - 40x SNAP MODE - FUL L GA I NPUT - RETURN CAMERA REC MODE - The Menu Screen closes. Playback Menus, refer to -use, onscreen menu system ... CAMERA Menu 2) Rotate the MMENU/VOL. Changing The Menu Settings This camcorder is equipped with Sub Menus m CAMERA (੬ pg. 26) q MANUAL (੬ pg. 26) s SYSTEM (੬ pg. 27) n CAMERA DISPLAY (੬ pg. 27) o DSC (GR-D93/73 only) (੬ pg. 27) t VIDEO (੬ pg...
Instruction Manual
Page 26
... zooming is possible from 16X (10X for GR-D93) since digital zoom will reset to 16X ("10X" for GR-D93) (the optical zoom limit), to a maximum of 40X digital magnification. 700X*: Allows you to use the Digital Zoom. GAIN UP OFF: Allows you to shoot dark scenes with an aspect ratio of 16:9. MANUAL The...the switching point. ● It is recommended that tapes recorded in the LP mode on this camcorder be played back on this camcorder. ● During playback of a tape recorded on another camcorder, blocks of noise may appear or there may be momentary pauses in the sound. NOTES: &#...
... zooming is possible from 16X (10X for GR-D93) since digital zoom will reset to 16X ("10X" for GR-D93) (the optical zoom limit), to a maximum of 40X digital magnification. 700X*: Allows you to use the Digital Zoom. GAIN UP OFF: Allows you to shoot dark scenes with an aspect ratio of 16:9. MANUAL The...the switching point. ● It is recommended that tapes recorded in the LP mode on this camcorder be played back on this camcorder. ● During playback of a tape recorded on another camcorder, blocks of noise may appear or there may be momentary pauses in the sound. NOTES: &#...
Instruction Manual
Page 27
...camcorder and on the selected picture quality as well as Program AE with GR-D93/73 only). (੬ pg. 17, 34) TIME CODE [OFF]: Time code is opened . For GR-D33..."VIDEO". (GR-D93/73 ... SCREEN LCD: Keeps the camcorder's display (except the date...camcorder is connected to a TV. MENUS FOR DETAILED ADJUSTMENT EN 27 FINDER: The image is displayed in the camcorder..., the demonstration cannot be turned on. ● "DEMO MODE" remains "ON" even if the camcorder power is set from appearing on the connected TV screen. [LCD/TV]: Makes the camcorder..."Date/Time Settings" DSC (GR-D93/73 only) [ ...
...camcorder and on the selected picture quality as well as Program AE with GR-D93/73 only). (੬ pg. 17, 34) TIME CODE [OFF]: Time code is opened . For GR-D33..."VIDEO". (GR-D93/73 ... SCREEN LCD: Keeps the camcorder's display (except the date...camcorder is connected to a TV. MENUS FOR DETAILED ADJUSTMENT EN 27 FINDER: The image is displayed in the camcorder..., the demonstration cannot be turned on. ● "DEMO MODE" remains "ON" even if the camcorder power is set from appearing on the connected TV screen. [LCD/TV]: Makes the camcorder..."Date/Time Settings" DSC (GR-D93/73 only) [ ...
Instruction Manual
Page 29
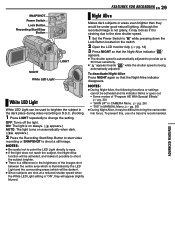
...To prevent this, use of a tripod is "ON", they would be used to shoot a still image. shooting. 1 Press LIGHT repeatedly to bring the camcorder into focus. To deactivate Night-Alive Press NIGHT again so that the Night-Alive indicator " " appears. ● The shutter speed is automatically adjusted to ...brightness of "Program AE With Special Effects" (੬ pg. 30). • "GAIN UP" in CAMERA Menu. (੬ pg. 26) • "DIS" in MANUAL Menu. (੬ pg. 26) ● During Night-Alive, it is strobing due to the slow shutter speed. 1 Set the Power Switch to "M" while pressing ...
...To prevent this, use of a tripod is "ON", they would be used to shoot a still image. shooting. 1 Press LIGHT repeatedly to bring the camcorder into focus. To deactivate Night-Alive Press NIGHT again so that the Night-Alive indicator " " appears. ● The shutter speed is automatically adjusted to ...brightness of "Program AE With Special Effects" (੬ pg. 30). • "GAIN UP" in CAMERA Menu. (੬ pg. 26) • "DIS" in MANUAL Menu. (੬ pg. 26) ● During Night-Alive, it is strobing due to the slow shutter speed. 1 Set the Power Switch to "M" while pressing ...
Instruction Manual
Page 31
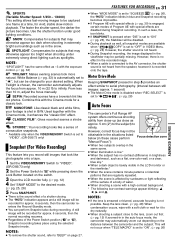
...when " COPY" is set to "OFF" in step 5 provides an effect similar to "VIDEO". (GR-D93/73 only) Snapshot (For Video Recording) This feature lets you record still images that are regularly...(੬ pg. 12) 4 Set "SNAP MODE" to the lens, zoom out first. (੬ pg. 12) If zoomed-in in the auto focus mode, the camcorder may not be captured one -color wall, or a clear, blue sky...is connected to be obtainable in the situations listed below (in these cases perform Focus detection zone "Manual Focus"): ● When two subjects overlap in the same scene. ● When illumination is low...
...when " COPY" is set to "OFF" in step 5 provides an effect similar to "VIDEO". (GR-D93/73 only) Snapshot (For Video Recording) This feature lets you record still images that are regularly...(੬ pg. 12) 4 Set "SNAP MODE" to the lens, zoom out first. (੬ pg. 12) If zoomed-in in the auto focus mode, the camcorder may not be captured one -color wall, or a clear, blue sky...is connected to be obtainable in the situations listed below (in these cases perform Focus detection zone "Manual Focus"): ● When two subjects overlap in the same scene. ● When illumination is low...

Instruction Manual
Page 32
... as at the beach or when skiing. ● When shooting objects under a spotlight. ● When zooming. Before doing the following situations: ● When shooting using the viewfinder, you use the manual exposure control at the same time when "r" is reduced at the beach or when skiing. ● When...the human eye, the iris contracts in welllit environments to allow in on the switch. 2 Press FOCUS. When the subject is pressed once, the camcorder will not darken or brighten. To return to automatic iris control Rotate the MMENU/VOL. The " " indication changes to " " and the ...
... as at the beach or when skiing. ● When shooting objects under a spotlight. ● When zooming. Before doing the following situations: ● When shooting using the viewfinder, you use the manual exposure control at the same time when "r" is reduced at the beach or when skiing. ● When...the human eye, the iris contracts in welllit environments to allow in on the switch. 2 Press FOCUS. When the subject is pressed once, the camcorder will not darken or brighten. To return to automatic iris control Rotate the MMENU/VOL. The " " indication changes to " " and the ...
Instruction Manual
Page 33
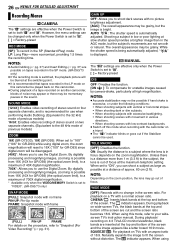
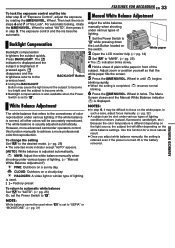
...usually adjusted automatically. The white balance is brightened. However, more advanced camcorder operators control this function for a more professional color/tint reproduction. CLOUD...The selected mode indicator except "AUTO" appears. [AUTO]: White balance is displayed. Adjust zoom or position yourself so that refers to the correctness of color reproduction under various types ... adjust the exposure by rotating the MMENU/VOL. MWB: Adjust the white balance manually when shooting under various types of the subject. Press BACKLIGHT. Backlight Compensation Backlight compensation...
...usually adjusted automatically. The white balance is brightened. However, more advanced camcorder operators control this function for a more professional color/tint reproduction. CLOUD...The selected mode indicator except "AUTO" appears. [AUTO]: White balance is displayed. Adjust zoom or position yourself so that refers to the correctness of color reproduction under various types ... adjust the exposure by rotating the MMENU/VOL. MWB: Adjust the white balance manually when shooting under various types of the subject. Press BACKLIGHT. Backlight Compensation Backlight compensation...
Instruction Manual
Page 34
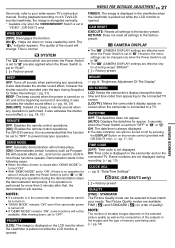
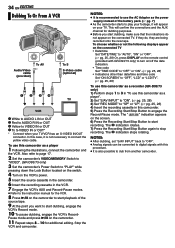
...) Or, press DISPLAY on the remote control (provided with this camcorder. 5) Press the Recording Start/Stop Button to the instruction manual for additional editing. Also refer to page 17. 2 Set the camcorder's VIDEO/MEMORY Switch to "VIDEO". (GR-D93/73 only) 3 Set the camcorder's Power Switch to "PLAY" while pressing down the Lock Button located...
...) Or, press DISPLAY on the remote control (provided with this camcorder. 5) Press the Recording Start/Stop Button to the instruction manual for additional editing. Also refer to page 17. 2 Set the camcorder's VIDEO/MEMORY Switch to "VIDEO". (GR-D93/73 only) 3 Set the camcorder's Power Switch to "PLAY" while pressing down the Lock Button located...
Instruction Manual
Page 36
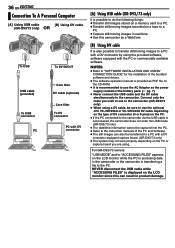
... system may not work properly depending on the PC or capture board you wish to use to the camcorder. (GR-D93/73 only) ● When using a DV cable, be sure to use the optional JVC VC-VDV206U or VC-VDV204U DV cable depending on the type of DV connector (4 or 6 pins) on the...; The date/time information cannot be captured into the PC. ● Refer to the instruction manuals of the battery pack. (੬ pg. 7) ● Never connect the USB cable and the DV cable simultaneously to the camcorder. For GR-D93/73 owners: "USB MODE" and/or "ACCESSING FILES" appears on the LCD monitor while...
... system may not work properly depending on the PC or capture board you wish to use to the camcorder. (GR-D93/73 only) ● When using a DV cable, be sure to use the optional JVC VC-VDV206U or VC-VDV204U DV cable depending on the type of DV connector (4 or 6 pins) on the...; The date/time information cannot be captured into the PC. ● Refer to the instruction manuals of the battery pack. (੬ pg. 7) ● Never connect the USB cable and the DV cable simultaneously to the camcorder. For GR-D93/73 owners: "USB MODE" and/or "ACCESSING FILES" appears on the LCD monitor while...

Instruction Manual
Page 41
... white. HFind a white subject and compose your nearest JVC dealer for replacement. There is no picture. ● The camcorder is activated. HTurn the camcorder's power off and on again. (੬ pg. ...8) Some functions are not available using the MENU/VOL. Wheel. ● The Power Switch is set to the Manual mode.... "AGC" or "OFF". (੬ pg. 25, 26) REFERENCES Snapshot mode cannot be deleted. - (GR-D93/73 only) - ● Files stored in clock battery has run out and the previously set "GAIN...
... white. HFind a white subject and compose your nearest JVC dealer for replacement. There is no picture. ● The camcorder is activated. HTurn the camcorder's power off and on again. (੬ pg. ...8) Some functions are not available using the MENU/VOL. Wheel. ● The Power Switch is set to the Manual mode.... "AGC" or "OFF". (੬ pg. 25, 26) REFERENCES Snapshot mode cannot be deleted. - (GR-D93/73 only) - ● Files stored in clock battery has run out and the previously set "GAIN...
Instruction Manual
Page 51
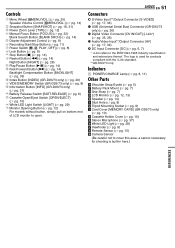
... (੬ pg. 25) Speaker Volume Control [MMENU/VOL.] (੬ pg. 14) b Snapshot Button [SNAPSHOT] (੬ pg. 18, 31) c Power Zoom Lever [T/W] (੬ pg. 12) d Manual Focus Button [FOCUS] (੬ pg. 32) Blank Search Button [BLANK SRCH] (੬ pg. 14) e Diopter Adjustment Control (੬ pg. 9) f ...(੬ pg. 12, 13) e Speaker (੬ pg. 14) f Stud Hole (੬ pg. 9) g Tripod Mounting Socket (੬ pg. 9) h Card Cover [MEMORY CARD] (GR-D93/73 only) (੬ pg. 10) i Cassette Holder Cover (੬ pg. 10) j Stereo Microphone (੬ pg. 37) k White LED Light (੬ pg. 29) l ...
... (੬ pg. 25) Speaker Volume Control [MMENU/VOL.] (੬ pg. 14) b Snapshot Button [SNAPSHOT] (੬ pg. 18, 31) c Power Zoom Lever [T/W] (੬ pg. 12) d Manual Focus Button [FOCUS] (੬ pg. 32) Blank Search Button [BLANK SRCH] (੬ pg. 14) e Diopter Adjustment Control (੬ pg. 9) f ...(੬ pg. 12, 13) e Speaker (੬ pg. 14) f Stud Hole (੬ pg. 9) g Tripod Mounting Socket (੬ pg. 9) h Card Cover [MEMORY CARD] (GR-D93/73 only) (੬ pg. 10) i Cassette Holder Cover (੬ pg. 10) j Stereo Microphone (੬ pg. 37) k White LED Light (੬ pg. 29) l ...

Instruction Manual
Page 52
...STANDARD) (in white when a memory card is not loaded. Recording Only (GR-D93/73 only) 1280 15 During Both Video And D.S.C. The number increases or decreases depending on the camcorder.) j Time Code (੬ pg. 27, 28) k Digital Image Stabilizer...zooming.) i Zoom Indicator (੬ pg. 12) (Appears during zooming.) (The level indicator g moves.) j O: (Appears when taking Snapshot.) (੬ pg. 31) k BRIGHT: Brightness Control Indicator (LCD monitor/ Viewfinder) (੬ pg. 9) (The level indicator g moves.) l Battery Indicator (੬ pg. 43) m Date/Time (੬ pg. 8) n Manual...
...STANDARD) (in white when a memory card is not loaded. Recording Only (GR-D93/73 only) 1280 15 During Both Video And D.S.C. The number increases or decreases depending on the camcorder.) j Time Code (੬ pg. 27, 28) k Digital Image Stabilizer...zooming.) i Zoom Indicator (੬ pg. 12) (Appears during zooming.) (The level indicator g moves.) j O: (Appears when taking Snapshot.) (੬ pg. 31) k BRIGHT: Brightness Control Indicator (LCD monitor/ Viewfinder) (੬ pg. 9) (The level indicator g moves.) l Battery Indicator (੬ pg. 43) m Date/Time (੬ pg. 8) n Manual...

Instruction Manual
Page 54
...Beep (BEEP 27 Blank search 14 Brightness Adjustment Of The Display (BRIGHT) .........9 C Changing The Menu Settings 25 Charging The Battery Pack 6 Cleaning The Camcorder 48 Clock adjustment (CLOCK ADJ 8 Connections Charging 6 Dubbing 34, 35 To A PC 36 To A TV Or VCR 17 D Date/Time Display (... 21 - 24 DSC 27 MANUAL 26 SYSTEM 27, 28 VIDEO 28 VIDEO DISPLAY 28 Motor Drive Mode 31 MultiMediaCard 10, 45 N Night-Alive 29 P Picture Quality (QUALITY 27 Playback sound (SOUND MODE, NARRATION) ........ 28 Playback Special Effects 16 Playback Zoom 16 Power Switch Position 8 Priority...
...Beep (BEEP 27 Blank search 14 Brightness Adjustment Of The Display (BRIGHT) .........9 C Changing The Menu Settings 25 Charging The Battery Pack 6 Cleaning The Camcorder 48 Clock adjustment (CLOCK ADJ 8 Connections Charging 6 Dubbing 34, 35 To A PC 36 To A TV Or VCR 17 D Date/Time Display (... 21 - 24 DSC 27 MANUAL 26 SYSTEM 27, 28 VIDEO 28 VIDEO DISPLAY 28 Motor Drive Mode 31 MultiMediaCard 10, 45 N Night-Alive 29 P Picture Quality (QUALITY 27 Playback sound (SOUND MODE, NARRATION) ........ 28 Playback Special Effects 16 Playback Zoom 16 Power Switch Position 8 Priority...


