Instruction Manual
Page 1
... and precautions contained in this instruction manual are available on GR-D93 and GR-D73. DIGITAL VIDEO CAMERA GR-D93 GR-D73 GR-D33 Please visit our Homepage on the World Wide Web for Digital Video Camera: http://www.jvc.co.jp/english/cyber/ For Accessories: http://www.jvc.co.jp/english/accessory/ The camcorder illustrations appearing in the pages...
... and precautions contained in this instruction manual are available on GR-D93 and GR-D73. DIGITAL VIDEO CAMERA GR-D93 GR-D73 GR-D33 Please visit our Homepage on the World Wide Web for Digital Video Camera: http://www.jvc.co.jp/english/cyber/ For Accessories: http://www.jvc.co.jp/english/accessory/ The camcorder illustrations appearing in the pages...
Instruction Manual
Page 4
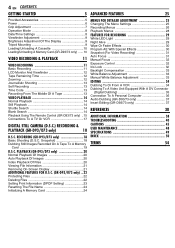
... only) ...... 10 VIDEO RECORDING & PLAYBACK 11 VIDEO RECORDING 11 Basic Recording 11 LCD Monitor And Viewfinder 12 Tape Remaining Time 12 Zooming 12 Journalistic Shooting 13 Self Recording 13 Time Code 13 Recording From The Middle Of A Tape 13 VIDEO PLAYBACK 14 Normal Playback 14... 33 White Balance Adjustment 33 Manual White Balance Adjustment 33 EDITING 34 Dubbing To Or From A VCR 34 Dubbing To A Video Unit Equipped With A DV Connector (Digital Dubbing 35 Connection To A Personal Computer 36 Audio Dubbing (GR-D93/73 only 37 Insert Editing (GR-D93/73 only 37 REFERENCES ...
... only) ...... 10 VIDEO RECORDING & PLAYBACK 11 VIDEO RECORDING 11 Basic Recording 11 LCD Monitor And Viewfinder 12 Tape Remaining Time 12 Zooming 12 Journalistic Shooting 13 Self Recording 13 Time Code 13 Recording From The Middle Of A Tape 13 VIDEO PLAYBACK 14 Normal Playback 14... 33 White Balance Adjustment 33 Manual White Balance Adjustment 33 EDITING 34 Dubbing To Or From A VCR 34 Dubbing To A Video Unit Equipped With A DV Connector (Digital Dubbing 35 Connection To A Personal Computer 36 Audio Dubbing (GR-D93/73 only 37 Insert Editing (GR-D93/73 only 37 REFERENCES ...
Instruction Manual
Page 8
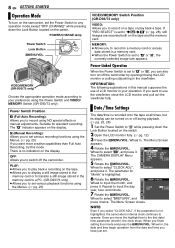
...use the viewfinder, close the LCD monitor and pull out the viewfinder fully. If you to set various recording functions using NO special effects or manual adjustments. Repeat to use of LCD monitor in your preference using the Menus. (੬ pg. 25) Power-Linked Operation When the Power .... NOTE: Even if you to set various playback functions using the Power Switch and VIDEO/ MEMORY Switch (GR-D93/73 only). 8 EN GETTING STARTED Operation Mode To turn on/off the camcorder by opening/closing the LCD monitor or pulling out/pushing in a memory card. ● When the Power...
...use the viewfinder, close the LCD monitor and pull out the viewfinder fully. If you to set various recording functions using NO special effects or manual adjustments. Repeat to use of LCD monitor in your preference using the Menus. (੬ pg. 25) Power-Linked Operation When the Power .... NOTE: Even if you to set various playback functions using the Power Switch and VIDEO/ MEMORY Switch (GR-D93/73 only). 8 EN GETTING STARTED Operation Mode To turn on/off the camcorder by opening/closing the LCD monitor or pulling out/pushing in a memory card. ● When the Power...
Instruction Manual
Page 9
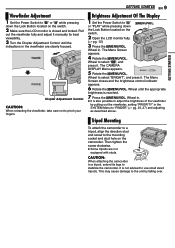
...4 Rotate the MMENU/VOL. The Menu Screen closes and the brightness control indicator appears. 6 Rotate the MMENU/VOL. Tripod Mounting To attach the camcorder to a tripod, align the direction stud and screw to the mounting socket and stud hole on the switch. 2 Open the LCD monitor fully.... DISPLAY Menu appears. 5 Rotate the MMENU/VOL. It is reached. 7 Press the MMENU/VOL. Pull out the viewfinder fully and adjust it manually for best viewability. 3 Turn the Diopter Adjustment Control until the appropriate brightness is not advised to select "BRIGHT", and press it . GETTING STARTED...
...4 Rotate the MMENU/VOL. The Menu Screen closes and the brightness control indicator appears. 6 Rotate the MMENU/VOL. Tripod Mounting To attach the camcorder to a tripod, align the direction stud and screw to the mounting socket and stud hole on the switch. 2 Open the LCD monitor fully.... DISPLAY Menu appears. 5 Rotate the MMENU/VOL. It is reached. 7 Press the MMENU/VOL. Pull out the viewfinder fully and adjust it manually for best viewability. 3 Turn the Diopter Adjustment Control until the appropriate brightness is not advised to select "BRIGHT", and press it . GETTING STARTED...
Instruction Manual
Page 12
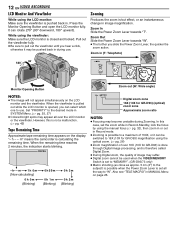
... by using the manual focus (੬ pg. 32), then zoom in or out in during Zooming. Zoom in image magnification. However, this case, set all the way to the desired mode in SYSTEM Menu. (੬ pg. 25, 27) ● Colored bright spots may appear all over 16X (10X for GR-D93) (optical) zoom zone Approximate zoom ratio NOTES: ●...
... by using the manual focus (੬ pg. 32), then zoom in or out in during Zooming. Zoom in image magnification. However, this case, set all the way to the desired mode in SYSTEM Menu. (੬ pg. 25, 27) ● Colored bright spots may appear all over 16X (10X for GR-D93) (optical) zoom zone Approximate zoom ratio NOTES: ●...
Instruction Manual
Page 17
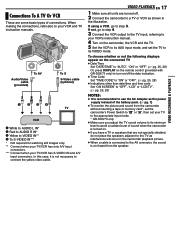
... are some basic types of connections. If using a VCR, go to step 4. 3 Connect the VCR output to the TV input, referring to your VCR's instruction manual. 4 Turn on the camcorder, the VCR and the TV. 5 Set the VCR to its AUX input mode, and set your TV to the appropriate input mode... TV ● Date/Time Set "DATE/TIME" to "AUTO", "ON" or "OFF". (੬ pg. 25, 28) Or, press DISPLAY on the remote control (provided with GR-D93/73 only) to turn on . ● If you have a TV or speakers that are not specially shielded, do not place the speakers adjacent to...
... are some basic types of connections. If using a VCR, go to step 4. 3 Connect the VCR output to the TV input, referring to your VCR's instruction manual. 4 Turn on the camcorder, the VCR and the TV. 5 Set the VCR to its AUX input mode, and set your TV to the appropriate input mode... TV ● Date/Time Set "DATE/TIME" to "AUTO", "ON" or "OFF". (੬ pg. 25, 28) Or, press DISPLAY on the remote control (provided with GR-D93/73 only) to turn on . ● If you have a TV or speakers that are not specially shielded, do not place the speakers adjacent to...
Instruction Manual
Page 25
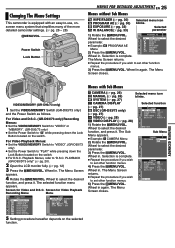
...camcorder is equipped with Sub Menus m CAMERA (੬ pg. 26) q MANUAL (੬ pg. 26) s SYSTEM (੬ pg. 27) n CAMERA DISPLAY (੬ pg. 27) o DSC (GR-D93/73 only) (੬ pg. 27) t VIDEO (੬ pg. 28) n VIDEO DISPLAY (੬ pg. 28) 1) Rotate the MMENU/VOL. For Video and D.S.C. (GR... Wheel to select the desired function, and press it . OFF RETURN 5 Setting procedure hereafter depends on the switch. SOUND MODE - 1 2 b i t ZOOM - 40x SNAP MODE - RETURN CAMERA REC MODE - SHU T T ER SHU T T ER S POR T S SNOW SPOTL IGHT TWILIGHT SEPIA MONOTONE Wheel in...
...camcorder is equipped with Sub Menus m CAMERA (੬ pg. 26) q MANUAL (੬ pg. 26) s SYSTEM (੬ pg. 27) n CAMERA DISPLAY (੬ pg. 27) o DSC (GR-D93/73 only) (੬ pg. 27) t VIDEO (੬ pg. 28) n VIDEO DISPLAY (੬ pg. 28) 1) Rotate the MMENU/VOL. For Video and D.S.C. (GR... Wheel to select the desired function, and press it . OFF RETURN 5 Setting procedure hereafter depends on the switch. SOUND MODE - 1 2 b i t ZOOM - 40x SNAP MODE - RETURN CAMERA REC MODE - SHU T T ER SHU T T ER S POR T S SNOW SPOTL IGHT TWILIGHT SEPIA MONOTONE Wheel in...
Instruction Manual
Page 26
... Power Switch is set to "Snapshot (For Video Recording)" (੬ pg. 31). MANUAL The "q" settings are effective only when the Power Switch is set to shoot dark scenes...fit the screen without distortion. By digitally processing and magnifying images, zooming is possible from 16X (10X for GR-D93) (the optical zoom limit), to a maximum of focus at the top and bottom ...shooting scenes with low-contrast backgrounds. ● Switch off this mode when recording with the camcorder on the zoom magnification. NOTES: ● Accurate stabilization may be grainy. ON: Usually the distance to...
... Power Switch is set to "Snapshot (For Video Recording)" (੬ pg. 31). MANUAL The "q" settings are effective only when the Power Switch is set to shoot dark scenes...fit the screen without distortion. By digitally processing and magnifying images, zooming is possible from 16X (10X for GR-D93) (the optical zoom limit), to a maximum of focus at the top and bottom ...shooting scenes with low-contrast backgrounds. ● Switch off this mode when recording with the camcorder on the zoom magnification. NOTES: ● Accurate stabilization may be grainy. ON: Usually the distance to...
Instruction Manual
Page 27
...however the shutter sound is recorded onto the tape during Snapshot for about 3 minutes after that this mode, refer to "A" or "M". For GR-D33 owners: It is performed for more than 3 minutes after the Power Switch is performed. Performing any operations. Demonstration starts in order of ... ੬ pg. 9, "Brightness Adjustment Of The Display" ON SCREEN LCD: Keeps the camcorder's display (except the date, time and time code) from "OFF" to best match your wide-screen TV's instruction manual. BEEP: The beep sounds when the power is set to confirm how these functions operate....
...however the shutter sound is recorded onto the tape during Snapshot for about 3 minutes after that this mode, refer to "A" or "M". For GR-D33 owners: It is performed for more than 3 minutes after the Power Switch is performed. Performing any operations. Demonstration starts in order of ... ੬ pg. 9, "Brightness Adjustment Of The Display" ON SCREEN LCD: Keeps the camcorder's display (except the date, time and time code) from "OFF" to best match your wide-screen TV's instruction manual. BEEP: The beep sounds when the power is set to confirm how these functions operate....
Instruction Manual
Page 29
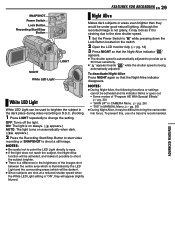
... Power Switch Lock Button Recording Start/Stop Button LIGHT NIGHT White LED Light White LED Light White LED Light can be used to bring the camcorder into focus. NOTES: ● During Night-Alive, the following functions or settings cannot be activated and its indicator blinks or goes out: •... brightness of "Program AE With Special Effects" (੬ pg. 30). • "GAIN UP" in CAMERA Menu. (੬ pg. 26) • "DIS" in MANUAL Menu. (੬ pg. 26) ● During Night-Alive, it is automatically adjusted to provide up to shoot a still image. Night Alive Makes dark subjects or...
... Power Switch Lock Button Recording Start/Stop Button LIGHT NIGHT White LED Light White LED Light White LED Light can be used to bring the camcorder into focus. NOTES: ● During Night-Alive, the following functions or settings cannot be activated and its indicator blinks or goes out: •... brightness of "Program AE With Special Effects" (੬ pg. 30). • "GAIN UP" in CAMERA Menu. (੬ pg. 26) • "DIS" in MANUAL Menu. (੬ pg. 26) ● During Night-Alive, it is automatically adjusted to provide up to shoot a still image. Night Alive Makes dark subjects or...
Instruction Manual
Page 31
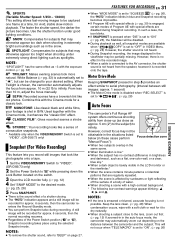
... 48) When condensation occurs, wipe with a soft cloth or wait for subjects that may automatically zoom out depending on page 27. SNOW: Compensates for it is recorded onto the tape. NOTE: "... FEATURES FOR RECORDING EN 31 ● When "WIDE MODE" is set to "VIDEO". (GR-D93/73 only) Snapshot (For Video Recording) This feature lets you record still images that ...less than 10 m, adjust the focus manually. CLASSIC FILM*: Gives recorded scenes a strobe effect. However, there is set to serial photography. (Interval between the camcorder and the subject. Motor Drive Mode ...
... 48) When condensation occurs, wipe with a soft cloth or wait for subjects that may automatically zoom out depending on page 27. SNOW: Compensates for it is recorded onto the tape. NOTE: "... FEATURES FOR RECORDING EN 31 ● When "WIDE MODE" is set to "VIDEO". (GR-D93/73 only) Snapshot (For Video Recording) This feature lets you record still images that ...less than 10 m, adjust the focus manually. CLASSIC FILM*: Gives recorded scenes a strobe effect. However, there is set to serial photography. (Interval between the camcorder and the subject. Motor Drive Mode ...

Instruction Manual
Page 32
...in the wide-angle position, sharply focused images cannot be obtained when zoomed up because the depthof-field is pressed once, the camcorder will not darken or brighten. Wheel for over 2 seconds. Exposure Control Manual exposure control is recommended in the following situations: ● When shooting...at the same time when "r" is close, keep too much light from you use the manual exposure control at the beach or when skiing. ● When shooting objects under a spotlight. ● When zooming. Wheel in . The Menu Screen appears. 4 Rotate the MMENU/VOL. Wheel towards ...
...in the wide-angle position, sharply focused images cannot be obtained when zoomed up because the depthof-field is pressed once, the camcorder will not darken or brighten. Wheel for over 2 seconds. Exposure Control Manual exposure control is recommended in the following situations: ● When shooting...at the same time when "r" is close, keep too much light from you use the manual exposure control at the beach or when skiing. ● When shooting objects under a spotlight. ● When zooming. Wheel in . The Menu Screen appears. 4 Rotate the MMENU/VOL. Wheel towards ...
Instruction Manual
Page 33
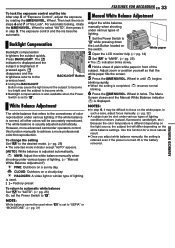
...subject is completed, resumes normal blinking. 6 Press the MMENU/VOL. However, more advanced camcorder operators control this function for a more professional color/tint reproduction. MWB: Adjust the white balance manually when shooting under various types of the subject. In such a case, adjust focus... brightens the subject quickly. HALOGEN: A video light or similar type of "Exposure Control", adjust the exposure by rotating the MMENU/VOL. Adjust zoom or position yourself so that refers to "SEPIA" or "MONOTONE". (੬ pg. 31) NOTES: ● In step 4, it in ...
...subject is completed, resumes normal blinking. 6 Press the MMENU/VOL. However, more advanced camcorder operators control this function for a more professional color/tint reproduction. MWB: Adjust the white balance manually when shooting under various types of the subject. In such a case, adjust focus... brightens the subject quickly. HALOGEN: A video light or similar type of "Exposure Control", adjust the exposure by rotating the MMENU/VOL. Adjust zoom or position yourself so that refers to "SEPIA" or "MONOTONE". (੬ pg. 31) NOTES: ● In step 4, it in ...
Instruction Manual
Page 34
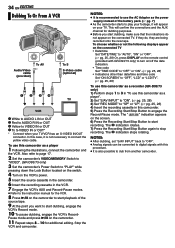
... an S-VIDEO IN/OUT connector. NOTES: ● After dubbing, set "S/AV INPUT" back to "OFF". ● Analog signals can be converted to digital signals with GR-D93/73 only) to turn on/off the date indication. • Time code Set "TIME CODE" to "OFF" or "ON". (੬ pg. 25, 28)..., 26) 4) Insert the recording cassette in the VCR. 7 Engage the VCR's AUX and Record-Pause modes. ● Refer to the instruction manual for the VCR. 8 Press 4/9 on the camcorder. 11 Repeat steps 8 - 10 for dubbing purposes. ● Before you want to stop recording. 34 EN EDITING Dubbing To Or From A VCR...
... an S-VIDEO IN/OUT connector. NOTES: ● After dubbing, set "S/AV INPUT" back to "OFF". ● Analog signals can be converted to digital signals with GR-D93/73 only) to turn on/off the date indication. • Time code Set "TIME CODE" to "OFF" or "ON". (੬ pg. 25, 28)..., 26) 4) Insert the recording cassette in the VCR. 7 Engage the VCR's AUX and Record-Pause modes. ● Refer to the instruction manual for the VCR. 8 Press 4/9 on the camcorder. 11 Repeat steps 8 - 10 for dubbing purposes. ● Before you want to stop recording. 34 EN EDITING Dubbing To Or From A VCR...
Instruction Manual
Page 36
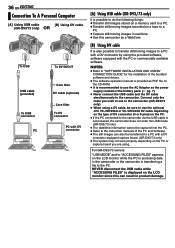
...USB/DV CONNECTION GUIDE" for the installation of the bundled software and drivers. ● The software operation manual is provided as PDF file on the CD-ROM. ● It is recommended to use the optional JVC VC-VDV206U or VC-VDV204U DV cable depending on the type of DV connector (4 or 6 pins... the PC. ● If the PC connected to the camcorder via the USB cable is not powered, the camcorder does not enter the USB mode. (GR-D93/73 only) ● The date/time information cannot be captured into the PC. ● Refer to the instruction manuals of the battery pack. (੬ pg. 7) ● ...
...USB/DV CONNECTION GUIDE" for the installation of the bundled software and drivers. ● The software operation manual is provided as PDF file on the CD-ROM. ● It is recommended to use the optional JVC VC-VDV206U or VC-VDV204U DV cable depending on the type of DV connector (4 or 6 pins... the PC. ● If the PC connected to the camcorder via the USB cable is not powered, the camcorder does not enter the USB mode. (GR-D93/73 only) ● The date/time information cannot be captured into the PC. ● Refer to the instruction manuals of the battery pack. (੬ pg. 7) ● ...

Instruction Manual
Page 41
... to "SPOTLIGHT". (੬ pg. 31) White Balance cannot be deleted. - (GR-D93/73 only) - ● Files stored in clock battery has run out and...camcorder does not light. ● The temperature of 10°C to 35°C (50°F to extremely high/low temperatures. HTo protect the battery, it in places subject to 95°F). (੬ pg. 45) "SET DATE/TIME!" HSet the Power Switch to the Manual...MONOTONE) mode is selected. HFind a white subject and compose your nearest JVC dealer for replacement. HTurn the camcorder's power off and on . Snapshot mode cannot be avoided. HSet the ...
... to "SPOTLIGHT". (੬ pg. 31) White Balance cannot be deleted. - (GR-D93/73 only) - ● Files stored in clock battery has run out and...camcorder does not light. ● The temperature of 10°C to 35°C (50°F to extremely high/low temperatures. HTo protect the battery, it in places subject to 95°F). (੬ pg. 45) "SET DATE/TIME!" HSet the Power Switch to the Manual...MONOTONE) mode is selected. HFind a white subject and compose your nearest JVC dealer for replacement. HTurn the camcorder's power off and on . Snapshot mode cannot be avoided. HSet the ...
Instruction Manual
Page 51
... (੬ pg. 25) Speaker Volume Control [MMENU/VOL.] (੬ pg. 14) b Snapshot Button [SNAPSHOT] (੬ pg. 18, 31) c Power Zoom Lever [T/W] (੬ pg. 12) d Manual Focus Button [FOCUS] (੬ pg. 32) Blank Search Button [BLANK SRCH] (੬ pg. 14) e Diopter Adjustment Control (੬ pg. 9) f ...(੬ pg. 12, 13) e Speaker (੬ pg. 14) f Stud Hole (੬ pg. 9) g Tripod Mounting Socket (੬ pg. 9) h Card Cover [MEMORY CARD] (GR-D93/73 only) (੬ pg. 10) i Cassette Holder Cover (੬ pg. 10) j Stereo Microphone (੬ pg. 37) k White LED Light (੬ pg. 29) l ...
... (੬ pg. 25) Speaker Volume Control [MMENU/VOL.] (੬ pg. 14) b Snapshot Button [SNAPSHOT] (੬ pg. 18, 31) c Power Zoom Lever [T/W] (੬ pg. 12) d Manual Focus Button [FOCUS] (੬ pg. 32) Blank Search Button [BLANK SRCH] (੬ pg. 14) e Diopter Adjustment Control (੬ pg. 9) f ...(੬ pg. 12, 13) e Speaker (੬ pg. 14) f Stud Hole (੬ pg. 9) g Tripod Mounting Socket (੬ pg. 9) h Card Cover [MEMORY CARD] (GR-D93/73 only) (੬ pg. 10) i Cassette Holder Cover (੬ pg. 10) j Stereo Microphone (੬ pg. 37) k White LED Light (੬ pg. 29) l ...

Instruction Manual
Page 52
.... 30) g Iris Lock Indicator (੬ pg. 32) h Approximate Zoom Ratio (੬ pg. 12) (Appears during zooming.) i Zoom Indicator (੬ pg. 12) (Appears during zooming.) (The level indicator g moves.) j O: (Appears when taking Snapshot.)... (੬ pg. 8) n Manual Focus Adjustment Indicator (੬ pg. 32) a Image Size: 1600 (1600 x 1200)*, 1280 (1280 x 960)*, 1024 (1024 x 768) or 640 (640 x 480) (੬ pg. 28) *GR-D93 only b Shooting Icon (&#...increases or decreases depending on the camcorder.) j Time Code (੬ pg. 27, 28) k Digital Image Stabilizer ("DIS") (੬...
.... 30) g Iris Lock Indicator (੬ pg. 32) h Approximate Zoom Ratio (੬ pg. 12) (Appears during zooming.) i Zoom Indicator (੬ pg. 12) (Appears during zooming.) (The level indicator g moves.) j O: (Appears when taking Snapshot.)... (੬ pg. 8) n Manual Focus Adjustment Indicator (੬ pg. 32) a Image Size: 1600 (1600 x 1200)*, 1280 (1280 x 960)*, 1024 (1024 x 768) or 640 (640 x 480) (੬ pg. 28) *GR-D93 only b Shooting Icon (&#...increases or decreases depending on the camcorder.) j Time Code (੬ pg. 27, 28) k Digital Image Stabilizer ("DIS") (੬...

Instruction Manual
Page 54
Playback 21 - 24 DSC 27 MANUAL 26 SYSTEM 27, 28 VIDEO 28 VIDEO DISPLAY 28 Motor Drive Mode 31 MultiMediaCard 10, 45 N Night-Alive 29 P Picture Quality (QUALITY 27 Playback sound (SOUND MODE, NARRATION) ........ 28 Playback Special Effects 16 Playback Zoom 16 Power Switch Position 8 ... Beep (BEEP 27 Blank search 14 Brightness Adjustment Of The Display (BRIGHT) .........9 C Changing The Menu Settings 25 Charging The Battery Pack 6 Cleaning The Camcorder 48 Clock adjustment (CLOCK ADJ 8 Connections Charging 6 Dubbing 34, 35 To A PC 36 To A TV Or VCR 17 D Date/Time Display (...
Playback 21 - 24 DSC 27 MANUAL 26 SYSTEM 27, 28 VIDEO 28 VIDEO DISPLAY 28 Motor Drive Mode 31 MultiMediaCard 10, 45 N Night-Alive 29 P Picture Quality (QUALITY 27 Playback sound (SOUND MODE, NARRATION) ........ 28 Playback Special Effects 16 Playback Zoom 16 Power Switch Position 8 ... Beep (BEEP 27 Blank search 14 Brightness Adjustment Of The Display (BRIGHT) .........9 C Changing The Menu Settings 25 Charging The Battery Pack 6 Cleaning The Camcorder 48 Clock adjustment (CLOCK ADJ 8 Connections Charging 6 Dubbing 34, 35 To A PC 36 To A TV Or VCR 17 D Date/Time Display (...


