Instruction Manual
Page 1
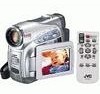
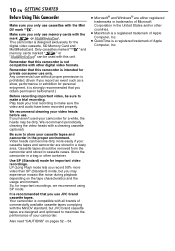
Serial No. and Serial No. which is located on the World Wide Web for Digital Video Camera: http://www.jvc.co.jp/english/cyber/ For Accessories: http://www.jvc.co.jp/english/accessory/ Dear Customer, Thank you for future reference. Model No. Before use,...for purchasing this product. DIGITAL VIDEO CAMERA GR-D290 GR-D270 Please visit our Homepage on the bottom of this digital video camera. To deactivate the demonstration, set "DEMO MODE" to ensure safe use of the camcorder. ENGLISH GETTING STARTED 6 VIDEO RECORDING & PLAYBACK 18 DIGITAL STILL CAMERA (D.S.C.) RECORDING &...
Serial No. and Serial No. which is located on the World Wide Web for Digital Video Camera: http://www.jvc.co.jp/english/cyber/ For Accessories: http://www.jvc.co.jp/english/accessory/ Dear Customer, Thank you for future reference. Model No. Before use,...for purchasing this product. DIGITAL VIDEO CAMERA GR-D290 GR-D270 Please visit our Homepage on the bottom of this digital video camera. To deactivate the demonstration, set "DEMO MODE" to ensure safe use of the camcorder. ENGLISH GETTING STARTED 6 VIDEO RECORDING & PLAYBACK 18 DIGITAL STILL CAMERA (D.S.C.) RECORDING &...

Instruction Manual
Page 2
... Program AE with Special Effects For example, "SPORTS" mode allows fastmoving images to be captured one frame at a slow speed. 2 EN Major Features of this Camcorder Wipe/Fader Effects You can use the Wipe/Fader Effects to -see moments at a time, for vivid, stable slow-motion. (੬ pg. 42) Data Battery...
... Program AE with Special Effects For example, "SPORTS" mode allows fastmoving images to be captured one frame at a slow speed. 2 EN Major Features of this Camcorder Wipe/Fader Effects You can use the Wipe/Fader Effects to -see moments at a time, for vivid, stable slow-motion. (੬ pg. 42) Data Battery...
Instruction Manual
Page 3
...countries.) Caution on its upper and lower sides. It cannot be necessary to accommodate different designs of a different standard. CAUTIONS: ● This camcorder is intended to alert the user to the presence of electric shock to constitute a risk of important operating and maintenance (servicing) instructions in fire... Industries Alliance: WARNING: TO PREVENT FIRE OR SHOCK HAZARD, DO NOT EXPOSE THIS UNIT TO RAIN OR MOISTURE. Use the JVC BN-VF707U/VF714U/VF733U battery packs and, to recharge them or to supply power to environmental considerations. Replace battery with...
...countries.) Caution on its upper and lower sides. It cannot be necessary to accommodate different designs of a different standard. CAUTIONS: ● This camcorder is intended to alert the user to the presence of electric shock to constitute a risk of important operating and maintenance (servicing) instructions in fire... Industries Alliance: WARNING: TO PREVENT FIRE OR SHOCK HAZARD, DO NOT EXPOSE THIS UNIT TO RAIN OR MOISTURE. Use the JVC BN-VF707U/VF714U/VF733U battery packs and, to recharge them or to supply power to environmental considerations. Replace battery with...

Instruction Manual
Page 4
...filled with water. It could tip over, causing serious damage to the user. Connecting cables (Audio/Video, S-Video, etc.) to the camcorder and leaving it has sufficient space on all servicing to avoid injury from tipover. 11. Install in accordance with dry cloth. 7. When ... has been damaged in any ventilation openings. Do not install near water. 6. Use only with the apparatus. Do not let children operate the camcorder, as they are blocked by the manufacturer. 10. Clean only with the manufacturer's instructions. 8. Keep these instructions. 2. 4 EN When the...
...filled with water. It could tip over, causing serious damage to the user. Connecting cables (Audio/Video, S-Video, etc.) to the camcorder and leaving it has sufficient space on all servicing to avoid injury from tipover. 11. Install in accordance with dry cloth. 7. When ... has been damaged in any ventilation openings. Do not install near water. 6. Use only with the apparatus. Do not let children operate the camcorder, as they are blocked by the manufacturer. 10. Clean only with the manufacturer's instructions. 8. Keep these instructions. 2. 4 EN When the...
Instruction Manual
Page 8
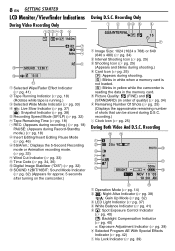
... a Selected Wipe/Fader Effect Indicator (੬ pg. 41) B Tape Running Indicator (੬ pg. 18) (Rotates while tape is reading the data in yellow while the camcorder is running.) C Selected Wide Mode Indicator (੬ pg. 33) D : Live Slow Indicator (੬ pg. 37) : Snapshot Indicator (੬ pg. 38) E ... mode or Animation recording mode. (੬ pg. 33) J Wind Cut Indicator (੬ pg. 33) K Time Code (੬ pg. 34, 36) L Digital Image Stabilizer ("DIS") (੬ pg. 32) M SOUND 12BIT/16BIT: Sound Mode Indicator (੬ pg. 32) (Appears for approx. 5 seconds after turning on the...
... a Selected Wipe/Fader Effect Indicator (੬ pg. 41) B Tape Running Indicator (੬ pg. 18) (Rotates while tape is reading the data in yellow while the camcorder is running.) C Selected Wide Mode Indicator (੬ pg. 33) D : Live Slow Indicator (੬ pg. 37) : Snapshot Indicator (੬ pg. 38) E ... mode or Animation recording mode. (੬ pg. 33) J Wind Cut Indicator (੬ pg. 33) K Time Code (੬ pg. 34, 36) L Digital Image Stabilizer ("DIS") (੬ pg. 32) M SOUND 12BIT/16BIT: Sound Mode Indicator (੬ pg. 32) (Appears for approx. 5 seconds after turning on the...
Instruction Manual
Page 10
...) mode, but JVC brand cassette tapes are either registered trademarks or trademarks of commercially available cassette tapes complying with the Mini DV mark . Make sure you only use memory cards with other digital video formats. Play back your trial recording to make a trial recording. Cassette tapes should be dirty. Remember that this camcorder is recommended...
...) mode, but JVC brand cassette tapes are either registered trademarks or trademarks of commercially available cassette tapes complying with the Mini DV mark . Make sure you only use memory cards with other digital video formats. Play back your trial recording to make a trial recording. Cassette tapes should be dirty. Remember that this camcorder is recommended...
Instruction Manual
Page 11
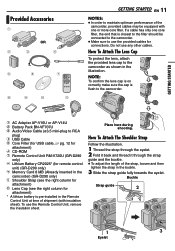
...AP-V14U b Battery Pack BN-VF707U c Audio/Video Cable (ø3.5 mini-plug to maintain optimum performance of the camcorder, provided cables may be connected to the camcorder. ● Make sure to the camcorder. Do not use the Remote Control Unit, remove the insulation sheet. Provided...cable, ੬ pg. 12 for attachment) f CD-ROM g Remote Control Unit RM-V720U (GR-D290 only) h Lithium Battery CR2025* (for remote control unit) (GR-D290 only) i Memory Card 8 MB (Already inserted in the camcorder) (GR-D290 only) j Shoulder Strap (see the right column for attachment) k Lens Cap (see the right...
...AP-V14U b Battery Pack BN-VF707U c Audio/Video Cable (ø3.5 mini-plug to maintain optimum performance of the camcorder, provided cables may be connected to the camcorder. ● Make sure to the camcorder. Do not use the Remote Control Unit, remove the insulation sheet. Provided...cable, ੬ pg. 12 for attachment) f CD-ROM g Remote Control Unit RM-V720U (GR-D290 only) h Lithium Battery CR2025* (for remote control unit) (GR-D290 only) i Memory Card 8 MB (Already inserted in the camcorder) (GR-D290 only) j Shoulder Strap (see the right column for attachment) k Lens Cap (see the right...

Instruction Manual
Page 12
12 EN GETTING STARTED How To Attach The Core Filter Attach the core filters to the camcorder. Stopper 2 Run the cable through the core filter, leaving approx. 3 cm (1-3/16") of the core filter as shown in the illustration. Core filter 3 cm (1-3/16") ...
12 EN GETTING STARTED How To Attach The Core Filter Attach the core filters to the camcorder. Stopper 2 Run the cable through the core filter, leaving approx. 3 cm (1-3/16") of the core filter as shown in the illustration. Core filter 3 cm (1-3/16") ...
Instruction Manual
Page 13
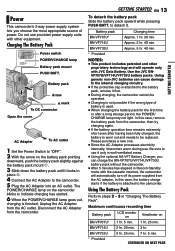
... time BN-VF707U* Approx. 1 hr. 30 min. Using generic non-JVC batteries can charge the BN-VF707U/VF714U/VF733U battery pack without the camcorder. ● After 5 minutes has elapsed in place b. 4 Connect the AC Adapter to the camcorder. 5 Plug the AC Adapter into an AC outlet. Using The Battery ... to indicate charging has started. 6 When the POWER/CHARGE lamp goes out, charging is attached to the camcorder. to use it . Use the JVC BNVF707U/VF714U/VF733U battery packs. Be sure to detach it only in "Charging The Battery Pack". Maximum continuous recording time Battery pack...
... time BN-VF707U* Approx. 1 hr. 30 min. Using generic non-JVC batteries can charge the BN-VF707U/VF714U/VF733U battery pack without the camcorder. ● After 5 minutes has elapsed in place b. 4 Connect the AC Adapter to the camcorder. 5 Plug the AC Adapter into an AC outlet. Using The Battery ... to indicate charging has started. 6 When the POWER/CHARGE lamp goes out, charging is attached to the camcorder. to use it . Use the JVC BNVF707U/VF714U/VF733U battery packs. Be sure to detach it only in "Charging The Battery Pack". Maximum continuous recording time Battery pack...
Instruction Manual
Page 14
... source, make sure that you tried to cover 3 times the planned shooting time. Using AC Power Perform step 4 in contact with your nearest JVC dealer. NOTE: The provided AC Adapter features automatic voltage selection in the memory card to a PC. ● Allows you to your preference using...its terminals to "OFF". 2) Open the LCD monitor fully. 3) Press DATA, and the battery status screen appears. ● It can result in a camcorder malfunction. Data Battery System You can result in a short circuit and possibly start a fire. OFF: Allows you to do so can check the remaining ...
... source, make sure that you tried to cover 3 times the planned shooting time. Using AC Power Perform step 4 in contact with your nearest JVC dealer. NOTE: The provided AC Adapter features automatic voltage selection in the memory card to a PC. ● Allows you to your preference using...its terminals to "OFF". 2) Open the LCD monitor fully. 3) Press DATA, and the battery status screen appears. ● It can result in a camcorder malfunction. Data Battery System You can result in a short circuit and possibly start a fire. OFF: Allows you to do so can check the remaining ...

Instruction Manual
Page 15
.... Power-Linked Operation When the Power Switch is recorded onto the tape at all times, but its display can be turned on or off the camcorder by opening/ closing the LCD monitor or pulling out/pushing in the viewfinder. ENGLISH CLOCK DEC 2 0 '0 5 ADJ . 5: 0 0 PM "LANGUAGE", and press MENU. to select CAMERA...
.... Power-Linked Operation When the Power Switch is recorded onto the tape at all times, but its display can be turned on or off the camcorder by opening/ closing the LCD monitor or pulling out/pushing in the viewfinder. ENGLISH CLOCK DEC 2 0 '0 5 ADJ . 5: 0 0 PM "LANGUAGE", and press MENU. to select CAMERA...

Instruction Manual
Page 16
... appears. 5 Press + or - The Menu Screen closes and the brightness control indicator appears. to the mounting socket and stud hole on the camcorder. Erase protection tab 1 Slide and hold OPEN/EJECT in the direction of the viewfinder, pull out the viewfinder fully and set "PRIORITY" to ...MENU to clear the brightness control indicator from the display. touching other parts may cause your fingers. Example: 6 Press + or - The camcorder needs to be powered up to get caught in the cassette holder, resulting in the viewfinder are not equipped with studs. The cassette holder ...
... appears. 5 Press + or - The Menu Screen closes and the brightness control indicator appears. to the mounting socket and stud hole on the camcorder. Erase protection tab 1 Slide and hold OPEN/EJECT in the direction of the viewfinder, pull out the viewfinder fully and set "PRIORITY" to ...MENU to clear the brightness control indicator from the display. touching other parts may cause your fingers. Example: 6 Press + or - The camcorder needs to be powered up to get caught in the cassette holder, resulting in the viewfinder are not equipped with studs. The cassette holder ...

Instruction Manual
Page 17
...be corrupted or cause the camcorder to become unable to recognize whether or not the card is installed. This prevents the tape from being recorded over . To unload a memory card, push it out. ● Do not touch the terminal on the reverse side of purchase. (GR-D290 only) Card Cover (...MEMORY CARD) Label Memory card Write/erase protection tab Clipped edge 1 Make sure the camcorder's power is off then on again. ● If the tape does not load properly, open , turn...
...be corrupted or cause the camcorder to become unable to recognize whether or not the card is installed. This prevents the tape from being recorded over . To unload a memory card, push it out. ● Do not touch the terminal on the reverse side of purchase. (GR-D290 only) Card Cover (...MEMORY CARD) Label Memory card Write/erase protection tab Clipped edge 1 Make sure the camcorder's power is off then on again. ● If the tape does not load properly, open , turn...

Instruction Manual
Page 18
...tape, the time code is interrupted and errors may vary according to the type of the calculation, may occur when editing the tape. m" means the camcorder is calculating the remaining time. It can select which one to use. However, this , refer to "Recording From The Middle Of A Tape" (&#... again or close and re-open the LCD monitor fully. "T REC" appears on the switch. ● The POWER/CHARGE lamp lights and the camcorder enters the Record-Standby mode. When the remaining time reaches 2 minutes, the indication starts blinking. ● The time required to calculate and display ...
...tape, the time code is interrupted and errors may vary according to the type of the calculation, may occur when editing the tape. m" means the camcorder is calculating the remaining time. It can select which one to use. However, this , refer to "Recording From The Middle Of A Tape" (&#... again or close and re-open the LCD monitor fully. "T REC" appears on the switch. ● The POWER/CHARGE lamp lights and the camcorder enters the Record-Standby mode. When the remaining time reaches 2 minutes, the indication starts blinking. ● The time required to calculate and display ...

Instruction Manual
Page 19
.... (੬ pg. 32) ● Zoom magnification of over 25X is done through Digital image processing, and is therefore called Digital Zoom. ● During Digital zoom, the quality of the recorded scene on the tape. Zoom in image magnification. Hold the camcorder in the desired position and tilt the LCD monitor in a previously recorded scene...
.... (੬ pg. 32) ● Zoom magnification of over 25X is done through Digital image processing, and is therefore called Digital Zoom. ● During Digital zoom, the quality of the recorded scene on the tape. Zoom in image magnification. Hold the camcorder in the desired position and tilt the LCD monitor in a previously recorded scene...

Instruction Manual
Page 20
... the Power Switch to "OFF", then to "PLAY". ● When a cable is connected to the S/AV connector, the sound is not heard from a battery, the camcorder shuts off automatically. 20 EN NOTES: ● The time code cannot be viewed in the Recording-Standby mode for the next shot. ● Distortion may... recording. To turn down the Lock Button located on a connected TV. (੬ pg. 22) ● If Stop mode continues for more than about 3 minutes, the camcorder's Stop mode is automatically engaged.
... the Power Switch to "OFF", then to "PLAY". ● When a cable is connected to the S/AV connector, the sound is not heard from a battery, the camcorder shuts off automatically. 20 EN NOTES: ● The time code cannot be viewed in the Recording-Standby mode for the next shot. ● Distortion may... recording. To turn down the Lock Button located on a connected TV. (੬ pg. 22) ● If Stop mode continues for more than about 3 minutes, the camcorder's Stop mode is automatically engaged.

Instruction Manual
Page 21
... be located between recorded scenes. VIDEO PLAYBACK EN 21 NOTES: ● Before starting Blank Search, if the current position is at a blank portion, the camcorder searches in the middle of a tape to avoid time code interruption. (੬ pg. 19) 1 Load a cassette. (੬ pg. 16) 2 ...Power Switch to select "EXECUTE", and press MENU. ● The "BLANK SEARCH" indication appears and the camcorder automatically starts reverse or forward search, then stops at a recorded portion, the camcorder searches in the forward direction. ● If the beginning or end of the tape is reached during Blank...
... be located between recorded scenes. VIDEO PLAYBACK EN 21 NOTES: ● Before starting Blank Search, if the current position is at a blank portion, the camcorder searches in the middle of a tape to avoid time code interruption. (੬ pg. 19) 1 Load a cassette. (੬ pg. 16) 2 ...Power Switch to select "EXECUTE", and press MENU. ● The "BLANK SEARCH" indication appears and the camcorder automatically starts reverse or forward search, then stops at a recorded portion, the camcorder searches in the forward direction. ● If the beginning or end of the tape is reached during Blank...
Instruction Manual
Page 22
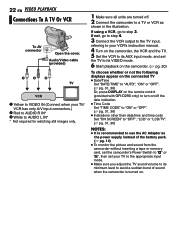
...mode. 6 Start playback on the camcorder. (੬ pg. 20) To choose whether or not the following displays appear on the connected TV ● Date/Time Set "DATE/TIME" to "AUTO", "ON" or "OFF". (੬ pg. 31, 36) Or, press DISPLAY on the remote control (provided with GR-D290 only) to step 3. If not...level to avoid a sudden burst of the battery pack. (੬ pg. 14) ● To monitor the picture and sound from the camcorder without inserting a tape or memory card, set the camcorder's Power Switch to "A" or "M", then set the TV to its AUX input mode, and set your TV/ VCR has only A/V ...
...mode. 6 Start playback on the camcorder. (੬ pg. 20) To choose whether or not the following displays appear on the connected TV ● Date/Time Set "DATE/TIME" to "AUTO", "ON" or "OFF". (੬ pg. 31, 36) Or, press DISPLAY on the remote control (provided with GR-D290 only) to step 3. If not...level to avoid a sudden burst of the battery pack. (੬ pg. 14) ● To monitor the picture and sound from the camcorder without inserting a tape or memory card, set the camcorder's Power Switch to "A" or "M", then set the TV to its AUX input mode, and set your TV/ VCR has only A/V ...

Instruction Manual
Page 23
..., Fast-Forward and Rewind) of images in a memory card (੬ pg. 26) Right Button (੬ pg. 24) K A. VIDEO RECORDING & PLAYBACK Playback Using The Remote Control (GR-D290 only) The Full-Function Remote Control Unit can operate this camcorder from a distance as well as the Recording Start/ Stop Button on the...
..., Fast-Forward and Rewind) of images in a memory card (੬ pg. 26) Right Button (੬ pg. 24) K A. VIDEO RECORDING & PLAYBACK Playback Using The Remote Control (GR-D290 only) The Full-Function Remote Control Unit can operate this camcorder from a distance as well as the Recording Start/ Stop Button on the...
Instruction Manual
Page 25
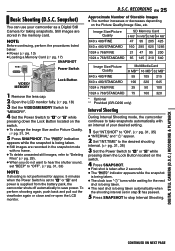
...To change the Image Size and/or Picture Quality, ੬ pg. 31, 34. 5 Press SNAPSHOT. RECORDING EN 25 Approximate Number of your camcorder as a Digital Still Camera for taking snapshots. Image Size/Picture Quality SD Memory Card 8 MB* 16 MB* 32 MB* 64 MB* 640 x 480/FINE.../STANDARD 190 320 645 1024 x 768/FINE 25 50 100 1024 x 768/STANDARD 75 160 320 * Optional ** Provided (GR-D290 only) Interval Shooting During Interval Shooting mode, the camcorder continues to take snapshots automatically with no frame. ● To delete unwanted still images, refer to "Deleting Files" (੬...
...To change the Image Size and/or Picture Quality, ੬ pg. 31, 34. 5 Press SNAPSHOT. RECORDING EN 25 Approximate Number of your camcorder as a Digital Still Camera for taking snapshots. Image Size/Picture Quality SD Memory Card 8 MB* 16 MB* 32 MB* 64 MB* 640 x 480/FINE.../STANDARD 190 320 645 1024 x 768/FINE 25 50 100 1024 x 768/STANDARD 75 160 320 * Optional ** Provided (GR-D290 only) Interval Shooting During Interval Shooting mode, the camcorder continues to take snapshots automatically with no frame. ● To delete unwanted still images, refer to "Deleting Files" (੬...


