Instructions
Page 5
RECORDING 25 Basic Shooting (D.S.C. PLAYBACK 26 Normal Playback Of Images 26 Auto Playback Of Images 27 Index Playback Of Files 27 Removing On-Screen Display 27 ADDITIONAL FEATURES FOR D.S.C 28 Dubbing Still Images Recorded On A Tape To A Memory Card 28 Resetting The File Name 28 Protecting Files 28 Deleting ... 17 VIDEO RECORDING & PLAYBACK 18 VIDEO RECORDING 18 Basic Recording 18 Tape Remaining Time 18 LCD Monitor And Viewfinder 18 Zooming 19 Journalistic Shooting 19 Time Code 19 Quick Review 20 Recording From The Middle Of A Tape...... 20 VIDEO PLAYBACK 20 Normal ...
RECORDING 25 Basic Shooting (D.S.C. PLAYBACK 26 Normal Playback Of Images 26 Auto Playback Of Images 27 Index Playback Of Files 27 Removing On-Screen Display 27 ADDITIONAL FEATURES FOR D.S.C 28 Dubbing Still Images Recorded On A Tape To A Memory Card 28 Resetting The File Name 28 Protecting Files 28 Deleting ... 17 VIDEO RECORDING & PLAYBACK 18 VIDEO RECORDING 18 Basic Recording 18 Tape Remaining Time 18 LCD Monitor And Viewfinder 18 Zooming 19 Journalistic Shooting 19 Time Code 19 Quick Review 20 Recording From The Middle Of A Tape...... 20 VIDEO PLAYBACK 20 Normal ...
Instructions
Page 7
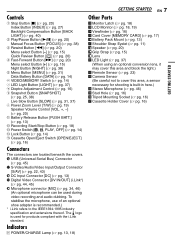
... Button [LIGHT] (੬ pg. 37) H Dioptre Adjustment Control (੬ pg. 16) I Snapshot Button [SNAPSHOT] (੬ pg. 25, 38) Live Slow Button [SLOW] (੬ pg. 31, 37) J Power Zoom Lever [T/W] (੬ pg. 19) Speaker Volume Control [VOL pg. 20) K Battery Release Button [PUSH BATT.] (੬ pg. 13...GETTING STARTED EN 7 Other Parts V Monitor Latch (੬ pg. 18) W LCD Monitor (੬ pg. 18, 19) X Viewfinder (੬ pg. 16) Y Card Cover [MEMORY CARD] (੬ pg. 17) Z Battery Pack Mount (੬ pg. 13) a Shoulder Strap Eyelet (੬ pg. 11) b Speaker (੬ pg. 20) c Grip Strap...
... Button [LIGHT] (੬ pg. 37) H Dioptre Adjustment Control (੬ pg. 16) I Snapshot Button [SNAPSHOT] (੬ pg. 25, 38) Live Slow Button [SLOW] (੬ pg. 31, 37) J Power Zoom Lever [T/W] (੬ pg. 19) Speaker Volume Control [VOL pg. 20) K Battery Release Button [PUSH BATT.] (੬ pg. 13...GETTING STARTED EN 7 Other Parts V Monitor Latch (੬ pg. 18) W LCD Monitor (੬ pg. 18, 19) X Viewfinder (੬ pg. 16) Y Card Cover [MEMORY CARD] (੬ pg. 17) Z Battery Pack Mount (੬ pg. 13) a Shoulder Strap Eyelet (੬ pg. 11) b Speaker (੬ pg. 20) c Grip Strap...
Instructions
Page 8
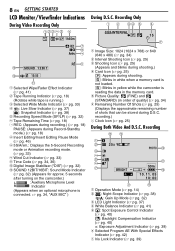
...) (in order of quality) (੬ pg. 34) F Remaining Number Of Shots (੬ pg. 25) (Displays the approximate remaining number of shots that can be stored during shooting. : Blinks in white when a memory card is not loaded. : Blinks in the memory card. Recording 89 1 2 25x W T 3 O0 4 5 6 7 BRIGHT q 50m w 10. 11.... (੬ pg. 32) M SOUND 12BIT/16BIT: Sound Mode Indicator (੬ pg. 32) (Appears for approx. 5 seconds after turning on the camcorder.) L : Auxiliary Microphone Level R Indicator (Appears when an optional microphone is reading the data in yellow while the...
...) (in order of quality) (੬ pg. 34) F Remaining Number Of Shots (੬ pg. 25) (Displays the approximate remaining number of shots that can be stored during shooting. : Blinks in white when a memory card is not loaded. : Blinks in the memory card. Recording 89 1 2 25x W T 3 O0 4 5 6 7 BRIGHT q 50m w 10. 11.... (੬ pg. 32) M SOUND 12BIT/16BIT: Sound Mode Indicator (੬ pg. 32) (Appears for approx. 5 seconds after turning on the camcorder.) L : Auxiliary Microphone Level R Indicator (Appears when an optional microphone is reading the data in yellow while the...
Instructions
Page 10
..., for important video recordings. Store the camcorder in a dusty area. Your camcorder is not compatible with this unit. Only cassettes marked " " and memory cards marked " " or " " can become dirty more video than SP (Standard) mode, but JVC brand cassette tapes are stored in a ...bag or other digital video formats. Play back your camcorder. Remember that this camcorder is intended for personal enjoyment,...
..., for important video recordings. Store the camcorder in a dusty area. Your camcorder is not compatible with this unit. Only cassettes marked " " and memory cards marked " " or " " can become dirty more video than SP (Standard) mode, but JVC brand cassette tapes are stored in a ...bag or other digital video formats. Play back your camcorder. Remember that this camcorder is intended for personal enjoyment,...
Instructions
Page 14
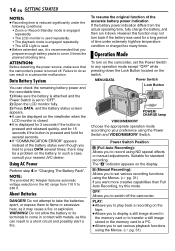
...seconds. ● If "COMMUNICATION ERROR" appears instead of time under the following conditions: • Zoom or Record-Standby mode is engaged repeatedly. • The LCD monitor is used repeatedly. •... operation mode except "OFF" while pressing down . However this function may not turn on the camcorder, set various recording functions using the Menus. (੬ pg. 31) Power Switch Position A...the batteries apart, or expose them to your nearest JVC dealer. M (Manual Recording): Allows you to display a still image stored in the memory card or to transfer a still image stored in...
...seconds. ● If "COMMUNICATION ERROR" appears instead of time under the following conditions: • Zoom or Record-Standby mode is engaged repeatedly. • The LCD monitor is used repeatedly. •... operation mode except "OFF" while pressing down . However this function may not turn on the camcorder, set various recording functions using the Menus. (੬ pg. 31) Power Switch Position A...the batteries apart, or expose them to your nearest JVC dealer. M (Manual Recording): Allows you to display a still image stored in the memory card or to transfer a still image stored in...
Instructions
Page 15
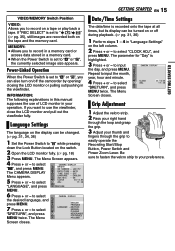
...select CAMERA DISPLAY the desired language, and press MENU. 7 Press + or - GETTING STARTED EN 15 GETTING STARTED VIDEO/MEMORY Switch Position VIDEO: Allows you to record on the left column. 2 Press + or - to input the month,...steps 1 - 4 in the viewfinder. Language Settings The language on the display can be turned on or off the camcorder by opening/ closing the LCD monitor or pulling out/pushing in "Language Settings" on a tape or play back ...easily operate the Recording Start/Stop Button, Power Switch and Power Zoom Lever. If "REC SELECT" is set to your operation.
...select CAMERA DISPLAY the desired language, and press MENU. 7 Press + or - GETTING STARTED EN 15 GETTING STARTED VIDEO/MEMORY Switch Position VIDEO: Allows you to record on the left column. 2 Press + or - to input the month,...steps 1 - 4 in the viewfinder. Language Settings The language on the display can be turned on or off the camcorder by opening/ closing the LCD monitor or pulling out/pushing in "Language Settings" on a tape or play back ...easily operate the Recording Start/Stop Button, Power Switch and Power Zoom Lever. If "REC SELECT" is set to your operation.
Instructions
Page 17
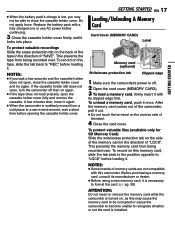
... again. ● If the tape does not load properly, open , turn the camcorder off . 2 Open the card cover (MEMORY CARD). 3 To load a memory card, firmly insert it with its manufacturer or dealer. ● Before using a new memory card, it is necessary to format the card. (੬ pg. 30) ATTENTION:... Do not insert or remove the memory card while the camcorder is turned on this camcorder. NOTES: ● Some brands of the label. 4 Close the card cover. GETTING STARTED Do not apply force. To protect valuable recordings...
... again. ● If the tape does not load properly, open , turn the camcorder off . 2 Open the card cover (MEMORY CARD). 3 To load a memory card, firmly insert it with its manufacturer or dealer. ● Before using a new memory card, it is necessary to format the card. (੬ pg. 30) ATTENTION:... Do not insert or remove the memory card while the camcorder is turned on this camcorder. NOTES: ● Some brands of the label. 4 Close the card cover. GETTING STARTED Do not apply force. To protect valuable recordings...
Instructions
Page 18
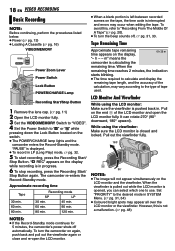
... time Tape 30 min. 60 min. 80 min. "T REC" appears on the switch. ● The POWER/CHARGE lamp lights and the camcorder enters the Record-Standby mode. When the remaining time reaches 2 minutes, the indication starts blinking. ● The time required to calculate and ...NOTE: Before continuing, perform the procedures listed below: ● Power (੬ pg. 13) ● Loading A Cassette (੬ pg. 16) VIDEO/MEMORY Power Zoom Lever Power Switch Lock Button POWER/CHARGE Lamp Recording Start/Stop Button 1 Remove the lens cap. (੬ pg. 11) 2 Open the LCD monitor fully....
... time Tape 30 min. 60 min. 80 min. "T REC" appears on the switch. ● The POWER/CHARGE lamp lights and the camcorder enters the Record-Standby mode. When the remaining time reaches 2 minutes, the indication starts blinking. ● The time required to calculate and ...NOTE: Before continuing, perform the procedures listed below: ● Power (੬ pg. 13) ● Loading A Cassette (੬ pg. 16) VIDEO/MEMORY Power Zoom Lever Power Switch Lock Button POWER/CHARGE Lamp Recording Start/Stop Button 1 Remove the lens cap. (੬ pg. 11) 2 Open the LCD monitor fully....
Instructions
Page 19
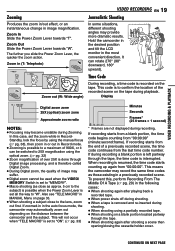
...the distance between the camcorder and the subject. Display 10 x W T Digital zoom zone 25X (optical) zoom zone Approximate zoom ratio NOTES: ● Focusing may provide more dramatic results. If zoomed-in in a previously...through the tape, the time code is to "ON". (੬ pg. 33) Minutes Seconds Frames* (25 frames = 1 second) 12 : 34 : 24 * Frames are not displayed during playback. If recording ...to "MEMORY". ● Macro shooting (as those existing in the auto focus mode, the camcorder may automatically zoom out depending on the tape. Zoom Out Slide the Power Zoom Lever ...
...the distance between the camcorder and the subject. Display 10 x W T Digital zoom zone 25X (optical) zoom zone Approximate zoom ratio NOTES: ● Focusing may provide more dramatic results. If zoomed-in in a previously...through the tape, the time code is to "ON". (੬ pg. 33) Minutes Seconds Frames* (25 frames = 1 second) 12 : 34 : 24 * Frames are not displayed during playback. If recording ...to "MEMORY". ● Macro shooting (as those existing in the auto focus mode, the camcorder may automatically zoom out depending on the tape. Zoom Out Slide the Power Zoom Lever ...
Instructions
Page 20
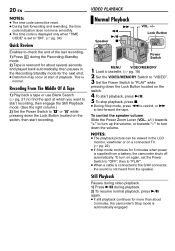
Lock Button MA Power Switch MENU VIDEO/MEMORY 1 Load a cassette. (੬ pg. 16) 2 Set the VIDEO/MEMORY Switch to "VIDEO". 3 Set the Power Switch to "PLAY" while pressing down the Lock Button located on again, set to "ON". (੬ pg. ...Playback Pauses during video playback. 1) Press 4/9 during the Recording-Standby mode. 2) Tape is rewound for about 3 minutes, the camcorder's Stop mode is automatically engaged. To control the speaker volume Slide the Power Zoom Lever (VOL. +/-) towards "+" to turn up the volume, or towards "-" to turn on the switch. 4 To start ...
Lock Button MA Power Switch MENU VIDEO/MEMORY 1 Load a cassette. (੬ pg. 16) 2 Set the VIDEO/MEMORY Switch to "VIDEO". 3 Set the Power Switch to "PLAY" while pressing down the Lock Button located on again, set to "ON". (੬ pg. ...Playback Pauses during video playback. 1) Press 4/9 during the Recording-Standby mode. 2) Tape is rewound for about 3 minutes, the camcorder's Stop mode is automatically engaged. To control the speaker volume Slide the Power Zoom Lever (VOL. +/-) towards "+" to turn up the volume, or towards "-" to turn on the switch. 4 To start ...
Instructions
Page 21
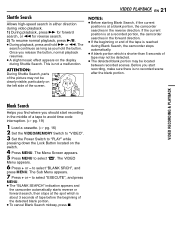
... automatically. ● A blank portion which is at a blank portion, the camcorder searches in the middle of a tape to avoid time code interruption. (੬ pg. 19) 1 Load a cassette. (੬ pg. 16) 2 Set the VIDEO/MEMORY Switch to "VIDEO". 3 Set the Power Switch to "PLAY" while pressing down the ...of tape before the beginning of the screen. to select "EXECUTE", and press MENU. ● The "BLANK SEARCH" indication appears and the camcorder automatically starts reverse or forward search, then stops at the spot which is shorter than 5 seconds of the tape is at a recorded portion, the...
... automatically. ● A blank portion which is at a blank portion, the camcorder searches in the middle of a tape to avoid time code interruption. (੬ pg. 19) 1 Load a cassette. (੬ pg. 16) 2 Set the VIDEO/MEMORY Switch to "VIDEO". 3 Set the Power Switch to "PLAY" while pressing down the ...of tape before the beginning of the screen. to select "EXECUTE", and press MENU. ● The "BLANK SEARCH" indication appears and the camcorder automatically starts reverse or forward search, then stops at the spot which is shorter than 5 seconds of the tape is at a recorded portion, the...
Instructions
Page 22
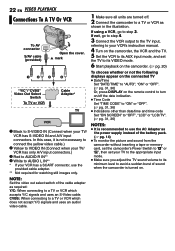
... A/V input connectors. If using a VCR, go to step 4. 3 Connect the VCR output to the TV input, referring to your VCR's instruction manual. 4 Turn on the camcorder, the VCR and the TV. 5 Set the VCR to its AUX input mode, and set the TV to its VIDEO mode. 6 Start playback on the... Adapter as the power supply instead of the battery pack. (੬ pg. 14) ● To monitor the picture and sound from the camcorder without inserting a tape or memory card, set the camcorder's Power Switch to "A" or "M", then set your TV to the appropriate input mode. ● Make sure you adjust the TV sound...
... A/V input connectors. If using a VCR, go to step 4. 3 Connect the VCR output to the TV input, referring to your VCR's instruction manual. 4 Turn on the camcorder, the VCR and the TV. 5 Set the VCR to its AUX input mode, and set the TV to its VIDEO mode. 6 Start playback on the... Adapter as the power supply instead of the battery pack. (੬ pg. 14) ● To monitor the picture and sound from the camcorder without inserting a tape or memory card, set the camcorder's Power Switch to "A" or "M", then set your TV to the appropriate input mode. ● Make sure you adjust the TV sound...

Instructions
Page 23
o Zoom (T/W) Buttons Zoom in/out (੬ pg. 19, 24) (Also available with... EFFECT Button (੬ pg. 24) N EFFECT ON/OFF Button (੬ pg. 24) The following buttons are available when the camcorder's Power Switch is 5 m. It also makes additional playback functions possible. (੬ pg. 24) Installing The Battery The remote control... Functions VIDEO PLAYBACK EN 23 The following buttons are available only when the camcorder's Power Switch is directly exposed to have the "+" mark visible. 3 Slide the holder back in a memory card (੬ pg. 26) Left Button (੬ pg. 24) ...
o Zoom (T/W) Buttons Zoom in/out (੬ pg. 19, 24) (Also available with... EFFECT Button (੬ pg. 24) N EFFECT ON/OFF Button (੬ pg. 24) The following buttons are available when the camcorder's Power Switch is 5 m. It also makes additional playback functions possible. (੬ pg. 24) Installing The Battery The remote control... Functions VIDEO PLAYBACK EN 23 The following buttons are available only when the camcorder's Power Switch is directly exposed to have the "+" mark visible. 3 Slide the holder back in a memory card (੬ pg. 26) Left Button (੬ pg. 24) ...

Instructions
Page 25
...to "OFF". (੬ pg. 31, 33) NOTE: If shooting is not performed for approx. 5 minutes when the Power Switch is set in the memory card. To perform shooting again, push back and pull out the viewfinder again or close and re-open the LCD monitor. DIGITAL STILL CAMERA (D.S.C.) RECORDING... & PLAYBACK CONTINUED ON NEXT PAGE RECORDING EN 25 Approximate Number of your camcorder as a Digital Still Camera for the next shot is being taken. ● The next shot is being taken automatically when the ...
...to "OFF". (੬ pg. 31, 33) NOTE: If shooting is not performed for approx. 5 minutes when the Power Switch is set in the memory card. To perform shooting again, push back and pull out the viewfinder again or close and re-open the LCD monitor. DIGITAL STILL CAMERA (D.S.C.) RECORDING... & PLAYBACK CONTINUED ON NEXT PAGE RECORDING EN 25 Approximate Number of your camcorder as a Digital Still Camera for the next shot is being taken. ● The next shot is being taken automatically when the ...
Instructions
Page 26
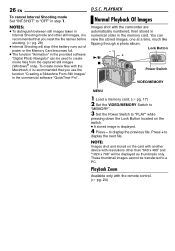
... control. (੬ pg. 24) 26 EN To cancel Interval Shooting mode Set "INT.SHOT" to display the previous file. Playback Zoom Available only with the camcorder are automatically numbered, then stored in numerical order in the provided software "Digital Photo Navigator" can view the stored images, one at ... Interval Shooting mode and other than "640 x 480" and "1024 x 768" will stop if the battery runs out of power or the Memory Card becomes full. ● The function "Animation" in the memory card. D.S.C. NOTES: ● To distinguish between still images taken in step 1.
... control. (੬ pg. 24) 26 EN To cancel Interval Shooting mode Set "INT.SHOT" to display the previous file. Playback Zoom Available only with the camcorder are automatically numbered, then stored in numerical order in the provided software "Digital Photo Navigator" can view the stored images, one at ... Interval Shooting mode and other than "640 x 480" and "1024 x 768" will stop if the battery runs out of power or the Memory Card becomes full. ● The function "Animation" in the memory card. D.S.C. NOTES: ● To distinguish between still images taken in step 1.
Instructions
Page 27
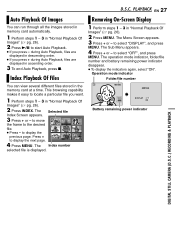
... Menu Screen appears. 3 Press + or - This browsing capability makes it easy to locate a particular file you press + during Auto Playback, files are displayed in the memory card at a time. Index Playback Of Files 1 Perform steps 1 - 3 in "Normal Playback Of Images" (੬ pg. 26). 2 Press 4/9 to the desired 4 5 6... file. ● Press - Operation mode indicator Folder/file number You can run through all the images stored in memory card automatically. 1 Perform steps 1 - 3 in "Normal Playback Of Images" (੬ pg. 26). 2 Press MENU.
... Menu Screen appears. 3 Press + or - This browsing capability makes it easy to locate a particular file you press + during Auto Playback, files are displayed in the memory card at a time. Index Playback Of Files 1 Perform steps 1 - 3 in "Normal Playback Of Images" (੬ pg. 26). 2 Press 4/9 to the desired 4 5 6... file. ● Press - Operation mode indicator Folder/file number You can run through all the images stored in memory card automatically. 1 Perform steps 1 - 3 in "Normal Playback Of Images" (੬ pg. 26). 2 Press MENU.
Instructions
Page 28
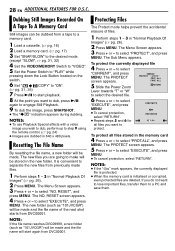
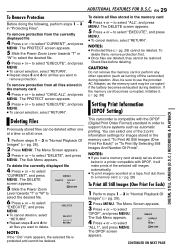
...Press + or - Protecting Files The Protect mode helps prevent the accidental erasure of the next shot starts from previously made . ALL 5 Slide the Power Zoom RETURN Lever towards "T" or "W" to select "EXECUTE", and press MENU. NOTES: ● If the " " mark appears, the currently displayed file ...RETURN". If you want to dub, press 4/9 again to protect. 28 EN ADDITIONAL FEATURES FOR D.S.C. Dubbing Still Images Recorded On A Tape To A Memory Card Still images can be stored in "Normal Playback Of Images" (੬ pg. 26). 2 Press MENU. NOTES: ● To use Playback ...
...Press + or - Protecting Files The Protect mode helps prevent the accidental erasure of the next shot starts from previously made . ALL 5 Slide the Power Zoom RETURN Lever towards "T" or "W" to select "EXECUTE", and press MENU. NOTES: ● If the " " mark appears, the currently displayed file ...RETURN". If you want to dub, press 4/9 again to protect. 28 EN ADDITIONAL FEATURES FOR D.S.C. Dubbing Still Images Recorded On A Tape To A Memory Card Still images can be stored in "Normal Playback Of Images" (੬ pg. 26). 2 Press MENU. NOTES: ● To use Playback ...
Instructions
Page 29
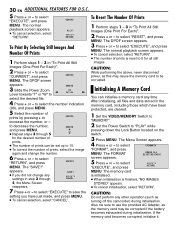
...+ or - The Menu Screen appears. 3 Press + or - DELETE CURRENT ALL 5 Slide the Power Zoom RETURN Lever towards "T" or "W" to select "DPOF", and press MENU. This camcorder is protected and cannot be deleted either one of the selected still images automatically. ● To print images ...DPOF Setting) DIGITAL STILL CAMERA (D.S.C.) RECORDING & PLAYBACK Deleting Files Previously stored files can select one at a time or all files stored in the memory card 4 Press + or - to select "EXECUTE", and press DELETE MENU. ● To cancel deletion, select "RETURN". ● Repeat...
...+ or - The Menu Screen appears. 3 Press + or - DELETE CURRENT ALL 5 Slide the Power Zoom RETURN Lever towards "T" or "W" to select "DPOF", and press MENU. This camcorder is protected and cannot be deleted either one of the selected still images automatically. ● To print images ...DPOF Setting) DIGITAL STILL CAMERA (D.S.C.) RECORDING & PLAYBACK Deleting Files Previously stored files can select one at a time or all files stored in the memory card 4 Press + or - to select "EXECUTE", and press DELETE MENU. ● To cancel deletion, select "RETURN". ● Repeat...
Instructions
Page 30
... to select "RESET", and press MENU. to select To Reset The Number Of Prints "EXECUTE", and press DPOF MENU. appears. 3 Slide the Power Zoom Lever towards "T" or "W" to select FORMAT "FORMAT", and press MENU. to 0 for all files and data stored in step 3 through 5 SHEETS 05... for the desired number of prints. ● The number of prints can initialise a memory card any other operation (such as turning off the camcorder) during initialisation. to SHEETS 00 RETURN select the desired file. 4 Press + or - to select "EXECUTE", and press ...
... to select "RESET", and press MENU. to select To Reset The Number Of Prints "EXECUTE", and press DPOF MENU. appears. 3 Slide the Power Zoom Lever towards "T" or "W" to select FORMAT "FORMAT", and press MENU. to 0 for all files and data stored in step 3 through 5 SHEETS 05... for the desired number of prints. ● The number of prints can initialise a memory card any other operation (such as turning off the camcorder) during initialisation. to SHEETS 00 RETURN select the desired file. 4 Press + or - to select "EXECUTE", and press ...
Instructions
Page 31
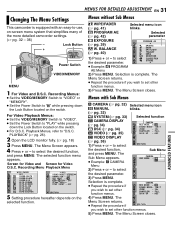
...ZOOM - 25x SNAP/SLOW - Menus without Sub Menus v WIPE/FADER Selected menu icon (੬ pg. 41) blinks. The Menu Screen returns. ● Repeat the procedure if you wish to "D.S.C. to "PLAY" while pressing down the Lock Button located on -screen menu system that simplifies many of the more detailed camcorder...PROGRAM AE (੬ pg. 39) u W. SOUND MODE - 1 2B I NPUT - FUL L GA I N UP - Lock Button + MA Power Switch VIDEO/MEMORY MENU 1 For Video and D.S.C. BALANCE (੬ pg. 40) 1) Press + or - S POR T S SNOW SPOTL IGHT TWILIGHT SEPIA MONOTONE CLASSIC FILM STROBE ...
...ZOOM - 25x SNAP/SLOW - Menus without Sub Menus v WIPE/FADER Selected menu icon (੬ pg. 41) blinks. The Menu Screen returns. ● Repeat the procedure if you wish to "D.S.C. to "PLAY" while pressing down the Lock Button located on -screen menu system that simplifies many of the more detailed camcorder...PROGRAM AE (੬ pg. 39) u W. SOUND MODE - 1 2B I NPUT - FUL L GA I N UP - Lock Button + MA Power Switch VIDEO/MEMORY MENU 1 For Video and D.S.C. BALANCE (੬ pg. 40) 1) Press + or - S POR T S SNOW SPOTL IGHT TWILIGHT SEPIA MONOTONE CLASSIC FILM STROBE ...


