Instruction Manual
Page 2
... service personnel. 3. Consult the dealer or an experienced radio/TV technician for purchasing a JVC product. There are designed to Part 15 of the following measures: - Do not view directly with the limits for a Class B digital device, pursuant to provide reasonable protection against harmful interference in a particular installation. REPRODUCTION OF LABEL: CAUTION LABEL, PLACED OUTSIDE THE UNIT. [European Union only] 2 Caution: Changes...
... service personnel. 3. Consult the dealer or an experienced radio/TV technician for purchasing a JVC product. There are designed to Part 15 of the following measures: - Do not view directly with the limits for a Class B digital device, pursuant to provide reasonable protection against harmful interference in a particular installation. REPRODUCTION OF LABEL: CAUTION LABEL, PLACED OUTSIDE THE UNIT. [European Union only] 2 Caution: Changes...
Instruction Manual
Page 3
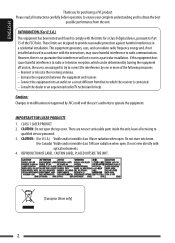
If you have parked the car for Bluetooth sources) without pressing any complicated operations. Works as this does not work, reset your unit • Your preset adjustments will block outside sounds, making driving dangerous. • Stop the car before operating the unit. 3 For safety... • Do not raise the volume level too much, as time countdown indicator. To use these controls for original functions again, wait for 15 seconds (or 30 seconds for...
If you have parked the car for Bluetooth sources) without pressing any complicated operations. Works as this does not work, reset your unit • Your preset adjustments will block outside sounds, making driving dangerous. • Stop the car before operating the unit. 3 For safety... • Do not raise the volume level too much, as time countdown indicator. To use these controls for original functions again, wait for 15 seconds (or 30 seconds for...
Instruction Manual
Page 4
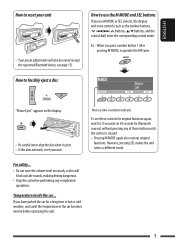
... car is below 0°C (32°F), the movement of the output level. appears on the display to prevent the display from being blurred. KD-AR780 is resumed, these functions will be involved in a traffic accident. Caution on volume setting: Discs produce very little noise compared with the steering wheel remote control function. • See the Installation/Connection Manual (separate volume) for connection. 4 Warning: If you need to operate the unit while driving...
... car is below 0°C (32°F), the movement of the output level. appears on the display to prevent the display from being blurred. KD-AR780 is resumed, these functions will be involved in a traffic accident. Caution on volume setting: Discs produce very little noise compared with the steering wheel remote control function. • See the Installation/Connection Manual (separate volume) for connection. 4 Warning: If you need to operate the unit while driving...
Instruction Manual
Page 6
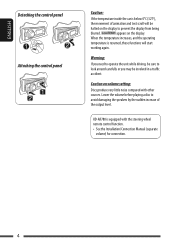
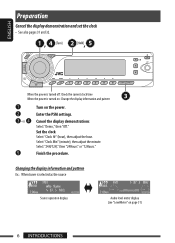
...." Select "Clock Min" (minute), then adjust the minute. Set the clock Select "Clock Hr" (hour), then adjust the hour. Cancel the display demonstrations Select "Demo," then "Off." Finish the procedure. Changing the display information and pattern Ex.: When tuner is turned on: Change the display information and pattern ~ Ÿ ! ] ⁄ @ Turn on page 31) 6 INTRODUCTIONS When the power is turned off: Check the current clock time When the power is selected as the source Source operation display Audio level meter display...
...." Select "Clock Min" (minute), then adjust the minute. Set the clock Select "Clock Hr" (hour), then adjust the hour. Cancel the display demonstrations Select "Demo," then "Off." Finish the procedure. Changing the display information and pattern Ex.: When tuner is turned on: Change the display information and pattern ~ Ÿ ! ] ⁄ @ Turn on page 31) 6 INTRODUCTIONS When the power is turned off: Check the current clock time When the power is selected as the source Source operation display Audio level meter display...
Instruction Manual
Page 7
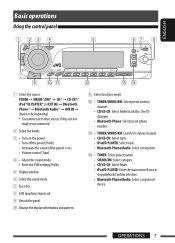
... the power is on). • Volume control [Turn]. 4 • Adjust the sound mode. • Enter the PSM settings [Hold]. 5 Display window 6 Select the sound mode. 7 Eject disc. 8 AUX (auxiliary) input jack 9 Detach the panel. e • TUNER/SIRIUS/XM: Search for CD changer). • Bluetooth Phone: Select preset phone number. OPERATIONS 7 ENGLISH Basic operations Using the control panel 1 Select the source. w • TUNER/SIRIUS/XM: Select preset station/ channel. • CD/CD-CH: Select folder/track/disc (for station/channel. • CD/CD-CH: Select track. • iPod/D.PLAYER...
... the power is on). • Volume control [Turn]. 4 • Adjust the sound mode. • Enter the PSM settings [Hold]. 5 Display window 6 Select the sound mode. 7 Eject disc. 8 AUX (auxiliary) input jack 9 Detach the panel. e • TUNER/SIRIUS/XM: Search for CD changer). • Bluetooth Phone: Select preset phone number. OPERATIONS 7 ENGLISH Basic operations Using the control panel 1 Select the source. w • TUNER/SIRIUS/XM: Select preset station/ channel. • CD/CD-CH: Select folder/track/disc (for station/channel. • CD/CD-CH: Select track. • iPod/D.PLAYER...
Instruction Manual
Page 8
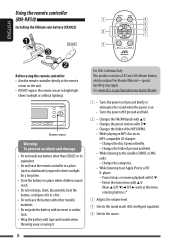
... • Do not install any battery other than CR2025 or its equivalent. • Do not leave the remote controller in a place (such as the menu selecting buttons.)* 3 Adjusts the volume level. 4 Selects the sound mode (iEQ: intelligent equalizer). 5 Selects the source. 8 player: - See www.dtsc.ca.gov/hazardouswaste/perchlorate 1 • Turns the power on if pressed briefly or attenuates the sound when the power is on. • Turns the power off if pressed...
... • Do not install any battery other than CR2025 or its equivalent. • Do not leave the remote controller in a place (such as the menu selecting buttons.)* 3 Adjusts the volume level. 4 Selects the sound mode (iEQ: intelligent equalizer). 5 Selects the source. 8 player: - See www.dtsc.ca.gov/hazardouswaste/perchlorate 1 • Turns the power on if pressed briefly or attenuates the sound when the power is on. • Turns the power off if pressed...
Instruction Manual
Page 10
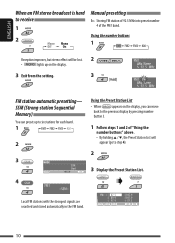
Using the number buttons 1 Reception improves, but stereo effect will be lost. 2 • lights up to six stations for each band. 1 2 3 Using the Preset Station List • When appears on the display. 3 Exit from the setting. 3 FM station automatic presetting- ENGLISH When an FM stereo broadcast is hard to step 4). 2 3 Display the Preset Station List. 4 Local FM stations with the strongest signals are searched and stored automatically in the...
Using the number buttons 1 Reception improves, but stereo effect will be lost. 2 • lights up to six stations for each band. 1 2 3 Using the Preset Station List • When appears on the display. 3 Exit from the setting. 3 FM station automatic presetting- ENGLISH When an FM stereo broadcast is hard to step 4). 2 3 Display the Preset Station List. 4 Local FM stations with the strongest signals are searched and stored automatically in the...
Instruction Manual
Page 13
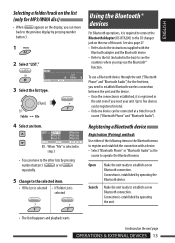
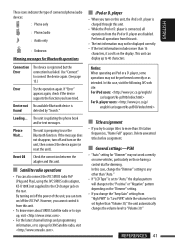
... selected Using the Bluetooth® devices For Bluetooth operations, it is selected in the box) to the CD changer jack on the rear of the following items in the unit even if you may use a Bluetooth device through the unit ("Bluetooth Phone" and "Bluetooth Audio") for each source ("Bluetooth Phone" and "Bluetooth Audio"). Continued on the display, you can be connected at a time for the first time, you need to establish Bluetooth wireless connection between the unit and the device. • Once the connection...
... selected Using the Bluetooth® devices For Bluetooth operations, it is selected in the box) to the CD changer jack on the rear of the following items in the unit even if you may use a Bluetooth device through the unit ("Bluetooth Phone" and "Bluetooth Audio") for each source ("Bluetooth Phone" and "Bluetooth Audio"). Continued on the display, you can be connected at a time for the first time, you need to establish Bluetooth wireless connection between the unit and the device. • Once the connection...
Instruction Manual
Page 15
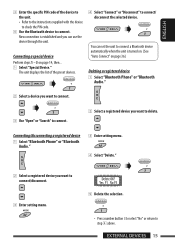
... number button 3 to select "No" or return to step 4 above. You can use the device through the unit. EXTERNAL DEVICES 15 Now connection is established and you want to delete. ENGLISH 3 Enter the specific PIN code of the preset devices. 4 Select "Connect" or "Disconnect" to connect/ disconnect the selected device. Connecting/disconnecting a registered device 1 Select "Bluetooth Phone" or "Bluetooth Audio." 3 Enter setting menu. 4 Select "Delete." 2 Select a registered device you can set the unit to connect a Bluetooth device automatically when the unit is turned on. (See "Auto...
... number button 3 to select "No" or return to step 4 above. You can use the device through the unit. EXTERNAL DEVICES 15 Now connection is established and you want to delete. ENGLISH 3 Enter the specific PIN code of the preset devices. 4 Select "Connect" or "Disconnect" to connect/ disconnect the selected device. Connecting/disconnecting a registered device 1 Select "Bluetooth Phone" or "Bluetooth Audio." 3 Enter setting menu. 4 Select "Delete." 2 Select a registered device you can set the unit to connect a Bluetooth device automatically when the unit is turned on. (See "Auto...
Instruction Manual
Page 16
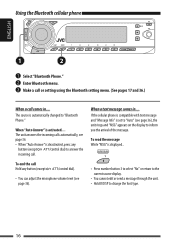
... in .... Using the Bluetooth cellular phone ENGLISH ~ Select "Bluetooth Phone." Ÿ Enter Bluetooth menu. ! Make a call or setting using the Bluetooth setting menu. (See pages 17 and 36.) When a call . The unit answers the incoming calls automatically, see page 36. • When "Auto Answer" is deactivated, press any button (except /control dial). • You can adjust the microphone volume level (see page 36), the unit rings and "MSG" appears on the display to...
... in .... Using the Bluetooth cellular phone ENGLISH ~ Select "Bluetooth Phone." Ÿ Enter Bluetooth menu. ! Make a call or setting using the Bluetooth setting menu. (See pages 17 and 36.) When a call . The unit answers the incoming calls automatically, see page 36. • When "Auto Answer" is deactivated, press any button (except /control dial). • You can adjust the microphone volume level (see page 36), the unit rings and "MSG" appears on the display to...
Instruction Manual
Page 26
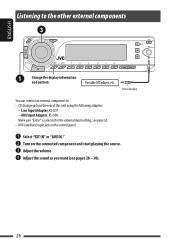
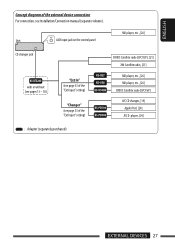
Adjust the volume. ⁄ Adjust the sound as you want (see page 33. • AUX (auxiliary) input jack on the control panel. ~ Select "EXT IN" or "AUX IN." Ÿ Turn on the rear of this unit using the following adapters: - ENGLISH Listening to the other external components Change the display information and pattern You can connect an external component to: • CD changer jack on the connected component and start playing the source. ! AUX Input Adapter, KS-U58 Make sure "Ext In" is selected for the external input setting, see pages 28 - 30). 26 Line Input Adapter, KS-U57 -
Adjust the volume. ⁄ Adjust the sound as you want (see page 33. • AUX (auxiliary) input jack on the control panel. ~ Select "EXT IN" or "AUX IN." Ÿ Turn on the rear of this unit using the following adapters: - ENGLISH Listening to the other external components Change the display information and pattern You can connect an external component to: • CD changer jack on the connected component and start playing the source. ! AUX Input Adapter, KS-U58 Make sure "Ext In" is selected for the external input setting, see pages 28 - 30). 26 Line Input Adapter, KS-U57 -
Instruction Manual
Page 27
Unit AUX input jack on the control panel MD player, etc., [26] CD changer jack with or without (see pages 13 - 18) (see page 33 of the "Ext Input" setting) SIRIUS Satellite radio (JVC DLP), [21] XM Satellite radio, [21] MD player, etc., [26] MD player, etc., [26] SIRIUS Satellite radio (JVC PnP) JVC CD changer, [19] Apple iPod, [24] JVC D. player, [24] : Adapter (separately purchased) EXTERNAL DEVICES 27 ENGLISH Concept diagram of the external device connection For connection, see page 33 of the "Ext Input" setting) (see Installation/Connection manual (separate volume).
Unit AUX input jack on the control panel MD player, etc., [26] CD changer jack with or without (see pages 13 - 18) (see page 33 of the "Ext Input" setting) SIRIUS Satellite radio (JVC DLP), [21] XM Satellite radio, [21] MD player, etc., [26] MD player, etc., [26] SIRIUS Satellite radio (JVC PnP) JVC CD changer, [19] Apple iPod, [24] JVC D. player, [24] : Adapter (separately purchased) EXTERNAL DEVICES 27 ENGLISH Concept diagram of the external device connection For connection, see page 33 of the "Ext Input" setting) (see Installation/Connection manual (separate volume).
Instruction Manual
Page 29
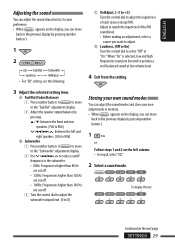
..." adjustment display. 2 Adjust the speaker output balance by pressing: 5 / ∞: between the front and rear speakers. [F06 to R06] 4/¢ : between the left column. • In step 2, select "EQ." 2 Select a sound mode. ENGLISH Adjusting the sound You can adjust the sound characteristics to your own adjustments in memory. • When appears on the display, you can move back to the previous display by pressing number button 3. 1 2 C VolAdjust, [-5 to +5] Turn the control dial to adjust the input level...
..." adjustment display. 2 Adjust the speaker output balance by pressing: 5 / ∞: between the front and rear speakers. [F06 to R06] 4/¢ : between the left column. • In step 2, select "EQ." 2 Select a sound mode. ENGLISH Adjusting the sound You can adjust the sound characteristics to your own adjustments in memory. • When appears on the display, you can move back to the previous display by pressing number button 3. 1 2 C VolAdjust, [-5 to +5] Turn the control dial to adjust the input level...
Instruction Manual
Page 32
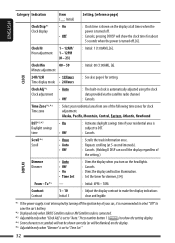
... adjusted using the clock data provided via the satellite radio channel. : Cancels. Clock Hr Hour adjustment 1 - 12AM/ 1 - 12PM (0 - 23) : Initial: 1 (1:00AM), [6]. Press number button 1 ( ) to show the clock time for dimmer, [34]. Alaska, Pacific, Mountain, Central, Eastern, Atlantic, Newfound DST *2, *3 • On Daylight savings time • Off : Activates daylight savings time if your car, it is recommended to select "Off" to save the car's battery. *2 Displayed only when SIRIUS Satellite radio or XM Satellite radio is connected. *3 Adjustable...
... adjusted using the clock data provided via the satellite radio channel. : Cancels. Clock Hr Hour adjustment 1 - 12AM/ 1 - 12PM (0 - 23) : Initial: 1 (1:00AM), [6]. Press number button 1 ( ) to show the clock time for dimmer, [34]. Alaska, Pacific, Mountain, Central, Eastern, Atlantic, Newfound DST *2, *3 • On Daylight savings time • Off : Activates daylight savings time if your car, it is recommended to select "Off" to save the car's battery. *2 Displayed only when SIRIUS Satellite radio or XM Satellite radio is connected. *3 Adjustable...

Instruction Manual
Page 33
... used during the day time*6; player, [24]. : To use a JVC CD changer, [19], or an Apple iPod/a JVC D. IF Band Intermediate frequency band • Auto • Wide : Increases the tuner selectivity to reduce interference noises between adjacent stations. (Stereo effect may be lost.) : Subject to interference noises from adjacent stations, but sound quality will not be degraded and the stereo effect will be used on the "Dimmer" setting. *7 Displayed only when SIRIUS Satellite radio is connected. *8 Displayed...
... used during the day time*6; player, [24]. : To use a JVC CD changer, [19], or an Apple iPod/a JVC D. IF Band Intermediate frequency band • Auto • Wide : Increases the tuner selectivity to reduce interference noises between adjacent stations. (Stereo effect may be lost.) : Subject to interference noises from adjacent stations, but sound quality will not be degraded and the stereo effect will be used on the "Dimmer" setting. *7 Displayed only when SIRIUS Satellite radio is connected. *8 Displayed...
Instruction Manual
Page 34
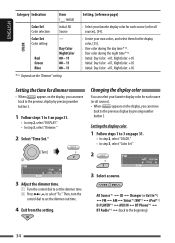
... 2, select "DISPLAY." • In step 3, select "Dimmer." 2 Select "Time Set." Setting the display color 1 Follow steps 1 to select "To." Then, turn the control dial to set the dimmer time. 2 Press ¢ to 3 on the "Dimmer" setting. All Source*1 Ô CD Ô Changer (or Ext In*2) Ô FM Ô AM Ô Sirius*3/XM*3 Ô iPod*3/ D.PLAYER*3 Ô AUX IN Ô BT Phone*3 Ô BT Audio*3 Ô (back to set the dimmer end time. 4 Exit from the setting. 3 Select a source. Setting, [reference page] : Select your favorite display color for...
... 2, select "DISPLAY." • In step 3, select "Dimmer." 2 Select "Time Set." Setting the display color 1 Follow steps 1 to select "To." Then, turn the control dial to set the dimmer time. 2 Press ¢ to 3 on the "Dimmer" setting. All Source*1 Ô CD Ô Changer (or Ext In*2) Ô FM Ô AM Ô Sirius*3/XM*3 Ô iPod*3/ D.PLAYER*3 Ô AUX IN Ô BT Phone*3 Ô BT Audio*3 Ô (back to set the dimmer end time. 4 Exit from the setting. 3 Select a source. Setting, [reference page] : Select your favorite display color for...
Instruction Manual
Page 41
... iPod or D. This unit can display up to "Volume 30." Notice: When operating an iPod or a D. In this unit, the iPod or D. In this unit. • To know more about SIRIUS Satellite radio or to sign up, visit . • For the latest channel listings and programming information, or to the CD changer jack on /off the JVC PnP. Please Wait... Satellite radio operations • You can turn off the power of connected phone/audio devices: : Phone only : Phone/audio : Audio...
... iPod or D. This unit can display up to "Volume 30." Notice: When operating an iPod or a D. In this unit, the iPod or D. In this unit. • To know more about SIRIUS Satellite radio or to sign up, visit . • For the latest channel listings and programming information, or to the CD changer jack on /off the JVC PnP. Please Wait... Satellite radio operations • You can turn off the power of connected phone/audio devices: : Phone only : Phone/audio : Audio...
Instruction Manual
Page 42
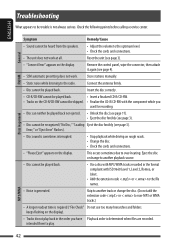
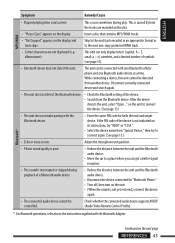
... playback while driving on rough roads. • Change the disc. • Check the cords and connections. • "Please Eject" appears on the display). • Tracks do not play . Store stations manually. • Static noise while listening to over-heating. ENGLISH Troubleshooting What appears to be heard from the speakers. • Adjust the volume to the optimum level. • Check the cords and connections. • The unit does not work .
... playback while driving on rough roads. • Change the disc. • Check the cords and connections. • "Please Eject" appears on the display). • Tracks do not play . Store stations manually. • Static noise while listening to over-heating. ENGLISH Troubleshooting What appears to be heard from the speakers. • Adjust the volume to the optimum level. • Check the cords and connections. • The unit does not work .
Instruction Manual
Page 43
... the unit to connect the device. (See page 13.) • The unit does not make pairing with the Bluetooth device. • Enter the same PIN code for "Bluetooth Phone." • Turn off, then turn on its instructions, try "0000" or "1234." • Select the device name from "Special Device," then try to the next non-copy-protected WMA track. • Correct characters are recorded on the disc. • "Please Eject" appears...
... the unit to connect the device. (See page 13.) • The unit does not make pairing with the Bluetooth device. • Enter the same PIN code for "Bluetooth Phone." • Turn off, then turn on its instructions, try "0000" or "1234." • Select the device name from "Special Device," then try to the next non-copy-protected WMA track. • Correct characters are recorded on the disc. • "Please Eject" appears...

Instruction Manual
Page 45
... the iPod/ D. Disconnect the adapter from the iPod nano. • Update the firmware version of the iPod nano. player's controls do not work . • Update the firmware version. • Charge the battery. • The sound is distorted. and any use of their respective owners. player does not turn on or does • Check the connecting cable and its connection. • Charge the battery. • Playback stops. player. • "Disconnect" appears on the display...
... the iPod/ D. Disconnect the adapter from the iPod nano. • Update the firmware version of the iPod nano. player's controls do not work . • Update the firmware version. • Charge the battery. • The sound is distorted. and any use of their respective owners. player does not turn on or does • Check the connecting cable and its connection. • Charge the battery. • Playback stops. player. • "Disconnect" appears on the display...


