Instruction Manual
Page 1
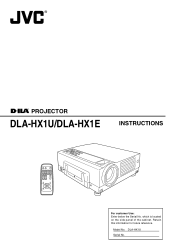
MENU EXIT ENTER PRESET HIDE For customer Use: Enter below the Serial No. Model No. Retain this information for future reference. DLA-HX1U Serial No. which is located on the side panel of the cabinet. ® ® PROJECTOR DLA-HX1U/DLA-HX1E INSTRUCTIONS PC VIDEO OPERATE W V-KEYSTONE H-KEYSTONE SCREEN DIGITAL ZOOM S FREEZE VOLUME FOCUS QUICK ALIGN.
MENU EXIT ENTER PRESET HIDE For customer Use: Enter below the Serial No. Model No. Retain this information for future reference. DLA-HX1U Serial No. which is located on the side panel of the cabinet. ® ® PROJECTOR DLA-HX1U/DLA-HX1E INSTRUCTIONS PC VIDEO OPERATE W V-KEYSTONE H-KEYSTONE SCREEN DIGITAL ZOOM S FREEZE VOLUME FOCUS QUICK ALIGN.

Instruction Manual
Page 2
... CAUTION: Changes or modification not approved by the product manufacturer as this product from the wall outlet before use attachments not recommended by JVC could void the user's authority to comply with the limits for help. ceiver. • Connect the ...ILA device. The video image could fall , causing serious injury to a child or adult, and serious damage to which may be projected for a long time or an abnormally bright video picture to the operator. Please read be burnt into the outlet, contact your personal safety. Place the projector near water. Do not use...
... CAUTION: Changes or modification not approved by the product manufacturer as this product from the wall outlet before use attachments not recommended by JVC could void the user's authority to comply with the limits for help. ceiver. • Connect the ...ILA device. The video image could fall , causing serious injury to a child or adult, and serious damage to which may be projected for a long time or an abnormally bright video picture to the operator. Please read be burnt into the outlet, contact your personal safety. Place the projector near water. Do not use...
Instruction Manual
Page 3
These openings must be impaired. - If you are not sure of the type of power supply to your home, consult your dealer. - Do not defeat the safety purpose of the lightsource lamp. For added protection of this product through vents (ventilation holes), etc...which could be blocked by opening or removing covers may result in impaired eyesight. - The power supply voltage rating of the projector could lead to repair it is used for service. - Use only the power cord designated by following power supply voltage. When it . Consult your dealer to personal injury. - Be ...
These openings must be impaired. - If you are not sure of the type of power supply to your home, consult your dealer. - Do not defeat the safety purpose of the lightsource lamp. For added protection of this product through vents (ventilation holes), etc...which could be blocked by opening or removing covers may result in impaired eyesight. - The power supply voltage rating of the projector could lead to repair it is used for service. - Use only the power cord designated by following power supply voltage. When it . Consult your dealer to personal injury. - Be ...
Instruction Manual
Page 4
... Green-and-yellow : Earth Blue : Neutral Brown : Live As these colors may not correspond with the coloured making identifying the terminals in your home or the cable is too short to reach a power point, then obtain an appropriate safety approved extension lead or adapter or consult your plug, ... an appropriate safety approved extension lead or adapter or consult your plug, proceed as fol- If a new main plug has to be connected to use only a correctly rated approved type, re-fit the fuse cover. The wire which is not suitable for the power points in the illustration below...
... Green-and-yellow : Earth Blue : Neutral Brown : Live As these colors may not correspond with the coloured making identifying the terminals in your home or the cable is too short to reach a power point, then obtain an appropriate safety approved extension lead or adapter or consult your plug, ... an appropriate safety approved extension lead or adapter or consult your plug, proceed as fol- If a new main plug has to be connected to use only a correctly rated approved type, re-fit the fuse cover. The wire which is not suitable for the power points in the illustration below...
Instruction Manual
Page 5
...(e.g. Caution About burning-in of the D-ILA device ● Do not allow it to come into the D-ILA device. Using the screen mode switch function • This projector is used directly. The cap may become deformed and this unit. When using the projector Please use of the screen mode switch function to ... images. How to the installation contractor. Do not project video images with a screen mode switch function that making use the projector after removing the lens cap. The video image could be projected. Viewing conditions ● Brightness of the screen to...
...(e.g. Caution About burning-in of the D-ILA device ● Do not allow it to come into the D-ILA device. Using the screen mode switch function • This projector is used directly. The cap may become deformed and this unit. When using the projector Please use of the screen mode switch function to ... images. How to the installation contractor. Do not project video images with a screen mode switch function that making use the projector after removing the lens cap. The video image could be projected. Viewing conditions ● Brightness of the screen to...
Instruction Manual
Page 6
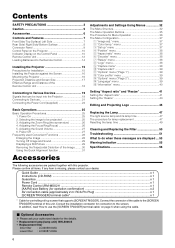
... Panel 10 Remote Control Unit 12 Loading Batteries into the Projector 19 Connecting to the [SCREEN TRIGGER] terminal of the Image ......... 30 Using the Quick Alignment function 31 Accessories Adjustments and Settings Using Menus 32 The Menu Structure 32 The Menu Operation Buttons ...7 Front Side/ Top Surface/ Left Side 7 Rear Side/ Right Side/ Bottom Surface 8 Connector Panel 9 Control Panel on the Projector 10 Indicator Display on page 5 when using the cable. Ⅵ Optional Accessories ❈ Please ask your dealer. Adjusting the Zoom Ring (the screen size 26 4. In ...
... Panel 10 Remote Control Unit 12 Loading Batteries into the Projector 19 Connecting to the [SCREEN TRIGGER] terminal of the Image ......... 30 Using the Quick Alignment function 31 Accessories Adjustments and Settings Using Menus 32 The Menu Structure 32 The Menu Operation Buttons ...7 Front Side/ Top Surface/ Left Side 7 Rear Side/ Right Side/ Bottom Surface 8 Connector Panel 9 Control Panel on the Projector 10 Indicator Display on page 5 when using the cable. Ⅵ Optional Accessories ❈ Please ask your dealer. Adjusting the Zoom Ring (the screen size 26 4. In ...
Instruction Manual
Page 7
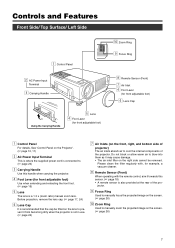
... right side cannot be fitted on the lens to prevent it towards this handle when carrying the projector. 4 Foot Lever (for example, a vacuum cleaner. 8 Remote Sensor (Front) When operating with , for front adjustable foot) Use when extending and retracting the front foot. (☞ page 15) 5 Lens The lens is a ... clean the filter regularly with the remote control, aim it from becoming dirty when the projector is not in use. (☞ page 24) 7 Air Inlets (on the front, right, and bottom side of projector) The air inlets absorb air to manually zoom the projected image on the screen. (&#...
... right side cannot be fitted on the lens to prevent it towards this handle when carrying the projector. 4 Foot Lever (for example, a vacuum cleaner. 8 Remote Sensor (Front) When operating with , for front adjustable foot) Use when extending and retracting the front foot. (☞ page 15) 5 Lens The lens is a ... clean the filter regularly with the remote control, aim it from becoming dirty when the projector is not in use. (☞ page 24) 7 Air Inlets (on the front, right, and bottom side of projector) The air inlets absorb air to manually zoom the projected image on the screen. (&#...
Instruction Manual
Page 8
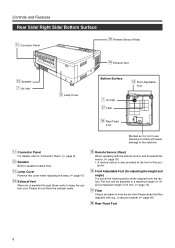
..., refer to a maximum angle of +6° and a maximum length of the pro- The foot can be adjusted to 'Connector Panel'. (☞ page 9) w Speaker Built-in use. e Lamp Cover Remove this sensor. (☞ page 18) • A remote sensor is expelled through these vents to the machine. Please clean the filter regularly with...
..., refer to a maximum angle of +6° and a maximum length of the pro- The foot can be adjusted to 'Connector Panel'. (☞ page 9) w Speaker Built-in use. e Lamp Cover Remove this sensor. (☞ page 18) • A remote sensor is expelled through these vents to the machine. Please clean the filter regularly with...

Instruction Manual
Page 9
...input is a composite sync (Cs) or G on sync signal. Devices which have component signal output terminals can be used to connect an external sensor to the projector. The external sensor is the input terminal for controlling roll-up screen that allow input of a VCR, etc. ... of external sync signals is unable to work due to rear projection etc., the [REMOTE] terminal can also be controlled using the supplied cable, read 'How to use this projector is monaural.) 6 [REMOTE] Terminal (stereo mini jack) When the remote control is automatically detected. Connect this terminal. ...
...input is a composite sync (Cs) or G on sync signal. Devices which have component signal output terminals can be used to connect an external sensor to the projector. The external sensor is the input terminal for controlling roll-up screen that allow input of a VCR, etc. ... of external sync signals is unable to work due to rear projection etc., the [REMOTE] terminal can also be controlled using the supplied cable, read 'How to use this projector is monaural.) 6 [REMOTE] Terminal (stereo mini jack) When the remote control is automatically detected. Connect this terminal. ...
Instruction Manual
Page 11
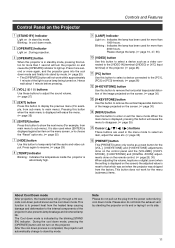
...to remove the vertical trapezoidal distortion of the image projected on : In stand by mode. Blinking : Indicates the lamp has been used when [ENTER] is indicated by standing the projector on its end or laying it one second or more than 1 second will erase the menu. (☞ page 35) 6...prevent heat from the heated lamp causing damage and deformation to disappear. (☞ page 35) t Cursor buttons These buttons are used for more again, and the projector goes into stand by mode. This button does not work within approximately 1 minute of the light-source lamp being turned on ...
...to remove the vertical trapezoidal distortion of the image projected on : In stand by mode. Blinking : Indicates the lamp has been used when [ENTER] is indicated by standing the projector on its end or laying it one second or more than 1 second will erase the menu. (☞ page 35) 6...prevent heat from the heated lamp causing damage and deformation to disappear. (☞ page 35) t Cursor buttons These buttons are used for more again, and the projector goes into stand by mode. This button does not work within approximately 1 minute of the light-source lamp being turned on ...
Instruction Manual
Page 13
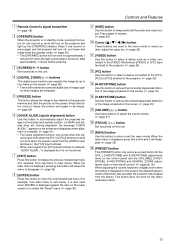
...terminal ([VIDEO] or [Y/C] Input terminal) of the projector. (☞ page 25) w [PC] button Use this button to select a device connected to the [PC1], [PC2] or [PC3] terminal of the projector. (☞ page 26) e [H-KEYSTONE] button Use this button to remove the horizontal trapezoidal distortion of the... image projected on the screen. (☞ page 30) r [V-KEYSTONE] button Use this button to select a device such as a reset button ...
...terminal ([VIDEO] or [Y/C] Input terminal) of the projector. (☞ page 25) w [PC] button Use this button to select a device connected to the [PC1], [PC2] or [PC3] terminal of the projector. (☞ page 26) e [H-KEYSTONE] button Use this button to remove the horizontal trapezoidal distortion of the... image projected on the screen. (☞ page 30) r [V-KEYSTONE] button Use this button to select a device such as a reset button ...
Instruction Manual
Page 14
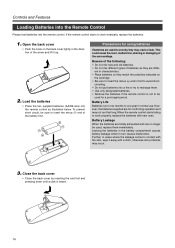
..., in the direction of batteries as illustrated below. Battery Leakage When the batteries are totally exhausted and can no longer be used, replace them . • Use only designated batteries. • Remove the batteries if the remote control is heard. 14 Open the back cover • ...battery compartment causes battery leakage which in first to insert the minus · end in turn causes malfunction. To prevent short circuit, be used for using batteries If batteries are differ- ent in characteristics. • Place batteries so they may occur. 3. circuiting. • Do not put...
..., in the direction of batteries as illustrated below. Battery Leakage When the batteries are totally exhausted and can no longer be used, replace them . • Use only designated batteries. • Remove the batteries if the remote control is heard. 14 Open the back cover • ...battery compartment causes battery leakage which in first to insert the minus · end in turn causes malfunction. To prevent short circuit, be used for using batteries If batteries are differ- ent in characteristics. • Place batteries so they may occur. 3. circuiting. • Do not put...

Instruction Manual
Page 15
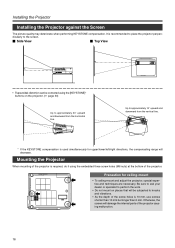
...• On a soft surface such as doing so may enclose the projector air-tight or block the exhaust vents. Adjusting the level of the following properly when installing the projector. Please DO NOT use an air conditioner so that internal and external temperatures are cooled down ). ... Space Required 150 mm 300 mm Do not use the projector while it in a space of the projector minutely • Lift the projector, rotate the front adjustable foot, and adjust the horizontal angle until the projector is not possible. When the projector is on its side. • Projecting images...
...• On a soft surface such as doing so may enclose the projector air-tight or block the exhaust vents. Adjusting the level of the following properly when installing the projector. Please DO NOT use an air conditioner so that internal and external temperatures are cooled down ). ... Space Required 150 mm 300 mm Do not use the projector while it in a space of the projector minutely • Lift the projector, rotate the front adjustable foot, and adjust the horizontal angle until the projector is not possible. When the projector is on its side. • Projecting images...
Instruction Manual
Page 16
...for upper/lower/left/right directions, the compensating range will damage the internal parts of the projector causing malfunction. 16 Mounting the Projector When mounting of the projector is required, do it using the embedded three screw holes (M6 nuts) at the bottom of the screw holes is ... to approximately 30° upward and downward from the vertical line. * If the KEYSTONE compensation is used simultaneously for ceiling-mount • To ceiling-mount and adjust the projector, special expertise and techniques are necessary. Be sure to ask your dealer or specialist to perform the ...
...for upper/lower/left/right directions, the compensating range will damage the internal parts of the projector causing malfunction. 16 Mounting the Projector When mounting of the projector is required, do it using the embedded three screw holes (M6 nuts) at the bottom of the screw holes is ... to approximately 30° upward and downward from the vertical line. * If the KEYSTONE compensation is used simultaneously for ceiling-mount • To ceiling-mount and adjust the projector, special expertise and techniques are necessary. Be sure to ask your dealer or specialist to perform the ...
Instruction Manual
Page 17
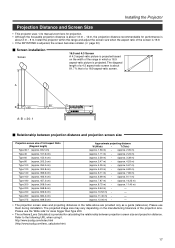
... Distance and Screen Size • This projector uses 1.3x manual zoom lens for projection. • Although the focusable projection distance is about 1.6 m ~ 12 m, the projection distance recommendable for performance is about 81.7 % that of the projection lens. Please use the 'Wide side' for calculating the ... only as a guide (reference). http://www.jvcdig.com/index.html (http://www.jvcdig.com/lens_calculator.htm) 17 Please use them during installation. Install the projector within this range and adjust the screen size when the aspect ratio of the screen is 16:9. • If the...
... Distance and Screen Size • This projector uses 1.3x manual zoom lens for projection. • Although the focusable projection distance is about 1.6 m ~ 12 m, the projection distance recommendable for performance is about 81.7 % that of the projection lens. Please use the 'Wide side' for calculating the ... only as a guide (reference). http://www.jvcdig.com/index.html (http://www.jvcdig.com/lens_calculator.htm) 17 Please use them during installation. Install the projector within this range and adjust the screen size when the aspect ratio of the screen is 16:9. • If the...

Instruction Manual
Page 18
... remote control via the supplied remote control, confirm that the cable is not connected to the projector. 18 FREEZE ENTER EXIT PRESET HIDE Remote Control Unit Remote Control Unit Ⅵ Using as a wired Remote Control By connecting a separately sold remote control (RM-M3010) is equivalent... to remote control, within the range of the remote cable length. Installing the Projector Effective Range and Distance of the Remote Control Unit Ⅵ Using as a wireless remote control unit The operable distance of the remote control unit is about 7 m for ...
... remote control via the supplied remote control, confirm that the cable is not connected to the projector. 18 FREEZE ENTER EXIT PRESET HIDE Remote Control Unit Remote Control Unit Ⅵ Using as a wired Remote Control By connecting a separately sold remote control (RM-M3010) is equivalent... to remote control, within the range of the remote cable length. Installing the Projector Effective Range and Distance of the Remote Control Unit Ⅵ Using as a wireless remote control unit The operable distance of the remote control unit is about 7 m for ...
Instruction Manual
Page 19
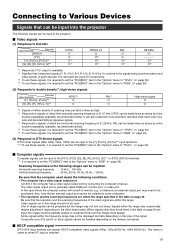
... the "PC2(BNC)" item in the "Options" menu to "YPBPR". (☞ page 39) *9: To use these signals, it is 31.25 kHz. Composite sync (Cs) and G on Sync signals cannot be input to the projector. Ⅵ Video signals (1) Response to Decoder Input terminal Decoder [VIDEO] [Y/C] [Y], [PB/CB], [PR... decoded 525p progressive signals. *7: Responds to signals of each decoder. Connecting to Various Devices Signals that can be input into the projector The following signals can be handled depending on the devices connected. Ⅵ HDCP compatible signal [PC3 DVI] input terminal can accept...
... the "PC2(BNC)" item in the "Options" menu to "YPBPR". (☞ page 39) *9: To use these signals, it is 31.25 kHz. Composite sync (Cs) and G on Sync signals cannot be input to the projector. Ⅵ Video signals (1) Response to Decoder Input terminal Decoder [VIDEO] [Y/C] [Y], [PB/CB], [PR... decoded 525p progressive signals. *7: Responds to signals of each decoder. Connecting to Various Devices Signals that can be input into the projector The following signals can be handled depending on the devices connected. Ⅵ HDCP compatible signal [PC3 DVI] input terminal can accept...
Instruction Manual
Page 20
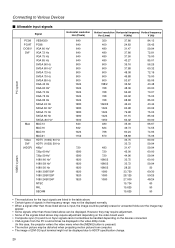
... in the frequency range may not be displayed normally. • When a signal other than those listed above may require adjustment depending on the video board used. • Composite sync (Cs) and G on Sync signals cannot sometimes be handled depending on the devices connected. • VGA signals from computer. &#... may be distorted when projecting motion picture from the PC could at times be displayed in the video 480p mode. (In this case, the projector enters the video menu when the [MENU] button is input, the image could be partially erased or unwanted folds-over the image may appear....
... in the frequency range may not be displayed normally. • When a signal other than those listed above may require adjustment depending on the video board used. • Composite sync (Cs) and G on Sync signals cannot sometimes be handled depending on the devices connected. • VGA signals from computer. &#... may be distorted when projecting motion picture from the PC could at times be displayed in the video 480p mode. (In this case, the projector enters the video menu when the [MENU] button is input, the image could be partially erased or unwanted folds-over the image may appear....
Instruction Manual
Page 21
...8226; Connect to Video Devices • Thoroughly read the manual that comes with much jitter is used, the "PC2(BNC)" item in "Options" menu must be sure to turn off both the projector and the device. Ⅵ Connecting to [AUDIO IN] terminal. Image input • Connect ...effect playbacks are not supplied. Connection • When connecting a video device, please use a TBC along with it, or use one with a built-in TBC. • Use of an extension cable to connect a video device and the projector could cause image deterioration or projection failure. • When a signal with each video...
...8226; Connect to Video Devices • Thoroughly read the manual that comes with much jitter is used, the "PC2(BNC)" item in "Options" menu must be sure to turn off both the projector and the device. Ⅵ Connecting to [AUDIO IN] terminal. Image input • Connect ...effect playbacks are not supplied. Connection • When connecting a video device, please use a TBC along with it, or use one with a built-in TBC. • Use of an extension cable to connect a video device and the projector could cause image deterioration or projection failure. • When a signal with each video...

Instruction Manual
Page 22
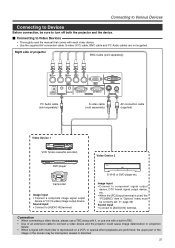
...IN RS-232C OUT RS-232C IN CONTROL Right side of projector Y/C VIDEO VIDEO IN To monitor connector Notebook Type To monitor connector ❈ There are some notebook type computers that come with the computer used , "PC2(BNC)" must be switched. Connecting to Various Devices..." menu. (☞ page 39) • When connecting an audio output terminal such as a computer sound source to the projector, connect to the [AUDIO IN] terminal using the separately available audio cable. • When connecting to PC-9800 Series computers, a separately available conversion adapter is connected....
...IN RS-232C OUT RS-232C IN CONTROL Right side of projector Y/C VIDEO VIDEO IN To monitor connector Notebook Type To monitor connector ❈ There are some notebook type computers that come with the computer used , "PC2(BNC)" must be switched. Connecting to Various Devices..." menu. (☞ page 39) • When connecting an audio output terminal such as a computer sound source to the projector, connect to the [AUDIO IN] terminal using the separately available audio cable. • When connecting to PC-9800 Series computers, a separately available conversion adapter is connected....