
Instruction Manual
Page 2
...) lamp that cannot support its installation, use and service. This projector is not sturdy enough, the projector could void the user's authority to which may fall or overturn, possibly causing personal injury. This equipment generates, uses, and can be blocked by the manufacturer. If the installation place is equipped with the limits for Class B digital devices, pursuant to environmental considerations. All operating instructions...
...) lamp that cannot support its installation, use and service. This projector is not sturdy enough, the projector could void the user's authority to which may fall or overturn, possibly causing personal injury. This equipment generates, uses, and can be blocked by the manufacturer. If the installation place is equipped with the limits for Class B digital devices, pursuant to environmental considerations. All operating instructions...
Instruction Manual
Page 3
... checks to cords at the illumination lamp directly by following conditions: a) When the power supply cord or plug is turned on . This plug will often require extensive work by the vibration, possibly causing it may result in a space of any way. Adjust only those controls that present special hazards when over heated. - f) When the product exhibits a distinct change in any service or repairs...
... checks to cords at the illumination lamp directly by following conditions: a) When the power supply cord or plug is turned on . This plug will often require extensive work by the vibration, possibly causing it may result in a space of any way. Adjust only those controls that present special hazards when over heated. - f) When the product exhibits a distinct change in any service or repairs...
Instruction Manual
Page 12
... Area of an Image......26 Settings Setting Menu 28 Procedures for Menu Operation 28 Setting Menu 29 Customizing Projected Images 40 Changing the Initial Setting of Picture Mode .40 Registering User-defined Picture Mode...........41 Registering User-defined Picture Mode from the Menu 41 Troubleshooting Troubleshooting 42 What to Do When these Messages Are Displayed 44 About Warning Indicators 45 Actions to Be Taken for Warning Mode...........45 Replacing the Lamp 46 Procedure for Lamp Replacement 46 Resetting Lamp Time 48 Cleaning and Replacing the Filter 49 Others RS...
... Area of an Image......26 Settings Setting Menu 28 Procedures for Menu Operation 28 Setting Menu 29 Customizing Projected Images 40 Changing the Initial Setting of Picture Mode .40 Registering User-defined Picture Mode...........41 Registering User-defined Picture Mode from the Menu 41 Troubleshooting Troubleshooting 42 What to Do When these Messages Are Displayed 44 About Warning Indicators 45 Actions to Be Taken for Warning Mode...........45 Replacing the Lamp 46 Procedure for Lamp Replacement 46 Resetting Lamp Time 48 Cleaning and Replacing the Filter 49 Others RS...
Instruction Manual
Page 13
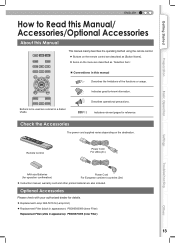
... GAMMA C.TEMP COLOR TINT N.R BRIGHT CONT SHARP TEST HIDE This manual mainly describes the operating method using the remote control. ● Buttons on the remote control are described as "Selection Item". ■ Conventions in a darker shade. MENU BACK CINEMA1 CINEMA2 NATURAL STAGE DYNAMIC Buttons to -know information. Remote Control Power Cord For USA (2m) Basic Operation Settings Troubleshooting AAA size Batteries (for operation confirmation) Power Cord For European continent countries (2m) ● Instruction manual, warranty...
... GAMMA C.TEMP COLOR TINT N.R BRIGHT CONT SHARP TEST HIDE This manual mainly describes the operating method using the remote control. ● Buttons on the remote control are described as "Selection Item". ■ Conventions in a darker shade. MENU BACK CINEMA1 CINEMA2 NATURAL STAGE DYNAMIC Buttons to -know information. Remote Control Power Cord For USA (2m) Basic Operation Settings Troubleshooting AAA size Batteries (for operation confirmation) Power Cord For European continent countries (2m) ● Instruction manual, warranty...
Instruction Manual
Page 16
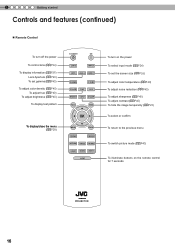
... STAGE DYNAMIC USER1 USER2 USER3 LIGHT To turn on the power To select input mode ( P24) To set the screen size ( P26) To adjust color temperature ( P40) To adjust noise reduction ( P40) To adjust sharpness ( P40) To adjust contrast ( P40) To hide the image temporarily ( P25) To select or confirm To return to the previous menu To switch picture mode ( P40) To illuminate buttons on the remote control for 7 seconds RM-MH2GB...
... STAGE DYNAMIC USER1 USER2 USER3 LIGHT To turn on the power To select input mode ( P24) To set the screen size ( P26) To adjust color temperature ( P40) To adjust noise reduction ( P40) To adjust sharpness ( P40) To adjust contrast ( P40) To hide the image temporarily ( P25) To select or confirm To return to the previous menu To switch picture mode ( P40) To illuminate buttons on the remote control for 7 seconds RM-MH2GB...

Instruction Manual
Page 17
... Range of Remote Control Unit ■ When directing the remote control toward this unit ● When aiming the remote control towards the remote sensor on this unit, ensure that the total of screen used, operable distance may decrease. When this unit. Getting Started ENGLISH How to Use the Remote control Loading Batteries 1 2 3 Preparation Basic Operation Settings ● If the remote control has to be brought closer to the projector to...
... Range of Remote Control Unit ■ When directing the remote control toward this unit ● When aiming the remote control towards the remote sensor on this unit, ensure that the total of screen used, operable distance may decrease. When this unit. Getting Started ENGLISH How to Use the Remote control Loading Batteries 1 2 3 Preparation Basic Operation Settings ● If the remote control has to be brought closer to the projector to...
Instruction Manual
Page 21
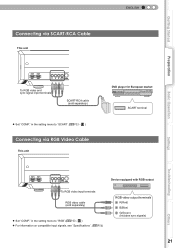
... Preparation Basic Operation HDMI 1 HDMI 2 Y CB/PB CR/PR VIDEO G B R SYNC S-VIDEO RS-232C To RGB video and sync signal input terminals SCART-RCA cable (sold separately) ● Set "COMP." in the setting menu to "RGB".( P33 - 12 ) ● For information on compatible input signals, see "Specifications". ( P56) RGB video output terminals R(Red) B(Blue) G(Green) (Includes sync signals) Others 21 Getting Started Connecting via RGB Video Cable This unit DVD player for European market SCART terminal Settings Troubleshooting HDMI 1 HDMI 2 Y CB...
... Preparation Basic Operation HDMI 1 HDMI 2 Y CB/PB CR/PR VIDEO G B R SYNC S-VIDEO RS-232C To RGB video and sync signal input terminals SCART-RCA cable (sold separately) ● Set "COMP." in the setting menu to "RGB".( P33 - 12 ) ● For information on compatible input signals, see "Specifications". ( P56) RGB video output terminals R(Red) B(Blue) G(Green) (Includes sync signals) Others 21 Getting Started Connecting via RGB Video Cable This unit DVD player for European market SCART terminal Settings Troubleshooting HDMI 1 HDMI 2 Y CB...
Instruction Manual
Page 24
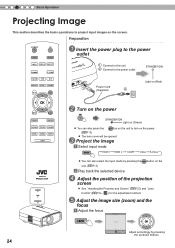
... 2 Connect to the power outlet STANDBY/ON 1 Power Cord (Supplied) 2 Light on (Red) MENU BACK CINEMA1 CINEMA2 NATURAL STAGE DYNAMIC USER1 USER2 USER3 LIGHT RM-MH2GB WARNING LAMP STANDBY/ON 2 Turn on the power ON STANDBY/ON Light on (Green) ● You can also press the button on the unit to project input images on the unit. ( P15) 2 Play back the selected device 4 Adjust the position of the projection screen ● See "Installing the Projector and Screen" ( P22...
... 2 Connect to the power outlet STANDBY/ON 1 Power Cord (Supplied) 2 Light on (Red) MENU BACK CINEMA1 CINEMA2 NATURAL STAGE DYNAMIC USER1 USER2 USER3 LIGHT RM-MH2GB WARNING LAMP STANDBY/ON 2 Turn on the power ON STANDBY/ON Light on (Green) ● You can also press the button on the unit to project input images on the unit. ( P15) 2 Play back the selected device 4 Adjust the position of the projection screen ● See "Installing the Projector and Screen" ( P22...
Instruction Manual
Page 25
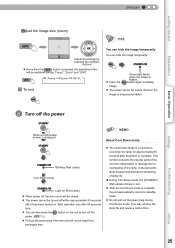
Settings Troubleshooting Others 25 HIDE Green light blinks when the image is complete. button again to cool down buttons ● Every time the LENS button is pressed, the adjustment item will be closed. ● The power cannot be switched among "Focus", "Zoom" and "Shift". This may shorten the lamp life and cause a malfunction. Start operation only after projection is ● Press the HIDE hidden. ENGLISH Getting Started Preparation Basic Operation 2Adjust the image size (zoom) Lens Control LENS Zoom Select Back...
Settings Troubleshooting Others 25 HIDE Green light blinks when the image is complete. button again to cool down buttons ● Every time the LENS button is pressed, the adjustment item will be closed. ● The power cannot be switched among "Focus", "Zoom" and "Shift". This may shorten the lamp life and cause a malfunction. Start operation only after projection is ● Press the HIDE hidden. ENGLISH Getting Started Preparation Basic Operation 2Adjust the image size (zoom) Lens Control LENS Zoom Select Back...
Instruction Manual
Page 27
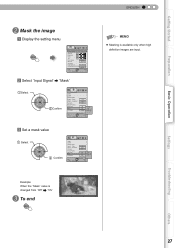
...) V-stretch Picture Position Over scan Mask Film Mode 16:9 Auto Off Off 5% 自Au动to 2.5% 5% Off Exit MENU Select Operate Back BACK MEMO ● Masking is changed from "Off" "5%" 3 To end MENU Settings Troubleshooting Others 27 Example: When the "Mask" value is available only when high definition images are input. Getting Started Preparation Basic Operation ENGLISH 2 Mask the image 1 Display the setting menu MENU Picture Adjust Picture Mode Natural Contrast 0 Brightness 0 Color 0 Tint 0 Color Temp.
...) V-stretch Picture Position Over scan Mask Film Mode 16:9 Auto Off Off 5% 自Au动to 2.5% 5% Off Exit MENU Select Operate Back BACK MEMO ● Masking is changed from "Off" "5%" 3 To end MENU Settings Troubleshooting Others 27 Example: When the "Mask" value is available only when high definition images are input. Getting Started Preparation Basic Operation ENGLISH 2 Mask the image 1 Display the setting menu MENU Picture Adjust Picture Mode Natural Contrast 0 Brightness 0 Color 0 Tint 0 Color Temp.
Instruction Manual
Page 28
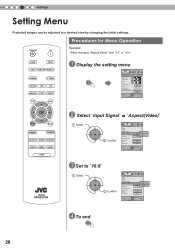
... 0 Color 0 Tint 0 Color Temp. Gamma Advanced Lens Aperture 6500K Normal 2 Exit MENU Select Reset Operate Back BACK MENU BACK CINEMA1 CINEMA2 NATURAL STAGE DYNAMIC USER1 USER2 USER3 LIGHT RM-MH2GB 2 Select "Input Signal" "Aspect(Video)" 1 Select 2 Confirm Input Signal HDMI COMP. 4 Settings Setting Menu Projected images can be adjusted to a desired view by changing the initial settings. Video/S-Video Aspect(Video) Aspect(Computer) V-stretch Picture Position Over scan Mask Film Mode 16:9 Auto Off Off 5% Auto 4:3 16:9 Zoom Exit MENU Select Operate...
... 0 Color 0 Tint 0 Color Temp. Gamma Advanced Lens Aperture 6500K Normal 2 Exit MENU Select Reset Operate Back BACK MENU BACK CINEMA1 CINEMA2 NATURAL STAGE DYNAMIC USER1 USER2 USER3 LIGHT RM-MH2GB 2 Select "Input Signal" "Aspect(Video)" 1 Select 2 Confirm Input Signal HDMI COMP. 4 Settings Setting Menu Projected images can be adjusted to a desired view by changing the initial settings. Video/S-Video Aspect(Video) Aspect(Computer) V-stretch Picture Position Over scan Mask Film Mode 16:9 Auto Off Off 5% Auto 4:3 16:9 Zoom Exit MENU Select Operate...
Instruction Manual
Page 34
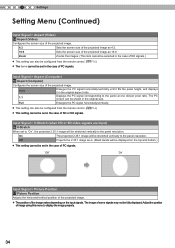
... remote control. ( P16) ● This setting cannot be shown in the original aspect ratio. 1:1 Displays the PC signal corresponding to display the image properly. 34 4 Settings Setting Menu (Continued) Input Signal > Aspect (Video) 14 Aspect (Video) Configures the screen size of the projected image. 4:3 Sets the screen size of the projected image as 4:3. 16:9 Sets the screen size of the projected image as -is. (Black bands will be displayed on the input signals. Off Projects the 2.35:1 image as 16:9. On The projected 2.35:1 image...
... remote control. ( P16) ● This setting cannot be shown in the original aspect ratio. 1:1 Displays the PC signal corresponding to display the image properly. 34 4 Settings Setting Menu (Continued) Input Signal > Aspect (Video) 14 Aspect (Video) Configures the screen size of the projected image. 4:3 Sets the screen size of the projected image as 4:3. 16:9 Sets the screen size of the projected image as -is. (Black bands will be displayed on the input signals. Off Projects the 2.35:1 image as 16:9. On The projected 2.35:1 image...
Instruction Manual
Page 36
... tabletop rear projection. A warning message appears when the [LENS] button on the screen incorrectly when trapezoidal distortion is pressed. Red (Move red to left /right button to right) Horiz. Ceiling Mount (F) Select this for ceiling front projection. Shift Function for tabletop front projection. Green (Move green down) 1 to 5 (Moves green up or down /left ) 1 to 7 (Move red to right) Vert. Front Select this for adjusting the lens focus. 4 Settings Setting Menu (Continued) Installation > Lens Control 21 Lens Control Controls the...
... tabletop rear projection. A warning message appears when the [LENS] button on the screen incorrectly when trapezoidal distortion is pressed. Red (Move red to left /right button to right) Horiz. Ceiling Mount (F) Select this for ceiling front projection. Shift Function for tabletop front projection. Green (Move green down) 1 to 5 (Moves green up or down /left ) 1 to 7 (Move red to right) Vert. Front Select this for adjusting the lens focus. 4 Settings Setting Menu (Continued) Installation > Lens Control 21 Lens Control Controls the...

Instruction Manual
Page 42
... Projected image is near exhaustion? Check the lamp time on ? Is the filter dirty? Is the power of the AV device turned on the information menu. and "HDMI" in Cool Down mode? P24 P18 to 21 P24 P18 to 15 P49 Video image does not appear Is the correct external input selected? P47 Is the lamp in the setting menu according to the input signal. Prepare a new lamp unit or replace as...
... Projected image is near exhaustion? Check the lamp time on ? Is the filter dirty? Is the power of the AV device turned on the information menu. and "HDMI" in Cool Down mode? P24 P18 to 21 P24 P18 to 15 P49 Video image does not appear Is the correct external input selected? P47 Is the lamp in the setting menu according to the input signal. Prepare a new lamp unit or replace as...

Instruction Manual
Page 43
Color does not appear or looks strange Is the image correctly adjusted? P27,35 - 19 P34 - 17 Remote control does not work Are batteries installed correctly? Getting Started Preparation ENGLISH The image cannot output by HDMI terminal Is the setup of position? Set "Mask" in the setting menu. Replace with HDMI" function "Off"? Is the remote control held too far away from the screen? Hold the remote control closer to ensure...
Color does not appear or looks strange Is the image correctly adjusted? P27,35 - 19 P34 - 17 Remote control does not work Are batteries installed correctly? Getting Started Preparation ENGLISH The image cannot output by HDMI terminal Is the setup of position? Set "Mask" in the setting menu. Replace with HDMI" function "Off"? Is the remote control held too far away from the screen? Hold the remote control closer to ensure...
Instruction Manual
Page 45
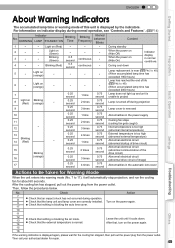
... of life 6 - Blinking (Red) 0.5 second continuous - Blinking (Green) 0.5 second continuous - Then call your authorized dealer for Warning Mode When the unit enters into warning mode (No. 7 to 48) (When accumulated lamp time has exceeded 2000 hours) 7 8 Light on (Red) - - - Light on (orange) - After the cooling fan has stopped, pull out the power plug from the power outlet. Light on (Green) - - - Turn on indicator display during operation. ● Check that the lamp unit and lamp cover are correctly installed. ● Check that...
... of life 6 - Blinking (Red) 0.5 second continuous - Blinking (Green) 0.5 second continuous - Then call your authorized dealer for Warning Mode When the unit enters into warning mode (No. 7 to 48) (When accumulated lamp time has exceeded 2000 hours) 7 8 Light on (Red) - - - Light on (orange) - After the cooling fan has stopped, pull out the power plug from the power outlet. Light on (Green) - - - Turn on indicator display during operation. ● Check that the lamp unit and lamp cover are correctly installed. ● Check that...
Instruction Manual
Page 48
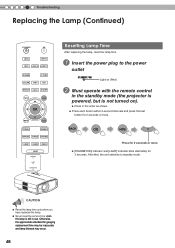
...; Reset the lamp time only when you have replaced the lamp. ● Never reset the service time when the lamp is not turned on (Red) 2 Must operate with the remote control in the standby mode (the projector is powered, but is still in the order as shown. ● Press each button within 2-second intervals and press the last button for 2 seconds or more ● [STANDBY/ON] indicator and [LAMP] indicator blink alternately for gauging replacement time may...
...; Reset the lamp time only when you have replaced the lamp. ● Never reset the service time when the lamp is not turned on (Red) 2 Must operate with the remote control in the standby mode (the projector is powered, but is still in the order as shown. ● Press each button within 2-second intervals and press the last button for 2 seconds or more ● [STANDBY/ON] indicator and [LAMP] indicator blink alternately for gauging replacement time may...
Instruction Manual
Page 53
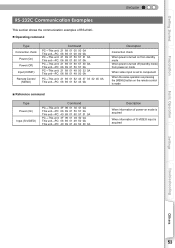
Getting Started Preparation ENGLISH RS-232C Communication Examples This section shows the communication examples of RS-232C. ■ Operating command Type Connection check Power (On) Power (Off) Input (COMP.) Remote Control (MENU) Command PC→This unit: 21 ...0A Description Connection check When power is turned on from standby mode When power is turned off (standby mode) from power-on mode When video input is set to component When the same operation as pressing the [MENU] button on the remote control is made ■ Reference command Type Power (On) Input (S-VIDEO) Command PC&#...
Getting Started Preparation ENGLISH RS-232C Communication Examples This section shows the communication examples of RS-232C. ■ Operating command Type Connection check Power (On) Power (Off) Input (COMP.) Remote Control (MENU) Command PC→This unit: 21 ...0A Description Connection check When power is turned on from standby mode When power is turned off (standby mode) from power-on mode When video input is set to component When the same operation as pressing the [MENU] button on the remote control is made ■ Reference command Type Power (On) Input (S-VIDEO) Command PC&#...

Instruction Manual
Page 54
... on the power occasionally and operate the unit. Turn on the screen. Block light using commercial blowers or lens cleaning papers for a Long Time Prolonged disuse of the picture may effect an error on the cabinet with rubber or plastic products. When Unit is no problem when playing normal video images such as the cabinet may deteriorate in the air inlets, the internal temperature cannot be...
... on the power occasionally and operate the unit. Turn on the screen. Block light using commercial blowers or lens cleaning papers for a Long Time Prolonged disuse of the picture may effect an error on the cabinet with rubber or plastic products. When Unit is no problem when playing normal video images such as the cabinet may deteriorate in the air inlets, the internal temperature cannot be...
Instruction Manual
Page 56
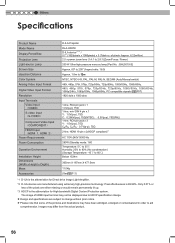
... Model Name Display Panel/Size Projection Lens Light-source Lamp Screen Size objection Distance Color System Analog Video Input Format Digital Video Input Format Resolution Input Terminals Video Input (VIDEO) S-video Input (S-VIDEO) Component Video Input (COMPONENT) HDMI Input (HDMI 1, HDMI 2) Power Requirements Power Consumption Operation Environment Installation Height Dimensions (Width x Height x Depth) Mass Accessories D-ILA Projector DLA-HD250 D-ILA device*1 *2 / 0.7" (1920pixels x 1080pixels) x 3 (Total no. The image of HDMI input...
... Model Name Display Panel/Size Projection Lens Light-source Lamp Screen Size objection Distance Color System Analog Video Input Format Digital Video Input Format Resolution Input Terminals Video Input (VIDEO) S-video Input (S-VIDEO) Component Video Input (COMPONENT) HDMI Input (HDMI 1, HDMI 2) Power Requirements Power Consumption Operation Environment Installation Height Dimensions (Width x Height x Depth) Mass Accessories D-ILA Projector DLA-HD250 D-ILA device*1 *2 / 0.7" (1920pixels x 1080pixels) x 3 (Total no. The image of HDMI input...


