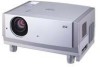
Instruction Manual
Page 5
...into the projection lens while the illumination lamp is turned on . Exposure of this projector. Do not drop, hit, or damage the light-source lamp (lamp unit) in a fire or electric shock. Do not use a damaged lightsource lamp. If you drop or impart a shock to the lamp, or discard it to ask your... product dealer. Use special care when handling the lamp. Use only ...
...into the projection lens while the illumination lamp is turned on . Exposure of this projector. Do not drop, hit, or damage the light-source lamp (lamp unit) in a fire or electric shock. Do not use a damaged lightsource lamp. If you drop or impart a shock to the lamp, or discard it to ask your... product dealer. Use special care when handling the lamp. Use only ...

Instruction Manual
Page 6
...Menu Mode Only 53 Setting and Adjusting Other Functions (OPTIONS 54 Getting Information 56 Replacing the Fuse 57 Replacing the Light-Source Lamp 58 Cleaning and Replacing the Filter Cover 63 Troubleshooting 64 Warning Indication 66 Warning Messages 67 Specifications 70 Outside dimensions 72 Pin... Mounting 21 When installing (adjusting/setting) the unit............21 Connecting to Various Devices.... 22 Signals that Can Be Input to the Projector 22 Connecting to Video Devices 24 Connecting to Hi-Vision Devices/DVD Players .....25 Connecting to Other Devices 26 Connecting to Devices...
...Menu Mode Only 53 Setting and Adjusting Other Functions (OPTIONS 54 Getting Information 56 Replacing the Fuse 57 Replacing the Light-Source Lamp 58 Cleaning and Replacing the Filter Cover 63 Troubleshooting 64 Warning Indication 66 Warning Messages 67 Specifications 70 Outside dimensions 72 Pin... Mounting 21 When installing (adjusting/setting) the unit............21 Connecting to Various Devices.... 22 Signals that Can Be Input to the Projector 22 Connecting to Video Devices 24 Connecting to Hi-Vision Devices/DVD Players .....25 Connecting to Other Devices 26 Connecting to Devices...

Instruction Manual
Page 8
... exhaust vents, or heat will build up to page 57. This could give you are not using the projector. Controls and Features Front Side / Top Surface / Right Side EXIT PRESEKTEYSTONE ENTER MENVIUDEO PC OPERATE LAMP HIDE TEMP UP DOWN 1 9 8 7 6 5 43 2 1 Exhaust vents Vents for adjusting the height and ..., refer to +7°. For details on the types of optional lenses available, refer to it while the light-source lamp is on page 16. 7 Lens One of the Projector" on or the cooling fan is the lens cap provided for information about attaching an optional lens. 8 Lens cap ...
... exhaust vents, or heat will build up to page 57. This could give you are not using the projector. Controls and Features Front Side / Top Surface / Right Side EXIT PRESEKTEYSTONE ENTER MENVIUDEO PC OPERATE LAMP HIDE TEMP UP DOWN 1 9 8 7 6 5 43 2 1 Exhaust vents Vents for adjusting the height and ..., refer to +7°. For details on the types of optional lenses available, refer to it while the light-source lamp is on page 16. 7 Lens One of the Projector" on or the cooling fan is the lens cap provided for information about attaching an optional lens. 8 Lens cap ...

Instruction Manual
Page 9
...Side / Rear Side UP DOWN EXIT PRESETKEYSTONE ENTER LAMP HIDE TEMP PC MENUVIDEO OPERSATTAEND BY Controls and Features p Connector panel For details, refer to "Adjusting the Inclination of the Projector" on page 16. q Rear adjustable foot (for leveling the projector) It is the air inlet. Adjustment can be...ENGLISH 7 Turn the foot to "Setting the Amount of +1.5° and -1.5° from the factory. For more information, refer to make the projector level. e Control panel For details, refer to move the lens position. r Lens shift knob cap When you have mounted a lens that uses...
...Side / Rear Side UP DOWN EXIT PRESETKEYSTONE ENTER LAMP HIDE TEMP PC MENUVIDEO OPERSATTAEND BY Controls and Features p Connector panel For details, refer to "Adjusting the Inclination of the Projector" on page 16. q Rear adjustable foot (for leveling the projector) It is the air inlet. Adjustment can be...ENGLISH 7 Turn the foot to "Setting the Amount of +1.5° and -1.5° from the factory. For more information, refer to make the projector level. e Control panel For details, refer to move the lens position. r Lens shift knob cap When you have mounted a lens that uses...

Instruction Manual
Page 10
..., refer to "Replacing the Light-Source Lamp" on page 58. y Opening for replacing the light-source lamp For replacing the light-source lamp, refer to "Setting the Position Selecting Screw for Ceiling Mounting" on page 15. u Fixing foot i Position selecting screw for ceiling mounting When using the projector in if placed nearby. CAUTION •...
..., refer to "Replacing the Light-Source Lamp" on page 58. y Opening for replacing the light-source lamp For replacing the light-source lamp, refer to "Setting the Position Selecting Screw for Ceiling Mounting" on page 15. u Fixing foot i Position selecting screw for ceiling mounting When using the projector in if placed nearby. CAUTION •...

Instruction Manual
Page 11
...; Do not turn off the MAIN POWER switch while in the cooldown mode. • Do not place the projector on the Projector UP DOWN EXIT PRESETKEYSTONE ENTER LAMP HIDE TEMP PC MENUVIDEO OPERSATTAEND BY r e w q p 9 8 1 LAMP TEMP HIDE KEYSTONE PRESET STAND BY OPERATE PC VIDEO MENU EXIT ENTER 2 3 4 5 6 7 Controls and ... cool down the heated lamp for about one minute after the lamp blinks. This feature is turned on page 43. 8 Cursor buttons 5/∞/2/3 These buttons will be used in the stand-by mode, press this button one second or more , and the projector is referred to set...
...; Do not turn off the MAIN POWER switch while in the cooldown mode. • Do not place the projector on the Projector UP DOWN EXIT PRESETKEYSTONE ENTER LAMP HIDE TEMP PC MENUVIDEO OPERSATTAEND BY r e w q p 9 8 1 LAMP TEMP HIDE KEYSTONE PRESET STAND BY OPERATE PC VIDEO MENU EXIT ENTER 2 3 4 5 6 7 Controls and ... cool down the heated lamp for about one minute after the lamp blinks. This feature is turned on page 43. 8 Cursor buttons 5/∞/2/3 These buttons will be used in the stand-by mode, press this button one second or more , and the projector is referred to set...

Instruction Manual
Page 12
Note • While the TEMP indicator is blinking (during abnormal temperature), the power is reset to that which was set when the projector was shipped from the factory. When adjusting the keystone or digital zoom (when the setting is displayed on the screen) the adjusted value is ...the light-source lamp has been used for more than approx. 1000 hours (1900 hours in the menu mode to return to the previous menu. When the main menu is displayed, this button will be used for the keystone setting screen. r TEMP indicator Blinking : The temperature inside the projector has risen ...
Note • While the TEMP indicator is blinking (during abnormal temperature), the power is reset to that which was set when the projector was shipped from the factory. When adjusting the keystone or digital zoom (when the setting is displayed on the screen) the adjusted value is ...the light-source lamp has been used for more than approx. 1000 hours (1900 hours in the menu mode to return to the previous menu. When the main menu is displayed, this button will be used for the keystone setting screen. r TEMP indicator Blinking : The temperature inside the projector has risen ...

Instruction Manual
Page 13
Connector Panel UP DOWN EXIT PRESETKEYSTONE ENTER LAMP HIDE TEMP PC MENUVIDEO OPERSATTAEND BY 1 2 3 Controls and Features 4 5 R Y Y/C G PB/B-Y VIDEO B PR/R-Y REMOTE H V IN IN OUT 6 7 8 9 1 PC (computer) 1 input terminal (D-sub 3-row 15 pin...this terminal. 3 DVI terminal [DVI-D 24 pin] This is the digital RGBHV input terminal. • The Mac ADC is to page 27 and 74. The projector can be controlled by connecting it to this case, use the supplied conversion adapter for vertical sync (V) and horizontal sync (H). 5 Component terminal Component signals (Y, B-Y, ...
Connector Panel UP DOWN EXIT PRESETKEYSTONE ENTER LAMP HIDE TEMP PC MENUVIDEO OPERSATTAEND BY 1 2 3 Controls and Features 4 5 R Y Y/C G PB/B-Y VIDEO B PR/R-Y REMOTE H V IN IN OUT 6 7 8 9 1 PC (computer) 1 input terminal (D-sub 3-row 15 pin...this terminal. 3 DVI terminal [DVI-D 24 pin] This is the digital RGBHV input terminal. • The Mac ADC is to page 27 and 74. The projector can be controlled by connecting it to this case, use the supplied conversion adapter for vertical sync (V) and horizontal sync (H). 5 Component terminal Component signals (Y, B-Y, ...
Instruction Manual
Page 14
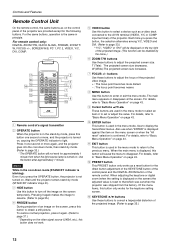
... turned on page 43. The main menu appears or disappears at the screen. Use to turn off the image on the top right of the projector. OPERATE W SCREEN S HIDE FREEZE COMP VIDEO PC1 PC2 DVI Y/C KEYSTONE T DIGITAL ZOOM W T ZOOM W FOCUS PRESET MENU EXIT ENTER 2 3 4 56 7 8 9 p RM-M160 REMOTE CONTROL... of the control panel and the DIGITAL ZOOM button of the projected image. (Refer to that which was shipped from when the light-source lamp is turned on the video signal source (UXGA, etc.), this button does not work for the following buttons. Press it again. (Refer ...
... turned on page 43. The main menu appears or disappears at the screen. Use to turn off the image on the top right of the projector. OPERATE W SCREEN S HIDE FREEZE COMP VIDEO PC1 PC2 DVI Y/C KEYSTONE T DIGITAL ZOOM W T ZOOM W FOCUS PRESET MENU EXIT ENTER 2 3 4 56 7 8 9 p RM-M160 REMOTE CONTROL... of the control panel and the DIGITAL ZOOM button of the projected image. (Refer to that which was shipped from when the light-source lamp is turned on the video signal source (UXGA, etc.), this button does not work for the following buttons. Press it again. (Refer ...

Instruction Manual
Page 17
... storage temperature range: 14°F to 140°F (-10°C to +60°C) I When installing the projector, observe the following: • Do not use the projector inclined ±30° horizontally (left/right). Allowable minimum space required 300mm 200mm 600mm 300mm 200mm ESPAÑOL...Where there is low. When the projector is enclosed in the following dimensions, use a cover which encloses the projector air-tight or blocks the exhaust vents. Avoid using the projector placed on its side. This could cause color variation or shorten the lamp life. • Do not block...
... storage temperature range: 14°F to 140°F (-10°C to +60°C) I When installing the projector, observe the following: • Do not use the projector inclined ±30° horizontally (left/right). Allowable minimum space required 300mm 200mm 600mm 300mm 200mm ESPAÑOL...Where there is low. When the projector is enclosed in the following dimensions, use a cover which encloses the projector air-tight or blocks the exhaust vents. Avoid using the projector placed on its side. This could cause color variation or shorten the lamp life. • Do not block...
Instruction Manual
Page 19
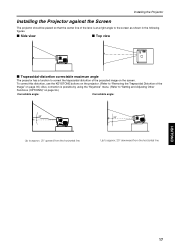
I Side view I Top view ENTER PC VIDEO MENU STAND BY OPERATE KEYSTONE VOLUME PRESET LAMP TEMP HIDE ESCAPE I Trapezoidal-distortion correctable maximum angle The projector has a function to approx. 20° downward from the horizontal line Up to correct the trapezoidal distortion of the ...by using the "Keystone" menu. (Refer to "Setting and Adjusting Other Functions (OPTIONS)" on the screen. Installing the Projector Installing the Projector against the Screen The projector should be placed so that the center line of the Image" on page 35.) Also, correction is at a right ...
I Side view I Top view ENTER PC VIDEO MENU STAND BY OPERATE KEYSTONE VOLUME PRESET LAMP TEMP HIDE ESCAPE I Trapezoidal-distortion correctable maximum angle The projector has a function to approx. 20° downward from the horizontal line Up to correct the trapezoidal distortion of the ...by using the "Keystone" menu. (Refer to "Setting and Adjusting Other Functions (OPTIONS)" on the screen. Installing the Projector Installing the Projector against the Screen The projector should be placed so that the center line of the Image" on page 35.) Also, correction is at a right ...
Instruction Manual
Page 20
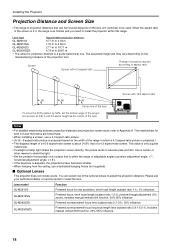
... Function GL-M2910G Powered focus for projection distance is a guide (reference) one of the optional lenses to shield the light. • Set the projector horizontally on the manufacturing tolerance of a 4:3 aspect-ratio screen. The relationships for both 4:3 and 16:9 ratios are listed there. • When ...may vary depending on a surface that of the projection lens. This value is only a guide (reference). • If sunlight or lamp light strikes the projection screen directly, the picture tends to 29.87 m *: The value for rear projection, short focal length (subject ratio 1:1),...
... Function GL-M2910G Powered focus for projection distance is a guide (reference) one of the optional lenses to shield the light. • Set the projector horizontally on the manufacturing tolerance of a 4:3 aspect-ratio screen. The relationships for both 4:3 and 16:9 ratios are listed there. • When ...may vary depending on a surface that of the projection lens. This value is only a guide (reference). • If sunlight or lamp light strikes the projection screen directly, the picture tends to 29.87 m *: The value for rear projection, short focal length (subject ratio 1:1),...

Instruction Manual
Page 32
... of the supplied power cord into a wall outlet. • Use the supplied power cord with a wet hand. LAMP HIDE TEMP UP DOWN Power cord (supplied) Ferrite core 2 Insert the main plug of the projector. Otherwise, there may be damaged. • Do not insert or pull out the plugs with the ferrite core...
... of the supplied power cord into a wall outlet. • Use the supplied power cord with a wet hand. LAMP HIDE TEMP UP DOWN Power cord (supplied) Ferrite core 2 Insert the main plug of the projector. Otherwise, there may be damaged. • Do not insert or pull out the plugs with the ferrite core...
Instruction Manual
Page 33
...different for more than 1000 hours (but less than in stand-by mode or turned off after the lamp has been used from the beginning. However, if the projector is used . However, if the projector is not put in stand-by mode or turned off , it can not be turned back on ... gradually become less bright quickly in some usage environments, replace the lamp if you notice that for adjusting multiple screens. This setting can be changed while the projector is best suited when using the projector continuously for more than 2010 hours), it can not be turned back on again. Since the ...
...different for more than 1000 hours (but less than in stand-by mode or turned off after the lamp has been used from the beginning. However, if the projector is used . However, if the projector is not put in stand-by mode or turned off , it can not be turned back on ... gradually become less bright quickly in some usage environments, replace the lamp if you notice that for adjusting multiple screens. This setting can be changed while the projector is best suited when using the projector continuously for more than 2010 hours), it can not be turned back on again. Since the ...

Instruction Manual
Page 34
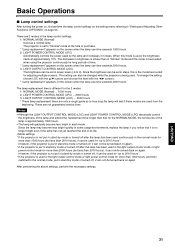
...cool-down mode (the STAND BY indicator blinking). Turning on the Power 1 Turn on . Projector's indicator STAND BY OPERATE 2 Press the OPERATE button for approximately 1 minute from when the light-source lamp is not a malfunction. • After the indicator comes on (stand-by mode). 32...minute or so for a few seconds, but this is turned on . UP DOWN OPERATE PC TEMP MENVIUDEO LAMP HIDE PRESEKTEYSTONE ENTER EXIT Basic Operations I Projector's buttons LAMP TEMP HIDE KEYSTONE PRESET STAND BY OPERATE PC VIDEO MENU STAND BY indicator OPERATE indicator OPERATE button EXIT ENTER...
...cool-down mode (the STAND BY indicator blinking). Turning on the Power 1 Turn on . Projector's indicator STAND BY OPERATE 2 Press the OPERATE button for approximately 1 minute from when the light-source lamp is not a malfunction. • After the indicator comes on (stand-by mode). 32...minute or so for a few seconds, but this is turned on . UP DOWN OPERATE PC TEMP MENVIUDEO LAMP HIDE PRESEKTEYSTONE ENTER EXIT Basic Operations I Projector's buttons LAMP TEMP HIDE KEYSTONE PRESET STAND BY OPERATE PC VIDEO MENU STAND BY indicator OPERATE indicator OPERATE button EXIT ENTER...

Instruction Manual
Page 35
...follows every time the button is pressed. The input mode changes as follows every time the button is pressed. Basic Operations I Projector's buttons LAMP TEMP HIDE KEYSTONE PRESET STAND BY OPERATE PC VIDEO MENU PC button VIDEO button EXIT ENTER I Language display The display languages of... the menus, direct buttons (DIGITAL ZOOM, KEYSTONE, etc) and messages is set to "ENGLISH" when the projector is bought. The display ...
...follows every time the button is pressed. The input mode changes as follows every time the button is pressed. Basic Operations I Projector's buttons LAMP TEMP HIDE KEYSTONE PRESET STAND BY OPERATE PC VIDEO MENU PC button VIDEO button EXIT ENTER I Language display The display languages of... the menus, direct buttons (DIGITAL ZOOM, KEYSTONE, etc) and messages is set to "ENGLISH" when the projector is bought. The display ...

Instruction Manual
Page 36
... view angle zooming by 2%. (For fine view angle adjustment) To enlarge the projected screen size Press the ZOOM W (Wide) button. Basic Operations I Projector's buttons PRESET button EXIT button LAMP TEMP HIDE KEYSTONE PRESET STAND BY OPERATE PC VIDEO MENU EXIT ENTER I Remote control unit SCREEN W/S button FOCUS +/- button ZOOM T/W button PRESET button...
... view angle zooming by 2%. (For fine view angle adjustment) To enlarge the projected screen size Press the ZOOM W (Wide) button. Basic Operations I Projector's buttons PRESET button EXIT button LAMP TEMP HIDE KEYSTONE PRESET STAND BY OPERATE PC VIDEO MENU EXIT ENTER I Remote control unit SCREEN W/S button FOCUS +/- button ZOOM T/W button PRESET button...

Instruction Manual
Page 37
... form is not a malfunction. • Depending on the type of the trapezoidal distortion adjustment is adjusted. Remote control unit Projector KEYSTONE KEYSTONE Projected image with trapezoidal distortion KEYSTONE KEYSTONE Notes • The trapezoidal distortion (keystone) can be adjusted from the ... button to page 54.) • The range of signal, some noise may appear on again. I Projector's buttons HIDE button KEYSTONE / buttons PRESET button EXIT button LAMP TEMP HIDE KEYSTONE PRESET STAND BY OPERATE PC VIDEO MENU EXIT ENTER I Remote control unit HIDE button KEYSTONE...
... form is not a malfunction. • Depending on the type of the trapezoidal distortion adjustment is adjusted. Remote control unit Projector KEYSTONE KEYSTONE Projected image with trapezoidal distortion KEYSTONE KEYSTONE Notes • The trapezoidal distortion (keystone) can be adjusted from the ... button to page 54.) • The range of signal, some noise may appear on again. I Projector's buttons HIDE button KEYSTONE / buttons PRESET button EXIT button LAMP TEMP HIDE KEYSTONE PRESET STAND BY OPERATE PC VIDEO MENU EXIT ENTER I Remote control unit HIDE button KEYSTONE...

Instruction Manual
Page 40
...; Input Switcher PC1 CH.0 Options Language Information Lamp time 123 h I Menu Transition Diagram in No signal Menu Mode This is displayed if there is pressed, the projector enters one of these modes by judging the input signal being used.) Lamp time: Accumulated used hours of selected time (...Unit: Minutes), the projector enters the stand-by the VIDEO or PC button. (Y/C, VIDEO, COMP...
...; Input Switcher PC1 CH.0 Options Language Information Lamp time 123 h I Menu Transition Diagram in No signal Menu Mode This is displayed if there is pressed, the projector enters one of these modes by judging the input signal being used.) Lamp time: Accumulated used hours of selected time (...Unit: Minutes), the projector enters the stand-by the VIDEO or PC button. (Y/C, VIDEO, COMP...

Instruction Manual
Page 41
... an item. RED GREEN BLUE Call reset 5∞ HDTV Page 1 1080i ENTER 1035i Set up English 3 or ENTER Language English ENTER Lamp control Color temp. Low RED 123 Middle High GREEN 123 EXIT BLUE 123 All reset ENTER ENTER Screen HDTV Page 1 EXIT ENTER Press ... 3 or Position ENTER Gamma ENTER Down Cinema Up Aspect ratio 4:3 16:9 EXIT Decoder Page 2 ENTER ENTER Press 5/∞ to "English" when the projector is displayed for other signals. Press 5/∞ to move the video screen/menu position. EXIT Keystone 123 Menu Image adj. Press 5/∞ / 2/3 ...
... an item. RED GREEN BLUE Call reset 5∞ HDTV Page 1 1080i ENTER 1035i Set up English 3 or ENTER Language English ENTER Lamp control Color temp. Low RED 123 Middle High GREEN 123 EXIT BLUE 123 All reset ENTER ENTER Screen HDTV Page 1 EXIT ENTER Press ... 3 or Position ENTER Gamma ENTER Down Cinema Up Aspect ratio 4:3 16:9 EXIT Decoder Page 2 ENTER ENTER Press 5/∞ to "English" when the projector is displayed for other signals. Press 5/∞ to move the video screen/menu position. EXIT Keystone 123 Menu Image adj. Press 5/∞ / 2/3 ...

