Instruction Manual
Page 4
... high temperature, as they may cause the product and cart to overturn, damaging equipment or causing possible injury to . - About burning-in to Part 15 of electric shock, do not remove cover. These ensure reliable operation of the D-ILA device Do not allow the same still picture to be projected for a Class B digital devices, pursuant to the D-ILA device. Do not project video images...
... high temperature, as they may cause the product and cart to overturn, damaging equipment or causing possible injury to . - About burning-in to Part 15 of electric shock, do not remove cover. These ensure reliable operation of the D-ILA device Do not allow the same still picture to be projected for a Class B digital devices, pursuant to the D-ILA device. Do not project video images...
Instruction Manual
Page 5
... AC outlet in any service or repairs to this unit through openings as an improper adjustment of your electrician to the lamp, or discard it . When it may touch dangerous voltage points or short out parts that produce heat. - Power cord Power supply voltage: AC 120 V * DO NOT allow any kind on or pinched by the Operation Manual, as they may cause...
... AC outlet in any service or repairs to this unit through openings as an improper adjustment of your electrician to the lamp, or discard it . When it may touch dangerous voltage points or short out parts that produce heat. - Power cord Power supply voltage: AC 120 V * DO NOT allow any kind on or pinched by the Operation Manual, as they may cause...

Instruction Manual
Page 6
... Menu Mode Only 53 Changing the Clamp pulse position (PC Menu Mode Only 53 Setting and Adjusting Other Functions (OPTIONS 54 Getting Information 56 Replacing the Fuse 57 Replacing the Light-Source Lamp 58 Cleaning and Replacing the Filter Cover 63 Troubleshooting 64 Warning Indication 66 Warning Messages 67 Specifications 70 Outside dimensions 72 Pin assignment (Specifications for Ceiling Mounting 21 When installing (adjusting/setting) the unit............21 Connecting to Various Devices.... 22 Signals that Can Be Input to the Projector 22 Connecting...
... Menu Mode Only 53 Changing the Clamp pulse position (PC Menu Mode Only 53 Setting and Adjusting Other Functions (OPTIONS 54 Getting Information 56 Replacing the Fuse 57 Replacing the Light-Source Lamp 58 Cleaning and Replacing the Filter Cover 63 Troubleshooting 64 Warning Indication 66 Warning Messages 67 Specifications 70 Outside dimensions 72 Pin assignment (Specifications for Ceiling Mounting 21 When installing (adjusting/setting) the unit............21 Connecting to Various Devices.... 22 Signals that Can Be Input to the Projector 22 Connecting...

Instruction Manual
Page 8
.... 3 AC IN (power input) terminal This is the power input terminal where the supplied power cord is installed. (Power source protection) To replace the fuse, refer to page 20.) 6 This could give you are not using the projector. Controls and Features Front Side / Top Surface / Right Side EXIT PRESEKTEYSTONE ENTER MENVIUDEO PC OPERATE LAMP HIDE TEMP UP DOWN 1 9 8 7 6 5 43 2 1 Exhaust vents Vents for the optional lens. CAUTIONS •...
.... 3 AC IN (power input) terminal This is the power input terminal where the supplied power cord is installed. (Power source protection) To replace the fuse, refer to page 20.) 6 This could give you are not using the projector. Controls and Features Front Side / Top Surface / Right Side EXIT PRESEKTEYSTONE ENTER MENVIUDEO PC OPERATE LAMP HIDE TEMP UP DOWN 1 9 8 7 6 5 43 2 1 Exhaust vents Vents for the optional lens. CAUTIONS •...

Instruction Manual
Page 10
... be turned to switch to "Precautions for ceiling mounting When using the projector in ceiling mounting. For more information, refer to "Setting the Position Selecting Screw for replacing the light-source lamp For replacing the light-source lamp, refer to build up inside , which otherwise would occur in an upside-down, ceilingmounted position (inverted top-to-bottom and right-toleft), the "position selecting screw for ceiling mounting" must be drawn in through the filter...
... be turned to switch to "Precautions for ceiling mounting When using the projector in ceiling mounting. For more information, refer to "Setting the Position Selecting Screw for replacing the light-source lamp For replacing the light-source lamp, refer to build up inside , which otherwise would occur in an upside-down, ceilingmounted position (inverted top-to-bottom and right-toleft), the "position selecting screw for ceiling mounting" must be drawn in through the filter...

Instruction Manual
Page 11
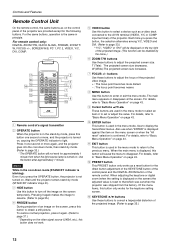
... mode, press this button to select a device connected to "Basic Menu Operation" on the menu screen or when the "All reset" selection is turned on the top right of the projector. Press it upright while in the cool-down mode. Use to "Basic Menu Operation" on the Projector UP DOWN EXIT PRESETKEYSTONE ENTER LAMP HIDE TEMP PC MENUVIDEO OPERSATTAEND BY r e w q p 9 8 1 LAMP TEMP HIDE KEYSTONE PRESET STAND BY OPERATE PC VIDEO MENU EXIT ENTER 2 3 4 5 6 7 Controls...
... mode, press this button to select a device connected to "Basic Menu Operation" on the menu screen or when the "All reset" selection is turned on the top right of the projector. Press it upright while in the cool-down mode. Use to "Basic Menu Operation" on the Projector UP DOWN EXIT PRESETKEYSTONE ENTER LAMP HIDE TEMP PC MENUVIDEO OPERSATTAEND BY r e w q p 9 8 1 LAMP TEMP HIDE KEYSTONE PRESET STAND BY OPERATE PC VIDEO MENU EXIT ENTER 2 3 4 5 6 7 Controls...
Instruction Manual
Page 14
... the light-source lamp is the same in principle. T (Tele): The projected screen size decreases. For the same buttons, operation is turned on. Controls and Features Remote Control Unit On the remote control, the same buttons as on the control panel of the projector are used in the menu mode to select an item or to set when the projector was set or adjust the value. When adjusting the keystone or digital zoom (when the setting is displayed on the screen) the adjusted...
... the light-source lamp is the same in principle. T (Tele): The projected screen size decreases. For the same buttons, operation is turned on. Controls and Features Remote Control Unit On the remote control, the same buttons as on the control panel of the projector are used in the menu mode to select an item or to set when the projector was set or adjust the value. When adjusting the keystone or digital zoom (when the setting is displayed on the screen) the adjusted...

Instruction Manual
Page 23
.... You can also change these settings without receiving a video signal. This will correct variance in color images (shading), which otherwise would occur in the illustration. For normal desktop mounting: Turn the screw clockwise. on the unit. • Adjust the focus after projecting a picture for 30 minutes or longer. Press the OPERATE button again to turn the "position selecting screw for ceiling mounting •To ceiling-mount and adjust the projector, special expertise and...
.... You can also change these settings without receiving a video signal. This will correct variance in color images (shading), which otherwise would occur in the illustration. For normal desktop mounting: Turn the screw clockwise. on the unit. • Adjust the focus after projecting a picture for 30 minutes or longer. Press the OPERATE button again to turn the "position selecting screw for ceiling mounting •To ceiling-mount and adjust the projector, special expertise and...
Instruction Manual
Page 24
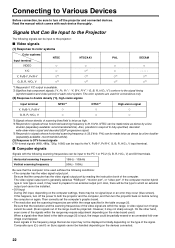
... video signal output port. However, it may not be displayed normally depending on again. Composite sync (CS) and G on page 23 is input, the image could be partially erased or an unneeded fold-over image could be projected. If this happens, turn off the power to signals whose horizontal scanning frequency is 33.5 kHz. Then correctly set the computer's graphic board. • The resolution...
... video signal output port. However, it may not be displayed normally depending on again. Composite sync (CS) and G on page 23 is input, the image could be partially erased or an unneeded fold-over image could be projected. If this happens, turn off the power to signals whose horizontal scanning frequency is 33.5 kHz. Then correctly set the computer's graphic board. • The resolution...

Instruction Manual
Page 32
... interference occurs. At this time, do not use mains voltage other than the power voltage indicated. • Do not scar, damage, or work on the MAIN POWER switch. 1 Insert the supplied power cord into the EXIT PRESEKTEYSTONE ENTER MENVIUDEO PC OPERATE power input terminal of the heat. Doing so can get hot and cause injury. 30 LAMP HIDE TEMP UP DOWN Power cord (supplied) Ferrite core 2 Insert the...
... interference occurs. At this time, do not use mains voltage other than the power voltage indicated. • Do not scar, damage, or work on the MAIN POWER switch. 1 Insert the supplied power cord into the EXIT PRESEKTEYSTONE ENTER MENVIUDEO PC OPERATE power input terminal of the heat. Doing so can get hot and cause injury. 30 LAMP HIDE TEMP UP DOWN Power cord (supplied) Ferrite core 2 Insert the...

Instruction Manual
Page 42
... image. Color temp.: RED: GREEN: BLUE: All-reset: Adjustable color temperature, Low/Middle*/High. Will be changed. Down/Cinema*/Up (Suitable for on film. This is automatically controlled with time. I Quick Reference Guide for upside-down hanging on signals) Reset above items to enter the "Set up 2" submenu Tracking: Normally, no meaning. Lamp time: Accumulated used .) Shows the projected image's type of the light-source lamp. * : Factory set values. Adjusts the red level. (0 to 255, the adjustable range varies depending on signals) Adjusts the green...
... image. Color temp.: RED: GREEN: BLUE: All-reset: Adjustable color temperature, Low/Middle*/High. Will be changed. Down/Cinema*/Up (Suitable for on film. This is automatically controlled with time. I Quick Reference Guide for upside-down hanging on signals) Reset above items to enter the "Set up 2" submenu Tracking: Normally, no meaning. Lamp time: Accumulated used .) Shows the projected image's type of the light-source lamp. * : Factory set values. Adjusts the red level. (0 to 255, the adjustable range varies depending on signals) Adjusts the green...

Instruction Manual
Page 43
... select an item. Color temp. Options Keystone 0 3 or Menu display 15sec ON ENTER ENTER Line display 5sec OFF Lamp time display ON OFF EXIT Keystone Lamp control ENTER ENTER EXIT Page 2 ENTER Press 5/∞ to move the video screen/menu position. Note • The display languages of the menus are explained in "English". ESPAÑOL ITALIANO FRANÇAIS DEUTSH ENGLISH 41 RED GREEN BLUE All reset Set up 1 Tracking...
... select an item. Color temp. Options Keystone 0 3 or Menu display 15sec ON ENTER ENTER Line display 5sec OFF Lamp time display ON OFF EXIT Keystone Lamp control ENTER ENTER EXIT Page 2 ENTER Press 5/∞ to move the video screen/menu position. Note • The display languages of the menus are explained in "English". ESPAÑOL ITALIANO FRANÇAIS DEUTSH ENGLISH 41 RED GREEN BLUE All reset Set up 1 Tracking...

Instruction Manual
Page 44
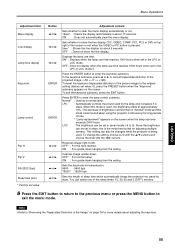
... used hours of the light-source lamp. * : Factory set value. 42 Keystone: Adjust to correct the trapezoidal distortion of the projected image. (-80 to +128, 0*) Lamp control: Normal*: Used as "PC1" or "PC2" appears on .) Line display: 5sec* (Line display such as a normal lamp. Frequency H: Shows the horizontal frequency of the input signal being received. ( kHz) Frequency V: Shows the vertical frequency of the input signal being received. ( Hz) Lamp time: Accumulated used .) Resolution: Shows the resolution...
... used hours of the light-source lamp. * : Factory set value. 42 Keystone: Adjust to correct the trapezoidal distortion of the projected image. (-80 to +128, 0*) Lamp control: Normal*: Used as "PC1" or "PC2" appears on .) Line display: 5sec* (Line display such as a normal lamp. Frequency H: Shows the horizontal frequency of the input signal being received. ( kHz) Frequency V: Shows the vertical frequency of the input signal being received. ( Hz) Lamp time: Accumulated used .) Resolution: Shows the resolution...
Instruction Manual
Page 57
... LOC mode. This setting can be set in "Normal" mode and this mode is best suited when using the projector continuously for about adjusting the keystone. Inverses image upside-down hanging from the ceiling. Menu Operations Adjustment item Menu display Line display Lamp time display Keystone Lamp control Flip H Flip V RS-232C [bps] Sleep time [min] * Factory set value: 0), press the PRESET button when the "Keystone" submenu appears on the screen. ON : Does not automatically clear the menu display. Normal* : Used as a normal lamp. To change the setting...
... LOC mode. This setting can be set in "Normal" mode and this mode is best suited when using the projector continuously for about adjusting the keystone. Inverses image upside-down hanging from the ceiling. Menu Operations Adjustment item Menu display Line display Lamp time display Keystone Lamp control Flip H Flip V RS-232C [bps] Sleep time [min] * Factory set value: 0), press the PRESET button when the "Keystone" submenu appears on the screen. ON : Does not automatically clear the menu display. Normal* : Used as a normal lamp. To change the setting...
Instruction Manual
Page 60
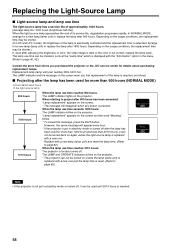
... lamp is electrically controlled and the replacement time is put in stand-by mode or turned off after the lamp has been used hours of its service life, degradation progresses rapidly. The LAMP and OPERATE indicators blinks on the projector. * The projector can be checked. Depending on the screen. * The message will appear every hour. * If the projector is extended. The lamp use time The light-source lamp has a service life of approximately 1000 hours. [Average lamp life: 1000 hours (brightness half-life)] When the light-source lamp...
... lamp is electrically controlled and the replacement time is put in stand-by mode or turned off after the lamp has been used hours of its service life, degradation progresses rapidly. The LAMP and OPERATE indicators blinks on the projector. * The projector can be checked. Depending on the screen. * The message will appear every hour. * If the projector is extended. The lamp use time The light-source lamp has a service life of approximately 1000 hours. [Average lamp life: 1000 hours (brightness half-life)] When the light-source lamp...

Instruction Manual
Page 61
... the lamp use time exceeds 1900 hours: The LAMP indicator blinks on , the message appears. Every time the projector is turned on the projector. The temperature of the light-source lamp is still high and could cause a malfunction. If you perform the replacement work there, this message, press the EXIT button. Replacing the Light-Source Lamp I Projecting after the lamp has been used for more than 1000 hours (LIGHT OUTPUT CONTROL MODE) (LAMP POWER CONTROL MODE) Accumulated used hours of the light-source lamp 1000 hours 1900 hours 2000 hours 2010 hours When the lamp use time...
... the lamp use time exceeds 1900 hours: The LAMP indicator blinks on , the message appears. Every time the projector is turned on the projector. The temperature of the light-source lamp is still high and could cause a malfunction. If you perform the replacement work there, this message, press the EXIT button. Replacing the Light-Source Lamp I Projecting after the lamp has been used for more than 1000 hours (LIGHT OUTPUT CONTROL MODE) (LAMP POWER CONTROL MODE) Accumulated used hours of the light-source lamp 1000 hours 1900 hours 2000 hours 2010 hours When the lamp use time...

Instruction Manual
Page 64
... previous button. * When you have replaced with a new light-source lamp, reset the lamp-time counter inside the projector to clear the accumulated lamp time to zero (0). Options Language Information Input Switcher Source VIDEO CH.0 NTSC Lamp time 123 h Lamp time (0 h) PC main menu Menu Image adj. The lamp use time only when you make a mistake in the item "Lamp time". After resetting, a new count will start for two seconds or more. * During this sequence, the STAND BY and OPERATE indicators alternately blink about...
... previous button. * When you have replaced with a new light-source lamp, reset the lamp-time counter inside the projector to clear the accumulated lamp time to zero (0). Options Language Information Input Switcher Source VIDEO CH.0 NTSC Lamp time 123 h Lamp time (0 h) PC main menu Menu Image adj. The lamp use time only when you make a mistake in the item "Lamp time". After resetting, a new count will start for two seconds or more. * During this sequence, the STAND BY and OPERATE indicators alternately blink about...

Instruction Manual
Page 66
... or Service Center. the lamp-replacement opening cover • Turn off the MAIN POWER switch, close closed correctly? • Turn off the MAIN POWER switch, fit the filter correctly, and turn off the power to release freezing. 12, 37 64 Video image freezes. • Was the FREEZE button on the remote control pressed? • Press the FREEZE button to both 22 output from the • Set connected devices correctly. - signal input or an error may...
... or Service Center. the lamp-replacement opening cover • Turn off the MAIN POWER switch, close closed correctly? • Turn off the MAIN POWER switch, fit the filter correctly, and turn off the power to release freezing. 12, 37 64 Video image freezes. • Was the FREEZE button on the remote control pressed? • Press the FREEZE button to both 22 output from the • Set connected devices correctly. - signal input or an error may...

Instruction Manual
Page 67
... lens These should be taken, refer to "Warning Indication" on • Press the PRESET button to damage. Do not wipe with thinner or benzene. - Troubleshooting Symptom Probable cause Corrective action A part of image is magnified. • Was the DIGITAL ZOOM T button on page 66. does not work. • Match the polarities of the connected devices appropriate? If this happens, turn the power back on video picture...
... lens These should be taken, refer to "Warning Indication" on • Press the PRESET button to damage. Do not wipe with thinner or benzene. - Troubleshooting Symptom Probable cause Corrective action A part of image is magnified. • Was the DIGITAL ZOOM T button on page 66. does not work. • Match the polarities of the connected devices appropriate? If this happens, turn the power back on video picture...

Instruction Manual
Page 68
... off the MAIN POWER switch, unplug the power cord, and call your dealer for retrying. OPERATE Blink Blink Blink Warning content The light-source lamp does not light and projection is too high. (Sensor 2) The cooling fan has stopped (locked). I Action to page 58. Nos. 4-7 : Follow the next steps. 1. Turn off during projecting an image. No. 7 : Leave the projector until the inside cools down . LAMP Indicator TEMP STAND BY 1 Blink Blink 2 Blink 3 Blink Blink 4 Blink 5 Blink 6 Blink Blink 7 Blink Blink Blink * For individual indicator lighting, refer to be...
... off the MAIN POWER switch, unplug the power cord, and call your dealer for retrying. OPERATE Blink Blink Blink Warning content The light-source lamp does not light and projection is too high. (Sensor 2) The cooling fan has stopped (locked). I Action to page 58. Nos. 4-7 : Follow the next steps. 1. Turn off during projecting an image. No. 7 : Leave the projector until the inside cools down . LAMP Indicator TEMP STAND BY 1 Blink Blink 2 Blink 3 Blink Blink 4 Blink 5 Blink 6 Blink Blink 7 Blink Blink Blink * For individual indicator lighting, refer to be...


