Installation Manual
Page 2
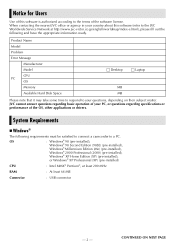
...regarding specifications or performance of the OS, other applications or drivers. CONTINUED ON NEXT PAGE Notice for Users Use of this software (refer to the JVC Worldwide Service Network at least 200 MHz RAM : At least 64 MB Connector : USB connector -2- OS : Windows® 98 (pre-installed....co.jp/english/worldmap/index-e.html), please fill out the following requirements must be satisfied to connect a camcorder to a PC. When contacting the nearest JVC office or agency in your country about this software is authorized according to your PC, or questions regarding basic operation ...
...regarding specifications or performance of the OS, other applications or drivers. CONTINUED ON NEXT PAGE Notice for Users Use of this software (refer to the JVC Worldwide Service Network at least 200 MHz RAM : At least 64 MB Connector : USB connector -2- OS : Windows® 98 (pre-installed....co.jp/english/worldmap/index-e.html), please fill out the following requirements must be satisfied to connect a camcorder to a PC. When contacting the nearest JVC office or agency in your country about this software is authorized according to your PC, or questions regarding basic operation ...

Installation Manual
Page 3
...those requirements. ● If your PC does not meet the system requirements above , the following requirements must be used when you connect a camcorder to the PC with 16-bit color Miscellaneous : Internet Explorer 5.5 or later DirectX 8.0a or later Ⅲ Macintosh The following requirements must...Apple Computer, Inc. ● Other product and company names included in the memory card to the hard disk on your PC. (Refer to "JVC Accessories" on our world web site at least 1 GB recommended Connector : USB connector IEEE1394 (i.LINK) connector Display : Must be capable of their ...
...those requirements. ● If your PC does not meet the system requirements above , the following requirements must be used when you connect a camcorder to the PC with 16-bit color Miscellaneous : Internet Explorer 5.5 or later DirectX 8.0a or later Ⅲ Macintosh The following requirements must...Apple Computer, Inc. ● Other product and company names included in the memory card to the hard disk on your PC. (Refer to "JVC Accessories" on our world web site at least 1 GB recommended Connector : USB connector IEEE1394 (i.LINK) connector Display : Must be capable of their ...

Installation Manual
Page 4
.... After a moment, the [SETUP] screen appears. ● From the [SETUP] screen, you can read and write memory cards in the camcorder. USB Video Streaming driver This driver allows you are no need to conduct a video conference over the Internet. From the [SETUP] screen in ... the on the driver or the software. -4- Software Installation (Windows®) Follow the procedure described below to connect the USB cable between the camcorder and the PC before installing the driver. After a moment, the [Important Notice] screen appears. ● If the [Important Notice] screen ...
.... After a moment, the [SETUP] screen appears. ● From the [SETUP] screen, you can read and write memory cards in the camcorder. USB Video Streaming driver This driver allows you are no need to conduct a video conference over the Internet. From the [SETUP] screen in ... the on the driver or the software. -4- Software Installation (Windows®) Follow the procedure described below to connect the USB cable between the camcorder and the PC before installing the driver. After a moment, the [Important Notice] screen appears. ● If the [Important Notice] screen ...

Installation Manual
Page 7
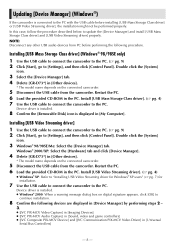
... on the CD-ROM. ● If you repeat steps 3 to 9 four times, the installation of ImageMixer 1.7. ● When you connect the camcorder to the PC with Windows® 2000 and Windows® XP, the [Microstaff WINASPI] screen appears. Be sure not to continue installation. After a... is complete. -7- After you perform installation of the desired language. NOTES: ● The software instruction manual is included on digital signature may appear. Double-click the [JVC] folder and then double-click the [Docs] folder. The driver search dialog box appears. 4 Click the next three items...
... on the CD-ROM. ● If you repeat steps 3 to 9 four times, the installation of ImageMixer 1.7. ● When you connect the camcorder to the PC with Windows® 2000 and Windows® XP, the [Microstaff WINASPI] screen appears. Be sure not to continue installation. After a... is complete. -7- After you perform installation of the desired language. NOTES: ● The software instruction manual is included on digital signature may appear. Double-click the [JVC] folder and then double-click the [Docs] folder. The driver search dialog box appears. 4 Click the next three items...
Installation Manual
Page 8
...; pg. 4) 7 Use the USB cable to connect the camcorder to the PC. Windows® 2000/XP: Select the [Hardware] tab and click [Device Manager]. 4 Delete [GR-D73*] in [Other devices]. * The model name depends on digital signature appears, click [OK] to continue installation. 8 Confirm the... in [Device Manager] by performing steps 2 - 3. ● [JVC PIX-MCV Video Capture] in [Imaging Devices] ● [JVC PIX-MCV Audio Capture] in [Sound, video and game controllers] ● [JVC Composite PIX-MCV Device] and [JVC Communication PIX-MCV Video Driver] in [Universal Serial Bus Controllers] -8-
...; pg. 4) 7 Use the USB cable to connect the camcorder to the PC. Windows® 2000/XP: Select the [Hardware] tab and click [Device Manager]. 4 Delete [GR-D73*] in [Other devices]. * The model name depends on digital signature appears, click [OK] to continue installation. 8 Confirm the... in [Device Manager] by performing steps 2 - 3. ● [JVC PIX-MCV Video Capture] in [Imaging Devices] ● [JVC PIX-MCV Audio Capture] in [Sound, video and game controllers] ● [JVC Composite PIX-MCV Device] and [JVC Communication PIX-MCV Video Driver] in [Universal Serial Bus Controllers] -8-
Installation Manual
Page 9
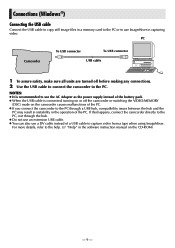
... the battery pack. ● When the USB cable is connected, turning on or off before making any connections. 2 Use the USB cable to connect the camcorder to the PC. Connections (Windows®) Connecting the USB cable Connect the USB cable to copy still image files in a memory card to the PC... operation of the PC. For more details, refer to the help. (੬ "Help" in the software instruction manual on the camcorder causes malfunctions of the PC. ● If you connect the camcorder to the PC through the hub. ● Do not use an extension USB cable. ● You can also use a DV...
... the battery pack. ● When the USB cable is connected, turning on or off before making any connections. 2 Use the USB cable to connect the camcorder to the PC. Connections (Windows®) Connecting the USB cable Connect the USB cable to copy still image files in a memory card to the PC... operation of the PC. For more details, refer to the help. (੬ "Help" in the software instruction manual on the camcorder causes malfunctions of the PC. ● If you connect the camcorder to the PC through the hub. ● Do not use an extension USB cable. ● You can also use a DV...
Installation Manual
Page 10
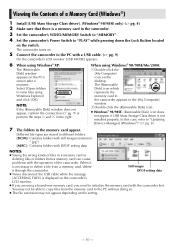
...in different folders. [DCIM]: Contains folders with still images (extension ".jpg") [MISC]: Contains folders with a USB cable. (੬ pg. 9) On the camcorder's LCD monitor [USB MODE] appears. . 6 When using Windows® XP: When using represents the Windows Explorer] memory card in a memory card or ...doing so. ● The file extension may not appear depending on the screen after a desktop. When it through the camcorder. The camcorder turns on. 5 Connect the camcorder to the PC with DPOF setting data NOTES: ● Saving the wrong kinds of files in and click [OK]. ...
...in different folders. [DCIM]: Contains folders with still images (extension ".jpg") [MISC]: Contains folders with a USB cable. (੬ pg. 9) On the camcorder's LCD monitor [USB MODE] appears. . 6 When using Windows® XP: When using represents the Windows Explorer] memory card in a memory card or ...doing so. ● The file extension may not appear depending on the screen after a desktop. When it through the camcorder. The camcorder turns on. 5 Connect the camcorder to the PC with DPOF setting data NOTES: ● Saving the wrong kinds of files in and click [OK]. ...

Installation Manual
Page 11
... PC. Playing Back Files on the PC (Windows®) Still images Use an application that folder in "Viewing the Contents of the camcorder, and the folder is displayed on the camcorder's LCD monitor. To view a still image, double-click the still image file (extension ".jpg"). - 11 - The message [ACCESSING FILES] appears on...
... PC. Playing Back Files on the PC (Windows®) Still images Use an application that folder in "Viewing the Contents of the camcorder, and the folder is displayed on the camcorder's LCD monitor. To view a still image, double-click the still image file (extension ".jpg"). - 11 - The message [ACCESSING FILES] appears on...

Installation Manual
Page 12
...to the PC correctly, the [Removable Disk] icon appears. 3 Right-click the [Removable Disk] icon in the menu. The camcorder turns off the camcorder. Disconnecting the USB Cable (Windows®) Before loading or unloading memory cards or turning off the PC, first disconnect the USB cable... 1 Confirm that the message [ACCESSING FILES] is not currently displayed on the LCD monitor of the camcorder. ● If the message [ACCESSING FILES] is connected to "OFF". If the camcorder is currently displayed, wait until it disappears before proceeding. 2 Double-click the [My Computer] icon ...
...to the PC correctly, the [Removable Disk] icon appears. 3 Right-click the [Removable Disk] icon in the menu. The camcorder turns off the camcorder. Disconnecting the USB Cable (Windows®) Before loading or unloading memory cards or turning off the PC, first disconnect the USB cable... 1 Confirm that the message [ACCESSING FILES] is not currently displayed on the LCD monitor of the camcorder. ● If the message [ACCESSING FILES] is connected to "OFF". If the camcorder is currently displayed, wait until it disappears before proceeding. 2 Double-click the [My Computer] icon ...

Installation Manual
Page 13
..., wait until it disappears before proceeding. 2 Double-click the [Safely Remove Hardware] or [Unplug or Eject Hardware] icon in the status bar. The camcorder turns off. - 13 - When using Windows® 2000/Me/XP 1 Confirm that the device can be safely removed appears, click [OK] and ...XP ● Windows® Me The model name depends on the LCD monitor of the camcorder. ● If the message [ACCESSING FILES] is not currently displayed on the connected camcorder. 5 Disconnect the USB cable. 6 Set the camcorder's Power Switch to step 5. 3 Select [USB Mass Storage Device] or [USB Disk...
..., wait until it disappears before proceeding. 2 Double-click the [Safely Remove Hardware] or [Unplug or Eject Hardware] icon in the status bar. The camcorder turns off. - 13 - When using Windows® 2000/Me/XP 1 Confirm that the device can be safely removed appears, click [OK] and ...XP ● Windows® Me The model name depends on the LCD monitor of the camcorder. ● If the message [ACCESSING FILES] is not currently displayed on the connected camcorder. 5 Disconnect the USB cable. 6 Set the camcorder's Power Switch to step 5. 3 Select [USB Mass Storage Device] or [USB Disk...

Installation Manual
Page 14
...com/ - 14 - Double click the CD-ROM icon. 2 Double-click the [ImageMixer] folder in capturing video. Follow the instructions which appear on the camcorder causes malfunctions of the battery pack. ● When the USB cable is included on the CD-ROM in the operation of the desired language. NOTES...: ● The software instruction manual is connected, turning on or off before making any other software you connect the camcorder to the PC through the hub. ● Do not use an extension USB cable. Note that Adobe® Acrobat® ReaderTM or Adobe®...
...com/ - 14 - Double click the CD-ROM icon. 2 Double-click the [ImageMixer] folder in capturing video. Follow the instructions which appear on the camcorder causes malfunctions of the battery pack. ● When the USB cable is included on the CD-ROM in the operation of the desired language. NOTES...: ● The software instruction manual is connected, turning on or off before making any other software you connect the camcorder to the PC through the hub. ● Do not use an extension USB cable. Note that Adobe® Acrobat® ReaderTM or Adobe®...
Installation Manual
Page 15
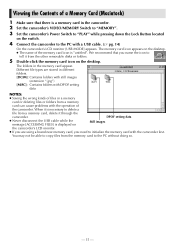
...cable while the message [ACCESSING FILES] is a memory card in the memory card appear. We recommend that there is displayed on Still images the camcorder's LCD monitor. ● If you are stored in different folders. [DCIM]: Contains folders with still images (extension ".jpg") [MISC]: Contains ...untitled". Viewing the Contents of a Memory Card (Macintosh) 1 Make sure that you need to initialize the memory card with the operation of the camcorder. The memory card icon appears on the desktop. ● The name of the memory card icon is necessary to delete a file from a ...
...cable while the message [ACCESSING FILES] is a memory card in the memory card appear. We recommend that there is displayed on Still images the camcorder's LCD monitor. ● If you are stored in different folders. [DCIM]: Contains folders with still images (extension ".jpg") [MISC]: Contains ...untitled". Viewing the Contents of a Memory Card (Macintosh) 1 Make sure that you need to initialize the memory card with the operation of the camcorder. The memory card icon appears on the desktop. ● The name of the memory card icon is necessary to delete a file from a ...

Installation Manual
Page 16
...the JPEG file format. The folders in the destination folder. ● To copy still images: Copy the folder within the [DCIM] folder. The camcorder turns off the camcorder. 1 Drop the memory card icon on the desktop into the [Trash] icon. ● If the confirmation message appears, click [OK]. 2 .... 2 Create a new folder, enter the folder name, and then double-click it disappears before proceeding. 3 Disconnect the USB cable. 4 Set the camcorder's Power Switch to "OFF". NOTE: Never disconnect the USB cable while the message [ACCESSING FILES] is copied from the memory card to the PC and...
...the JPEG file format. The folders in the destination folder. ● To copy still images: Copy the folder within the [DCIM] folder. The camcorder turns off the camcorder. 1 Drop the memory card icon on the desktop into the [Trash] icon. ● If the confirmation message appears, click [OK]. 2 .... 2 Create a new folder, enter the folder name, and then double-click it disappears before proceeding. 3 Disconnect the USB cable. 4 Set the camcorder's Power Switch to "OFF". NOTE: Never disconnect the USB cable while the message [ACCESSING FILES] is copied from the memory card to the PC and...


