
Installation Manual
Page 1
SOFTWARE INSTALLATION AND USB CONNECTION GUIDE ENGLISH LYT1197-001A COPYRIGHT © 2003 VICTOR COMPANY OF JAPAN, LTD. CAUTION: ● Operate this equipment according to the operating procedures described in this software. ● Changes or modifications not approved by JVC could void user's authority to modify this manual. ● Use only the provided CD-ROM. How to handle a CD-ROM ● Take care not to soil or scratch...
SOFTWARE INSTALLATION AND USB CONNECTION GUIDE ENGLISH LYT1197-001A COPYRIGHT © 2003 VICTOR COMPANY OF JAPAN, LTD. CAUTION: ● Operate this equipment according to the operating procedures described in this software. ● Changes or modifications not approved by JVC could void user's authority to modify this manual. ● Use only the provided CD-ROM. How to handle a CD-ROM ● Take care not to soil or scratch...
Installation Manual
Page 2
... matter. System Requirements Ⅲ Windows® The following and have the appropriate information ready. Product Name Model Problem Error Message Manufacturer Model CPU PC OS Memory Available Hard Disk Space □ Desktop □ Laptop MB MB Please note that it may take some time to respond to the terms of the software license. Notice for Users Use of this software (refer to a PC. CONTINUED...
... matter. System Requirements Ⅲ Windows® The following and have the appropriate information ready. Product Name Model Problem Error Message Manufacturer Model CPU PC OS Memory Available Hard Disk Space □ Desktop □ Laptop MB MB Please note that it may take some time to respond to the terms of the software license. Notice for Users Use of this software (refer to a PC. CONTINUED...

Installation Manual
Page 3
... of displaying 800 x 600 dots with an IEEE1394 (DV) cable. However, Windows® 98 cannot be used when you can use the optional USB reader/writer CUVUSD70, the PC card adapter CU-VPSD60 or the floppy disk adapter CU-VFSD50 to load the files in this instruction manual are either...guarantee that the provided software will work on all personal computers meeting those requirements. ● If your PC does not meet the system requirements above , the following requirements must be satisfied to connect a camcorder to a PC. OS : Mac OS 9.0.4 to 9.2.2 Exclude Mac OS X and Mac OS X [Classic] ...
... of displaying 800 x 600 dots with an IEEE1394 (DV) cable. However, Windows® 98 cannot be used when you can use the optional USB reader/writer CUVUSD70, the PC card adapter CU-VPSD60 or the floppy disk adapter CU-VFSD50 to load the files in this instruction manual are either...guarantee that the provided software will work on all personal computers meeting those requirements. ● If your PC does not meet the system requirements above , the following requirements must be satisfied to connect a camcorder to a PC. OS : Mac OS 9.0.4 to 9.2.2 Exclude Mac OS X and Mac OS X [Classic] ...

Installation Manual
Page 4
... installation. The installation of other application icons on screen instructions to conduct a video conference over the Internet. Software Installation (Windows®) Follow the procedure described below to record camcorder's audio and video output on the driver or the software. -4- Windows® 98/98SE/Me/2000: Be sure NOT to read and write memory cards in step 3, you to install the software. The procedure differs depending on your PC to connect the USB cable...
... installation. The installation of other application icons on screen instructions to conduct a video conference over the Internet. Software Installation (Windows®) Follow the procedure described below to record camcorder's audio and video output on the driver or the software. -4- Windows® 98/98SE/Me/2000: Be sure NOT to read and write memory cards in step 3, you to install the software. The procedure differs depending on your PC to connect the USB cable...

Installation Manual
Page 5
... [Next]. When the installation is possible to change the information. -5- Following steps are the example of USB Mass Storage Class driver on Windows® XP. [ImageMixer] screen appears. Confirm your information and click [Next]. ● It is finished, [InstallShield Wizard Complete] screen appears. Click [ImageMixer]. [Choose Setup Language] screen appears. Then, [ImageMixer Setup] screen appears. Click [Yes]. [Customer Information] screen appears. Following steps...
... [Next]. When the installation is possible to change the information. -5- Following steps are the example of USB Mass Storage Class driver on Windows® XP. [ImageMixer] screen appears. Confirm your information and click [Next]. ● It is finished, [InstallShield Wizard Complete] screen appears. Click [ImageMixer]. [Choose Setup Language] screen appears. Then, [ImageMixer Setup] screen appears. Click [Yes]. [Customer Information] screen appears. Following steps...

Installation Manual
Page 6
.... Then, [InstallShield Wizard Complete] screen appears. Then, [Start Copying Files] screen appears. When the installation is finished. Confirm the contents and click the close button on the upper right of the window to install all of the desired software. CONTINUED ON NEXT PAGE Then, [Choose Destination Location] screen appears. The PC restarts, and after a moment the [SETUP] screen in step 2 appears. 5 Repeat...
.... Then, [InstallShield Wizard Complete] screen appears. Then, [Start Copying Files] screen appears. When the installation is finished. Confirm the contents and click the close button on the upper right of the window to install all of the desired software. CONTINUED ON NEXT PAGE Then, [Choose Destination Location] screen appears. The PC restarts, and after a moment the [SETUP] screen in step 2 appears. 5 Repeat...

Installation Manual
Page 7
... below. ● [Search for Windows® XP users When you do so, the USB Video Streaming drivers will not be loaded from a list or specific location (Advanced)] and then click [Next]. Open the "Start.pdf" file and click the button of a software that is already installed, uninstallation will start. Click [Next] to select [Stop Installation]. NOTES: ● The software instruction manual is necessary so that USB Video Streaming driver works properly.
... below. ● [Search for Windows® XP users When you do so, the USB Video Streaming drivers will not be loaded from a list or specific location (Advanced)] and then click [Next]. Open the "Start.pdf" file and click the button of a software that is already installed, uninstallation will start. Click [Next] to select [Stop Installation]. NOTES: ● The software instruction manual is necessary so that USB Video Streaming driver works properly.
Installation Manual
Page 8
... are displayed in [Device Manager] by performing steps 2 - 3. ● [JVC PIX-MCV Video Capture] in [Imaging Devices] ● [JVC PIX-MCV Audio Capture] in [Sound, video and game controllers] ● [JVC Composite PIX-MCV Device] and [JVC Communication PIX-MCV Video Driver] in [Universal Serial Bus Controllers] -8- Device driver is installed. 8 Confirm the [Removable Disk] icon is installed. ● Windows® 2000: When a warning message dialog box on the connected camcorder. 5 Disconnect the USB cable from the camcorder. Installing [USB Mass Storage Class driver] (Windows®...
... are displayed in [Device Manager] by performing steps 2 - 3. ● [JVC PIX-MCV Video Capture] in [Imaging Devices] ● [JVC PIX-MCV Audio Capture] in [Sound, video and game controllers] ● [JVC Composite PIX-MCV Device] and [JVC Communication PIX-MCV Video Driver] in [Universal Serial Bus Controllers] -8- Device driver is installed. 8 Confirm the [Removable Disk] icon is installed. ● Windows® 2000: When a warning message dialog box on the connected camcorder. 5 Disconnect the USB cable from the camcorder. Installing [USB Mass Storage Class driver] (Windows®...
Installation Manual
Page 9
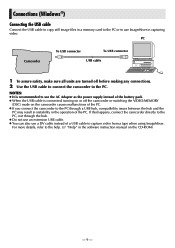
... the PC may result in instability in the operation of the PC. Connections (Windows®) Connecting the USB cable Connect the USB cable to copy still image files in a memory card to the PC or to use a DV cable instead of a USB cable to capture video from a tape when using ImageMixer. PC Camcorder To USB connector To USB connector USB cable 1 To assure safety, make sure all units are turned off the camcorder or switching the VIDEO/MEMORY (DSC) mode on the CD...
... the PC may result in instability in the operation of the PC. Connections (Windows®) Connecting the USB cable Connect the USB cable to copy still image files in a memory card to the PC or to use a DV cable instead of a USB cable to capture video from a tape when using ImageMixer. PC Camcorder To USB connector To USB connector USB cable 1 To assure safety, make sure all units are turned off the camcorder or switching the VIDEO/MEMORY (DSC) mode on the CD...
Installation Manual
Page 10
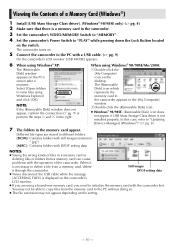
...represents the Windows Explorer] memory card in and click [OK]. DPOF setting data ● Never disconnect the USB cable while the message [ACCESSING FILES] is not installed properly. Viewing the Contents of a Memory Card (Windows®) 1 Install [USB Mass Storage Class driver]. (Windows® 98/98SE only) (੬ pg. 4) 2 Make sure that there is necessary to delete a file from a memory card, delete Still images it is a memory card in the camcorder. 3 Set the camcorder's VIDEO/MEMORY Switch to "MEMORY". 4 Set the camcorder's Power Switch to "PLAY" while pressing...
...represents the Windows Explorer] memory card in and click [OK]. DPOF setting data ● Never disconnect the USB cable while the message [ACCESSING FILES] is not installed properly. Viewing the Contents of a Memory Card (Windows®) 1 Install [USB Mass Storage Class driver]. (Windows® 98/98SE only) (੬ pg. 4) 2 Make sure that there is necessary to delete a file from a memory card, delete Still images it is a memory card in the camcorder. 3 Set the camcorder's VIDEO/MEMORY Switch to "MEMORY". 4 Set the camcorder's Power Switch to "PLAY" while pressing...

Installation Manual
Page 11
Playing Back Files on the PC (Windows®) Still images Use an application that can be copied, and then drag and drop that folder in "Viewing the Contents of the camcorder, and the folder is displayed on the camcorder's LCD monitor. NOTE: Never disconnect the USB cable while the message [ACCESSING FILES] is copied from the memory card to the PC. The message [ACCESSING FILES] appears on the PC. 1 Perform the procedure in...
Playing Back Files on the PC (Windows®) Still images Use an application that can be copied, and then drag and drop that folder in "Viewing the Contents of the camcorder, and the folder is displayed on the camcorder's LCD monitor. NOTE: Never disconnect the USB cable while the message [ACCESSING FILES] is copied from the memory card to the PC. The message [ACCESSING FILES] appears on the PC. 1 Perform the procedure in...

Installation Manual
Page 12
... 5. 5 Disconnect the USB cable. ● If any message appears, click [OK]. 6 Set the camcorder's Power Switch to the PC correctly, the [Removable Disk] icon appears. 3 Right-click the [Removable Disk] icon in the menu. Disconnecting the USB Cable (Windows®) Before loading or unloading memory cards or turning off the PC, first disconnect the USB cable and turn off . - 12 - A menu appears. 4 Click [Eject] in the [My Computer] window. The camcorder turns off the camcorder. CONTINUED ON...
... 5. 5 Disconnect the USB cable. ● If any message appears, click [OK]. 6 Set the camcorder's Power Switch to the PC correctly, the [Removable Disk] icon appears. 3 Right-click the [Removable Disk] icon in the menu. Disconnecting the USB Cable (Windows®) Before loading or unloading memory cards or turning off the PC, first disconnect the USB cable and turn off . - 12 - A menu appears. 4 Click [Eject] in the [My Computer] window. The camcorder turns off the camcorder. CONTINUED ON...

Installation Manual
Page 13
.... When using Windows® 2000/Me/XP 1 Confirm that the device can be safely removed appears, click [OK] and then click [Close]. ● Windows® 2000/XP ● Windows® Me The model name depends on the LCD monitor of the camcorder. ● If the message [ACCESSING FILES] is not currently displayed on the connected camcorder. 5 Disconnect the USB cable. 6 Set the camcorder's Power Switch to step 5. 3 Select [USB Mass Storage Device] or [USB Disk...
.... When using Windows® 2000/Me/XP 1 Confirm that the device can be safely removed appears, click [OK] and then click [Close]. ● Windows® 2000/XP ● Windows® Me The model name depends on the LCD monitor of the camcorder. ● If the message [ACCESSING FILES] is not currently displayed on the connected camcorder. 5 Disconnect the USB cable. 6 Set the camcorder's Power Switch to step 5. 3 Select [USB Mass Storage Device] or [USB Disk...

Installation Manual
Page 14
... you are turned off the camcorder or switching the VIDEO/MEMORY (DSC) mode on the screen. Double click the CD-ROM icon. 2 Double-click the [ImageMixer] folder in capturing video. Note that Adobe® Acrobat® ReaderTM or Adobe® Reader® must be loaded from Adobe's web site: http://www.adobe.com/ - 14 - Connections (Macintosh) Connect the USB cable to copy still image files in a memory card to...
... you are turned off the camcorder or switching the VIDEO/MEMORY (DSC) mode on the screen. Double click the CD-ROM icon. 2 Double-click the [ImageMixer] folder in capturing video. Note that Adobe® Acrobat® ReaderTM or Adobe® Reader® must be loaded from Adobe's web site: http://www.adobe.com/ - 14 - Connections (Macintosh) Connect the USB cable to copy still image files in a memory card to...
Installation Manual
Page 15
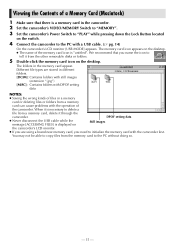
... memory card icon appears on the desktop. DPOF setting data ● Never disconnect the USB cable while the message [ACCESSING FILES] is "untitled". Different file types are using a brand new memory card, you name the icon to tell it through the camcorder. Viewing the Contents of a Memory Card (Macintosh) 1 Make sure that you need to initialize the memory card with the camcorder first. You may not be able to copy files from the other removable disks...
... memory card icon appears on the desktop. DPOF setting data ● Never disconnect the USB cable while the message [ACCESSING FILES] is "untitled". Different file types are using a brand new memory card, you name the icon to tell it through the camcorder. Viewing the Contents of a Memory Card (Macintosh) 1 Make sure that you need to initialize the memory card with the camcorder first. You may not be able to copy files from the other removable disks...

Installation Manual
Page 16
... the USB cable. 4 Set the camcorder's Power Switch to the PC and played back on the PC. 1 Double-click the memory card icon on the LCD monitor of the camcorder, and the folder is not currently displayed on the application icon. Copying Files to the PC (Macintosh) Still image files that are stored in a memory card can handle the JPEG file format. NOTE: Never disconnect the USB cable while the message [ACCESSING FILES] is displayed on...
... the USB cable. 4 Set the camcorder's Power Switch to the PC and played back on the PC. 1 Double-click the memory card icon on the LCD monitor of the camcorder, and the folder is not currently displayed on the application icon. Copying Files to the PC (Macintosh) Still image files that are stored in a memory card can handle the JPEG file format. NOTE: Never disconnect the USB cable while the message [ACCESSING FILES] is displayed on...


