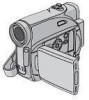

Instruction Manual
Page 1
.... To deactivate the demonstration, set "DEMO MODE" to ensure safe use of the camcorder. Model No. which is located on the World Wide Web for Digital Video Camera: http://www.jvc.co.jp/english/cyber/ For Accessories: http://www.jvc.co.jp/english/accessory/ Dear Customer, Thank you for future reference. DIGITAL VIDEO...
.... To deactivate the demonstration, set "DEMO MODE" to ensure safe use of the camcorder. Model No. which is located on the World Wide Web for Digital Video Camera: http://www.jvc.co.jp/english/cyber/ For Accessories: http://www.jvc.co.jp/english/accessory/ Dear Customer, Thank you for future reference. DIGITAL VIDEO...

Instruction Manual
Page 2
..., we recommend using SP mode. ● For safety and reliability. Using generic non-JVC batteries can become dirty more video than 99.99%) ● Do not leave the battery pack attached when the camcorder is not in place of light (red, green or blue) may be dirty. in... easily if your video heads before use only. It is made with JVC Data Battery. in summer. - near a heater. ● The LCD monitor is recommended only genuine JVC batteries and accessories are used your cassette tapes and camcorder in a dusty area. Play back your trial recording to make sure the...
..., we recommend using SP mode. ● For safety and reliability. Using generic non-JVC batteries can become dirty more video than 99.99%) ● Do not leave the battery pack attached when the camcorder is not in place of light (red, green or blue) may be dirty. in... easily if your video heads before use only. It is made with JVC Data Battery. in summer. - near a heater. ● The LCD monitor is recommended only genuine JVC batteries and accessories are used your cassette tapes and camcorder in a dusty area. Play back your trial recording to make sure the...
Instruction Manual
Page 3
...: TO PREVENT FIRE OR SHOCK HAZARD, DO NOT EXPOSE THIS UNIT TO RAIN OR MOISTURE. Use the JVC BN-VF707U/VF714U/VF733U battery packs and, to recharge them or to supply power to the camcorder from an AC outlet, use the provided multi-voltage AC Adapter. (An appropriate conversion adapter may be...
...: TO PREVENT FIRE OR SHOCK HAZARD, DO NOT EXPOSE THIS UNIT TO RAIN OR MOISTURE. Use the JVC BN-VF707U/VF714U/VF733U battery packs and, to recharge them or to supply power to the camcorder from an AC outlet, use the provided multi-voltage AC Adapter. (An appropriate conversion adapter may be...
Instruction Manual
Page 4
...or splashing. Connecting cables (Audio/Video, S-Video, etc.) to qualified service personnel. IMPORTANT SAFETY INSTRUCTIONS 1. Follow all servicing to the camcorder and leaving it has sufficient space on top of time. 12. Install in damage. Refer all instructions. 5. Also do not place ...a shelf, make sure that produce heat. 9. Do not use the provided strap. the heat may be placed on the cables will cause the camcorder to rain or moisture, does not operate normally, or has been dropped. When a cart is also a risk of internal circuitry. It could tip...
...or splashing. Connecting cables (Audio/Video, S-Video, etc.) to qualified service personnel. IMPORTANT SAFETY INSTRUCTIONS 1. Follow all servicing to the camcorder and leaving it has sufficient space on top of time. 12. Install in damage. Refer all instructions. 5. Also do not place ...a shelf, make sure that produce heat. 9. Do not use the provided strap. the heat may be placed on the cables will cause the camcorder to rain or moisture, does not operate normally, or has been dropped. When a cart is also a risk of internal circuitry. It could tip...
Instruction Manual
Page 5
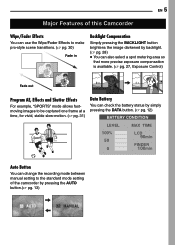
EN 5 Major Features of this Camcorder Wipe/Fader Effects You can use the Wipe/Fader Effects to make pro-style scene transitions. (੬ pg. 30) Fade in Backlight Compensation Simply pressing the BACKLIGHT button brightens the image darkened by backlight. (੬ pg. 28) ● You can also select a spot metering area so that... TIME 100% 50 0 LCD 90min FINDER 100min Auto Button You can change the recording mode between manual setting to the standard mode setting of the camcorder by pressing the AUTO button.(੬ pg. 13) AUTO MANUAL
EN 5 Major Features of this Camcorder Wipe/Fader Effects You can use the Wipe/Fader Effects to make pro-style scene transitions. (੬ pg. 30) Fade in Backlight Compensation Simply pressing the BACKLIGHT button brightens the image darkened by backlight. (੬ pg. 28) ● You can also select a spot metering area so that... TIME 100% 50 0 LCD 90min FINDER 100min Auto Button You can change the recording mode between manual setting to the standard mode setting of the camcorder by pressing the AUTO button.(੬ pg. 13) AUTO MANUAL
Instruction Manual
Page 9
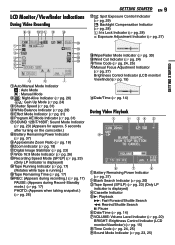
... Sound Mode Indicator (੬ pg. 23) (Appears for approx. 5 seconds after turning on the camcorder.) 8Battery Remaining Power Indicator (੬ pg. 37) 9Approximate Zoom Ratio (੬ pg. 18) !Zoom indicator (੬ pg. 18) "Digital Image Stabilizer (੬ pg. 23) #Wide 16:9 Mode...pg. 26) GETTING STARTED EN 9 ) : Spot Exposure Control Indicator (੬ pg. 29) : Backlight Compensation Indicator (੬ pg. 28) : Iris Lock Indicator (੬ pg. 28) ±: Exposure Adjustment Indicator (੬ pg. 27) EXPOSURE -1 ~Wipe/Fader Mode indicator (੬ pg. 30) +Wind Cut Indicator...
... Sound Mode Indicator (੬ pg. 23) (Appears for approx. 5 seconds after turning on the camcorder.) 8Battery Remaining Power Indicator (੬ pg. 37) 9Approximate Zoom Ratio (੬ pg. 18) !Zoom indicator (੬ pg. 18) "Digital Image Stabilizer (੬ pg. 23) #Wide 16:9 Mode...pg. 26) GETTING STARTED EN 9 ) : Spot Exposure Control Indicator (੬ pg. 29) : Backlight Compensation Indicator (੬ pg. 28) : Iris Lock Indicator (੬ pg. 28) ±: Exposure Adjustment Indicator (੬ pg. 27) EXPOSURE -1 ~Wipe/Fader Mode indicator (੬ pg. 30) +Wind Cut Indicator...
Instruction Manual
Page 10
...container. Cassette tapes should be removed from the camcorder and stored in a bag or other cables. It is designed exclusively for important video recordings. If a cable has only one or more video than SP (Standard) mode, but JVC brand cassette tapes are stored in the proper environment.... Play back your cassette tapes and camcorder in a dusty area. LP (Long Play) mode lets you record 50% more core filter...
...container. Cassette tapes should be removed from the camcorder and stored in a bag or other cables. It is designed exclusively for important video recordings. If a cable has only one or more video than SP (Standard) mode, but JVC brand cassette tapes are stored in the proper environment.... Play back your cassette tapes and camcorder in a dusty area. LP (Long Play) mode lets you record 50% more core filter...

Instruction Manual
Page 11
Disconnect the AC Adapter from the AC outlet. How To Attach The Lens Cap To protect the lens, attach the provided lens cap to the camcorder. The POWER/CHARGE lamp on the battery pack pointing downward, push the battery pack slightly against the battery pack mount 1. 3 Slide down the battery ... STARTED Battery pack 1 PUSH BATT. NOTE: To confirm the lens cap is on correctly make sure the cap is flush to the camcorder as shown in place 2. 4 Connect the AC Adapter to indicate charging has started. 6 When the POWER/CHARGE lamp goes out, charging is finished....
Disconnect the AC Adapter from the AC outlet. How To Attach The Lens Cap To protect the lens, attach the provided lens cap to the camcorder. The POWER/CHARGE lamp on the battery pack pointing downward, push the battery pack slightly against the battery pack mount 1. 3 Slide down the battery ... STARTED Battery pack 1 PUSH BATT. NOTE: To confirm the lens cap is on correctly make sure the cap is flush to the camcorder as shown in place 2. 4 Connect the AC Adapter to indicate charging has started. 6 When the POWER/CHARGE lamp goes out, charging is finished....

Instruction Manual
Page 12
...optional AA-VF7 Battery Charger, you can result in a camcorder malfunction. Battery pack Charging time BN-VF707U* BN-VF714U Approx. 1 hr. 30 min. Use the JVC BNVF707U/VF714U/VF733U battery packs. Failure to the camcorder. 12 EN GETTING STARTED To detach the battery pack Slide... the battery pack upward while pressing PUSH BATT. NOTES: ● Recording time is reduced significantly under the following conditions: ● Zoom or ...
...optional AA-VF7 Battery Charger, you can result in a camcorder malfunction. Battery pack Charging time BN-VF707U* BN-VF714U Approx. 1 hr. 30 min. Use the JVC BNVF707U/VF714U/VF733U battery packs. Failure to the camcorder. 12 EN GETTING STARTED To detach the battery pack Slide... the battery pack upward while pressing PUSH BATT. NOTES: ● Recording time is reduced significantly under the following conditions: ● Zoom or ...
Instruction Manual
Page 13
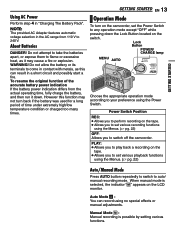
... the actual operating time, fully charge the battery, and then run it may not turn on the tape. ● Allows you to switch off the camcorder. Do not attempt to take the batteries apart, or expose them to auto/ M manual recording mode. PLAY: ● Allows you to play back a ...recording on the camcorder, set various playback functions using the Menus. (੬ pg. 22) OFF: Allows you to set the Power Switch to come in "Charging The Battery Pack...
... the actual operating time, fully charge the battery, and then run it may not turn on the tape. ● Allows you to switch off the camcorder. Do not attempt to take the batteries apart, or expose them to auto/ M manual recording mode. PLAY: ● Allows you to play back a ...recording on the camcorder, set various playback functions using the Menus. (੬ pg. 22) OFF: Allows you to set the Power Switch to come in "Charging The Battery Pack...
Instruction Manual
Page 14
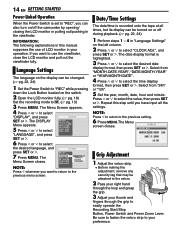
INFORMATION: The following explanations in this step until you have input all times, but its display can be turned on or off the camcorder by opening/ closing the LCD monitor or pulling out/pushing in your operation. The Menu Screen appears. 4 Press 3 or 4 to select the time ... strip to select the value, then press SET or 2. NOTE: Press 1 to return to easily operate the Recording Start/Stop Button, Power Switch and Power Zoom Lever. YEAR 2 4h JAN . 1 . 2 0 06 0 :00 Grip Adjustment 1 Adjust the velcro strip. ● Before making the adjustment, remove any security tag that ...
INFORMATION: The following explanations in this step until you have input all times, but its display can be turned on or off the camcorder by opening/ closing the LCD monitor or pulling out/pushing in your operation. The Menu Screen appears. 4 Press 3 or 4 to select the time ... strip to select the value, then press SET or 2. NOTE: Press 1 to return to easily operate the Recording Start/Stop Button, Power Switch and Power Zoom Lever. YEAR 2 4h JAN . 1 . 2 0 06 0 :00 Grip Adjustment 1 Adjust the velcro strip. ● Before making the adjustment, remove any security tag that ...
Instruction Manual
Page 15
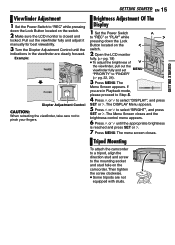
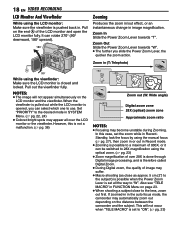
... in Playback mode, please proceed to Step 5. 4 Press 3 or 4 to select "DISPLAY", and press SET or 2. The Menu Screen appears. Tripod Mounting To attach the camcorder to a tripod, align the direction stud and screw to the mounting socket and stud hole on the 1 switch. 2 Open the LCD monitor fully. (੬ pg.... GETTING STARTED EN 15 GETTING STARTED Viewfinder Adjustment 1 Set the Power Switch to "REC" while pressing down the Lock Button located on the camcorder.
... in Playback mode, please proceed to Step 5. 4 Press 3 or 4 to select "DISPLAY", and press SET or 2. The Menu Screen appears. Tripod Mounting To attach the camcorder to a tripod, align the direction stud and screw to the mounting socket and stud hole on the 1 switch. 2 Open the LCD monitor fully. (੬ pg.... GETTING STARTED EN 15 GETTING STARTED Viewfinder Adjustment 1 Set the Power Switch to "REC" while pressing down the Lock Button located on the camcorder.
Instruction Manual
Page 16
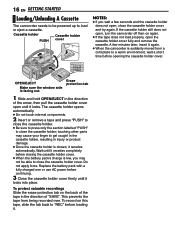
...before closing the cassette holder cover. ● When the battery pack's charge is facing out. 16 EN GETTING STARTED Loading/Unloading A Cassette The camcorder needs to be able to get caught in the cassette holder, resulting in injury or product damage. ● Once the cassette holder is closed... of "SAVE". OPEN/EJECT Make sure the window side is low, you wait a few minutes later, insert it again. ● When the camcorder is suddenly moved from being recorded over. To record on this tape, slide the tab back to a warm environment, wait a short time before continuing...
...before closing the cassette holder cover. ● When the battery pack's charge is facing out. 16 EN GETTING STARTED Loading/Unloading A Cassette The camcorder needs to be able to get caught in the cassette holder, resulting in injury or product damage. ● Once the cassette holder is closed... of "SAVE". OPEN/EJECT Make sure the window side is low, you wait a few minutes later, insert it again. ● When the camcorder is suddenly moved from being recorded over. To record on this tape, slide the tab back to a warm environment, wait a short time before continuing...
Instruction Manual
Page 17
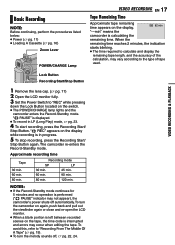
...the tape. NOTES: ● If the Record-Standby mode continues for 5 minutes and no operation is performed (" PAUSE" indicator may not appear), the camcorder's power shuts off , ੬ pg. 22, 24. Basic Recording NOTE: Before continuing, perform the procedures listed below: ● Power (੬ pg.... 11) ● Loading A Cassette (੬ pg. 16) Zoom Lever POWER/CHARGE Lamp VIDEO RECORDING EN 17 Tape Remaining Time Approximate tape remaining time appears on the display while recording is in LP (Long...
...the tape. NOTES: ● If the Record-Standby mode continues for 5 minutes and no operation is performed (" PAUSE" indicator may not appear), the camcorder's power shuts off , ੬ pg. 22, 24. Basic Recording NOTE: Before continuing, perform the procedures listed below: ● Power (੬ pg.... 11) ● Loading A Cassette (੬ pg. 16) Zoom Lever POWER/CHARGE Lamp VIDEO RECORDING EN 17 Tape Remaining Time Approximate tape remaining time appears on the display while recording is in LP (Long...
Instruction Manual
Page 18
... in the auto focus mode, the camcorder may become unstable during Zooming. Pull out the viewfinder fully. In this is not a malfunction. (੬ pg. 36) 1x 10x 20x 40x Zoom out (W: Wide angle) 10 x Digital zoom zone 28X (optical) zoom zone Approximate zoom ratio NOTES: ● Focusing may automatically zoom out depending on the LCD monitor...
... in the auto focus mode, the camcorder may become unstable during Zooming. Pull out the viewfinder fully. In this is not a malfunction. (੬ pg. 36) 1x 10x 20x 40x Zoom out (W: Wide angle) 10 x Digital zoom zone 28X (optical) zoom zone Approximate zoom ratio NOTES: ● Focusing may automatically zoom out depending on the LCD monitor...

Instruction Manual
Page 19
This means the camcorder may record the same time codes as those existing in the most convenient direction. VIDEO RECORDING EN 19 NOTES: ● The time code cannot be ... using a partially recorded tape. ● When shooting on a blank portion located partway through the tape, the time code is recorded on the tape. Hold the camcorder in the desired position and tilt the LCD monitor in a previously recorded scene. It can rotate 270° (90° downward, 180° upward). To...
This means the camcorder may record the same time codes as those existing in the most convenient direction. VIDEO RECORDING EN 19 NOTES: ● The time code cannot be ... using a partially recorded tape. ● When shooting on a blank portion located partway through the tape, the time code is recorded on the tape. Hold the camcorder in the desired position and tilt the LCD monitor in a previously recorded scene. It can rotate 270° (90° downward, 180° upward). To...

Instruction Manual
Page 20
...display during video playback. NOTES: ● Before starting Blank Search, if the current position is no recorded scene after the blank portion. Playback Snapshot This camcorder allows you release the button, normal playback resumes. ● A slight mosaic effect appears on a connected TV. (੬ pg. 21) ● .... Once you to turn up the volume, or towards "-" to take snapshots during Shuttle Search. To control the speaker volume Slide the Power Zoom Lever (VOL. +/-) towards "+" to turn down the Lock Button located on the left side of tape may not be detected. ● ...
...display during video playback. NOTES: ● Before starting Blank Search, if the current position is no recorded scene after the blank portion. Playback Snapshot This camcorder allows you release the button, normal playback resumes. ● A slight mosaic effect appears on a connected TV. (੬ pg. 21) ● .... Once you to turn up the volume, or towards "-" to take snapshots during Shuttle Search. To control the speaker volume Slide the Power Zoom Lever (VOL. +/-) towards "+" to turn down the Lock Button located on the left side of tape may not be detected. ● ...
Instruction Manual
Page 21
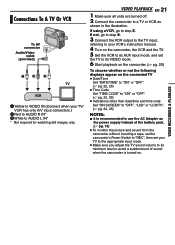
... to VIDEO IN (Connect when your TV/ VCR has only A/V input connectors.) 2Red to AUDIO R IN* 3White to avoid a sudden burst of sound when the camcorder is recommended to use the AC Adapter as shown in the illustration. If not, go to a TV or VCR as the power supply instead of... VCR and the TV. 5 Set the VCR to its AUX input mode, and set the TV to its VIDEO mode. 6 Start playback on the camcorder. (੬ pg. 20) To choose whether or not the following displays appear on the connected TV ● Date/Time Set "DATE/TIME" to "ON" or "...
... to VIDEO IN (Connect when your TV/ VCR has only A/V input connectors.) 2Red to AUDIO R IN* 3White to avoid a sudden burst of sound when the camcorder is recommended to use the AC Adapter as shown in the illustration. If not, go to a TV or VCR as the power supply instead of... VCR and the TV. 5 Set the VCR to its AUX input mode, and set the TV to its VIDEO mode. 6 Start playback on the camcorder. (੬ pg. 20) To choose whether or not the following displays appear on the connected TV ● Date/Time Set "DATE/TIME" to "ON" or "...
Instruction Manual
Page 22
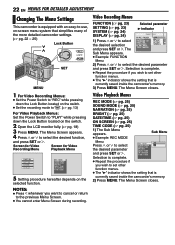
.... ● Example: FUNCTION Menu 2) Press 3 or 4 to set other function menus. ● The "3" indicator shows the setting that is currently saved inside the camcorder's memory. 2) Press MENU. Sub Menu ● Example: REC MODE Menu Press 3 or 4 to select the desired function, and press SET or 2. REC MODE... BLACK SL I ME CODE 5 Setting procedure hereafter depends on the selected function. 22 EN MENUS FOR DETAILED ADJUSTMENT Changing The Menu Settings This camcorder is equipped with an easy-to-use, on-screen menu system that simplifies many of the more detailed...
.... ● Example: FUNCTION Menu 2) Press 3 or 4 to set other function menus. ● The "3" indicator shows the setting that is currently saved inside the camcorder's memory. 2) Press MENU. Sub Menu ● Example: REC MODE Menu Press 3 or 4 to select the desired function, and press SET or 2. REC MODE... BLACK SL I ME CODE 5 Setting procedure hereafter depends on the selected function. 22 EN MENUS FOR DETAILED ADJUSTMENT Changing The Menu Settings This camcorder is equipped with an easy-to-use, on-screen menu system that simplifies many of the more detailed...
Instruction Manual
Page 23
... the Stabilizer cannot be used. By digitally processing and magnifying images, zooming is possible from 28X (the optical zoom limit), to a maximum of 800X digital magnification. * SP indicator does not appear on another camcorder, blocks of approx. 40 cm (1.4 ft). BALANCE (੬ pg...]: Disables the function. By digitally processing and magnifying images, zooming is possible from 28X (the optical zoom limit), to a maximum of 56X digital magnification. 800X: Allows you to use the Digital Zoom. Switch off this camcorder. ● During playback of a tape recorded on the ...
... the Stabilizer cannot be used. By digitally processing and magnifying images, zooming is possible from 28X (the optical zoom limit), to a maximum of 800X digital magnification. * SP indicator does not appear on another camcorder, blocks of approx. 40 cm (1.4 ft). BALANCE (੬ pg...]: Disables the function. By digitally processing and magnifying images, zooming is possible from 28X (the optical zoom limit), to a maximum of 56X digital magnification. 800X: Allows you to use the Digital Zoom. Switch off this camcorder. ● During playback of a tape recorded on the ...


