Instruction Manual
Page 4
... material without the authorization of BD-X200 Functions ...4 Precautions for DVD Recorder Use ...5 Precautions for Disc Usage ...6 Details Regarding Discs ...7 Component Names & Functions Front Panel ...9 Rear Panel ...12 LCD Display and On-Screen Content LCD Display ...14 On-Screen Content ...16 Status Messages ...16 Disc Status ...18 Event Messages ...19 Alarm Messages ...20 Preparation Signal Connections ...21 Power Connections ...23 Turning the Power On & Off ...24 Inserting & Removing Discs ...25 Using a Keyboard & Mouse ...26 Setting & Displaying the Date & Time ...27 2
... material without the authorization of BD-X200 Functions ...4 Precautions for DVD Recorder Use ...5 Precautions for Disc Usage ...6 Details Regarding Discs ...7 Component Names & Functions Front Panel ...9 Rear Panel ...12 LCD Display and On-Screen Content LCD Display ...14 On-Screen Content ...16 Status Messages ...16 Disc Status ...18 Event Messages ...19 Alarm Messages ...20 Preparation Signal Connections ...21 Power Connections ...23 Turning the Power On & Off ...24 Inserting & Removing Discs ...25 Using a Keyboard & Mouse ...26 Setting & Displaying the Date & Time ...27 2
Instruction Manual
Page 5
...Playback Signals From a DV Camera or VCR 63 Recording Video & Audio From a Non-Linear Editor ...64 In, Out & Chapter Points from External Edit Lists ...68 Recording Operations Using a DV Camera Trigger ...69 DVD Dubbing Dubbing DVDs Using the LAN Terminal ...70 Setup Menu Setup Menu Configuration ...74 Setting the Setup Menu ...75 Restoring to Default Settings ...75 Setup Menus ...76 DISC MENU Screen ...77 INPUT SELECT MENU screen ...77 SYSTEM MENU Screen ...78 PRESET STYLE MENU screen ...79 RECORDER MENU Screen ...80 REMOTE MENU screen ...82 DISPLAY MENU screen ...83 CLOCK ADJUST MENU screen...
...Playback Signals From a DV Camera or VCR 63 Recording Video & Audio From a Non-Linear Editor ...64 In, Out & Chapter Points from External Edit Lists ...68 Recording Operations Using a DV Camera Trigger ...69 DVD Dubbing Dubbing DVDs Using the LAN Terminal ...70 Setup Menu Setup Menu Configuration ...74 Setting the Setup Menu ...75 Restoring to Default Settings ...75 Setup Menus ...76 DISC MENU Screen ...77 INPUT SELECT MENU screen ...77 SYSTEM MENU Screen ...78 PRESET STYLE MENU screen ...79 RECORDER MENU Screen ...80 REMOTE MENU screen ...82 DISPLAY MENU screen ...83 CLOCK ADJUST MENU screen...
Instruction Manual
Page 6
... played on other DVD players. 4 This terminal allows two BD-X200 DVD recorders to be connected using a LAN cable, and the recorders can then operate as master and receiver devices during the recording of content to a DVD. Video: Composite video, YC separate, or DV signals (including audio) Audio: Analog audio or DV signals (including video) ⅥA wide range of recording methods are required.) Synchro-recording is carried out from the REMOTE CONTROL screen. (☞ Page 59) ● When a digital video...
... played on other DVD players. 4 This terminal allows two BD-X200 DVD recorders to be connected using a LAN cable, and the recorders can then operate as master and receiver devices during the recording of content to a DVD. Video: Composite video, YC separate, or DV signals (including audio) Audio: Analog audio or DV signals (including video) ⅥA wide range of recording methods are required.) Synchro-recording is carried out from the REMOTE CONTROL screen. (☞ Page 59) ● When a digital video...
Instruction Manual
Page 7
... time, please disconnect the AC adaptor to avoid wasting electricity. Ⅵ Cleaning the Exterior (with the power off and then carry out setup procedures as described in the corresponding user's manuals. Ⅵ The DVD drive unit is likely that condensation will occur, remove any other device. Ⅵ Before connecting the BD-X200 to other similar problems. In this type of situation, allow the DVD recorder...
... time, please disconnect the AC adaptor to avoid wasting electricity. Ⅵ Cleaning the Exterior (with the power off and then carry out setup procedures as described in the corresponding user's manuals. Ⅵ The DVD drive unit is likely that condensation will occur, remove any other device. Ⅵ Before connecting the BD-X200 to other similar problems. In this type of situation, allow the DVD recorder...

Instruction Manual
Page 9
... in audio and/or video • Unintentional stopping during playback ● Commercially-available DVD-Videos and DVD-ROMs cannot be used . The deletion of specific sections of data is impossible to overwrite previously recorded content with DVD-R Standard 2.0 (video mode) can be used . 7 Details Regarding Discs Discs for Recording & Playback Finalizing The following conditions may occur when attempting to play discs recorded using other devices on this DVD recorder. • Inability to play • Block-type noise...
... in audio and/or video • Unintentional stopping during playback ● Commercially-available DVD-Videos and DVD-ROMs cannot be used . The deletion of specific sections of data is impossible to overwrite previously recorded content with DVD-R Standard 2.0 (video mode) can be used . 7 Details Regarding Discs Discs for Recording & Playback Finalizing The following conditions may occur when attempting to play discs recorded using other devices on this DVD recorder. • Inability to play • Block-type noise...

Instruction Manual
Page 11
... actual recording levels. 9 Component Names & Functions Front Panel 1 5 8 OPERATE AUDIO CH1 CH2 PHONES 2 6 BUSY OPEN/CLOSE DOLBY DIGITAL LPCM MPEG DVD RECORDER BD-X200 TITLE CHAPTER REV STOP PLAY FWD PAUSE REC OPTION DV Y/C LINE SET UP TOP SET MENU MENU 3 4 7 1 OPERATE button and indicator ● This button is used to turn on the DVD recorder and to make it flashes when no signal is present. 8 Phones jack and volume adjuster The phones jack allows headphones to be connected to the DVD recorder...
... actual recording levels. 9 Component Names & Functions Front Panel 1 5 8 OPERATE AUDIO CH1 CH2 PHONES 2 6 BUSY OPEN/CLOSE DOLBY DIGITAL LPCM MPEG DVD RECORDER BD-X200 TITLE CHAPTER REV STOP PLAY FWD PAUSE REC OPTION DV Y/C LINE SET UP TOP SET MENU MENU 3 4 7 1 OPERATE button and indicator ● This button is used to turn on the DVD recorder and to make it flashes when no signal is present. 8 Phones jack and volume adjuster The phones jack allows headphones to be connected to the DVD recorder...

Instruction Manual
Page 14
... and output via these signals for this terminal's audio and video signals for input, set INPUT SELECT from the INPUT SELECT MENU screen to DV. ● REMOTE SELECT from the REMOTE MENU screen is used to select a control method for input, set INPUT SELECT from the INPUT SELECT MENU screen to LINE. ● SETUP from the RECORDER MENU (2/2) screen. 3 VIDEO LINE OUT terminal (BNC) This terminal is used to connect the DVD recorder to a monitor. ● When the DVD recorder is in Stop or Recording mode, the video input signal is a setup signal. ● This terminal's specification...
... and output via these signals for this terminal's audio and video signals for input, set INPUT SELECT from the INPUT SELECT MENU screen to DV. ● REMOTE SELECT from the REMOTE MENU screen is used to select a control method for input, set INPUT SELECT from the INPUT SELECT MENU screen to LINE. ● SETUP from the RECORDER MENU (2/2) screen. 3 VIDEO LINE OUT terminal (BNC) This terminal is used to connect the DVD recorder to a monitor. ● When the DVD recorder is in Stop or Recording mode, the video input signal is a setup signal. ● This terminal's specification...

Instruction Manual
Page 15
... the DVD recorder's buttons when using a keyboard. ● It is not be used as a keyboard or mouse. Video and audio from the VCR can be possible to operate devices other than a keyboard or mouse by connecting them to the USB terminal. ● Set KEYBOARD STYLE from the REMOTE MENU screen to 9PIN(MASTER). DC IN terminal (2-pin) This terminal is supplied via RS-422A. $ LAN SIGNAL GND VIDEO...
... the DVD recorder's buttons when using a keyboard. ● It is not be used as a keyboard or mouse. Video and audio from the VCR can be possible to operate devices other than a keyboard or mouse by connecting them to the USB terminal. ● Set KEYBOARD STYLE from the REMOTE MENU screen to 9PIN(MASTER). DC IN terminal (2-pin) This terminal is supplied via RS-422A. $ LAN SIGNAL GND VIDEO...

Instruction Manual
Page 31
... or manual insertion of audio recording levels. Audio recording levels can be possible to modify the chapter menu's style and thumbnails and to insert chapter names and comments whenever recording is stopped (i.e., whenever title closing is performed). ● Once title closing ) Processing After Recording (☞ Page 42) If additional recording is to select the appropriate recording signal, setup the recording conditions, and make other necessary settings. (☞ Page 31) Adjustment...
... or manual insertion of audio recording levels. Audio recording levels can be possible to modify the chapter menu's style and thumbnails and to insert chapter names and comments whenever recording is stopped (i.e., whenever title closing is performed). ● Once title closing ) Processing After Recording (☞ Page 42) If additional recording is to select the appropriate recording signal, setup the recording conditions, and make other necessary settings. (☞ Page 31) Adjustment...

Instruction Manual
Page 33
... is displayed. SETUP should be set to ON if it is a setup signal, or to OFF if it selects the recording method for the wide-screen discrimination signal.) • THUMBNAIL FORM This parameter selects the method to be used to manually set when recording an audio signal from the top of discs to indicate the action to be adjusted independently (INDEPENDENCE). Pre-Recording Settings Ⅵ Recorder switch settings Use the AUDIO INPUT LEVEL switch on the DVD recorder's rear panel to select...
... is displayed. SETUP should be set to ON if it is a setup signal, or to OFF if it selects the recording method for the wide-screen discrimination signal.) • THUMBNAIL FORM This parameter selects the method to be used to manually set when recording an audio signal from the top of discs to indicate the action to be adjusted independently (INDEPENDENCE). Pre-Recording Settings Ⅵ Recorder switch settings Use the AUDIO INPUT LEVEL switch on the DVD recorder's rear panel to select...

Instruction Manual
Page 35
... one of the video; Large values increase the quality of the following procedures. • Select MENU and press the SET button to return to the Setup Menu. • Press the SET UP button to return to display the Setup Menu. BUSY OPEN/CLOSE OPTION DV Y/C LINE SET UP TOP SET MENU MENU SET UP button SET button RECORDER MENU (1/2) screen RECORDER MENU (1/2) MENU CHAPTER CREATION SET INTERVAL TOTAL CONTENTS TIME ENCODE QUALITY (Mbps) AUDIO ENCODE ASPECT MANUAL Every05Min NO USE 4.4 LPCM AUTO Setting Encoding Formats ⅥStop the DVD recorder. 1.
... one of the video; Large values increase the quality of the following procedures. • Select MENU and press the SET button to return to the Setup Menu. • Press the SET UP button to return to display the Setup Menu. BUSY OPEN/CLOSE OPTION DV Y/C LINE SET UP TOP SET MENU MENU SET UP button SET button RECORDER MENU (1/2) screen RECORDER MENU (1/2) MENU CHAPTER CREATION SET INTERVAL TOTAL CONTENTS TIME ENCODE QUALITY (Mbps) AUDIO ENCODE ASPECT MANUAL Every05Min NO USE 4.4 LPCM AUTO Setting Encoding Formats ⅥStop the DVD recorder. 1.

Instruction Manual
Page 37
...: The AUDIO INPUT LEVEL switch on the far right does not light. Adjusting the Audio Recording Levels OPERATE Audio level indicator AUDIO CH1 CH2 PHONES BUSY OPEN/CLOSE DOLBY DIGITAL LPCM MPEG DVD RECORDER BD-X200 TITLE CHAPTER REV STOP PLAY FWD PAUSE REC OPTION DV Y/C LINE SET UP TOP SET MENU MENU Buttons used ⅥReturn from the RECORDER MENU (1/2) screen and press the SET button. 2. Make the required setting using two different methods, and AUDIO REC VOLUME MODE from the RECORDER MENU (2/2) screen. Returning Audio Recording Levels to Default Settings (UNITY MODE...
...: The AUDIO INPUT LEVEL switch on the far right does not light. Adjusting the Audio Recording Levels OPERATE Audio level indicator AUDIO CH1 CH2 PHONES BUSY OPEN/CLOSE DOLBY DIGITAL LPCM MPEG DVD RECORDER BD-X200 TITLE CHAPTER REV STOP PLAY FWD PAUSE REC OPTION DV Y/C LINE SET UP TOP SET MENU MENU Buttons used ⅥReturn from the RECORDER MENU (1/2) screen and press the SET button. 2. Make the required setting using two different methods, and AUDIO REC VOLUME MODE from the RECORDER MENU (2/2) screen. Returning Audio Recording Levels to Default Settings (UNITY MODE...
Instruction Manual
Page 42
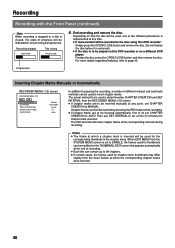
... AUTO. Recording Recording with the Front Panel (continued) Note When recording is stopped or a title is closed, the state of progress will be indicated on a different DVD player: Finalize the disc, press the OPEN/CLOSE button, and then remove the disc. Progress bar Inserting Chapter Marks Manually or Automatically RECORDER MENU (1/2) screen RECORDER MENU (1/2) MENU CHAPTER CREATION SET INTERVAL TOTAL CONTENTS TIME ENCODE QUALITY (Mbps) AUDIO ENCODE MANUAL Every05Min NO USE 4.4 LPCM In addition to pausing the recording, a number of different manual...
... AUTO. Recording Recording with the Front Panel (continued) Note When recording is stopped or a title is closed, the state of progress will be indicated on a different DVD player: Finalize the disc, press the OPEN/CLOSE button, and then remove the disc. Progress bar Inserting Chapter Marks Manually or Automatically RECORDER MENU (1/2) screen RECORDER MENU (1/2) MENU CHAPTER CREATION SET INTERVAL TOTAL CONTENTS TIME ENCODE QUALITY (Mbps) AUDIO ENCODE MANUAL Every05Min NO USE 4.4 LPCM In addition to pausing the recording, a number of different manual...

Instruction Manual
Page 43
... DVD recorder's SET UP button. Depending on a different DVD player: Use FINALIZE from the REC CONTROL panel can be used when working with this screen using the REC CONTROL panel displayed on the monitor or the DVD recorder. Keyboard : Use the arrow keys and √) to select Record (r) from the REC CONTROL panel, and then press the Enter key. Using a Keyboard & Mouse to Control Recording BD-X200 recording operations can be input for the disc title are not displayed on the monitor. REMOTE MENU screen REMOTE MENU MENU REMOTE SELECT...
... DVD recorder's SET UP button. Depending on a different DVD player: Use FINALIZE from the REC CONTROL panel can be used when working with this screen using the REC CONTROL panel displayed on the monitor or the DVD recorder. Keyboard : Use the arrow keys and √) to select Record (r) from the REC CONTROL panel, and then press the Enter key. Using a Keyboard & Mouse to Control Recording BD-X200 recording operations can be input for the disc title are not displayed on the monitor. REMOTE MENU screen REMOTE MENU MENU REMOTE SELECT...

Instruction Manual
Page 44
...:22 The screen that support video mode. TITLE END is to be set to DISABLE, a screen seeking confirmation of finalizing will be carried out in two different ways. ● Select DISC MENU and then FINALIZE from the SYSTEM MENU screen. Recording Finalizing (for playback on this and other DVD players) Finalize a disc recorded using the Setup Menu: DISC MENU MENU FINALIZE DISC ERASE q Press the SET UP button to display the Setup Menu, and EXECUTE CANCEL then select DISC MENU. In the case...
...:22 The screen that support video mode. TITLE END is to be set to DISABLE, a screen seeking confirmation of finalizing will be carried out in two different ways. ● Select DISC MENU and then FINALIZE from the SYSTEM MENU screen. Recording Finalizing (for playback on this and other DVD players) Finalize a disc recorded using the Setup Menu: DISC MENU MENU FINALIZE DISC ERASE q Press the SET UP button to display the Setup Menu, and EXECUTE CANCEL then select DISC MENU. In the case...

Instruction Manual
Page 62
... playback tape where recording is selected using the REMOTE CONTROL (9PIN MASTER/DV MASTER) screen. e : Eject u : Fast reverse or fast-reverse play : Frame-Reverse play q : Stop w : Pause t : Play : Frame-advance play y : Fast forward or fast-forward play * The action to be taken by the DVD recorder in response to pressing of the y or u button (i.e., FF/REW or SEARCH) is to be started. VCR Control Panel The buttons provided in this panel are used to start point for editing): Set the time code...
... playback tape where recording is selected using the REMOTE CONTROL (9PIN MASTER/DV MASTER) screen. e : Eject u : Fast reverse or fast-reverse play : Frame-Reverse play q : Stop w : Pause t : Play : Frame-advance play y : Fast forward or fast-forward play * The action to be taken by the DVD recorder in response to pressing of the y or u button (i.e., FF/REW or SEARCH) is to be started. VCR Control Panel The buttons provided in this panel are used to start point for editing): Set the time code...

Instruction Manual
Page 63
w Select the TC INPUT button using the cursor keys and input a time code (hours: minutes: seconds: frames) into the TC input field using the REMOTE CONTROL screen, it will not be possible to select EDL LOAD on the REMOTE CONTROL screen. ● Whenever an external edit list (EDL) is read or time-code registration is selected in the drop frame mode, a value corrected automatically will be sorted from tape positions w REMOTE CONTROL SCREEN ( 9PIN MASTER ) EXIT IN...
w Select the TC INPUT button using the cursor keys and input a time code (hours: minutes: seconds: frames) into the TC input field using the REMOTE CONTROL screen, it will not be possible to select EDL LOAD on the REMOTE CONTROL screen. ● Whenever an external edit list (EDL) is read or time-code registration is selected in the drop frame mode, a value corrected automatically will be sorted from tape positions w REMOTE CONTROL SCREEN ( 9PIN MASTER ) EXIT IN...

Instruction Manual
Page 68
... the TC input w field using the REMOTE CONTROL screen, it will be possible to drop. When in the drop frame mode, a value corrected automatically will be registered when inputting the frame to select EDL LOAD on the REMOTE CONTROL screen. ● Whenever an external edit list (EDL) is read or time-code registration is set to be highlighted. Even if a different screen is opened or the power is indicated in...
... the TC input w field using the REMOTE CONTROL screen, it will be possible to drop. When in the drop frame mode, a value corrected automatically will be registered when inputting the frame to select EDL LOAD on the REMOTE CONTROL screen. ● Whenever an external edit list (EDL) is read or time-code registration is set to be highlighted. Even if a different screen is opened or the power is indicated in...
Instruction Manual
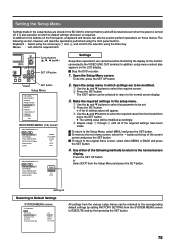
Page 77
... the SET button. Ⅵ To return to default settings whenever so required. The following methods to return to the VIDEO LINE OUT terminal. BUSY OPEN/CLOSE Cursor buttons (6, 7, 8 and t) OPTION DV Y/C LINE SET UP TOP SET MENU MENU SET UP button SET button Setup Menu DISC MENU INPUT SELECT SYSTEM PRESET STYLE RECORDER REMOTE DISPLAY CLOCK ADJUST DUBBING NETWORK EXIT RECORDER MENU (1/2) screen RECORDER MENU (1/2) MENU CHAPTER CREATION SET INTERVAL TOTAL CONTENTS TIME ENCODE QUALITY (Mbps) AUDIO ENCODE ASPECT MANUAL Every05Min NO USE 4.4 LPCM AUTO RECORDER MENU (1/2) MENU CHAPTER...
... the SET button. Ⅵ To return to default settings whenever so required. The following methods to return to the VIDEO LINE OUT terminal. BUSY OPEN/CLOSE Cursor buttons (6, 7, 8 and t) OPTION DV Y/C LINE SET UP TOP SET MENU MENU SET UP button SET button Setup Menu DISC MENU INPUT SELECT SYSTEM PRESET STYLE RECORDER REMOTE DISPLAY CLOCK ADJUST DUBBING NETWORK EXIT RECORDER MENU (1/2) screen RECORDER MENU (1/2) MENU CHAPTER CREATION SET INTERVAL TOTAL CONTENTS TIME ENCODE QUALITY (Mbps) AUDIO ENCODE ASPECT MANUAL Every05Min NO USE 4.4 LPCM AUTO RECORDER MENU (1/2) MENU CHAPTER...

Instruction Manual
Page 83
S2 : S2 terminal mode is to be recorded. A discrimination signal for normal video with the left , and right of wide-screen discrimination signals. Letterbox video : Content with a 4:3 aspect ratio and squeezed video is to be set the specification for the DVD recorder's VIDEO Y/C [S2] INPUT terminal in order to enable the recording of the video content is to be removed to form thumbnails. (LETTER BOX) AUDIO CHANNEL (DV) DV CH [1,2ch † 1,2ch...
S2 : S2 terminal mode is to be recorded. A discrimination signal for normal video with the left , and right of wide-screen discrimination signals. Letterbox video : Content with a 4:3 aspect ratio and squeezed video is to be set the specification for the DVD recorder's VIDEO Y/C [S2] INPUT terminal in order to enable the recording of the video content is to be removed to form thumbnails. (LETTER BOX) AUDIO CHANNEL (DV) DV CH [1,2ch † 1,2ch...


