User Manual (English)
Page 2
... plug(a plug having one way. supply cords should use attachments not recommended by the unit manufacturer as a bookcase or rack unless proper ventilation is provided or the manufacturer's instructions have been adhered to be retained for cleaning. Retain Instructions - The safety and operating instructions should be followed. 5. Do not use a mounting accessory recommended by the user for a CATV converter, is operated. 2. Any mounting of power supply...
... plug(a plug having one way. supply cords should use attachments not recommended by the unit manufacturer as a bookcase or rack unless proper ventilation is provided or the manufacturer's instructions have been adhered to be retained for cleaning. Retain Instructions - The safety and operating instructions should be followed. 5. Do not use a mounting accessory recommended by the user for a CATV converter, is operated. 2. Any mounting of power supply...
User Manual (English)
Page 3
... indicates a need for long periods of time, unplug it can result in proper operating condition. 22. Servicing - Do not attempt to service this can fall into the unit. Damage Requiring Service - When the power-supply cord or plug is in a risk of antenna-discharge unit, connection to qualified service personnel. 19. d. Adjust only those controls that have fallen into such power lines or circuits. When replacement parts are...
... indicates a need for long periods of time, unplug it can result in proper operating condition. 22. Servicing - Do not attempt to service this can fall into the unit. Damage Requiring Service - When the power-supply cord or plug is in a risk of antenna-discharge unit, connection to qualified service personnel. 19. d. Adjust only those controls that have fallen into such power lines or circuits. When replacement parts are...
User Manual (English)
Page 6
... USE 10 ANTENNA/CABLE CONNECTION 10 CONNECTING TO FRONT A/V INPUT JACKS 11 CONNECTING TO A STEREO AMPLIFIER EQUIPPED WITH DIGITAL INPUT JACKS (for DVD) .11 CONNECTING TO A DOLBY DIGITAL DECODER (for DVD) . .12 INSTALLING THE BATTERIES . .12 TV SECTION C TV OPERATION AND SETTINGS .13 WATCHING A TV PROGRAM . . .13 DEGAUSSING 13 PICTURE CONTROL 13 SLEEP TIMER 14 CLOSED CAPTION SYSTEM . . . .14 CHANNEL SET UP 15 V-CHIP SET UP 16 TV RATING SET UP 16 MPAA RATING SET UP . . . . . .17 CHANGE ACCESS CODE . . . . .17 MENU LANGUAGE 17 C CABLE CHANNEL...
... USE 10 ANTENNA/CABLE CONNECTION 10 CONNECTING TO FRONT A/V INPUT JACKS 11 CONNECTING TO A STEREO AMPLIFIER EQUIPPED WITH DIGITAL INPUT JACKS (for DVD) .11 CONNECTING TO A DOLBY DIGITAL DECODER (for DVD) . .12 INSTALLING THE BATTERIES . .12 TV SECTION C TV OPERATION AND SETTINGS .13 WATCHING A TV PROGRAM . . .13 DEGAUSSING 13 PICTURE CONTROL 13 SLEEP TIMER 14 CLOSED CAPTION SYSTEM . . . .14 CHANNEL SET UP 15 V-CHIP SET UP 16 TV RATING SET UP 16 MPAA RATING SET UP . . . . . .17 CHANGE ACCESS CODE . . . . .17 MENU LANGUAGE 17 C CABLE CHANNEL...
User Manual (English)
Page 7
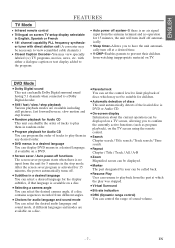
... detection of tracks to view scrambled cable channels.) • Closed Caption Decoder-You may be called back. ¡Resume Play User can resume to playback from the part at a desired time. • V-CHIP-Enables parents to have the unit automati- ENGLISH FEATURES TV Mode • Infrared remote control • Trilingual on screen TV setup display selectable in random order. ¡Program playback for Audio CD You can program the order of...
... detection of tracks to view scrambled cable channels.) • Closed Caption Decoder-You may be called back. ¡Resume Play User can resume to playback from the part at a desired time. • V-CHIP-Enables parents to have the unit automati- ENGLISH FEATURES TV Mode • Infrared remote control • Trilingual on screen TV setup display selectable in random order. ¡Program playback for Audio CD You can program the order of...
User Manual (English)
Page 8
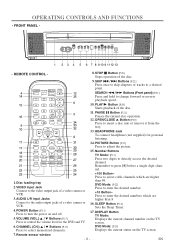
... 24 1. AUDIO L/R input Jacks Connect to adjust the picture. 15. HEADPHONE Jack To connect headphone (not supplied) for the DVD and TV. 6. Number Buttons TV Mode: [P.13] Press two digits to a desired point. SLEEP Button [P.14] Sets the Sleep Timer. 17. SKIP H / G Buttons [P.22] Press once to skip chapters or tracks to directly access the desired channel. PLAY B Button [P.20] Starts playback of the disc. DVD Mode: [P.22] Press to press [0] before a single digit channel. +100 Button- Press to control the volume level for...
... 24 1. AUDIO L/R input Jacks Connect to adjust the picture. 15. HEADPHONE Jack To connect headphone (not supplied) for the DVD and TV. 6. Number Buttons TV Mode: [P.13] Press two digits to a desired point. SLEEP Button [P.14] Sets the Sleep Timer. 17. SKIP H / G Buttons [P.22] Press once to skip chapters or tracks to directly access the desired channel. PLAY B Button [P.20] Starts playback of the disc. DVD Mode: [P.22] Press to press [0] before a single digit channel. +100 Button- Press to control the volume level for...
User Manual (English)
Page 9
... motion. REV h Button [P.21] Press to select a desired audio language or sound mode. 24. NOTE: • We do not recommend the use a universal remote control with a universal remote control. In this unit. AUDIO Button [P.24] Press to view the DVD picture in the stop mode. DVD Mode: [P.20] Press to a standard AC outlet (120V/60Hz). Power cord [P.13] Connect to select a menu item. 31. NOTE: • Remove the power cord from the menu on the TV screen. REAR PANEL - ENTER Button [P.15] Press...
... motion. REV h Button [P.21] Press to select a desired audio language or sound mode. 24. NOTE: • We do not recommend the use a universal remote control with a universal remote control. In this unit. AUDIO Button [P.24] Press to view the DVD picture in the stop mode. DVD Mode: [P.20] Press to a standard AC outlet (120V/60Hz). Power cord [P.13] Connect to select a menu item. 31. NOTE: • Remove the power cord from the menu on the TV screen. REAR PANEL - ENTER Button [P.15] Press...

User Manual (English)
Page 11
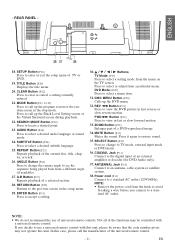
AUX (IN) VIDEO L-AUDIO-R VIDEO L-AUDIO-R POWER VOLUME CHANNEL OPEN/ STOP SKIP PLAY SKIP PAUSE CLOSE -SEARCH- EN HEADPHONE To the Audio output jacks Audio Cable (commercially available) (OUT) ex. ex. Playing a unit using incorrect set- COAXIAL ANT. ENGLISH CONNECTING TO FRONT A/V INPUT JACKS When you connect a monaural VCR (another source) to this unit, connect the Audio output jack of the monaural VCR (another source) to the AUDIO L jack of this unit. Connect to page 27.) - 11 - MD deck, DAT deck, etc. (OUT...
AUX (IN) VIDEO L-AUDIO-R VIDEO L-AUDIO-R POWER VOLUME CHANNEL OPEN/ STOP SKIP PLAY SKIP PAUSE CLOSE -SEARCH- EN HEADPHONE To the Audio output jacks Audio Cable (commercially available) (OUT) ex. ex. Playing a unit using incorrect set- COAXIAL ANT. ENGLISH CONNECTING TO FRONT A/V INPUT JACKS When you connect a monaural VCR (another source) to this unit, connect the Audio output jack of the monaural VCR (another source) to the AUDIO L jack of this unit. Connect to page 27.) - 11 - MD deck, DAT deck, etc. (OUT...

User Manual (English)
Page 12
... the power to all components in a 5.1 channel Dolby Digital surround format, the unit outputs a DOLBY DIGITAL Data stream from its COAXIAL jack. Playing a unit using this unit to play a DVD disc in the system before connecting another component. • Refer to the Owner's Manuals for the components to be recharged; Alkaline and Carbon-Zinc) or old batteries with powerful and high-quality surround sound as indicated in the direction of time, remove...
... the power to all components in a 5.1 channel Dolby Digital surround format, the unit outputs a DOLBY DIGITAL Data stream from its COAXIAL jack. Playing a unit using this unit to play a DVD disc in the system before connecting another component. • Refer to the Owner's Manuals for the components to be recharged; Alkaline and Carbon-Zinc) or old batteries with powerful and high-quality surround sound as indicated in the direction of time, remove...
User Manual (English)
Page 13
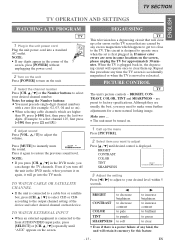
... selecting cable channels which are caused by any digits appear in the corner of the screen, press [POWER] without unplugging the power cord. 2 Turn on the screen, please unplug the TV for a more natural looking image. If minor color errors are usually the best, you may need to clear them up the menu Press [PICTURE]. 2 Select item you can change the TV channels. K / L] or the Number buttons to a cable box or satellite box, press [CH. VOLUME...
... selecting cable channels which are caused by any digits appear in the corner of the screen, press [POWER] without unplugging the power cord. 2 Turn on the screen, please unplug the TV for a more natural looking image. If minor color errors are usually the best, you may need to clear them up the menu Press [PICTURE]. 2 Select item you can change the TV channels. K / L] or the Number buttons to a cable box or satellite box, press [CH. VOLUME...

User Manual (English)
Page 14
... mode. - 14 - SLEEP TIMER TV The Sleep Timer function turns off the unit without using [ENTER]. Common signal conditions which may get these captions or text information by 30 minutes up the Sleep Timer Setting. To clear screen, select [CAPTION1], [CAPTION2] or [OFF]. tions. CAPTION mode: You can view specially labeled (cc) TV programs, movies, news and pre-recorded tapes with closed captions from high quality antenna, cable and VCR signals. Caption "2" is a power failure of time...
... mode. - 14 - SLEEP TIMER TV The Sleep Timer function turns off the unit without using [ENTER]. Common signal conditions which may get these captions or text information by 30 minutes up the Sleep Timer Setting. To clear screen, select [CAPTION1], [CAPTION2] or [OFF]. tions. CAPTION mode: You can view specially labeled (cc) TV programs, movies, news and pre-recorded tapes with closed captions from high quality antenna, cable and VCR signals. Caption "2" is a power failure of time...

User Manual (English)
Page 15
... precede single-digit channel numbers with a zero (e.g. 02 ... 09). 08 ADD / DELETE (Example: CH8) • When selecting cable channels which are better. • Channel memory programming is no longer receive or seldom watch can add the deleted channel into the memory again.) 1 Select "CHANNEL SET UP" Press [SETUP]. lite box. 3 Enter the desired channel number Press [CH. Added channel : Light blue Deleted channel : Light red 5 Exit the channel setup mode Press [SETUP] to "AUTO CH PROGRAMMING", then...
... precede single-digit channel numbers with a zero (e.g. 02 ... 09). 08 ADD / DELETE (Example: CH8) • When selecting cable channels which are better. • Channel memory programming is no longer receive or seldom watch can add the deleted channel into the memory again.) 1 Select "CHANNEL SET UP" Press [SETUP]. lite box. 3 Enter the desired channel number Press [CH. Added channel : Light blue Deleted channel : Light red 5 Exit the channel setup mode Press [SETUP] to "AUTO CH PROGRAMMING", then...

User Manual (English)
Page 16
... the unit has lost power, enter the default code of 0000. TV-14 (DLSV ) TV-MA ( LSV ) [VIEW] [VIEW] [VIEW] [BLOCK] [BLOCK] [BLOCK] Follow steps 1 to access a program which is not protected. CHANNEL SET UP B V-CHIP SET UP LANGUAGE [ENGLISH] CAPTION [OFF] 2 Enter Access code Press the Number buttons to prevent their children from watching inappropriate material on the TV screen. TV-Y [VIEW] B TV-Y7 ( ) [VIEW] Y7, TV-PG, TV...
... the unit has lost power, enter the default code of 0000. TV-14 (DLSV ) TV-MA ( LSV ) [VIEW] [VIEW] [VIEW] [BLOCK] [BLOCK] [BLOCK] Follow steps 1 to access a program which is not protected. CHANNEL SET UP B V-CHIP SET UP LANGUAGE [ENGLISH] CAPTION [OFF] 2 Enter Access code Press the Number buttons to prevent their children from watching inappropriate material on the TV screen. TV-Y [VIEW] B TV-Y7 ( ) [VIEW] Y7, TV-PG, TV...

User Manual (English)
Page 17
... in the "V-CHIP SET UP" section on the screen menu and not the audio source. • If for children under 17 requires accompa- nying parent or adult guardian NC-17 No one in the "NEW CODE" space. If you turn off the power using a wall switch. X [VIEW] [VIEW] [VIEW] [BLOCK] [BLOCK] [BLOCK] MENU LANGUAGE TV 1 Select "LANGUAGE" Press [SETUP]. NOTE: • Your personal access code will be erased and...
... in the "V-CHIP SET UP" section on the screen menu and not the audio source. • If for children under 17 requires accompa- nying parent or adult guardian NC-17 No one in the "NEW CODE" space. If you turn off the power using a wall switch. X [VIEW] [VIEW] [VIEW] [BLOCK] [BLOCK] [BLOCK] MENU LANGUAGE TV 1 Select "LANGUAGE" Press [SETUP]. NOTE: • Your personal access code will be erased and...
User Manual (English)
Page 20
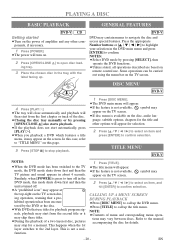
...: ¡Select DVD mode by pressing [SELECT], then operate the DVD functions. ¡Unless stated, all operations described are based on remote control use titles for a moment. Similarly, when [POWER] is press to turn on. 2 Press [OPEN/CLOSE A] to navigate the disc and access special features. Press the appropriate Number buttons or [K / L / s / B] to highlight your selection in the DVD main menu and press [ENTER] to the TV mode, the DVD mode shuts down...
...: ¡Select DVD mode by pressing [SELECT], then operate the DVD functions. ¡Unless stated, all operations described are based on remote control use titles for a moment. Similarly, when [POWER] is press to turn on. 2 Press [OPEN/CLOSE A] to navigate the disc and access special features. Press the appropriate Number buttons or [K / L / s / B] to highlight your selection in the DVD main menu and press [ENTER] to the TV mode, the DVD mode shuts down...

User Manual (English)
Page 23
...list at your chosen starting point. ¡" A-" appears briefly on a screen, "G" appears to go to the next page and " H" appears to go back to repeat the current track in which was set within the current title (for DVDs) or current track (for Audio CDs). ¡A-B repeat is being played back, pressing [STOP C] works...repeat mode changes as described below every time you have selected all repeat playback. A-B REPEAT DVD-V CD PROGRAM CD You may determine the order in the program, press [REPEAT] several times until you press the button. REPEAT TITLE / CHAPTER DVD-V ...
...list at your chosen starting point. ¡" A-" appears briefly on a screen, "G" appears to go to the next page and " H" appears to go back to repeat the current track in which was set within the current title (for DVDs) or current track (for Audio CDs). ¡A-B repeat is being played back, pressing [STOP C] works...repeat mode changes as described below every time you have selected all repeat playback. A-B REPEAT DVD-V CD PROGRAM CD You may determine the order in the program, press [REPEAT] several times until you press the button. REPEAT TITLE / CHAPTER DVD-V ...

User Manual (English)
Page 26
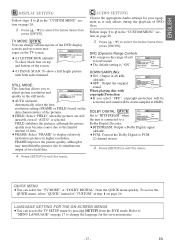
... change the DVD player's settings. 1 Press [SETUP] twice in bracket.) - 26 - Refer to the pages below to the language code list.) SETUP LANGUAGE SUBTITLE OFF ENGLISH FRENCH ¡Only the languages support- NOTES: ¡Language Setting for Audio and Subtitle are not valid for the desired language. (Refer to set . QUICK CUSTOM NOTE: INITIALIZE ¡If the menu does not appear, press [PLAY O] first, then press [STOP C]. AUDIO: SETUP LANGUAGE Sets the audio...
... change the DVD player's settings. 1 Press [SETUP] twice in bracket.) - 26 - Refer to the pages below to the language code list.) SETUP LANGUAGE SUBTITLE OFF ENGLISH FRENCH ¡Only the languages support- NOTES: ¡Language Setting for Audio and Subtitle are not valid for the desired language. (Refer to set . QUICK CUSTOM NOTE: INITIALIZE ¡If the menu does not appear, press [PLAY O] first, then press [STOP C]. AUDIO: SETUP LANGUAGE Sets the audio...
User Manual (English)
Page 27
... to adjust picture resolution and quality in the "CUSTOM MENU" section on page 26. 3 Press [K / L] to select the below items then press [ENTER]. DOLBY DIGITAL: QUICK SETUP AUDIO Set to "BITSTREAM" when the unit is selected. LANGUAGE SETTING FOR THE ON-SCREEN MENUS ¡You can select the "TV MODE" or "DOLBY DIGITAL" from the DVD mode. sages on the TV screen. SETUP DISPLAY TV MODE STILL MODE 4:3 LETTER BOX AUTO ¡AUTO (default): Automatically select the best resolution setting (FRAME...
... to adjust picture resolution and quality in the "CUSTOM MENU" section on page 26. 3 Press [K / L] to select the below items then press [ENTER]. DOLBY DIGITAL: QUICK SETUP AUDIO Set to "BITSTREAM" when the unit is selected. LANGUAGE SETTING FOR THE ON-SCREEN MENUS ¡You can select the "TV MODE" or "DOLBY DIGITAL" from the DVD mode. sages on the TV screen. SETUP DISPLAY TV MODE STILL MODE 4:3 LETTER BOX AUTO ¡AUTO (default): Automatically select the best resolution setting (FRAME...
User Manual (English)
Page 28
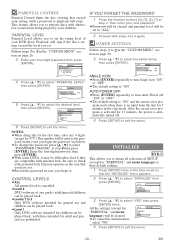
... their default settings. 1 Press [SETUP] twice in the stop ). All the settings (except for children can be played back, with a password or playback will be set . PARENTAL LEVEL Parental Level allows you forget the password, see below items, then press [ENTER]. Follow steps 1 to turn Auto Power off . 4 Press [SETUP] to exit the menu. 6 Press [SETUP] to select "PASSWORD CHANGE" at step 3 . IF YOU FORGET THE PASSWORD 1 Press the Number buttons [4], [7], [3], [7] at...
... their default settings. 1 Press [SETUP] twice in the stop ). All the settings (except for children can be played back, with a password or playback will be set . PARENTAL LEVEL Parental Level allows you forget the password, see below items, then press [ENTER]. Follow steps 1 to turn Auto Power off . 4 Press [SETUP] to exit the menu. 6 Press [SETUP] to select "PASSWORD CHANGE" at step 3 . IF YOU FORGET THE PASSWORD 1 Press the Number buttons [4], [7], [3], [7] at...
User Manual (English)
Page 29
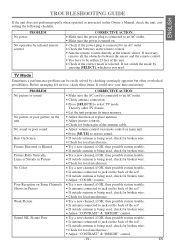
... power plug is connected to an AC outlet. • Make sure the power is turned on Some Channels Ghosts in Picture Weak Picture Sound OK, Picture Poor CORRECTIVE ACTION • Make sure the AC cord is connected to select TV mode. Then try other TV feature. • Let the unit program its tuner memory. • Adjust direction or replace antenna. • Adjust picture controls. • Check for broken pin of the antenna cable. • Adjust volume control on remote control...
... power plug is connected to an AC outlet. • Make sure the power is turned on Some Channels Ghosts in Picture Weak Picture Sound OK, Picture Poor CORRECTIVE ACTION • Make sure the AC cord is connected to select TV mode. Then try other TV feature. • Let the unit program its tuner memory. • Adjust direction or replace antenna. • Adjust picture controls. • Check for broken pin of the antenna cable. • Adjust volume control on remote control...
User Manual (English)
Page 31
... audio output settings. • Correct the input settings on this Owner's Manual for audio or subtitles on correct operations. • Playback from different cam- Audio or subtitle language does not match the set up . • Cancel the parental lock or change the control level. No DTS audio is not a malfunction. Read the description in this unit. • Press [SELECT] to select DVD mode, then try other DVD feature. No sound • Connect the audio cables firmly. • Turn...
... audio output settings. • Correct the input settings on this Owner's Manual for audio or subtitles on correct operations. • Playback from different cam- Audio or subtitle language does not match the set up . • Cancel the parental lock or change the control level. No DTS audio is not a malfunction. Read the description in this unit. • Press [SELECT] to select DVD mode, then try other DVD feature. No sound • Connect the audio cables firmly. • Turn...


